/etc/destinations.xml
TIF 2016.2.0 Release Information
30 September 2016
Table of Contents
- 1. General
- 2. New features
- 2.1. Configurable Create/Update Integration
- 2.2. Template with Apache Freemarker
- 2.3. Pagination Support
- 2.4. XML Spec
- 2.5. Configurable REST Service
- 2.6. Create / Update Integration
- 2.7. Transaction Type
- 2.8. Synchronous Job Invokation
- 2.9. Encrypted Password
- 2.10. Admin UI
- 2.11. Tutorials
- 2.12. FTP Destination
- 2.13. Email Destination
1. General
1.1. Rename of "tvc-cfg" Folder
A minor change in the directory layout has been made. The folder ${TIF_ROOT}/modules/enovia/tvc-cfg has been renamed
to ${TIF_ROOT}/modules/enovia/cfg.
During a transition period, the old directory will still be scanned for files, remember though that the new directory takes precedence over the old directory. Also note that SOAP Services can due to limitations in the Apache Axis2 layer only be deployed from the new location.
1.2. Webapps - web.xml NOT overwritten
In earlier versions of TIF, the web.xml files per each web-app were overwritten on every TIF install.
As of this release, the jaxrs and jaxws webapps contains a template-web.xml file that only will be copied over to web.xml upon startup if no web.xml file already exists.
1.3. XML Schema Files
XML schema files are now available for most of the configuration files within TIF.
| Configuration File | Schema Location |
|---|---|
/etc/destinations.xsd |
|
/modules/enovia/etc/timetable.xml |
/modules/enovia/etc/timetable.xsd |
/modules/enovia/cfg/<type> |
/modules/enovia/schema/*.xsd |
Example usage:
<?xml version="1.0" encoding="iso-8859-1"?>
<Payload xmlns="http://technia.com/TIF/Payload"
    xmlns:xsi="http://www.w3.org/2001/XMLSchema-instance"
    xsi:schemaLocation="http://technia.com/TIF/Payload ../../schema/payload.xsd">
</Payload>
The XSD files will also be available online, however at the time of writing
this document, the URLs are not defined. Most likely they will follow the same
layout as TVC, e.g. http://products.technia.com/tif/schema/2016.2/JobCfg.xsd
|
See here for more info.
1.4. Prepare for JDK 9
In order to prepare for JDK 9, which among others will remove the bootclasspath
option, we have changed some minor parts of the start scripts that used this
(also incldues the Windows service registration)
Please refer to the files in the bin directory part of the distribution for
additional information.
In most cases the tif.bat and tif.sh files are never modified so the new versions
can be used as drop-in-replacement without any further changes.
If you have installed TIF as a Windows service, then you need to
re-register the service according to bin/service_example.bat.
|
1.5. Last Release Supporting Java 7
As announced earlier, TIF will move over to Java 8 in the near future. This release will be the last version supporting Java 7.
| This affects the TIF server. The ENOVIA client API will still be compiled with Java 6 in order to allow using TIF with older ENOVIA versions that is using older Java versions. |
2. New features
Below are the new features as of this release.
2.1. Configurable Create/Update Integration
A new powerful feature allowing you to create/update objects and/or structures in ENOVIA via TIF has been added. This integration can be triggered via the following technologies:
-
HTTP/REST Call
-
JMS Message
-
File Integration
Also illustrated in the image below.
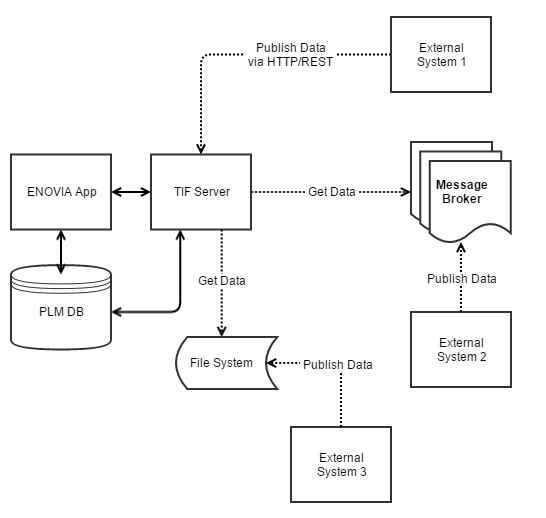
Figure 1. Create/Update Integration
You can setup different type of integrations accepting different kind of input data, in order to support most use-cases that requires create and/or update objects/structures inside ENOVIA™ based upon content within other systems.
The create/update integration is flexible and allows almost any kind of XML data as input.
Read more about this powerful feature here
Also, the following tutorials covers the create/update integration:
2.2. Template with Apache Freemarker
As an alternative/complementary way to generate the payload, one can use the new Apache Freemarker support in TIF. You may still use XML/XSLT if you are more familiar to those technologies, the Freemarker templating is a different technology solving the same use-cases. It is even possible to mix using both Templates and XML/XSLT within the same payload.
Also, a new type of payload fraction has been added, simply called <Template>
that can be used to invoke a Freemarker template for inclusion of static data OR
other kind of data.
2.3. Pagination Support
Support for dividing larger data-sets into smaller chunks has been added, in order to reduce the amount memory being allocated.
This can be enabled per tabe-data-fraction within the payload configuration, or globally within the ENOVIA module settings file.
To enable per Table Data Fraction, use the following syntax.
<Payload>
	<TableContent paginationSize="100"> (1)
		<Table>tvc:table/PartBOM.xml</Table>
		<DataSet>tvc:dataset/PartBOM.xml</DataSet>
	</TableContent>
</Payload>| 1 | paginationSize attribute controls chunk size. Default is -1 (taken from module settings file) |
See here for more info.
2.4. XML Spec
The XML spec feature allows you to customize the generated XML from the Table-Content fractions. As of this release, you can put the XML spec definition in its own file under the "xmlspec" directory and reference it from your payload configurations instead.
You can reference the XML spec configuration as shown below:
<Payload>
  <TableContent>
    <XMLSpec ref="MyXMLSpec.xml" /> (1)
  </TableContent>
</Payload>| 1 | Or use the syntax tvc:xmlspec/MyXMLSpec.xml |
Also, now you can configure whether or not to add the cell-value size attribute. Controlled
via the element <AddCellValueSize>false</AddCellValueSize>.
2.5. Configurable REST Service
2.5.1. Authentication / Credentials
The REST services now supports container managed security. You can configure a REST service to run either as the authenticated user, or after successful authentication switch to super-user credentials.
See this chapter for more information.
2.5.2. Access
In addition to authentication, you can also configure additional access rules for a REST service such as role/group assignment, access program and/or access mask.
See this chapter for more information.
2.6. Create / Update Integration
The REST service can be used to trigger the new create/update integration feature.
Example:
<Rest>
    <DisplayName>EBOM Create/Update Service</DisplayName>
    <ServiceName>ebom</ServiceName>
    <Credentials containerManaged="true" />
    <Create config="EBOM.xml" />
</Rest>
Read more here.
2.7. Transaction Type
You can now configure what kind of transaction that should be used during the invoke of a REST service (read/update/none).
2.8. Synchronous Job Invokation
Support for invoking a job synchronously has been added.
You may as a part of your business-logic invoke a TIF job in order to retrieve data from or update another system during the execution.
Read more here.
2.9. Encrypted Password
The password for the admin user to the Admin Console may now be encrypted within the configuration file.
2.10. Admin UI
2.10.1. Test Payload Generator
After logging in to the Admin UI, one can use the browser to test generating payload for a given object / configuration combination.
Read more here
2.11. Tutorials
The documentation bundle has been complemented with a number of tutorials covering different areas of the TIF functionality.
2.12. FTP Destination
FTP is now supported as a destination. It can be used to send data to a file located in an FTP(S) server.
An example configuration:
<Destinations>

    <FTP id="ftp-1"
        hostName="myHost"
        port="21"
        userName="myUserName"
        password="myPassword"
        directory="myDir/mySubDir"
        filePrefix="myPrefix-"
        fileSuffix=".xml"
        existStrategy="replace"
        useSSL="false"
        implicit="false"
        usePROTP="true" />

</Destinations>
2.13. Email Destination
Email is now supported as a destination. An email destination is used to send data to one or more email recipients.
An example configuration:
<Destinations>

    <Email id="email-1" subject="My Test Message">
        <To>example1@technia.com</To>
        <To>example2@technia.com</To>
        <Cc>example3@technia.com</Cc>
        <Bcc>example4@technia.com</Bcc>
    </Email>

</Destinations>