
Tutorial - Synchronous Integration
18 September 2016
1. Goals
The goal with this tutorial is to understand the basics of a synchronous integration. Most integrations in TIF are made asynchronously, however, in some cases it is needed to perform them in a synchronous way.
In this tutorial the use case is to allocate new Part IDs from an external system when the user creates a new Part from the ENOVIA application.
Within the ENOVIA client that is installed, there are a number of classes and configurations available that makes it easier to integrate the synchronous job call in your use case flow. If you for example use the TVC Structure Browser, there are some reusable code written that might help you with most of the logic.
2. Use Case Flow
The image below illustrates the flow.
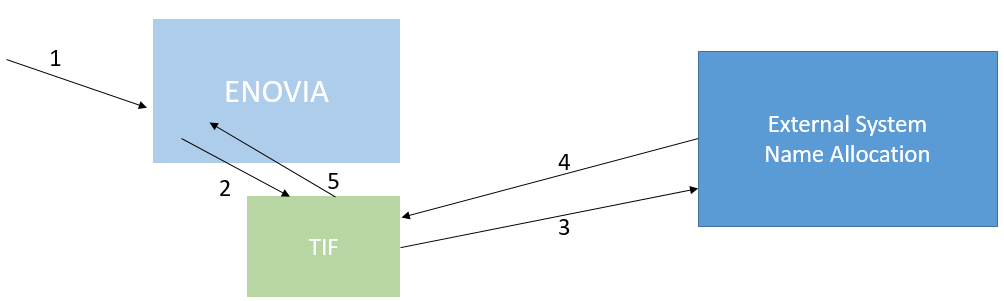
Figure 2. Allocating object names/ids from an external system
-
The user submits a create Part form in the ENOVIA application.
-
The form processing logic will call TIF to perform the name allocation
-
TIF will do the actual call with the remote system
-
Value is returned to TIF/ENOVIA Application
3. First, the Data Format
The remote system that is responsible for the name allocation expects the data to follow a certain format.
In this case, it should be XML and have the following format:
<Request>
    <UOM>... unit of measure...</UOM>
    <DESCRIPTION>... description ...</DESCRIPTION>
    <STATUS>... the status ...</STATUS>
</Request>
E.g. When we create a Part, we need to pass in the unit-of-measure, description and status in order to be able to allocate the name.
The returned data from the other system in our case follows this simple format:
<reservation-response>
    <id>... the reserver id </id>
</reservation-response>
4. The End Point
Next step is to decide how to call the other system, when dealing with a synchronous integration it probably will be a plain HTTP call, REST/HTTP or SOAP/HTTP.
In this case we use a plain HTTP end point. Hence, we will in the ${TIF_ROOT}/etc/destinations.xml add the following entry:
<Destinations>
    <Http id="reserve-part-number" (1)
          url="http://172.16.16.210:9000/integration/reservePartId"
          method="POST" />
</Destinations>| 1 | This is the ID we will use later when we refer to this end-point |
5. TIF Job Configuration
On the TIF side, we need to create a new Job Configuration that controls this kind of job.
We will create a file called ${TIF_ROOT}/modules/enovia/cfg/jobcfg/ReservePartName.xml.
This Job will be of kind Transfer Data.
${TIF_ROOT}/modules/enovia/cfg/jobcfg/ReservePartName.xml
<Job>
    <Name>Reserve Part ID</Name>
    <TransferData>
        <Payload inline="true" omitRootElement="true"> (1)
            <Template inline="true"><![CDATA[ (2)
                <#ftl output_format="XML">
                <Request>
                    <UOM>${paramMap.unitOfMeasure[0]}</UOM>
                    <DESCRIPTION>${paramMap.description[0]}</DESCRIPTION>
                    <STATUS>New</STATUS>
                </Request>
            ]]></Template>
        </Payload>
        <Destinations>
            <Http id="reserve-part-number"> (3)
                <RetryAttempts>0</RetryAttempts>
            </Http>
        </Destinations>
    </TransferData>
</Job>| 1 | For simplicity, we here define the Payload definition inline with the Job configuration. In simple cases like this, it is preferrable in order to keep the number of configuration files low. |
| 2 | We use the Templating feature (Apache Freemarker) to contruct the payload. In this case we define the template inline since it is relatively small. However, recommended is to move the template into a separate file. |
| 3 | Here we define the http endpoint |
6. ENOVIA Configurations
On the ENOVIA side, we need to trigger the TIF Job and handle the return values.
In our case we use the Form feature of the TVC Structure Browser to create new Part objects, hence we define the Form in an XML configuration file.
Lets look into such file
/WEB-INF/tvc/form/NewPart.xml
<?xml version="1.0" encoding="UTF-8"?>
<Form xmlns="http://technia.com/TVC/Form" xmlns:xsi="http://www.w3.org/2001/XMLSchema-instance"
	xsi:schemaLocation="http://technia.com/TVC/Form http://products.technia.com/tvc/schema/latest/Form.xsd"
	id="create-part">
	<Header>Create Part</Header>
	<SubHeader></SubHeader>
	<RunOncePerSelection />
	<Processor>com.technia.tif.enovia.client.structurebrowser.form.NameAllocation</Processor> (1)
	<Tab>
		<Label>Basic</Label>
		<TypeField>
			<TypePattern>type_Part</TypePattern>
		</TypeField>
		<NameField id="name"> (2)
			<Required>true</Required>
			<AutoName>true</AutoName>
			<Visible>false</Visible>
			<Setting name="xpath" value="/reservation-response/id/text()" /> (3)
			<Setting name="jobCfg" value="tvc:jobcfg/ReservePartName.xml" /> (4)
			<Setting name="sendValuesFor" value="description,unitOfMeasure" /> (5)
		</NameField>
		<PolicyField>
			<Label>Policy</Label>
			<Required>true</Required>
			<DefaultValue>policy_ECPart</DefaultValue>
			<Filter>
				<Exclude>policy_DevelopmentPart</Exclude>
				<Exclude>policy_StandardPart</Exclude>
				<Exclude>policy_Version</Exclude>
			</Filter>
		</PolicyField>
		<Field id="description">
			<Label>Description</Label>
			<MapsTo>description</MapsTo>
			<Required>false</Required>
			<ClearEnabled>true</ClearEnabled>
		</Field>
		<Field id="unitOfMeasure">
			<Label>Unit Of Measure</Label>
			<MapsTo>attribute_UnitofMeasure</MapsTo>
			<Required>false</Required>
		</Field>
	</Tab>
</Form>| 1 | This Form Processor is part of the TIF ENOVIA Client library and can be used in a TVC Structure Browser Form to simplify the invoke of Jobs. |
| 2 | The id='name' is expected from the built-in Form Processor in TIF in order to be able to locate the Name Field. |
| 3 | The xpath setting is required in order to be able to select the name value from the response data |
| 4 | The jobCfg setting is required and points out the TIF Job configuration to be used |
| 5 | Optional setting that contains a comma separated list of field id’s, which values are passed over as params into the TIF Job. |
7. Programatically Invoke a Synchronous Job
If you want to integrate the TIF Synchronous job call in other places, you can easily do so programatically.
Example code below:
...
import com.technia.tif.enovia.api.synch.InvokeJobResponse;
import com.technia.tif.enovia.client.synch.SynchCreateNewJob;
...

Map<String, String[]> paramMap = ...
SynchCreateNewJob req = new SynchCreateNewJob();
req.setJobCfg(jobCfg);
req.setParamMap(paramMap);
InvokeJobResponse response;
try {
    response = req.run();
} catch (XMLException e) {
    throw new TVCException("A data exchange error occured while " +
        "retreiving the name from the remote system", e);
} catch (IOException e) {
    throw new TVCException("An I/O error occured while retreiving " +
        "the name from the remote system", e);
}
if (response.getHasError()) {
    throw new TVCException(response.getErrorMessage());
}

String firstResult = response.getFirstResult().getResponse();
...