Tutorial - How to connect with IBM MQ over JMS
11 September 2019
1. Goals
The goal of this tutorial is to configure a JMS Destination that connects with an IBM MQ system.
The tutorial includes reference configuration for an outbound integration that transfers payload to the MQ. The examples cover both MQ queue and topic.
| This tutorial is written for IBM MQ version 9.1 with file based JNDI service provider. Some steps might differ depending on your MQ version and type of JNDI service provider. |
2. Use Case Flow
In brief, the flow in this tutorial is the following:
-
A job is triggered.
-
Payload is extracted from ENOVIA.
-
The extracted payload is transferred to MQ over JMS.
3. Preparations
In order to connect the MQ, some preparation is necessary. This requires access to the MQ server, as some of the needed files are part of the MQ installation.
3.1. Download MQ Client JAR Files
First, we need to download MQ client JAR files from IBM fix central. Choose a client that matches with your MQ version. In this example we are connecting to version 9.1, so we choose "IBM MQ clients v9.1 LTS & CD" ⇒ "9.1.x.x-MQ-Install-Java-All".
Download and run the installer and copy extracted JAR files in ${TIF_ROOT}/lib/custom. The following files are at least required:
-
bcpkix-jdk15on.jar
-
bcprov-jdk15on.jar
-
com.ibm.mq.allclient.jar
-
com.ibm.mq.traceControl.jar
-
fscontext.jar
-
jms.jar
-
providerutil.jar
3.2. Create Bindings for Context Factory
In this example, we are using file based JNDI service provider. The MQ server installation contains a tool called "JMSAdmin" that creates necessary .bindings file for the provider.
JMSAdmin is located under ${MQ-INSTALL-DIR}/java/bin and there is also template file ${MQ-INSTALL-DIR}/java/bin/JMSAdmin.config.
Modify the template:
-
uncomment line
INITIAL_CONTEXT_FACTORY=com.sun.jndi.fscontext.RefFSContextFactory. -
uncomment and modify line
PROVIDER_URL=file:///tmpwheretmpis the folder where.bindingsfile will be written.
Next, run JMSAdmin with parameters ./JMSAdmin -t -v -cfg JMSAdmin.config. In the JMSAdmin console you need to enter some commands to create definitions for a queue or topic.
An example for a queue:
def q(JNDI_MY_QUEUE) QUEUE(MY_QUEUE)
def qcf(MY_CONN_FACTORY) qmgr(MY_QUEUE_MANAGER) transport(CLIENT) channel(MY_CHANNEL) host(1.2.3.4) port(1414)
end
where
-
JNDI_MY_QUEUEis "JNDI name" for the queue -
MY_QUEUEis the queue name in MQ -
MY_CONN_FACTORYis "JNDI name" for queue connection factory that will be referred in${TIF_ROOT}/etc/destinations.xml -
MY_QUEUE_MANAGERis queue manager name in MQ -
MY_CHANNELis channel name in MQ -
1.2.3.4and1414are address and port number of MQ server
An example for a topic:
def t(JNDI_MY_TOPIC) topic(MY_TOPIC)
def tcf(MY_CONN_FACTORY) qmgr(MY_QUEUE_MANAGER) transport(CLIENT) channel(MY_CHANNEL) host(1.2.3.4) port(1414)
end
where
-
JNDI_MY_TOPICis "JNDI name" for the queue -
MY_TOPICis the topic name in MQ -
MY_CONN_FACTORYis "JNDI name" for topic connection factory that will be referred in${TIF_ROOT}/etc/destinations.xml -
MY_QUEUE_MANAGERis queue manager name in MQ -
MY_CHANNELis channel name in MQ -
1.2.3.4and1414are address and port number of MQ server
Copy the created .bindings file to a folder that is accessible by TIF server, for example ${TIF_ROOT}/lib/custom.
3.3. Modify destinations.xml
Finally, modify JMS destination config in ${TIF_ROOT}/etc/destinations.xml to match with the bindings file:
<JMS id="jms-1"
    initialContextFactory="com.sun.jndi.fscontext.RefFSContextFactory"
    providerURL="file:///tif/lib/custom" (1)
    connectionFactoryKey="MY_CONN_FACTORY"
    user="MY_USERNAME" (2)
    password="MY_PASSWORD" (3)
>

    <!-- Uncomment Queue OR Topic, not both!
        <Queue name="JNDI_MY_QUEUE" />
        <Topic name="JNDI_MY_TOPIC" />
    -->
</JMS>| 1 | Assuming you have placed .bindings to /tif/lib/custom. |
| 2 | MQ user name. |
| 3 | MQ password. |
4. Integration Configuration
On the TIF server we need to create XML configuration files for a job that extracts and transfers payload to MQ.
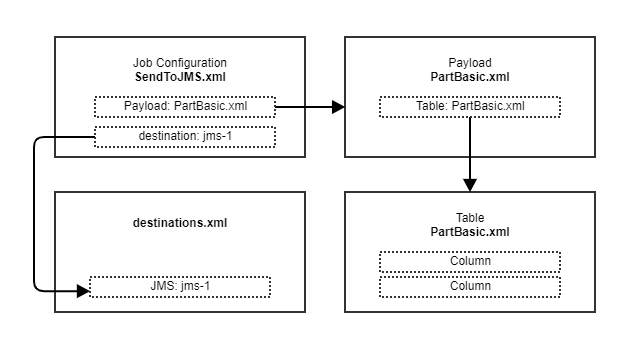
Job configuration:
${TIF_ROOT}/modules/enovia/cfg/jobcfg/SendToJMS.xml
<Job>
    <Name>Send to JMS</Name>
    <TransferData>
        <Payload>tvc:payload/PartBasic.xml</Payload>
        <Destinations>
            <JMS id="jms-1" messageType="text" /> (1)
        </Destinations>
    </TransferData>
</Job>| 1 | Sends message to JMS in text format. |
Payload:
${TIF_ROOT}/modules/enovia/cfg/payload/PartBasic.xml
<Payload>
    <!-- Modify according to your integration -->
    <TableContent>
        <Table>tvc:table/PartBasic.xml</Table>
    </TableContent>
</Payload>
Table:
${TIF_ROOT}/modules/enovia/cfg/table/PartBasic.xml
<Table>
    <!-- Modify according to your integration -->
    <Column>
        <Name>type</Name>
        <Label>type</Label>
        <Expression>type</Expression>
    </Column>
    <Column>
        <Name>name</Name>
        <Label>name</Label>
        <Expression>name</Expression>
    </Column>
    <Column>
        <Name>revision</Name>
        <Label>revision</Label>
        <Expression>revision</Expression>
    </Column>
</Table>
5. Testing Transfer
Trigger a job for example from MQL: exec prog TIFTrigger -method newJob 1.2.3.4 tvc:jobcfg/SendToJMS.xml where 1.2.3.4 is the source object ID.
You can observe the job status from TIF Admin UI.
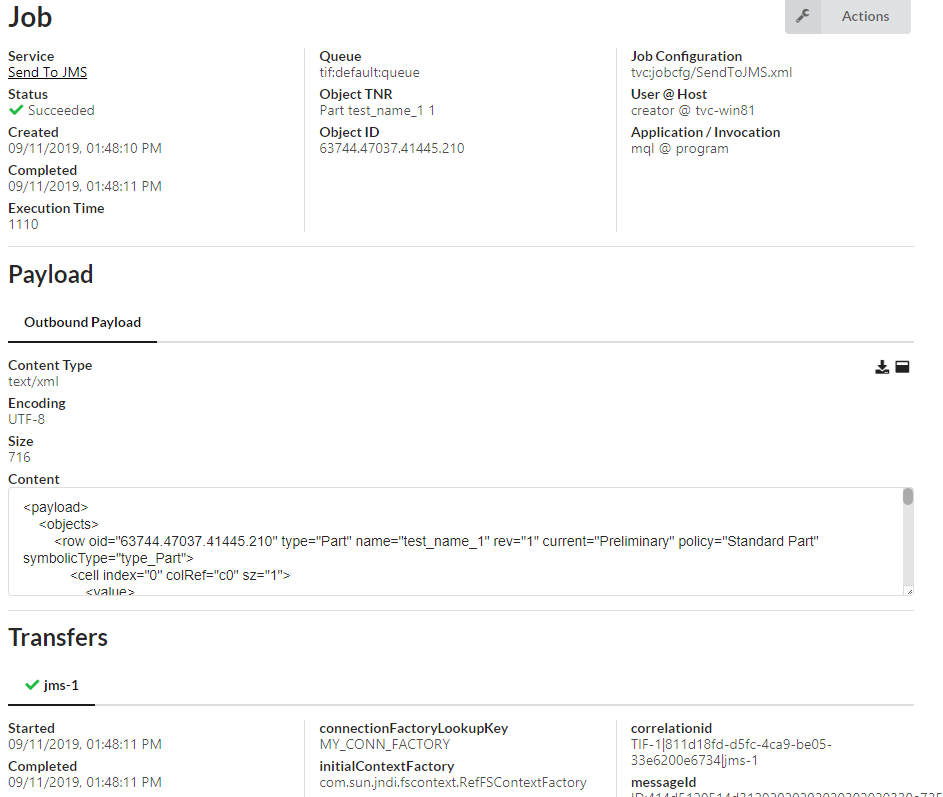
Figure 2. Successful Job
Once job is completed, you should also see the message in MQ admin console.
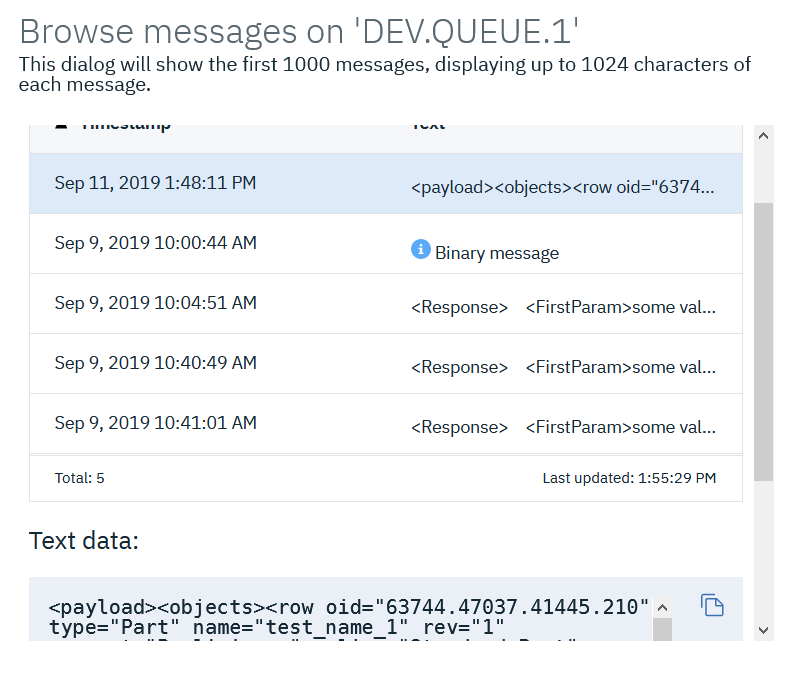
Figure 3. IBM MQ Admin Console - Queue
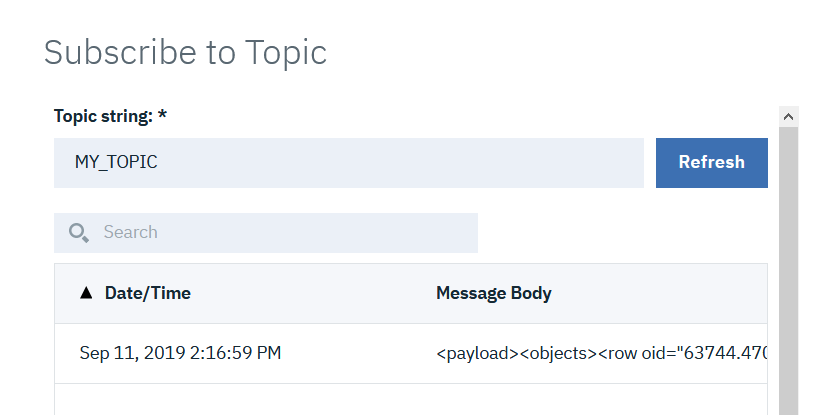
Figure 4. IBM MQ Admin Console - Topic