
TIF Installation Guide
14 May 2015
1. TIF Installation
The TIF is packaged into two separate parts, namely.
- The TIF Server
-
This package also contains the ENOVIA connector (might change in a future release)
- The client side part of the ENOVIA connector inside TIF
-
Contains a small schema to be installed in the ENOVIA database along with a JAR file containing the necessary code used by the client. Also contains some web related files
The TIF server is currently packaged into a ZIP archive, tif-server.zip.
The ENOVIA client is bundled as an installer, one for Windows and one for Linux/UNIX.
All of these files are downloadable from https://products.technia.com.
2. Installation Overview
TIF can be installed in a few different ways. Starting with the easiest setup, TIF can be installed on the same server as the 3DSpace application is running at. This is visualized in the image below. This setup is often selected in development or test environments.
Figure 1. Installation Alternative 1
The preferred setup in a production system, is to have the TIF instance on its own server. This requires also that 3DSpace (formerly known as ENOVIA Server) is installed at the same machine in order for TIF to be able to connect with 3DSpace/ENOVIA.
This setup is illustrated in the image below.
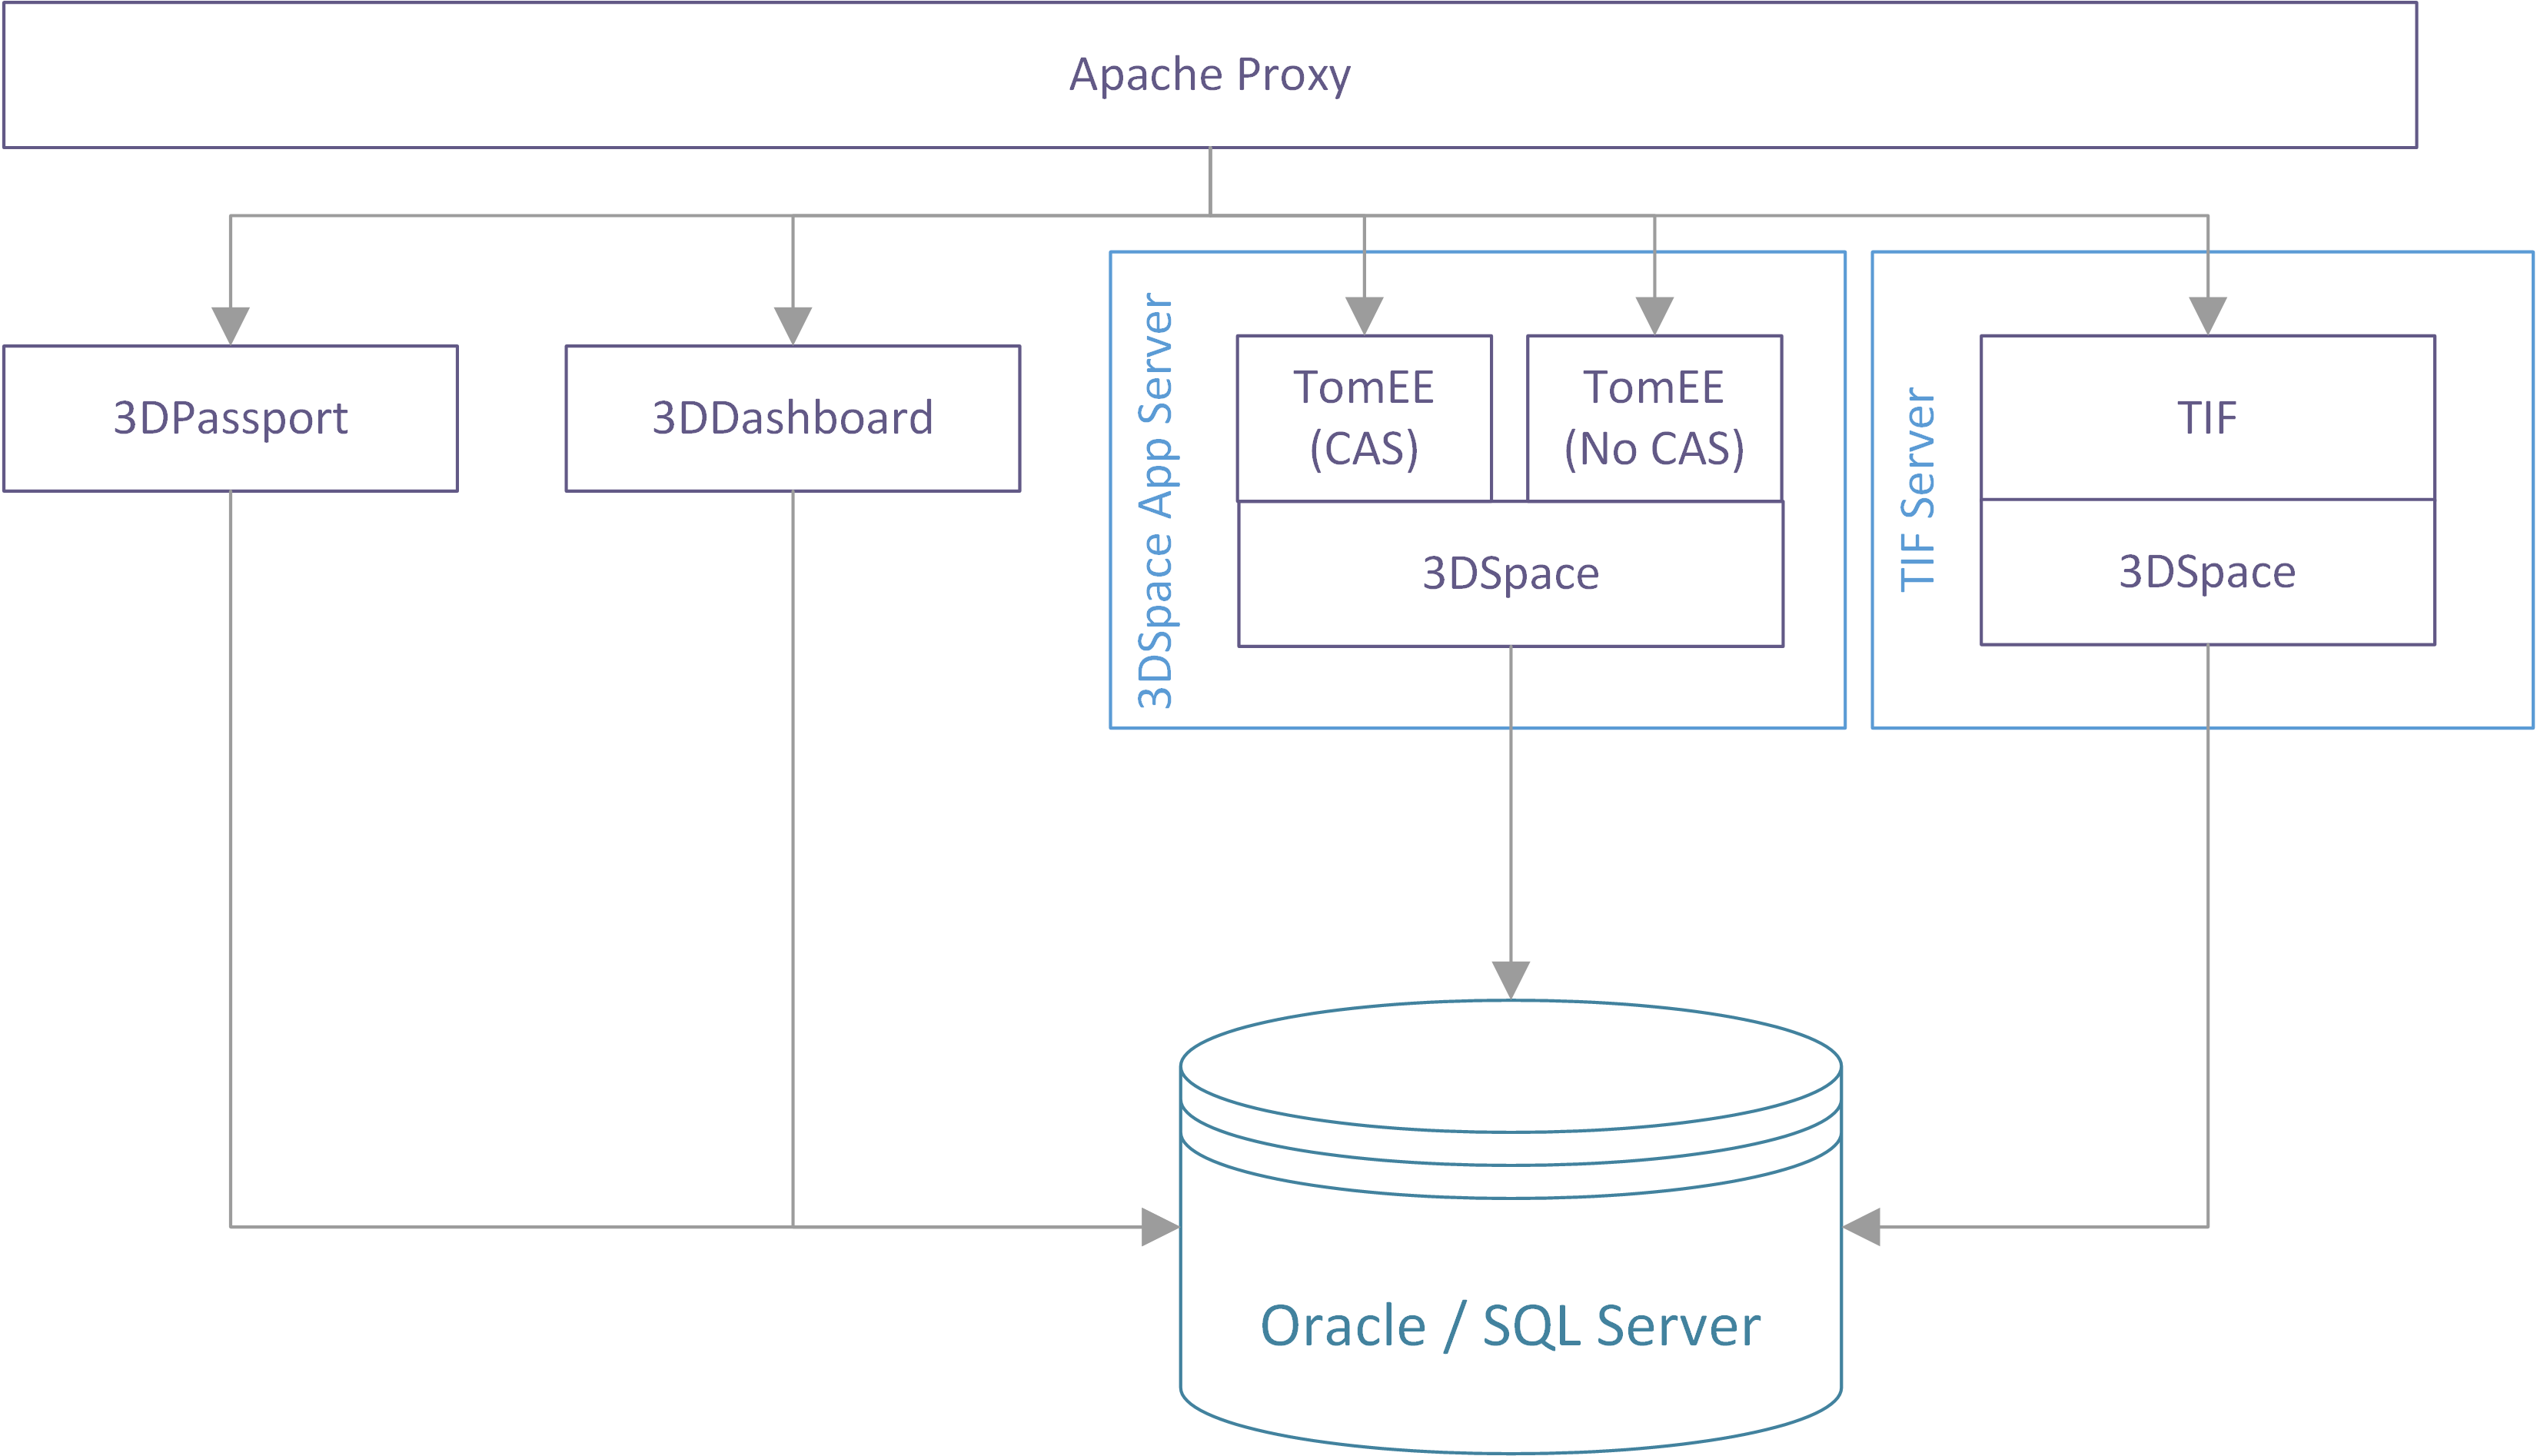
Figure 2. Installation Alternative 2
The last setup alternative is to have TIF running on a separate server like described above, but instead of connecting to the 3DSpace/ENOVIA database directly, instead connect via HTTP/XML to a running Tomee instance.
This setup does not require a 3DSpace/ENOVIA Server installation, however, it still requires you to ensure that the necessary JAR files required to connect with ENOVIA is present for the TIF server.
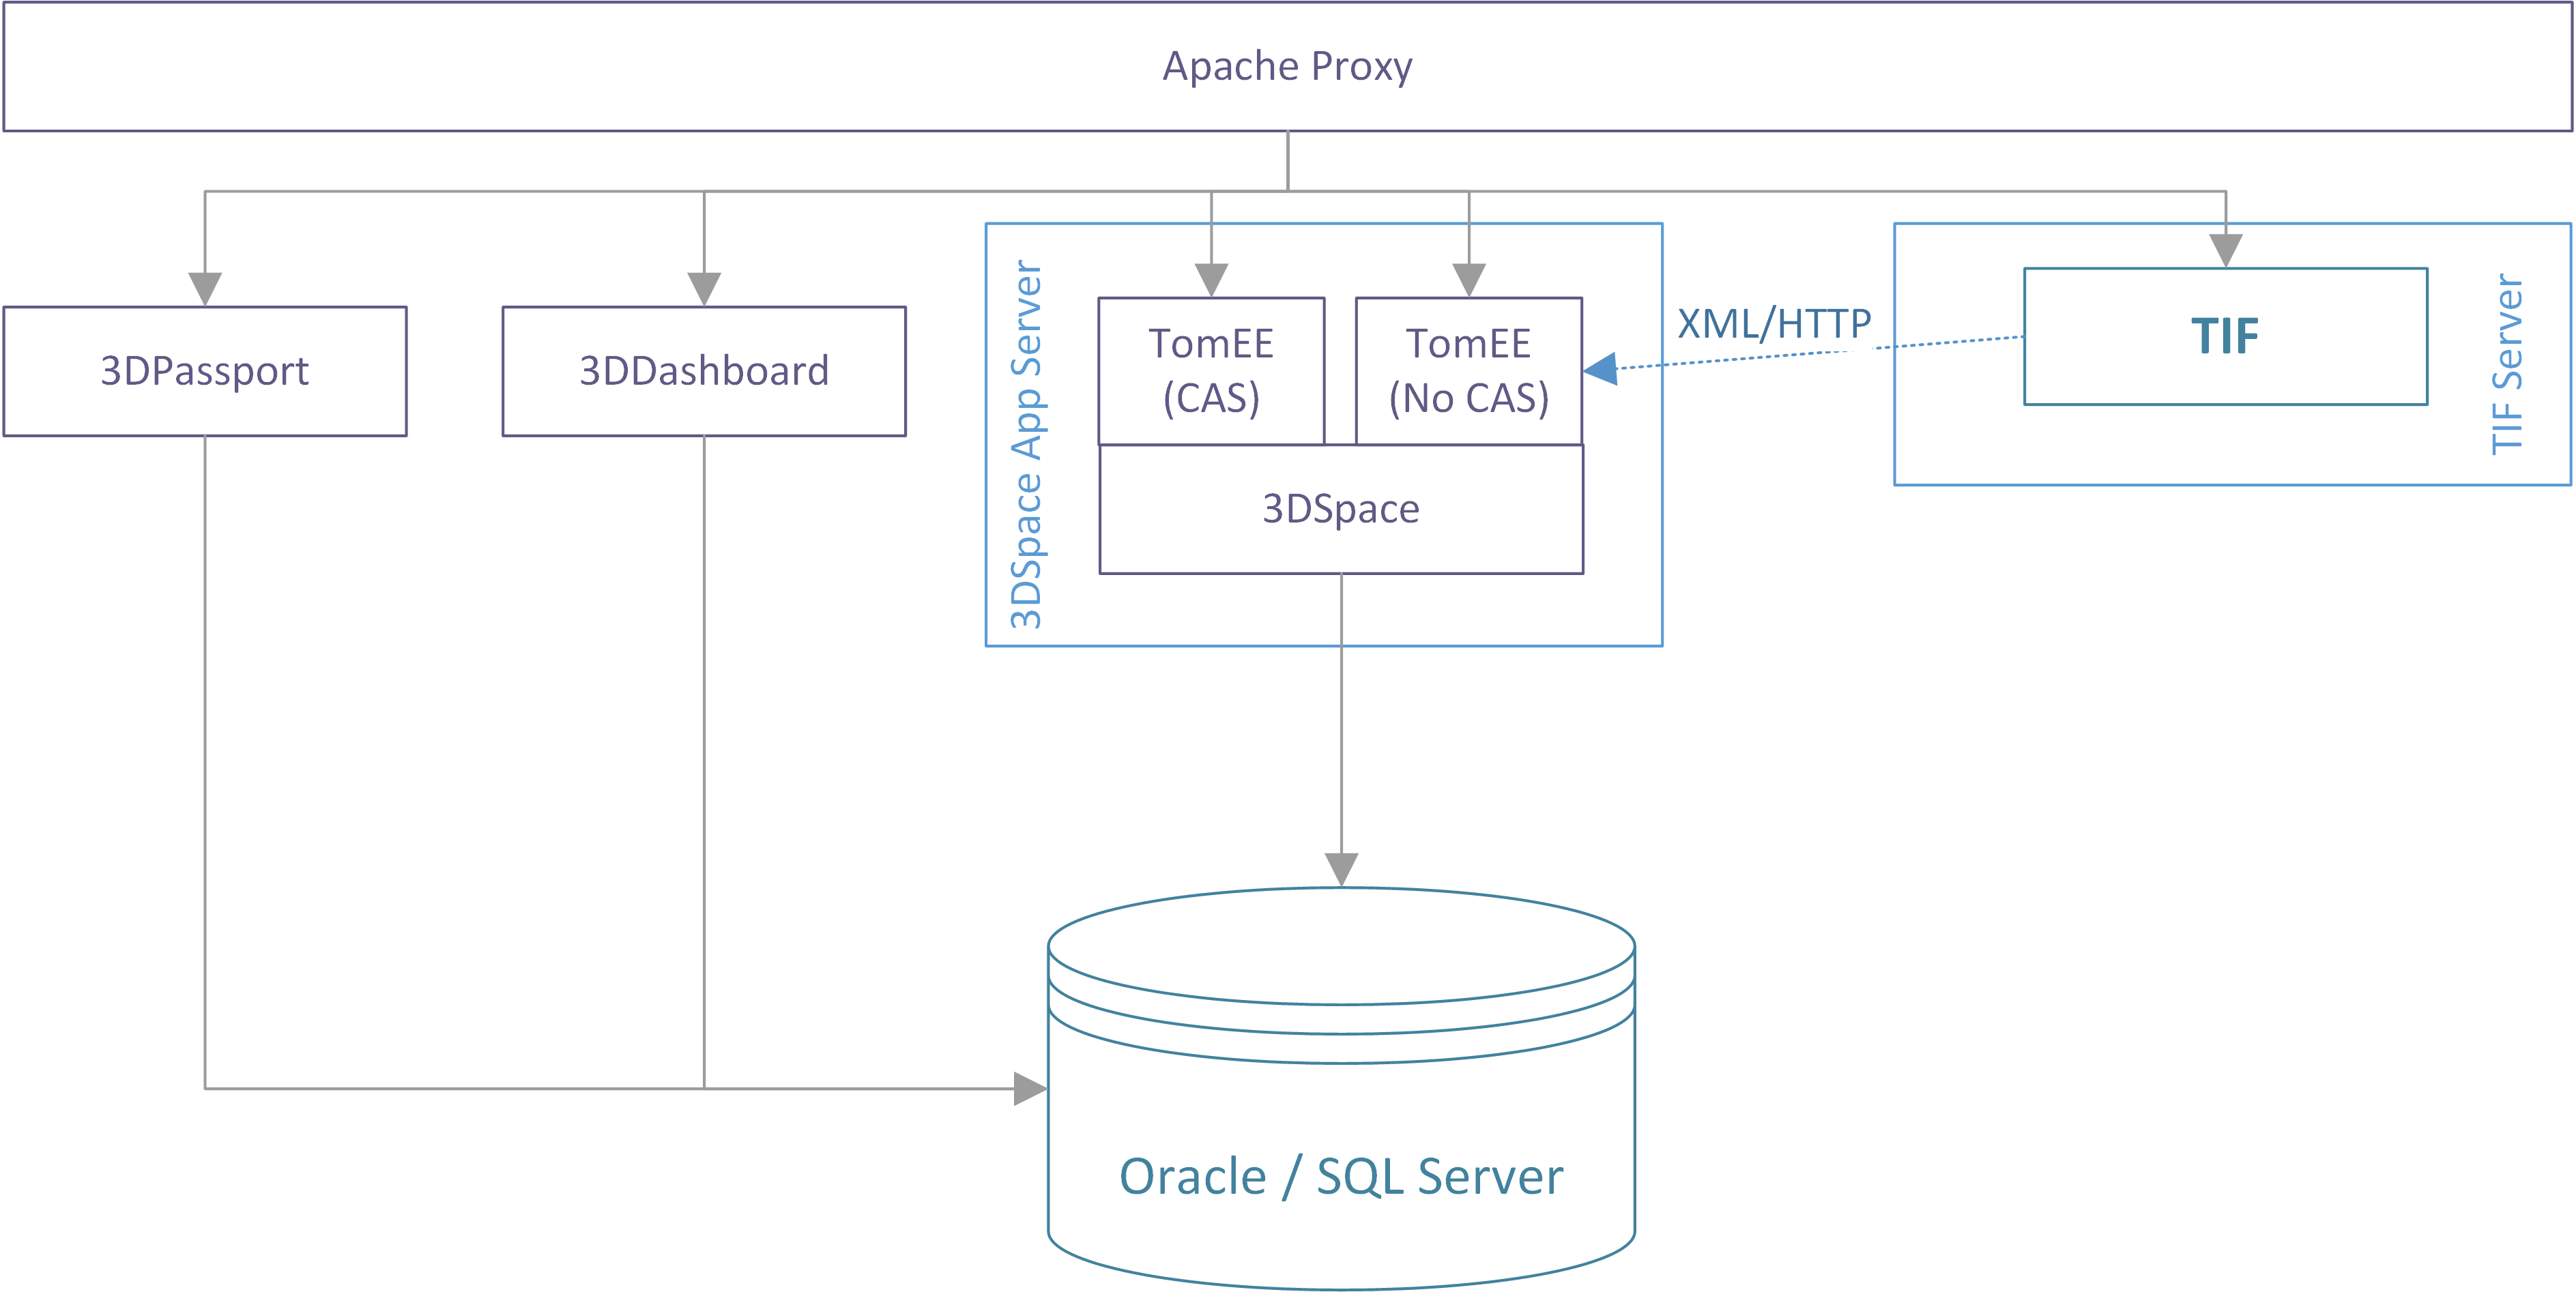
Figure 3. Installation Alternative 3
|
If you connect to ENOVIA/3DSpace over HTTP, remember that you need to define the ENOVIA connect string in the following file: ${TIF_HOME}/modules/envoia/etc/tvc.custom.properties The property should be defined like shown in the example below: enovia.host=http://host.docker.internal:8080/enovia |
3. Upgrade Notes
Currently, the TIF server does not have an installer that automates the complete installation process.
| One thing to remember between two upgrades, is to remove all JAR files from the TIF server installation directory if you perform the upgrade into the same directory as the previous version. |
4. Installing the Server
First, extract the tif-server.zip into a new and empty directory, for example c:\apps\tif-server. The root folder for the TIF server is from now on referred to as ${TIF_ROOT}.
Within the ${TIF_ROOT}/bin directory, you will find a couple of files that will be used to start/stop (manage) a TIF instance but also other helpful files such as example script that illustrates how to install the TIF server as a service within Windows OS.
File |
Description |
tif.bat |
Start/stop script for TIF on Windows. Note that this script might require some additional environment variables to be set prior to running. Take a look into the start_example.bat script how to do so. |
tif.sh |
Start/Stop script for TIF on UNIX. Note: Ensure that this file has the +x flag set on UNIX. This script might require some environment variables to be set prior to starting TIF. See notes below. |
These scripts most likely requires some additional environment variables to be set prior to starting TIF, this has been exemplified within the "start_example.bat" script on Windows and within the "setenv.example.sh" file for Unix.
Note that this file should be renamed to setenv.sh in order to work,
the provided file is just there for convenience and will never be executed by the tif.sh start script.
|
The script you use needs to be changed to match your own environment.
So on Windows, you should copy the file start_tif.bat into your own.
On Unix, you should create a file called setenv.sh.
So, create a file called start_tif.bat, which will set the following properties:
set JAVA_HOME=d:\apps\jdk64\latest
set ENOVIA_HOME=d:\apps\ENOVIA\V6R2012X\Server
set WEBAPP_ROOT=D:\Projects\DEV-2012X\enovia
call tif.bat run
The JAVA_HOME variable points out the JDK that will be used for running TIF.
TIF is compiled with Java 8 and thus requires at least Java 8 runtime.
Use the same bit size of the JVM as your ENOVIA/3DSpace requires.
The ENOVIA_HOME variable (if set) will only result in that the bin directory is added to the PATH.
You can omit this if your PATH already is setup correctly.
Finally, the WEBAPP_ROOT directory is used to point of the ENOVIA application.
The reason why you need to point out the ENOVIA webapplication,
is because TIF needs to be aware of the JAR files and other class/properties files found from WEB-INF/classes and WEB-INF/lib.
You may choose to not set this environment variable.
In that case, you must copy the content of WEB-INF/classes and WEB-INF/lib from your ENOVIA web application into the ${TIF_ROOT}/modules/enovia/lib/custom directory.
The least required JAR file you need to copy depends on the ENOVIA version you use, but the list below may give a hint:
-
eMatrixServletRMI.jar
-
enoviaKernel.jar
-
FcsClient.jar
-
FcsClientLargeFile.jar
-
Mx_jdom.jar
-
search_common.jar
Note 1: The "tif.bat" script takes one argument, which can be any of "run", "start" or "stop".
Note 2: The difference between "run" and "start" is that run starts the server in the same window while "start" opens a new window.
Note 3: To stop the TIF server, use a stop script that launches "tif.bat" with stop as argument. Don’t stop the server using CTRL-C or similar, because that causes an unclean shutdown of TIF with unexpected result.
Note 4: By default, the tif.bat script reads an environment variable called HEAP_SIZE to set the Java heap size. This value is default set to 1024MB.
4.1. TIF as a Linux systemd service
If you want to define a service to be administrated via the systemd manager, you need to create a so called systemd unit file describing the service.
Below is an example of such service.
[Unit]
Description="Technia Integration Framework (TIF) systemd-style service."
After=local-fs.target network-online.target

[Service]
Type=exec
ExecStart=/opt/tif/bin/tif.sh start
ExecStop=/opt/tif/bin/tif.sh stop
Restart=on-failure
User=tif

[Install]
WantedBy=multi-user.target
The service can be put in for example /etc/systemd/system/tif.service.
After adding the service file, reload the systemd cache via systemctl daemon-reload
To start the service, run systemctl start tif.service.
To enable, e.g. ensuring that it is started when the server is rebooted, the service run systenctl enable tif.service
4.2. TIF as a Linux init.d service
Below is an example of a script suitable for putting into the init.d folder as a Linux service.
This is only an example and can be considered as a starting point for your own service.
The variables TIF_HOME and TIF_USER needs to be set in the script.
#!/bin/sh
# chkconfig: 2345 95 20
# description: Starts and stops the tif daemon
# This is the init script for starting/stopping tif
# processname: tif
TIF_HOME=
TIF_USER=

start() {
    echo -n $"Starting tif service: "
    su -s /bin/bash $TIF_USER -c $TIF_HOME/bin/tif.sh start
    echo $?
}
stop() {
    echo -n $"Stopping tif service: "
    su -s /bin/bash $TIF_USER -c $TIF_HOME/bin/tif.sh stop
    echo $?
}
restart() {
    stop
    start
}
status() {
    ps -aef | grep tif
}
# Handle the different input options
case "$1" in
    start)
    start
    ;;
    stop)
    stop
    ;;
    status)
    status
    ;;
    restart)
    restart
    ;;
    *)
    echo $"Usage: $0 {start|stop|restart|status}"
    exit 1
esac
exit 0
4.3. TIF as a Windows Service
There is a sample BAT (service_example.bat) file found from ${TIF_ROOT}/bin showing how to register the TIF as a Window service.
This requires you to download a separate application called prunsrv from the Apache Commons site.
The file "service_example.bat" shows an example including some documentation how to do so.
5. Installing the ENOVIA Client
The ENOVIA client is installed via an automated installer.
When starting the installer, you will be prompted for the following information:
-
JAVA_HOME directory. Must be of version 1.7 or greater.
-
The JVM is used to run the Schema installer so it has to match the bit-size of ENOVIA (32/64 bit)
-
-
ENOVIA Server Installation Directory
-
Your bootstrap file (MATRIX-R)
-
Database credentials (username / password of ENOVIA system user)
-
Other database settings (depending on selected database)
-
The ENOVIA web application directory
The installer will add a few entities to the ENOVIA data model, in order to be able to handle the TIF jobs and queues.