Tutorial - Transfer Data
20 September 2016
1. Goals
The goal with this tutorial is to understand how to create a payload based upon information inside the ENOVIA™ DB and transfer the data into some external location.
In this tutorial we will both illustrate how you can trigger a data-transfer both manually, but also based upon events inside ENOVIA™, for example modify-attribute event.
We will in this use case publish data onto a JMS queue.
2. First, the Data Format
From ENOVIA™, we will publish data that follows this format:
<part-data>
<name>...</name>
<description>...</description>
<status>...</status>
<unit-of-measure>...</unit-of-measure>
<last-modified>...</last-modified>
<created>...</created>
<bill-of-material>
<row qty="..." findNumber="..." refDes="..." item="..." />
...
</bill-of-material>
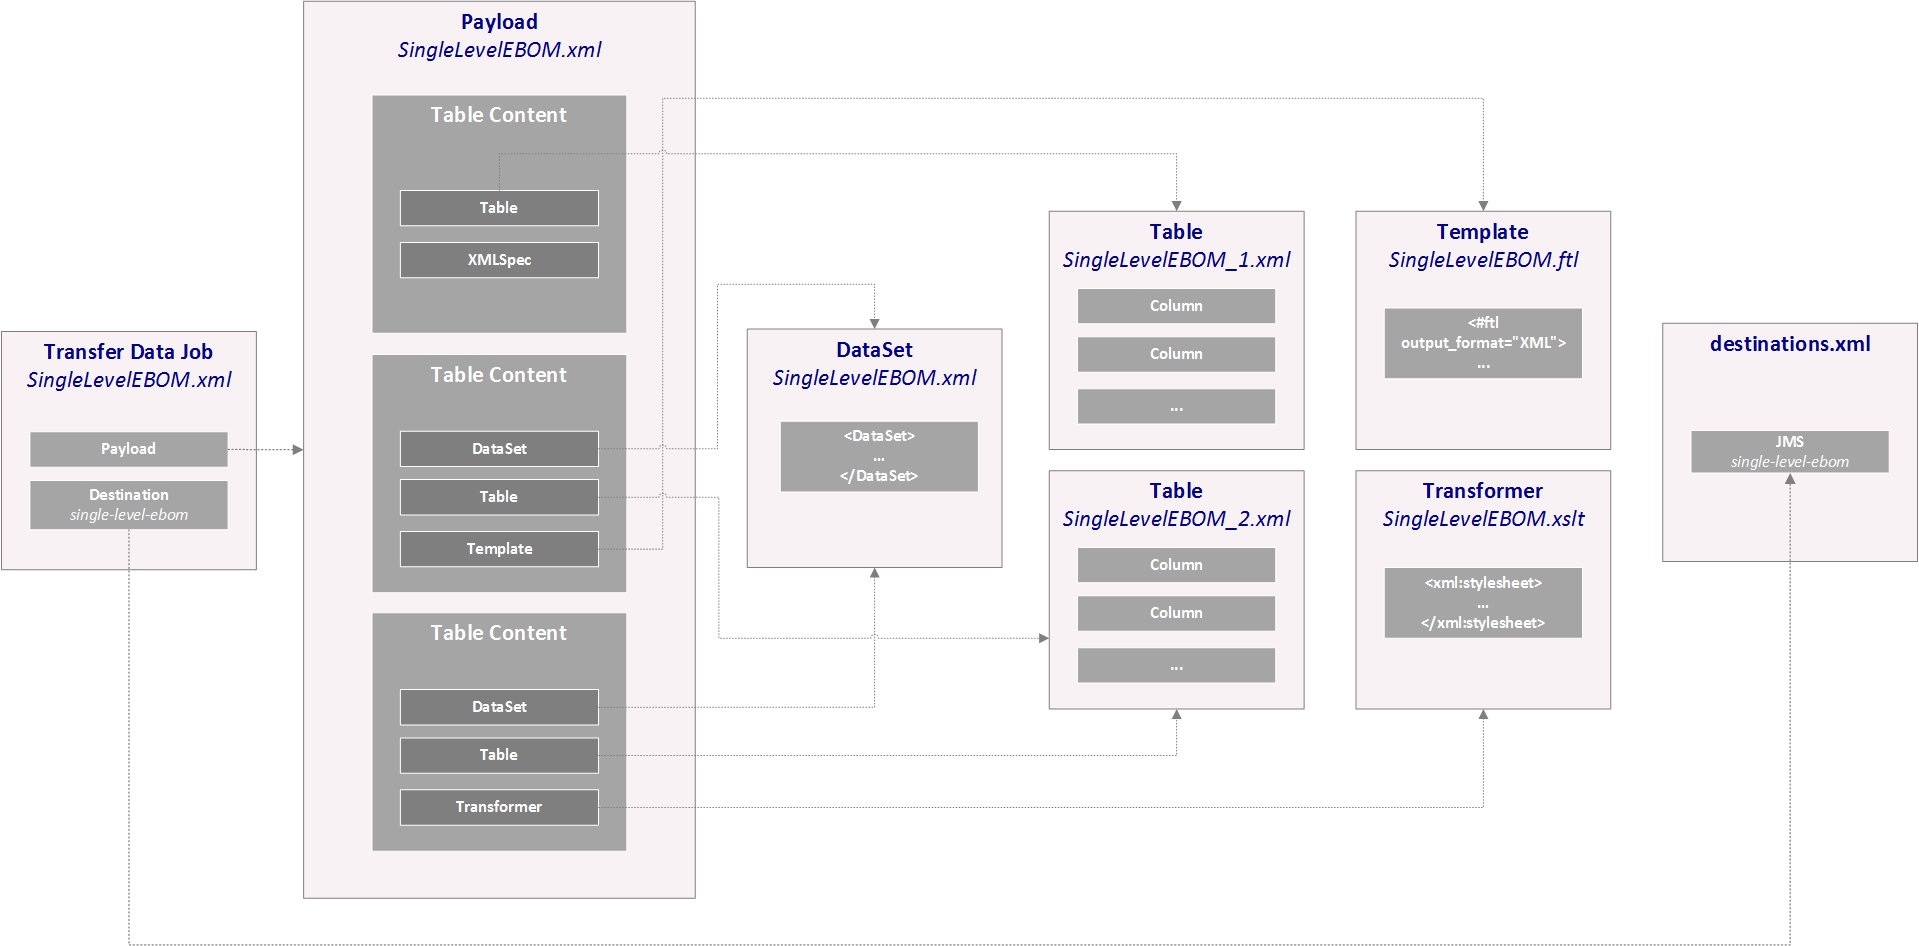
</part-data>3. The Payload
The payload configuration is responsible for producing data according to your business rules.
TIF has a wide range of support that allows you to create the payload in different ways. In this tutorial we look into using a couple of different alternatives like
-
Using the Templating support (Apache Freemarker)
-
XSLT
-
Use of so called XML-Spec configurations to adjust the generated XML without further processing.
${TIF_ROOT}/modules/enovia/cfg/payload/SingleLevelEBOM.xml
<Payload rootElement="part-data">
    <TableContent outerElement=""> (1)
        <Table>SingleLevelEBOM_1.xml</Table>
        <XMLSpec> <!-- NOTE: Can be put in a separate file and reused -->
            <IncludeTableHeaders>false</IncludeTableHeaders>
            <IncludeTableGroups>false</IncludeTableGroups>
            <AddColumnId>false</AddColumnId>
            <AddCellIndex>false</AddCellIndex>
            <AddColumnRef>false</AddColumnRef>
            <AddCellValueSize>false</AddCellValueSize>
            <OmitCellValueElement>true</OmitCellValueElement>
            <OmitRowAttributes>true</OmitRowAttributes>
            <UseColumnName>true</UseColumnName>
            <TableDataElement/>
            <RowElement/>
        </XMLSpec>
    </TableContent>

    <TableContent> (2)
        <DataSet>SingleLevelEBOM.xml</DataSet>
        <Table>SingleLevelEBOM_2.xml</Table>
        <Template>SingleLevelEBOM.ftl</Template>
    </TableContent>

    <TableContent> (3)
        <DataSet>SingleLevelEBOM.xml</DataSet>
        <Table>SingleLevelEBOM_2.xml</Table>
        <Transformer>SingleLevelEBOM.xslt</Transformer>
    </TableContent>
</Payload>| 1 | Section 1: Extract info about the Part and use XML-Spec to tweak the generated XML to reduce need for additional processing |
| 2 | Section 2: Use Freemarker Template to generate output |
| 3 | Section 3: Generates same output as section 2, just illustrate how to use XSLT instead of Template |
| In the first section we only use the context object, hence we do not need any data-set for retreival of data. We only specify a table, containing the select statements we are interested of. |
Related configuration(s) below:
Here is the table we use to extract the meta data from the context object:
${TIF_ROOT}/modules/enovia/cfg/table/SingleLevelEBOM_1.xml
<?xml version="1.0" encoding="UTF-8"?>
<Table>
    <Column>
        <Name>name</Name>
        <Expression>name</Expression>
    </Column>
    <Column>
        <Name>description</Name>
        <Expression>description</Expression>
    </Column>
    <Column>
        <Name>status</Name>
        <Expression>current</Expression>
    </Column>
    <Column>
        <Name>unit-of-measure</Name>
        <Expression>${attribute[attribute_UnitofMeasure]}</Expression>
    </Column>
    <Column>
        <Name>created</Name>
        <Expression>originated</Expression>
    </Column>
    <Column>
        <Name>last-modified</Name>
        <Expression>modified</Expression>
    </Column>
</Table>
Here is the data set we use to expand the first level. Note that we remove the root node from the result.
${TIF_ROOT}/modules/enovia/cfg/dataset/SingleLevelEBOM.xml
<DataSet>
    <RemoveRoots>
        <Expand>
            <Depth>1</Depth>
            <From>true</From>
            <RelationshipPattern>
                <Relationship>relationship_EBOM</Relationship>
            </RelationshipPattern>
        </Expand>
    </RemoveRoots>
</DataSet>
Below is the table used for the EBOM rows:
${TIF_ROOT}/modules/enovia/cfg/table/SingleLevelEBOM_2.xml
<?xml version="1.0" encoding="UTF-8"?>
<Table>
    <Column usesBusinessObject="false">
        <Name>find-number</Name>
        <Expression>${attribute[attribute_FindNumber]}</Expression>
    </Column>
    <Column usesBusinessObject="false">
        <Name>quantity</Name>
        <Expression>${attribute[attribute_Quantity]}</Expression>
    </Column>
    <Column usesBusinessObject="false">
        <Name>reference-designator</Name>
        <Expression>${attribute[attribute_ReferenceDesignator]}</Expression>
    </Column>
    <Column>
        <Name>name</Name>
        <Expression>name</Expression>
    </Column>
    <Column>
        <Name>status</Name>
        <Expression>current</Expression>
    </Column>
</Table>
Here is the template used in section 2:
${TIF_ROOT}/modules/enovia/cfg/template/SingleLevelEBOM.ftl
<#ftl output_format="XML">

<bill-of-material>
    <#list data.rows as row>
        <row
                   qty="${row.getCell("quantity").getFirstValue().getValue()}"
            findNumber="${row.getCell("find-number").getFirstValue().getValue()}"
                refDes="${row.getCell("reference-designator").getFirstValue().getValue()}"
                  item="${row.getCell("name").getFirstValue().getValue()}"
                status="${row.getCell("status").getFirstValue().getValue()}" />
    </#list>
</bill-of-material>
And finally, the XSLT stylesheet used in section 3:
${TIF_ROOT}/modules/enovia/cfg/xslt/SingleLevelEBOM.xslt
<?xml version="1.0" encoding="UTF-8"?>
<xsl:stylesheet version="1.0"
    xmlns:xsl="http://www.w3.org/1999/XSL/Transform" xmlns:xsi="http://www.w3.org/2001/XMLSchema-instance">

    <xsl:output omit-xml-declaration="yes" indent="yes"/>
    <xsl:strip-space elements="*" />

    <xsl:template match="/">
        <xsl:element name="bill-of-material">
            <xsl:for-each select="//row">
                <xsl:apply-templates select="." mode="ebom" />
            </xsl:for-each>
        </xsl:element>
    </xsl:template>

    <xsl:template match="row" mode="ebom">
        <xsl:element name="row">
            <xsl:attribute name="findNumber"><xsl:value-of select="cell[1]/value[1]/text()"/></xsl:attribute>
            <xsl:attribute name="qty"><xsl:value-of select="cell[2]/value[1]/text()"/></xsl:attribute>
            <xsl:attribute name="refDes"><xsl:value-of select="cell[3]/value[1]/text()"/></xsl:attribute>
            <xsl:attribute name="item"><xsl:value-of select="cell[4]/value[1]/text()"/></xsl:attribute>
            <xsl:attribute name="status"><xsl:value-of select="cell[5]/value[1]/text()"/></xsl:attribute>
        </xsl:element>
    </xsl:template>
</xsl:stylesheet>
3.1. Testing the Payload
It is possible to test the payload via the Admin UI.
The following URL syntax can be used:
http://localhost:8181/enovia/admin/testPayload?objectId=53160.3064.60233.1057&payloadCfg=SingleLevelEBOM.xml&clearCache=true
Accepted parameters are:
- objectId
-
The ENOVIA id of the object to create payload for
- payloadCfg
-
The name of the payload configuration to test
- clearCache
-
Force clear cache
4. Destination
${TIF_ROOT}/etc/destinations.xml
<Destinations>
    <JMS id="single-level-ebom"
         initialContextFactory="org.apache.activemq.jndi.ActiveMQInitialContextFactory"
         providerURL="tcp://172.16.16.210:61616">
        <Queue name="single-level-ebom" jndiKey="queue.%s"/>
    </JMS>
</Destinations>
5. Job Configuration
The Job configuration will put the pieces together, e.g in this example we use a transfer-data job and in such configuration we specify the payload to be used along with where to send the data.
${TIF_ROOT}/modules/enovia/cfg/jobcfg/SingleLevelEBOM.xml
<Job>
    <Name>Single Level EBOM</Name>
    <TransferData>
        <Payload>tvc:payload/SingleLevelEBOM.xml</Payload>
        <Destinations>
            <JMS id="single-level-ebom" messageType="text"/>
        </Destinations>
    </TransferData>
</Job>
6. Launch Job Manually
Below is a command defined in XML format that can be used by for example the TVC Structure Browser. If you need to use the command in a different context you need to create a corresponding Command object inside the ENOVIA™ database and assign it to the desired Menu.
<?xml version="1.0" encoding="UTF-8"?>
<!-- Sample command for creation of a TIF job manually -->
<Command>
    <Label>Send Part to ...</Label>
    <URL action="/tifCreateJob"
         submit="true"
         target="tableHiddenFrame">
        <Param name="job" value="SingleLevelEBOM.xml"/>
    </URL>
    <RowSelectType>single</RowSelectType>
</Command>
7. Launch Job via Trigger
You need to add the following trigger program object to enable this:
add bus "eService Trigger Program Parameters" "PolicyECPartStateApprovedPromoteAction" "TransferDataToERP"
    vault "eService Administration"
    policy "eService Trigger Program Policy"
    current Active
    "eService Program Name" "TIFTrigger"
    "eService Method Name" "newJob"
    "eService Program Argument 1" "${OBJECTID}"
    "eService Program Argument 2" "SingleLevelEBOM.xml";