Tutorial - Create / Update a Structure
20 September 2016
1. Goals
The goal with this tutorial is to understand the create/update integration and create or update a bill-of-material structure inside ENOVIA™.
In this tutorial the use case is to set up an integration that will receive messages via a REST service, and based upon the content of the message trigger a create/update configuration that will build the structure inside ENOVIA.
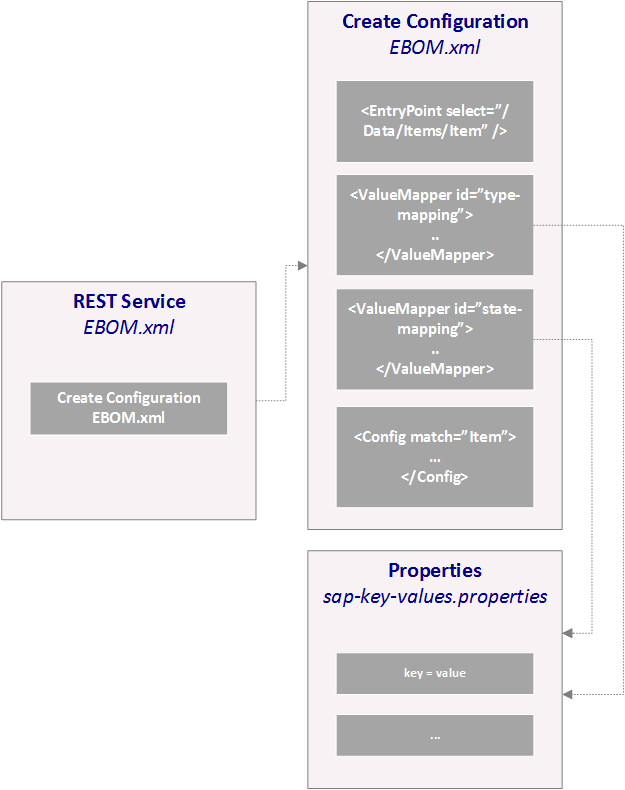
2. Use Case Flow
The image below illustrates the flow.

Figure 2. Create/Update data in ENOVIA from External System
-
An external system posts XML data over HTTP into TIF
-
A TIF REST service accepts the data and triggers a create/update integration use case.
3. First, the Data Format
The remote system will publish data that follows this schematic format:
<Data>
    <Items>
        <Item ...>
            <Item ...>
        </Item>

        <Item ...>
            <Item ...>
            <Item ...>
        </Item>

        <Item ...>
            <Item ...>
                <Item ...>
                    <Item ...>
                    <Item ...>
                </Item>
            </Item>
        </Item>
        ...
    </Items>
</Data>
For example this data would be allowed to send:
<Data>
    <Items>
        <Item t="sap-material" id="XZ-0001" status="Released" weight="100 g">
            <Item qty="1" pos="0001" t="sap-material" id="XZ-0002" status="Released" weight="0.025 kg" rdo="Corporate Plant" />
            <Item qty="1" pos="0002" t="sap-material" id="XZ-0003" status="Released" weight="53 g" rdo="WIP Plant" />
            <Item qty="1" pos="0003" t="sap-material" id="XZ-0004" status="Released" weight="20.0" rdo="WIP Plant" />
            <Item qty="2" pos="0004" t="sap-material" id="XZ-0005" status="Released" weight="30.0" rdo="WIP Plant">
                <Item pos="0001" qty="1" t="sap-material" id="XZ-0006" status="Released" weight="5.12 g" rdo="WIP Plant" />
                <Item pos="0002" qty="1" t="sap-material" id="XZ-0007" status="Released" weight="212 g" rdo="WIP Plant" />
                <Item pos="0003" qty="1" t="sap-material" id="XZ-0008" status="Released" weight="12 g" rdo="WIP Plant" />
                <Item pos="0004" qty="1" t="sap-material" id="XZ-0009" status="Released" weight="2.4 kg" rdo="WIP Plant" />
                <Item pos="0005" qty="2" t="sap-material" id="XZ-0010" status="Released" weight="5 kg" rdo="WIP Plant" />
            </Item>
        </Item>
    </Items>
</Data>
4. The Create/Update Configuration
On the TIF server we need to create our create/update configuration that defines how to create/update the object(s) and relationship(s) inside ENOVIA.
Based upon the input format, we create this configuration:
${TIF_ROOT}/modules/enovia/cfg/createconfig/EBOM.xml
<CreateConfiguration
    txType="update"
    runPrivileged="true"
    historyOff="true"
    triggerOff="true">

    <EntryPoint select="/Data/Items/Item" /> (1)

    <ValueMapper id="type-mapping"> (2)
        <ValueLookup name="sap-key-values.properties" keyPrefix="type." />
    </ValueMapper>

    <ValueMapper id="status-mapping"> (3)
        <ValueLookup name="sap-key-values.properties" keyPrefix="state." />
    </ValueMapper>

    <Config match="Item"> (4)
        <IfFound>Update</IfFound>

        <IdentityMatch> (5)
            <Type select="@t" valueMapper="type-mapping" />
            <Name select="@id" />
            <Revision latest="true" select="@status" valueMapper="status-mapping"/>
        </IdentityMatch>

        <CreateValues>  (6)
            <Revision firstInSequence="true" />
            <Policy fallbackValue="policy_ECPart" />
            <State select="@status" valueMapper="status-mapping" />
            <Vault fallbackValue="vault_eServiceProduction" />
            <Owner fallbackValue="tiftest" />
            <Originated select="@created" dateFormat="iso-date" />
        </CreateValues>

        <UpdateValues useForCreate="true"> (7)
            <Attribute name="attribute_Weight" select="@weight" />
            <RDO select="@rdo" />
        </UpdateValues>

        <Connections>
            <Connection relationship="relationship_EBOM" select="Item" disconnectExisting="true"> (8)
                <IdentityMatch>
                    <Relationship>
                        <Attribute name="attribute_FindNumber" select="@pos"/>
                    </Relationship>
                </IdentityMatch>
                <UpdateValues>
                    <Attribute name="attribute_Quantity" select="@qty" />
                </UpdateValues>
            </Connection>
        </Connections>
    </Config>
</CreateConfiguration>| 1 | Defines the XPath specifying where to start processing data from the incoming payload. |
| 2 | Here we illustrate how to translate values using an external file. |
| 3 | Same as above. Use a property file for value lookup. |
| 4 | The entry point xpath will match on Item elements, and this configuration specifies the logic to apply on such element |
| 5 | The identity match defines how we map to an object inside the ENOVIA database |
| 6 | If we were not able to map the object, we use the create values to instruct how to create the Item. |
| 7 | The update values section is used when updating the object (but can also be configured to be applied also when creating the object) |
| 8 | The Connection specifies the kind of relationship (among others), and how to identify a relationship from the inbound data with a relationship within the ENOVIA DB. Note that the Item configuration will be applied recursively in this case for any child Item. |
We also used an external properties file for value lookup. This file is defined as:
${TIF_ROOT}/modules/enovia/cfg/lookup/sap-key-values.properties
type.sap-material = Part
type.something-else = Something Else Part

state.Released = Release
state.Obsoleted = Obsolete
5. The End Point
The integration will be invoked via HTTP/REST, hence we need to setup a REST service.
${TIF_ROOT}/modules/enovia/cfg/restservice/EBOM.xml
<Rest>
    <DisplayName>EBOM Create/Update Service</DisplayName> (1)
    <ServiceName>ebom</ServiceName> (2)
    <Credentials containerManaged="true" /> (3)
    <Create config="EBOM.xml" /> (4)
</Rest>| 1 | This is a friendly name that will be used in the Admin UI |
| 2 | The service name maps to the URL. E.g. this service will be triggered via http://tifserver/enovia/jaxrs/service/ebom |
| 3 | The credentials defines that this service requires authentication against ENOVIA. Please read this document for more information. |
| 4 | Point out the Create/Update configuration to be used. |
6. Testing the Service
One way to test the service is to use for example the "Postman" tool available as a Chrome plugin.
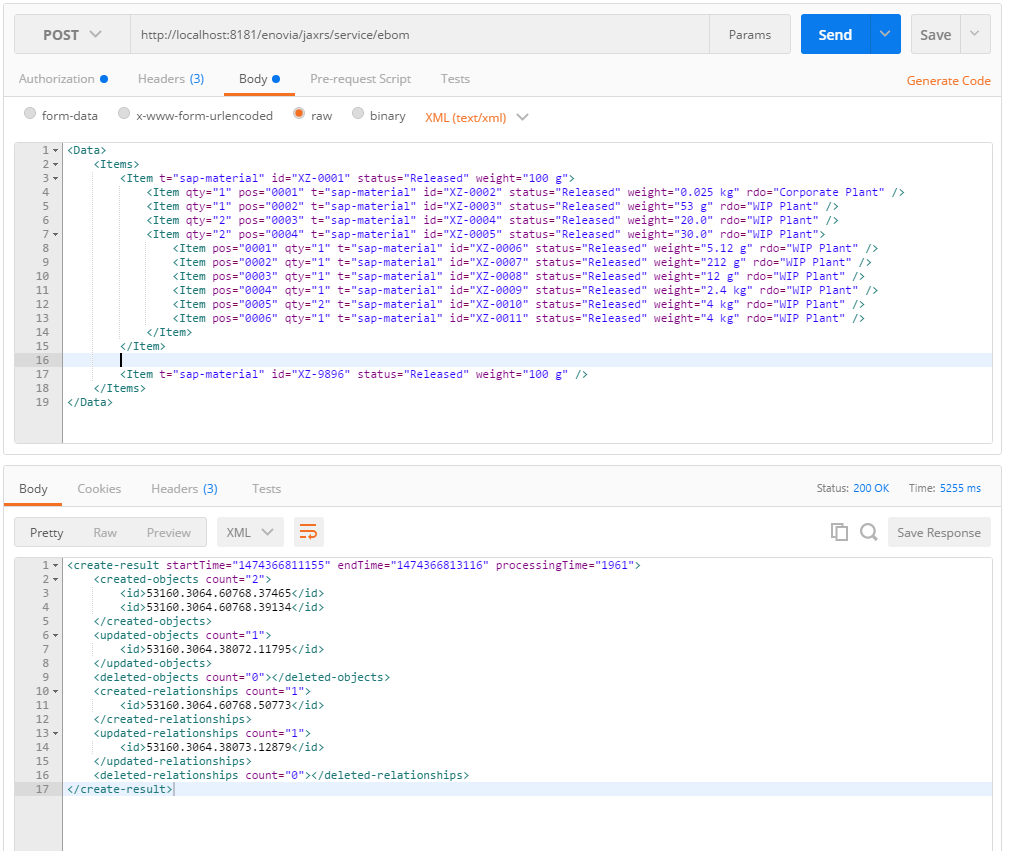
Figure 3. Postman in Action