Tutorial - Create / Update Object
19 September 2016
1. Goals
The goal with this tutorial is to understand the create/update integration and create/update Part’s in ENOVIA™.
The create/update integration can be used for either create or update of a single object, multiple objects or structures.
In this tutorial the use case is to set up an integration that will receive messages via a JMS queue, and based upon the content of the message trigger a create/update configuration to either create or update a single Part object.
2. Use Case Flow
The image below illustrates the flow.
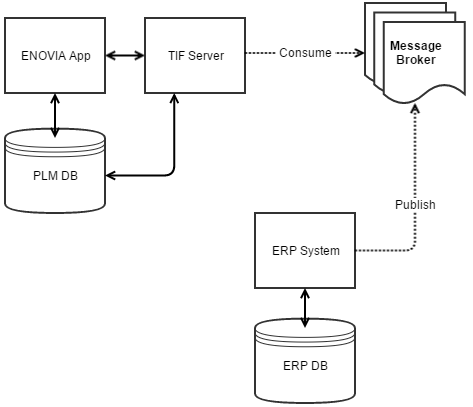
Figure 2. Create/Update data in ENOVIA from External System
-
Users creates data in an external system, for example an ERP system.
-
The ERP system uses JMS/messaging to expose data into "other" system (for example PLM)
-
TIF is used for consuming the JMS messages and run create/update integration in order to synchronize the data with ENOVIA
3. First, the Data Format
The remote system will publish data that follows this format:
<part>
    <id>...</id>
    <name>...</name>
    <description>...</description>
    <status>...</status>
    <unit-of-measure>...</unit-of-measure>
    <last-modified>...</last-modified>
    <created>...</created>
</part>
4. The Create/Update Configuration
On the TIF server we need to create our create/update configuration that defines how to create/update the object(s) in ENOVIA.
Based upon the input format, we create this configuration.
In our case, the configuration will look like this:
${TIF_ROOT}/modules/enovia/cfg/createconfig/Part_from_ERP.xml
<CreateConfiguration
    historyOff="true"
    triggerOff="true"
    runPrivileged="true"
    dateFormat="yyyy-MM-dd HH:mm:ss.SSS"> (1)

    <EntryPoint select="/part" /> (2)

    <ValueMapper id="stateMapping"> (3)
        <If is="New" caseSensitive="false">Preliminary</If>
        <If is="Released" caseSensitive="false">Release</If>
    </ValueMapper>

    <Config match="part"> (4)
        <IdentityMatch>
            <Type fallbackValue="type_Part" />
            <Name select="id/text()" />
            <Revision latestInState="true" select="status/text()" valueMapper="stateMapping"/> (5)
        </IdentityMatch>
        <CreateValues>
            <Revision firstInSequence="true" />
            <Vault fallbackValue="vault_eServiceProduction"/>
            <Policy fallbackValue="policy_ECPart" />
        </CreateValues>
        <UpdateValues useForCreate="true">
            <Originated select="created/text()" />
            <Modified select="last-modified/text()" />
            <State select="status/text()" valueMapper="stateMapping" />
            <Description select="description/text()" />
            <Attribute name="attribute_UnitofMeasure" value="unit-of-measure/text()" />
        </UpdateValues>
    </Config>
</CreateConfiguration>| 1 | This is the default date format our ERP system uses for representation of date values |
| 2 | We will start processing the data from this XPath expression |
| 3 | Data values are not equal among these systems, so here we use a simple translation mapping. Note that you can use properties files etc for the mapping also. |
| 4 | We provide configuration rules for the "part" element. E.g. we need to be able to identify the object in ENOVIA, and if not found, we need to provide creation values specific for ENOVIA. |
| 5 | Special mapping to find the latest revision of an object in a particular State. |
That’s it. We will only create or update single objects with this configuration, no related objects or structures.
5. The JMS Details
Since we will get the data via JMS messages, we need to setup the JMS connection details on the TIF server.
We start with the destinations.xml file:
${TIF_ROOT}/etc/destinations.xml
<Destinations>
    <JMS id="part-from-erp" (1)
         initialContextFactory="org.apache.activemq.jndi.ActiveMQInitialContextFactory"
         providerURL="tcp://172.16.16.210:61616">
        <Queue name="updated_parts" jndiKey="queue.%s"/> (2)
    </JMS>
</Destinations>| 1 | This is the identifier that we associate this endpoint with |
| 2 | Here we specify the queue name that we will bind to. |
6. Bind JMS with our Create/Update Configuration
As a last thing, we must now configure a JMS listener that will receive the data and trigger the create/update configuration.
To do so, we need to edit the file ${TIF_ROOT}/modules/enovia/etc/module.custom.properties and
add the JMS listener configuration in there.
${TIF_ROOT}/modules/enovia/etc/module.custom.properties
jmsListener.Part_from_ERP.enabled = true
jmsListener.Part_from_ERP.destination = part-from-erp
jmsListener.Part_from_ERP.name = Create/Update Part from ERP
jmsListener.Part_from_ERP.type = CreateUpdateIntegration
jmsListener.Part_from_ERP.configuration = tvc:createconfig/Part_from_ERP.xml (1)
jmsListener.Part_from_ERP.payloadconfig = tvc:payload/Part_from_ERP_Response.xml (2)| 1 | Point out the configuration we made earlier |
| 2 | Here we point an optional configuration that we use for creation of the response message. See below for an example. |
| When TIF is started up, it will automatically create a JMS listener that connects to the JMS broker and starts listening for new messages according to the configuration above. |
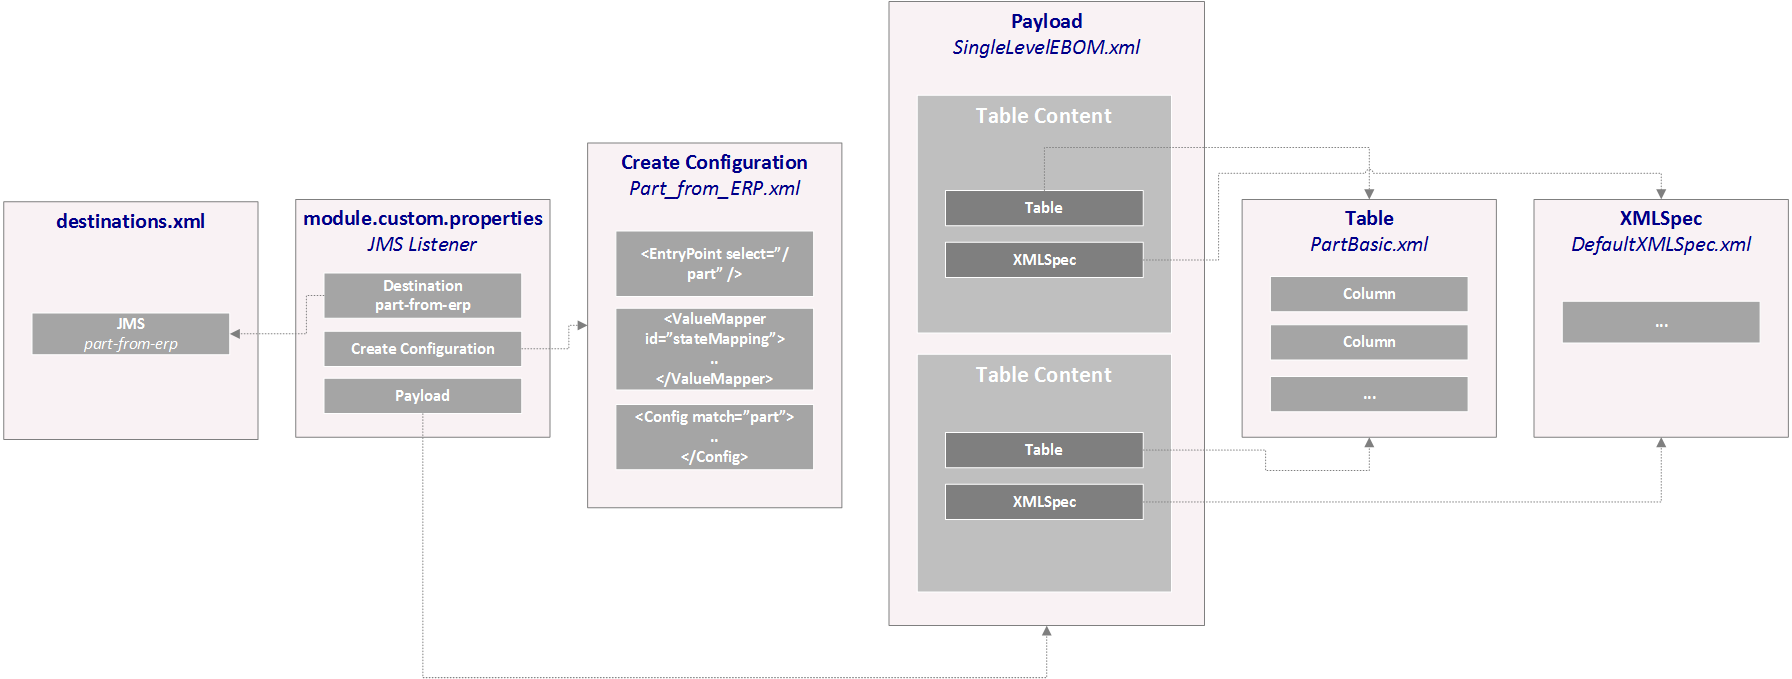
Below, the payload configuration that generates the response data.
${TIF_ROOT}/modules/enovia/cfg/payload/Part_from_ERP_Response.xml
<Payload rootElement="Response">

    <TableContent objectIdParam="createdObjectIds" outerElement="CreatedObjects"> (1)
        <Table>tvc:table/PartBasic.xml</Table>
        <XMLSpec config="DefaultXMLSpec.xml" />
    </TableContent>

    <TableContent objectIdParam="updatedObjectIds" outerElement="UpdatedObjects"> (2)
        <Table>tvc:table/PartBasic.xml</Table>
        <XMLSpec config="DefaultXMLSpec.xml" />
    </TableContent>
</Payload>| 1 | This fraction generates information about created objects |
| 2 | Here we generate information about updated objects |
7. Admin UI
Looking into the Admin UI, you can find the Job and you will see something similar to
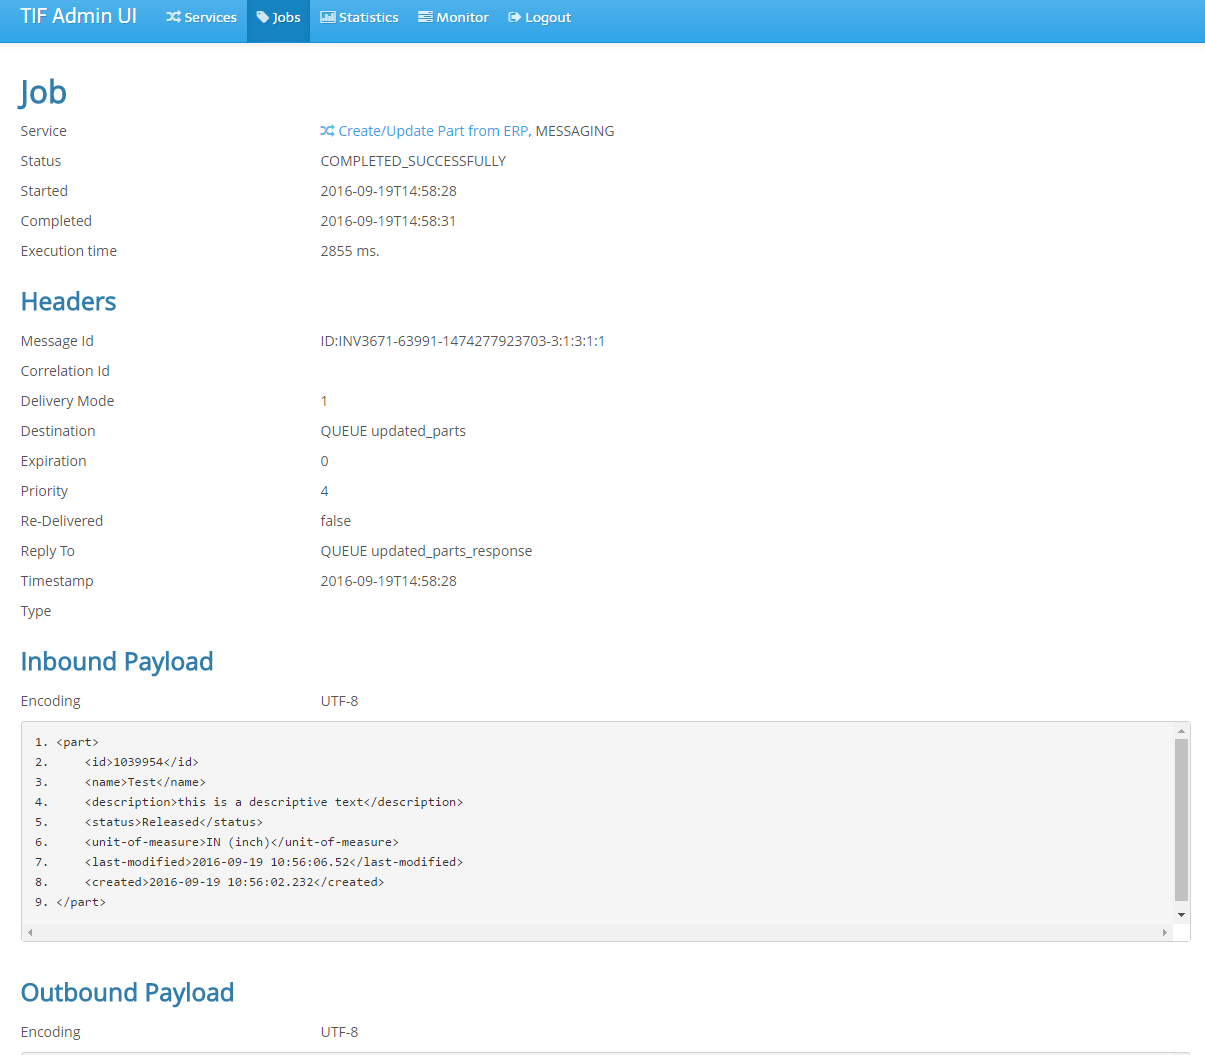
Figure 3. Admin UI