requiresInputObject
TIF ENOVIA Connector - Configurable Integrations
28 August 2016
Table of Contents
- 1. Create / Update Integration
- 1.1. Contextual or Non-Contextual
- 1.2. Configuration File
- 1.3. Input Formats
- 1.4. Entry Point
- 1.5. Config
- 1.6. IdentityMatch
- 1.7. CreateValues
- 1.8. UpdateValues
- 1.9. CustomField
- 1.10. Connections
- 1.11. EmbeddedFiles
- 1.12. ValueMapper
- 1.13. Namespaces
- 1.14. Revising
- 1.15. Example Configuration
- 1.16. Trigger a Create/Update Integration via REST
- 1.17. Trigger a Create/Update Integration via JMS
- 1.18. Trigger a Create/Update Integration via File
- 1.19. Extension Points
- 1.20. Debugging
1. Create / Update Integration
The create and/or update integration allows you to setup use cases, which will enable support for
-
Create or Update a single object
-
Create or Update multiple objects
-
Create or Update objects and relationships connected in a single or multi level fashion
The integration does not require a certain format of the incoming payload (the incoming data), instead it is via the create/update configuration you specify how the data is formatted and what actions that should be taken.
The create/update configuration is defined in an XML file, which should be stored
within a folder called "createconfig" below ${TIF_ROOT}/modules/enovia/cfg.
| You need to have some basic knowledge in XPath expressions, in order to understand how to write your configurations to match/map to the incoming payload data. |
1.1. Contextual or Non-Contextual
The create/update configuration can operate in two different modes depending on the use case, e.g. contextual and non-contextual. Contextual means that the integration runs in the context of a certain business-object, while in the other case it is the incoming payload that contains all information.
1.2. Configuration File
The create/update configuration contains on a high level:
-
Format of incoming data
-
Instructions from where in the incoming data to start the processing. This is done via
<EntryPoint>definitions. -
Rules depending on what data that has been matched. This is done via
<Config>definitions.
The root element within a create/update configuration is <CreateConfiguration>,
and this element supports the following attributes:
| Attribute | Description | Type | Default |
|---|---|---|---|
Whether or not to run the integration in contextual mode or not. |
Boolean |
False |
|
runPrivileged |
Can be used to enforce running the integration as a super-user. This may be useful in situations where the current user do not have sufficient privileges to perform certain changes in the database. |
Booolean |
False |
historyOff |
May be used to turn off history logging while running the integration. |
Booolean |
False |
triggerOff |
May be used to turn off triggers while running the integration. |
Booolean |
False |
maxLevels |
May be used to restrict the integration to process structures deeper than this value. No restrictions are defined by default. |
Integer |
-1 |
txType |
The transaction type to be used while running the integration. Possible values are
|
String |
update |
dateFormat |
The default date format to be used when parsing date values from the incoming data. The value should either be a valid date pattern string, or one of the following pre-defined values:
|
String |
iso-date-time |
xpathFactory |
Define a custom XPathFactory to be used.
Either you point out a class using its fully qualified name, or use the short names
|
String |
Default is |
listener |
Name of class implementing
May be used to listen to event’s occurring during the integration execution |
String |
The allowed child elements are:
| Child Element | Cardinality | Required | Description |
|---|---|---|---|
|
0 or 1 |
No |
May be used to handle more complex input formats, for example ZIP input |
|
1+ |
Yes |
Defines entry points, e.g. where to look for the starting point within the incoming payload. |
|
1+ |
Yes |
Defines the create/update rules for a given kind of element. |
|
0+ |
No |
May be used to define different kind of translations of incoming values to ENOVIA™ understandable values. |
|
0 or 1 |
No |
May be used to point out an XML Schema to be used for validation of the incoming payload. |
|
0 or 1 |
No |
Configure the namespace context while evaluating XPath expressions during the processing. |
1.3. Input Formats
With the <InputFormats> element you can specify what kind of format the incoming
data should have. By default, if this is not specified, the incoming data is
assumed to be an XML file processed as-is.
If you omit the <InputFormats> element, we assume that the data passed
in to the create/update integration is XML data.
|
The following input formats are supported:
- Default
-
XML, which is handled as-is without any conversion
- XML
-
XML that is converted to another XML format using an XSLT stylesheet.
- JSON
-
JSON data that is converted automatically to XML
- CSV
-
Comma separated values. Automatically converted to XML.
- Zip
-
ZIP file containing the data
Allowed child elements are:
| Child Element | Supported Attributes | Description |
|---|---|---|
|
- |
Used to process ZIP input files. ZIP files may contain both meta-data and additional files, which for example may be checked-in to objects being created and/or updated during the process. |
|
|
Used for conversion of CSV data into XML for further processing |
|
|
Used for converting XML data into another XML format for further processing |
|
|
Used for converting JSON data into XML. |
|
- |
E.g. just use the default input, assumed to be XML without need for further conversion. |
1.3.1. ZIP Input
A ZIP file contains multiple files, and you need to specify what files within the ZIP archive that contains the data that should be processed by the create / update integration engine. You can either point out a single file by its path/name or use globbing pattern to match multiple files.
Exampe 1, ZIP format and starting point is the data.xml file in the root of the ZIP archive.
<InputFormats>
    <Zip>
        <InputFiles>data.xml</InputFiles>
    </Zip>
</InputFormats>
Note that if the data you are processing is in a different format, you need to transform it to XML. Supported transformers are CSV, XML and JSON.
Exampe 2, ZIP format and starting point are the files matching the pattern data/*.csv.
<InputFormats>
    <Zip>
        <InputFiles>data/*.csv</InputFiles>
        <Transformer> (1)
            <CSV charset="UTF-8" separator="," includesHeader="true" />
        </Transformer>
    </Zip>
</InputFormats>| 1 | For CSV data, we need to transform it to XML. |
1.3.2. JSON to XML
JSON data is converted to XML as shown in the examples below:
| JSON | XML |
|---|---|
|
|
|
|
| 1 | Any occcurence of invalid XML name character is removed when transforming a JSON property name into an XML element name. E.g. the space is being removed. |
| 2 | In this case, the whole name was invalid - hence we use the fallback element name. |
1.3.3. CSV to XML
CSV is fairly easy to transform into XML. Each row in the CSV data is mapped to a
<row> element and each field is contained in a <field> element.
See below for an example how the CSV data is converted to XML
Input data in CSV format
Part,A-0001,B,Release,45 g
Part,A-0002,C,Release,94 g
Results in this XML
<data>
  <row>
      <field>Part</field>
      <field>A-0001</field>
      <field>B</field>
      <field>Release</field>
      <field>45 g</field>
  </row>
  <row>
      <field>Part</field>
      <field>A-0002</field>
      <field>C</field>
      <field>Release</field>
      <field>94 g</field>
  </row>
</data>
1.4. Entry Point
Depending on if you run in contextual mode or not (by using the requiresInputObject attribute), you need to use the EntryPoint element in two different ways.
Lets start with the non-contextual mode, in this mode you only need to specify the select attribute and optionally the mode attribute. The select attribute specifies an XPath expression, which will select an element or a list of elements from the incoming payload. Below are some examples
<EntryPoint /> (1)
<EntryPoint select="/" /> (2)
<EntryPoint select="/Data/Items/Item" /> (3)| 1 | Implicitly selects the first level elements below the root element of the incoming payload. |
| 2 | Selects the root element of the incoming payload |
| 3 | Selects the elements (or element) matching the given XPath |
The optional mode attribute may be used to process the matched elements in a particular mode. We will discuss the mode attribute more further in the document.
Example:
<EntryPoint select="/Data/Items/Item" mode="root" />Alternative 2, when processing in contextual mode: In this case, you will not use the select nor the mode attributes. Instead, you will use one or more child elements below the EntryPoint element called ContextObject, which defines for what context object it is valid for and how the context object is connected to the incoming payload. Example:
<EntryPoint>
    <ContextObject match="type.kindOf[Part] AND current == 'Release'"> (1)
        <Connections>
            <Connection relationship="relationship_EBOM" select="/Data/BOM/rows" /> (2)
        </Connections>
    </ContextObject>
    <ContextObject match="type.kindOf[Product]'"> (3)
        ...
    </ContextObject>
    <ContextObject> (4)
        ...
    </ContextObject>
    ...
</EntryPoint>| 1 | Configuration used when context object matches the ENOVIA expression, e.g. for released Part’s. |
| 2 | Connection configuration (See later section for more details). Specifies for different kind of relationship(s) how to connect the context object with the incoming data. The select attribute defines an XPath expression that maps to data that represents objects that should be connected with this relationship. NOTE: You may have multiple Connection elements. |
| 3 | Configuration used when context object is of type Product. |
| 4 | Fallback configuration, which matches any context object. |
|
The match attribute must be a valid ENOVIA™ expression, which is evaluated against the database by TIF. You can test your expressions via MQL by using the following syntax. |
If you omit the match attribute, it implies that it will be valid for any kind of object.
However, the order a <ContextObject> definition is being resolved, is that the first one that matches will be used.
If none matched, but there is a configuration with an empty (or missing) match attribute,
that configuration will be used.
1.5. Config
The Config element describes what to actually do with the incoming data. A single Config definition is mapped to operate against a certain element (or elements) from the incoming payload.
This matching is done via the name of the current element that has been selected either via the EntryPoint or via a Connection
Below are some examples of such mapping.
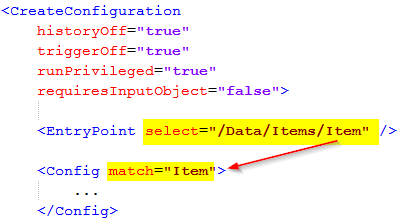
Figure 1. Basic mapping between EntryPoint and Config
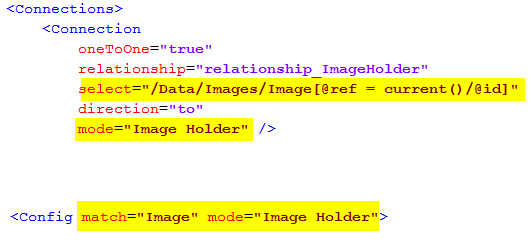
Figure 2. Mapping from Connection to Config using both select and mode
E.g. the select attribute on either the <EntryPoint> or <Connection> elements
consists of an XPath expression that is evaluated from the current position of the
incoming payload. The matched elements are then mapped to a certain <Config> element,
which contains instructions on how to handle the data.
| The mode attribute may be used to allow processing of an element using different configurations, depending on the current processing mode. |
The allowed attributes on the <Config> element are:
| Attribute | Description | Type | Default |
|---|---|---|---|
match |
Defines the name of the XML element from the incoming payload, which this config is valid for. |
String |
|
mode |
An optional value that defines the mode, which this config is valid for |
String |
The allowed child elements are:
| Child Element | Cardinality | Required | Description |
|---|---|---|---|
|
0 or 1 |
No |
Defines what to do, if the object the current element in the incoming payload represents exists in the ENOVIA™ database. Possible values are:
|
|
0 or 1 |
No |
Defines behavior when the current element in the incoming payload does not map to an object inside the ENOVIA™ database. Possible values are:
|
|
1 |
Yes |
Defines how to find the object inside the ENOVIA™ database based upon the incoming values. |
|
0 or 1 |
No |
Defines how to create the object inside the ENOVIA™ database based upon the incoming values. |
|
0 or 1 |
No |
Defines how to update the object inside the ENOVIA™ database based upon the incoming values. |
|
0 or 1 |
No |
Specifies optional connections that should be created or updated. |
|
0 or 1 |
No |
May be used to configure how to deal with file content that has been embedded within the incoming data. |
The logic follows this flow:
-
The rules inside the
<IdentityMatch>defines how to obtain values required for identifying the object inside the ENOVIA™ database. -
If no object could be mapped AND the
<CreateValues>section has been defined, TIF will try to create the object based upon the values given. Note that in the case for create, values defined within the<IdentityMatch>but not in the<CreateValues>section will be part of the create operation. -
If ONE object were found, TIF will if BOTH
<IfFound>is set to update and the<UpdateValues>has been defined, try to update the object inside the database. -
If more than one object were found, an exception will be raised and the processing will abort.
-
If
<IfNotFound>is set to revise, special revisioning rules are applied. See this chapter for more details.
1.6. IdentityMatch
The purpose of the <IdentityMatch> element is to define values used to identify
the object in ENOVIA.
The child elements are used to identify data that maps to certain fields inside ENOVIA. You may combine the elements as needed/required depending on the use-case.
Note that there are some common attributes shared by all child elements (except the CustomField).
- select
-
String, defines an XPath expression that is used to select the value from the incoming payload data.
- selectReturnType
-
String, May be used to declare a custom return type from the select expression. Particular if you are using xpath functions, this needs to be defined. Allowed values are: NODE, NODESET, STRING, NUMBER and BOOLEAN.
- fallbackValue
-
String, defines a fallback value to be used. May be used if you don’t expect the value to be present within the incoming payload data.
- valueMapper
-
String, defines an optional value-mapper definition, which is used to lookup the value against.
- resolveValue
-
Boolean, default is true for Type, Policy and Vault values. Defines if to treat value as a symbolic name, e.g. is to resolve it.
- allowEmptyValue
-
Boolean, default is false except for attribute fields and the description field. Defines if to allow empty values.
The table below shows the possible child elements and its additional attributes that may be of interest to use in the context of identity matching.
| Child Element | Valid Attributes in context of Identity Match | Notes |
|---|---|---|
|
|
|
|
|
|
|
Note: The attribute latest and last are used in conjunction to each other. If no revision in the given state was found, you can fallback to last revision. If this behavior is unwanted, set the last attribute to false. |
|
|
- |
|
|
- |
|
|
- |
|
|
|
|
|
- |
|
|
- |
|
|
- |
|
|
|
|
|
- |
No other fields are allowed in identity match. |
|
- |
No other fields are allowed in identity match. |
|
Up to implementation |
Below follows some examples how to construct an Identify Matching.
Example 1:
<Config match="Part">
  <IdentityMatch>
      <Type fallbackValue="Part"/>
      <Name select="@n" />
      <Revision select="@rev" />
  </IdentityMatch>
</Config>
This would work on data that is structured like this
<Part n="A-000101221" rev="C">
    ...
</Part>
Example 2:
<Config match="Part">
  <IdentityMatch>
      <Type select="Type/text()"/>
      <Name select="Name/text()" />
      <Revision latest="true" select="State/text()" />
  </IdentityMatch>
</Config>
This would work on data that is structured like this
<Part>
  <Type>Hardware Part</Type>
  <Name>A-000101221</Name>
  <State>Release</State>
  ...
</Part>
Example 3:
<Config match="Something">
  <IdentityMatch>
      <Attribute name="attribute_UUID" select="@uuid" />
  </IdentityMatch>
</Config>
This would work on data that is structured like this
<Something uuid="8a9616bc-ae81-4532-87f3-214993789016">
  ...
</Something>
1.7. CreateValues
The purpose of the <CreateValues> element is to define values used when creating
objects inside the ENOVIA™ database.
The child elements are used to identify data that maps to certain fields inside ENOVIA. You may combine the elements as needed/required depending on the use-case.
Fields defined within the <IdentityMatch> section will automatically be part
of the <CreateValues> unless they are overridden in the <CreateValues> section.
|
Note that there are some common attributes shared by all child elements (except the CustomField).
- select
-
String, defines an XPath expression that is used to select the value from the incoming payload data.
- selectReturnType
-
String, May be used to declare a custom return type from the select expression. Particular if you are using xpath functions, this needs to be defined. Allowed values are: NODE, NODESET, STRING, NUMBER and BOOLEAN.
- fallbackValue
-
String, defines a fallback value to be used. May be used if you don’t expect the value to be present within the incoming payload data.
- valueMapper
-
String, defines an optional value-mapper definition, which is used to lookup the value against.
- resolveValue
-
Boolean, default is true for Type, Policy and Vault values. Defines if to treat value as a symbolic name, e.g. is to resolve it.
- allowEmptyValue
-
Boolean, default is false except for attribute fields and the description field. Defines if to allow empty values.
| Child Element | Valid Attributes in context of Create |
|---|---|
|
- |
|
|
|
|
|
|
|
- |
|
- |
|
|
|
- |
|
- |
|
- |
|
|
|
|
|
|
|
|
|
Up to implementation |
Below are some examples how to construct a create value section.
Example 1:
<Config match="Part">

  <IdentityMatch> (1)
    <Type select="@t" valueMapper="type-mapping" />
    <Name select="@n" />
    <Revision latest="true" fallbackValue="Release" />
  </IdentityMatch>

  <CreateValues> (2)
    <Revision firstInSequence="true" />
    <State fallbackValue="Release" />
    <Policy fallbackValue="policy_ECPart" />
    <Owner fallbackValue="tiftest" />
    <Originated select="@created" dateFormat="iso-date" />
    <Vault fallbackValue="vault_eServiceProduction" />
  </CreateValues>

</Config>| 1 | Values set here but not in the <CreateValues> section are also part of
the create operation. In this case, the Revision field is the only overridden field. |
| 2 | Defines the necessary values to create the object. In this example static/fallback values are used heavily. |
1.8. UpdateValues
The purpose of the <UpdateValues> element is to define values used when updating
objects inside the ENOVIA™ database.
The child elements are used to identify data that maps to certain fields inside ENOVIA. You may combine the elements as needed/required depending on the use-case.
Note that there are some common attributes shared by all child elements (except the CustomField).
- select
-
String, defines an XPath expression that is used to select the value from the incoming payload data.
- selectReturnType
-
String, May be used to declare a custom return type from the select expression. Particular if you are using xpath functions, this needs to be defined. Allowed values are: NODE, NODESET, STRING, NUMBER and BOOLEAN.
- fallbackValue
-
String, defines a fallback value to be used. May be used if you don’t expect the value to be present within the incoming payload data.
- valueMapper
-
String, defines an optional value-mapper definition, which is used to lookup the value against.
- resolveValue
-
Boolean, default is true for Type, Policy and Vault values. Defines if to treat value as a symbolic name, e.g. is to resolve it.
- allowEmptyValue
-
Boolean, default is false except for attribute fields and the description field. Defines if to allow empty values.
| Child Element | Valid Attributes in context of Create |
|---|---|
|
- |
|
- |
|
|
|
- |
|
- |
|
- |
|
|
|
|
|
|
|
|
|
Up to implementation |
Below are some examples how to construct an update value section.
Example 1:
<Config match="Part">

  ....

  <UpdateValues>
    <Attribute name="attribute_Weight" select="@weight" />
    <Attribute name="attribute_UnitOfMeasure" select="@uom" />
    <Attribute name="attribute_SparePart" select="@sparePart" />
    <Modified select="@modified" dateFormat="iso" />
  </UpdateValues>

</Config>
If you don’t want to set the same values during create as in the update case,
set the attribute useForCreate="false" on the <UpdateValues> element.
|
1.9. CustomField
As seen in previous chapters related to the elements <IdentityMatch>, <CreateValues>
and <UpdateValues>, an element called <CustomField> has been mentioned.
This field may be used to handle more complex data. To use it, you use the following syntax:
<CustomField className="com.acme.SomeClass" />This class must implement the interface com.technia.tif.enovia.integration.create.def.Field.
1.10. Connections
You may use the create/update integration to create and/or update connections within the ENOVIA™ database.
The <Connections> element is valid to use either within a <Config> section or
within the <EntryPoint> section in case you run the integration within a context object.
The <Connections> element is just a place holder for one or more <Connection>
elements.
The <Connection> element supports the following attributes
| Attribute | Required | Description | Type | Default |
|---|---|---|---|---|
select |
Yes |
Defines an XPath expression that is used to select the "children" from the incoming payload |
String |
|
mode |
No |
Defines what mode to process the child nodes within (This relates to what |
String |
|
relationship |
Yes |
Defines the name of the ENOVIA relationship to be used (symbolic names are allowed) |
String |
|
direction |
No |
Default is FROM, may be used to switch direction to TO |
from or to |
from |
typePattern |
No |
Optional type pattern (comma separated list of type names) to be used when expanding data in ENOVIA and matching with incoming payload |
String |
|
objectWhere |
No |
Optional where clause to apply on objects used when expanding data in ENOVIA and matching with incoming payload |
String |
|
relationshipWhere |
No |
Optional where clause to apply on relationships used when expanding the data in ENOVIA and matching within incoming payload |
String |
|
disconnectExisting |
No |
A flag to indicate whether or not to disconnect existing relationships, that NOT is mapped to the incoming payload |
Boolean |
False |
oneToOne |
No |
A special attribute that can be used to indicated that the connection will always either have none or one object connected |
Boolean |
False |
The allowed child elements are:
| Child Element | Cardinality | Required | Description |
|---|---|---|---|
|
0 or 1 |
Yes, unless the special attribute oneToOne has been set to true |
Defines how to map the incoming data into a particular relationship inside ENOVIA. See below how to construct an identity matching for relationships |
|
0 or 1 |
No |
Defines how to create the relationship inside the ENOVIA™ database based upon the incoming values. |
|
0 or 1 |
No |
Defines how to update the relationship inside the ENOVIA™ database based upon the incoming values. |
The identity matching for relationships are constructed by defining a combination of values, where each value either is related to the object or from the relationship itself.
Example 1:
<Connection ...>
  <IdentityMatch>
    <Relationship>
      <Attribute name="attribute_FindNumber" select="@findNumber" />
    </Relationship>
    <Object>
      <Name select="@identifier" />
    </Object>
  </IdentityMatch>
</Connection>
This would construct an identity matcher, which will map the attribute findNumber from the incoming data to the "Find Number" attribute-value of the relationship in the database combined with the name on the related object mapped to the attribute identifier.
You may use either or both values from the relationship or the related object, in order to conduct the identity matching.
Allowed children of the <IdentityMatch>/<Relationship> element:
| Child Element | Description |
|---|---|
|
Maps to the relationship type |
|
Attribute from the relationship |
|
Ownership |
|
Ownership (altowner1) |
|
Ownership (altowner2) |
|
Modified date |
|
Originated date |
|
Custom field mapping |
Allowed children of the <IdentityMatch>/<Object> element:
| Child Element | Description |
|---|---|
|
Maps to object type |
|
Maps to object name |
|
Maps to object revision |
|
Maps to object policy |
|
Maps to object vault |
|
Maps to object state |
|
Maps to object description |
|
Maps to object owner |
|
Maps to object alt-owner1 |
|
Maps to object alt-owner2 |
|
Maps to object modified |
|
Maps to object originated |
|
Maps to object attribute |
|
Custom field mapping |
For the child elements <CreateValues> and <UpdateValues>, see previous chapters.
1.11. EmbeddedFiles
With the <EmbeddedFiles> element you can deal with files that is part of the payload.
The files may either be part of the payload itself, e.g embedded in the XML data,
or part of the ZIP file being used for processing the create/update use-case.
Three modes exists:
-
Files embedded directly in the payload, typically base-64 encoded file content
-
Files part of the ZIP file, and the payload refernces or uses files from it
-
Files part of the ZIP file, but no direct reference to the files from the payload, instead the files are mapped using a file-mapper.
It is not recommended to embed too many files within the incoming payload for performance reasons, choose instead to use a ZIP file when the amount of files are large or the size of the files are large.
The <EmbeddedFiles> element is just a container for one or more <File> elements.
The <File> elements supports these common attributes:
| Attribute | Description | Type | Default |
|---|---|---|---|
select |
Defines an XPath expression, used to obtain the element(s) representing the file content. |
String |
. |
cdm |
Defines if to use CDM mode or not. Default is to autodetect this. Possible values are:
|
String |
auto |
reuseVersion |
In case of CDM mode, this attribute can be used to enforce creation of new version |
Boolean |
False |
appendFile |
If to append the file |
Boolean |
True |
unlock |
If to unlock object |
Boolean |
True |
multiple |
May be used to specify if multiple files are expected from the incoming payload |
Boolean |
True |
nameSelect |
An XPath expression to be used to select the name of the file from the current element |
String |
|
nameSelectReturnType |
Allowed values are: NODE, NODESET, STRING, NUMBER and BOOLEAN. |
String |
NODE |
nameFallback |
A static value for the file-name, may only be used IF the multiple attribute has been set to FALSE |
String |
|
formatSelect |
An XPath expression used to select the format of the file |
String |
|
formatSelectReturnType |
Allowed values are: NODE, NODESET, STRING, NUMBER and BOOLEAN. |
String |
NODE |
formatFallback |
A static value for the format to be used |
String |
1.11.1. Embedding Files
To use embedded files mode, one need some additional attributes
| Attribute | Description | Type | Default |
|---|---|---|---|
contentSelect |
An XPath expression used to select the content of the file |
String |
|
contentEncoding |
The encoding used when converting the encoded string into bytes |
String |
UTF-8 |
encoding |
Specifies in what encoding format the content is encoded in. Currently only base64 is allowed/supported |
String |
base64 |
Lets look into an example how this could be utilized.
Example of incoming data, which would map to an objects image holder (note that the content has been cropped to reduce space). File content is embedded within the source XML data.
Incoming XML data
<Data>
    <Items>
        <Item id="fa-fe-2c-2d" t="Part" n="XZ-0001" rev="A" w="100 g">
            ...
        </Item>
    </Items>

    <Images>
        <Image ref="fa-fe-2c-2d">
            <Content format="mxImage" name="image.png">iVBORw0KGgoAAAANSUhEUgAAAQoAAAFmCAMAAACiIyTaAAABv1BMVEU...
The essential parts of the create/update configuration
<Config match="Item">
  ...
  <Connections>
      <Connection
          oneToOne="true"
          relationship="relationship_ImageHolder"
          direction="to"
          select="/Data/Images/Image[@ref = current()/@id]" (1)
          mode="Image Holder" />

<Config match="Image" mode="Image Holder"> (2)
    <CreateValues>
        <Type fallbackValue="type_ImageHolder" />
        <Name useSystemTime="true" prefix="auto_"/>
        <Revision fallbackValue="" />
        <Policy useFirst="true" />
        <Vault fallbackValue="vault_eServiceProduction" />
    </CreateValues>
    <EmbeddedFiles>
        <File (3)
            cdm="false"
            multiple="true"
            append="true"
            encoding="base64"

            select="Content"
            nameSelect="@name"

            formatSelect="@format"
            formatFallback="generic"
            contentSelect="text()" />
    </EmbeddedFiles>
</Config>| 1 | Connection defined for Item, used to create the image holder |
| 2 | Configuration for creation / updating of the Image Holder |
| 3 | File element that instructs how to find the files to be checked in. |
1.11.2. Referencing Files in ZIP from Payload
To use the file reference mode, one need some additional attributes
| Attribute | Description | Type | Default |
|---|---|---|---|
fileRefSelect |
Depends on input format. For example if you use ZIP input format, your data may refer to a file within the ZIP archive and this attribute specifies the XPath expression that would select the file reference name. The name is then used when querying the Content Handler for the used Input Format. |
String |
|
fileRefPrefix |
Can be used to prepend some path prefix to the selected value |
String |
|
fileRefSuffix |
Can be used to append some path suffix to the selected value |
String |
Example:
Incoming XML data
<Data>
    <Images>
        <Image name="..." rev="...">
          <File fileName="image1.png" format="Large"/>
          <File fileName="image2.png" format="Medium"/>
The essential parts of the create/update configuration
<Config match="Image">
    ...
    <EmbeddedFiles>
        <File
            cdm="false"
            multiple="true"
            append="true"

            fileRefSelect="File"
            fileRefPrefix="files/"
            nameSelect="@fileName"
            formatSelect="@format" />
    </EmbeddedFiles>
</Config>
During processing, the file handler will then look for the following files in the incoming ZIP data:
-
files/image1.png
-
files/image2.png
1.11.3. Mapping Files from ZIP
If the payload itself does not point out the files, one may map files from the ZIP data instead.
To use this mode you need to set the useFileMapper attribute on the <File> element to true.
<File useFileMapper="true" ...>
When this mode is defined, you need to specify some additional mapping rules as child elements.
| Child Element | Description | Required |
|---|---|---|
|
Defines mapping rules, e.g. where to look for files in the incoming ZIP file in context of the current object being processed |
True |
|
Defines additional filtering rules, e.g. files to exclude/include |
False |
The <FileMapper> element must contain at least one <PathItem> element.
The path items together builds up the search path to the files to be processed.
The table below shows the accepted attributes on a path item element.
| Attribute | Description | Example |
|---|---|---|
value |
Defines a static path item name |
|
select |
Defines an XPath expression that will select a value from the current context in the XML data |
|
mapsToFormat |
May be used to define that the name of the path at this level specifies the format for the file |
|
ignoreMissing |
May be used to ignore missing item without throwing exception. Default is true. |
|
| If neither the value nor the select attribute are defined, the path-item matches to any directory. |
Lets shown an example below:
Content of incoming ZIP file
│   payload.xml
│
└───files
    ├───TST-0001
    │   ├───generic
    │   │       file1.doc
    │   │       file2.xls
    │   │       file3.doc
    │   │
    │   └───JT
    │           test1.jt
    │           test2.jt
    │
    ├───TST-0002
    │   └───generic
    │           SomeFile.xlsx
    │
    ├───TST-0003
    └───TST-0004
Payload Content
<Specs>
    <Spec type="CAD Drawing" name="TST-0001" rev="A"/>
    <Spec type="CAD Drawing" name="TST-0002" rev="A"/>
    <Spec type="CAD Drawing" name="TST-0003" rev="A"/>
    <Spec type="CAD Drawing" name="TST-0004" rev="A"/>
</Specs>
Create/Update Configuration
<CreateConfiguration
    txType="update"
    runPrivileged="true"
    historyOff="true"
    triggerOff="true">

    <InputFormats>
        <Zip>
            <InputFiles>payload.xml</InputFiles>
        </Zip>
    </InputFormats>

    <EntryPoint select="/Specs/Spec" />

    <Config match="Spec">
        <IfFound>Update</IfFound>
        <IdentityMatch>
            <Type select="@type" />
            <Name select="@name" />
            <Revision select="@rev"/>
        </IdentityMatch>
        <CreateValues>
            <Policy fallbackValue="CAD Drawing"/>
            <Vault fallbackValue="vault_eServiceProduction" />
        </CreateValues>
        <EmbeddedFiles>
            <File reuseVersion="true"
                  formatFallback="generic"
                  useFileMapper="true"> (1)
                <FileMapper> (2)
                    <PathItem value="files" />
                    <PathItem select="@name" />
                    <PathItem mapsToFormat="true" />
                </FileMapper>
                <FileFilter excludedFormats="JT" />
            </File>
        </EmbeddedFiles>
    </Config>
</CreateConfiguration>| 1 | The useFileMapper must be set to true |
| 2 | The <FileMapper> element specifies the path to the files. Note that a path item can contain static names or dynamic names selected from the XML data.
A path item may also contain the format name, thush the mapsToFormat attribute can be used to specify that. |
1.12. ValueMapper
You may use so called value mappers to support translation of values. For example name of types or states may not be the same between two different systems.
You may define as many value mappers as you need, each is given an identifier, which you refer to on those fields representing values that needs to be translated.
The <ValueMapper> element must have an attribute called id containing a valid identifier.
Possible child elements to the <ValueMapper> element are (note you may combine them as you need):
| Child Element | Description |
|---|---|
|
Defines a reference to an external mapping file (see below) |
|
Defines inline rules (see below) |
|
Custom value mappers. Requires attribute className pointing to
class that implements the interface |
Using value lookup:
The <ValueLookup> element supports these attributes:
- name
-
The name of the extrernal file.
If the name starts with file:, then the value is assumed to be a file from the file system, where TIF is running. You may use macros like
${TIF.HOME}to refer to the root directory of the current TIF installation.If the name does not start with file:, it is assumed to be a resource stored within the
${TIF_ROOT}/modules/enovia/cfg/lookupdirectory. If the file ends with.propertiesit is assumed to be a standard Java properties file, otherwise, if it ends with.xmlit is assumed to be an XML file following this format:<Properties> <Property name="property-1" value="value1" /> <Property key="property-2" value="value2" /> <Property name="property-3">value 3</Property> <Group key="group1"> <Property key="p1" value=".." /> <!-- accessed via key group1.p1 --> </Group> </Properties> - keyPrefix
-
An extra string to be prepended to the value before performing the lookup
- keySuffix
-
An extra string to be appended to the value before performing the lookup
Using inline rules:
The <If> element can be used in the following way:
<ValueMapper id="...">
  <If is="something" caseSensitive="false">replace value</If>
  <If matches="a?c?e*">replace value</If>
  <If beginsWith="abc">replace value</If>
  <If endsWith="def">replace value</If>
  <If regexp="...">replace value</If>
</ValueMapper>
1.13. Namespaces
The <Namespaces> element can be used to configure the name-space context used when evaluating XPath expressions.
In case your incoming XML data contains namespace information, the XPaths may be difficult to define without the mapping of prefix/uri.
You can choose to either define all your Namespace mappings manually, or use the setting that will copy over the namespaces from the source document. The latter requires that you always know what prefixes are being used for the URIs.
To copy over the namespaces from the source (incoming data), then you should use the following attributes.
<CreateConfiguration>
    <Namespaces mapFromSource="true" mapFromRootElementOnly="true" />
    ...
</CreateConfiguration>
The mapFromRootElementOnly attribute is by default set to true, but in case your namespace declarations occurs later on in the document,
you may need to set this flag to false. That implies the whole document is being scanned for xmlns: declarations.
If you prefer declaring the namespaces manually, you can use the following syntax.
<CreateConfiguration>
    <Namespaces>
        <Namespace prefix="a" uri="http://the_uri_for_a" />
        <Namespace prefix="b" uri="http://the_uri_for_b" />
    </Namespaces>
    ...
</CreateConfiguration>
This will give you exact control over the prefix/uri mapping.
1.14. Revising
If an object could not be mapped through the identity values, the create/update integration can be configured to revise an earlier revision.
First, one need to configure the <IfNotFound> to revise. The default value for this setting is create.
When this mode is enabled, the create/update integration will try to find an object having the same TYPE and NAME as the object you try to match with.
Lets take an example. Below is a simple payload and a matching configuration.
Payload snippet
<Object>
    <Kind>Part</Kind>
    <Identifier>TEST-000001</Identifier>
    <Revision>C</Revision>
</Object>
Create/Update configuration snippet
<Config match="Object">
    <IfFound>update</IfFound>
    <IfNotFound>revise</IfNotFound> (1)

    <IdentityMatch>
        <Type select="Kind/text()" />
        <Name select="Identifier/text()" />
        <Revision select="Revision/text()" />
    </IdentityMatch>
</Config>
If the object Part/TEST-000001/C does not exist, the create update integration will perform a query like below to find an object to revise.
temp query bus Part TEST-000001 * where "revision == last" limit 1
If this query does NOT return any result, the object is created in the same way
as if the <IfNotFound> setting would have its value set to create.
If the query returns a result, that object is first revised and secondly, the revised object is updated according to configurations made.
Additional control over the revisioning can be specified using the <ReviseBehavior> elment as
shown below:
<Config match="Object">
    <IfFound>update</IfFound>
    <IfNotFound>revise</IfNotFound>

    <ReviseBehavior
        reviseWithFile="true"
        searchType="type_Part"
        searchExpandType="true" />
</Config>
The attribute supported on the <ReviseBehavior> element are:
| Name | Description |
|---|---|
reviseWithFile |
Defines the flag revise-with-file passed to the ENOVIA kernel upon revising the object. Default is FALSE. |
searchType |
Overrides the type used in the type pattern when quering for the revisions. By default we use the same type as the object you are targetting. Note however if your revision sequence may have objects of different type it may be useful here to specify a common root type that will be used in the query. |
searchVaultPattern |
Specifies a custom vault pattern, if you want to narrow the query over certain vaults. Default is all vaults. |
searchExpandType |
Whether or not to query for objects having a sub-type of the type used in the query. Default is TRUE. |
1.14.1. Advanced Revisioning - Build Revision Sequence
It is possible to as a part of the create/update integration use-case create the revision sequence on-the-fly. Example: you are requesting to create/update an object of revision E and you do not know if the past revisions are in the database. Hence you want to include information that there exists four earlier revisions and let the create/update integration create "placeholders" for these in the database.
Starting with an example, below is a payload snippet and a matching configuration snippet.
Payload Snippet
<Object>
    <Kind>Part</Kind>
    <Identifier>TEST-000002</Identifier>
    <Revision>E</Revision>
    <Revisions> (1)
        <Rev value="A" state="Obsolete">description...</Rev>
        <Rev value="B" state="Obsolete">description...</Rev>
        <Rev value="C" state="Obsolete">description...</Rev>
        <Rev value="D" state="Release">description...</Rev>
    </Revisions>
</Object>| 1 | The revisions are provided in this format (other format alternatives are supported) |
The create/config configuration below:
Create Update Configuration Snippet
    <Config match="Object">
        <IfFound>update</IfFound>
        <IfNotFound>revise</IfNotFound> (1)

        <ReviseBehavior> (2)
            <BuildSequence select="Revisions/Rev/@value"> (3)
                <States select="Revisions/Rev/@state" />
                <Descriptions select="Revisions/Rev/text()" />
            </BuildSequence>
</ReviseBehavior>| 1 | Remember to specify the if-not-found to revise |
| 2 | Supply <ReviseBehavior> to define advanced revisioning rules |
| 3 | The <BuildSequence> element is used to control the building of revision sequences. |
The attribute supported on the <BuildSequence> element are:
| Name | Required | Description |
|---|---|---|
select |
Yes |
An XPath expression used to select the revisions. The XPath starts from the contextual object you currently are locate on. |
splitBy |
No |
If the select expression maps to a single value containing for example a comma separated list, you need to speficy the delimiter to split by here. |
order |
No |
If the list for some reason is provided in reverse order, you can specify the value "reverse" here to indicate so. |
Allowed (optional) child elements are
-
<States>
-
<Descriptions>
These elements are used to provide additional data to be used when creating the revision sequence. E.g. you may want to specify the states of the objects.
| If a revision already exists in the database, the existing revision will not be updated regarding state or description, even though the data you provided is different. |
Both the <States> and <Descriptions> elements supports the exact same attributes as for the <BuildSequence> element, described above.
| The values selected for the revisions and the states and/or descriptions must have the same number of items. |
Below is an alternate payload and matching configuration:
Payload Snippet
<Object>
    <Kind>Part</Kind>
    <Identifier>TEST-000002</Identifier>
    <Revision seq="A,B,C,D">E</Revision>
</Object>
Create Update Configuration Snippet
    <Config match="Object">
        <IfFound>update</IfFound>
        <IfNotFound>revise</IfNotFound>

        <ReviseBehavior>
            <BuildSequence select="Revision/@seq" splitBy=","/>
        </ReviseBehavior>
1.15. Example Configuration
<CreateConfiguration
    txType="update"
    runPrivileged="true"
    historyOff="true"
    triggerOff="true">

    <EntryPoint select="/Data/Items/Item" />

    <ValueMapper id="type-mapping">
        <ValueLookup name="sap-key-values.properties" keyPrefix="type." />
    </ValueMapper>

    <Config match="Item">
        <IfFound>Update</IfFound>

        <IdentityMatch>
            <Type select="@t" valueMapper="type-mapping" />
            <Name select="@n" />
            <Revision latest="true" fallbackValue="Release" />
        </IdentityMatch>

        <CreateValues>
            <Revision firstInSequence="true" />
            <State fallbackValue="Release" />
            <Policy fallbackValue="policy_ECPart" />
            <Owner fallbackValue="tiftest" />
            <Originated select="@created" dateFormat="iso-date" />
            <Vault fallbackValue="vault_eServiceProduction" />
        </CreateValues>

        <UpdateValues useForCreate="true">
            <Attribute name="attribute_Weight" select="@w" ifNull="fail" />
            <Description base64Encoded="true" select="Description/text()"/>
            <RDO select="@rdo" />
        </UpdateValues>

        <Connections>
            <Connection relationship="relationship_EBOM"
                        select="Item"
                        disconnectExisting="true">
                <IdentityMatch>
                    <Relationship>
                        <Attribute
                            name="attribute_FindNumber"
                            select="@findNumber"/>
                    </Relationship>
                </IdentityMatch>
            </Connection>

            <Connection relationship="relationship_ReferenceDocument"
                        typePattern=""
                        select="Specs/Doc"
                        disconnectExisting="true">

                <IdentityMatch>
                    <Object>
                        <Name select="@docID" />
                    </Object>
                </IdentityMatch>

                <UpdateValues useForCreate="true">
                    <Attribute
                        name="attribute_DocumentClassification"
                        select="@classification" />
                </UpdateValues>
            </Connection>
        </Connections>
    </Config>

    <Config match="Doc">
        <IdentityMatch>
            <Type fallbackValue="Document"/>
            <Name select="@docID" />
            <Revision fallbackValue="*"/>
        </IdentityMatch>
        <CreateValues>
            <Policy fallbackValue="Document" />
            <Vault fallbackValue="eService Production" />
        </CreateValues>
    </Config>

 </CreateConfiguration>
1.16. Trigger a Create/Update Integration via REST
In order to trigger a create/update configuration via REST call, you need to
create a REST service configuration within ${TIF_ROOT}/modules/enovia/cfg/restservice.
Below is an example how to launch such use case without requiring any context object.
<Rest>
    <DisplayName>EBOM Create/Update Service</DisplayName>
    <ServiceName>ebom</ServiceName>
    <Credentials containerManaged="true" />
    <Create config="EBOM.xml" /> (1)
    <Create config="EBOM.xml" payload="tvc:payload/test1.xml"/> (2)
</Rest>| 1 | This points out the configuration tvc:createconfig/EBOM.xml |
| 2 | Alternative, when there is a need to generate custom response via payload configuration |
Below is an alternative REST service configuration showing how to use input/context object.
<Rest>
    <DisplayName>EBOM Create/Update service (single level)</DisplayName>
    <ServiceName>ebom-single-level</ServiceName>
    <IdLocator type="tnr"> (1)
        <Setting name="allowWildcards" value="false" />
    </IdLocator>
    <Credentials containerManaged="true" />
    <Create config="EBOM-single-level.xml" />
</Rest>| 1 | Here we require the type name and revision to be present on the URL. Note that alternative ways to map URL into id’s can be done. Please read the chapter describing configurable REST Services here. |
Using custom payload generation:
When you point out a custom payload, please note that you must use the "objectIdParam" attribute to lookup the correct ID´s. For relationships, use "relationshipIdParam" attribute instead.
<Payload rootElement="Response">
    <XMLSpec>
        <IncludeTableHeaders>false</IncludeTableHeaders>
        <IncludeTableGroups>false</IncludeTableGroups>
        <AddColumnId>false</AddColumnId>
        <AddCellIndex>false</AddCellIndex>
        <AddColumnRef>false</AddColumnRef>
        <AddCellValueSize>false</AddCellValueSize>
        <OmitCellValueElement>true</OmitCellValueElement>
        <OmitRowAttributes>true</OmitRowAttributes>
        <UseColumnName>true</UseColumnName>
        <TableDataElement/>
        <RowElement>${TYPE}</RowElement>
    </XMLSpec>

    <TableContent objectIdParam="createdObjectIds" outerElement="CreatedObjects"> (1)
        <Table>tvc:table/PartBasic.xml</Table>
    </TableContent>

    <TableContent objectIdParam="updatedObjectIds" outerElement="UpdatedObjects"> (2)
        <Table>tvc:table/PartBasic.xml</Table>
    </TableContent>

    <TableContent relationshipIdParam="createdRelationshipIds" outerElement="CreatedRelationships"> (3)
        <Table>tvc:table/RelBasic.xml</Table>
    </TableContent>

</Payload>| 1 | Use id’s of created business objects |
| 2 | use id’s of updated business objects |
| 3 | use id’s of created relationships |
The available parameters are:
-
createdObjectIds
-
revisedObjectIds
-
updatedObjectIds
-
allObjectIds
-
createdRelationshipIds
-
updatedRelationshipIds
-
allRelationshipIds
1.17. Trigger a Create/Update Integration via JMS
In order to trigger a create/update integration via JMS, you need to
add a JSM message listener within the directory ${TIF_ROOT}/modules/enovia/cfg/jmslistener.
Below is an example how to setup such a listener:
${TIF_ROOT}/modules/enovia/cfg/jmslistener/TestListener.xml
<JMSListener>
    <Name>Create Update EBOM via JMS</Name>
    <Destination id="jms-1" /> (1)
    <WithContext user="..." /> (2)
    <Handler type="CreateUpdateIntegration" /> (3)
    <Arguments>
        <Argument name="configuration" value="tvc:createconfig/EBOM.xml" /> (4)
        <!-- Below: Extra optional parameters -->
        <Argument name="payloadconfig" value="tvc:payload/EBOM_Response.xml" /> (5)
        <Argument name="objectidparam" value="oid" /> (6)
        <Argument name="responsemessagetype" value="text" /> (7)
    </Arguments>
</JMSListener>| 1 | This is the destination you will get messages from |
| 2 | If you want to run the integration as a certain user, specify so here |
| 3 | This will choose the correct message listener |
| 4 | Points out the create/update configuration to be used |
| 5 | Specify custom payload config used to produce the response |
| 6 | Specify custom header name to use for reading contextual object id |
| 7 | Type of return message, default is text. Use stream to force stream message |
Please see previous chapter for details regarding using a custom payload for creation of the response.
The response message is sent to the queue as specified within the Reply To header of the JMS Message.
|
1.18. Trigger a Create/Update Integration via File
It is also possible to trigger the create/update integration via file system integration.
To do so, you need to add a directory listener within the directory ${TIF_ROOT}/modules/enovia/cfg/directorylistener.
Below is an example how to setup such a listener:
${TIF_ROOT}/modules/enovia/cfg/directorylistener/TestListener.xml
<tif:DirectoryListener
    xmlns:tif="http://technia.com/TIF/DirectoryListener"
    xmlns:xsi="http://www.w3.org/2001/XMLSchema-instance"
    xsi:schemaLocation="http://technia.com/TIF/DirectoryListener http://products.technia.com/tif/schema/latest/DirectoryListener.xsd">

    <tif:Name>Create Update EBOM via File</tif:Name>
    <tif:Destination id="file-dest-in" /> (1)
    <tif:WithContext user="tiftest" /> (2)
    <tif:Handler type="CreateUpdateIntegration" /> (3)
    <tif:Paths delete="true" /> (4)
    <tif:Arguments>
        <tif:Argument name="configuration" value="tvc:createconfig/EBOM.xml" /> (5)
        <tif:Argument name="outputDestination" value="file-dest-out" /> (6)
        <tif:Argument name="errorDestination" value="file-dest-err" /> (7)
        <tif:Argument name="payloadconfig" value="tvc:payload/EBOM_Response.xml" /> (8)
    </tif:Arguments>
</tif:DirectoryListener>| 1 | This is the destination that configures the directory to listen for files from |
| 2 | If you want to run the integration as a certain user, specify so here |
| 3 | This will choose the correct directory listener that will trigger the integration correctly |
| 4 | Deletes the source file after completion |
| 5 | Points out the create/update configuration to be used |
| 6 | Defines a destination where the success response is written into. Note that the file-name remains the same as from the input directory. |
| 7 | Defines a destination where the error response is written into. Note that the file-name remains the same as from the input directory. |
| 8 | Specify custom payload config used to produce the response |
Please see previous chapter for details regarding using a custom payload for creation of the response.
1.18.1. Encoding
Encoding of input and success/error response payload can be optionally defined as arguments.
For example:
    ...
    <tif:Arguments>
        <tif:Argument name="inputEncoding" value="UTF-8" /> (1)
        <tif:Argument name="outputEncoding" value="UTF-8" /> (2)
    </tif:Arguments>
</tif:DirectoryListener>| 1 | Defines encoding of input payload. If not defined, default charset is used. |
| 2 | Defines encoding of success/error payload. If not defined, default charset is used. |
1.19. Extension Points
There are some possibilities within the create/update integration to plugin custom code in order to override certain behavior or add extra logic when something happens during the processing.
1.19.1. Custom listener
In order to listen to occurring events, one can specify a listener within the configuration as shown below.
Such listener must implement the interface com.technia.tif.enovia.integration.event.IntegrationListener.
This interface has one method that you need to implement:
void handleEvent(IntegrationEvent event);The event argument passed may be an instance of:
-
com.technia.tif.enovia.integration.event.ObjectEvent
-
com.technia.tif.enovia.integration.event.RelationshipEvent
-
com.technia.tif.enovia.integration.event.FileEvent
-
com.technia.tif.enovia.integration.event.FailureEvent
-
com.technia.tif.enovia.integration.event.XMLParsedEvent
From the event object, you can get the event type, which is an enum constant with the following values
| Enum Constant | Description |
|---|---|
OBJECT_CREATED |
A business object was created |
OBJECT_REVISED |
A business object was revised |
OBJECT_UPDATED |
A business object was modified |
OBJECT_DELETED |
A business object was deleted |
RELATIONSHIP_CREATED |
A relationship was created |
RELATIONSHIP_UPDATED |
A relationship was modified |
RELATIONSHIP_DELETED |
A relationship was deleted |
FILE_CHECKEDIN |
A file was checked-in to a business object |
STARTED |
The integration started |
COMPLETED |
The integration is complete |
FAILURE |
The integration failed |
TRANSACTION_START_UPDATE |
An update transaction has been started |
TRANSACTION_START_READ |
A read transaction has been started (not commonly used) |
TRANSACTION_COMMITTED |
The transaction was committed |
TRANSACTION_ABORTED |
The transaction was aborted |
XML_PARSED |
The XML data has been parsed |
OTHER |
Other unspecified event |
If you want to abort the processing of the integration, you can always throw an unchecked exception, example:
package com.acme;

import com.technia.tif.core.TIFRuntimeException;
import com.technia.tif.enovia.integration.event.FailureEvent;
import com.technia.tif.enovia.integration.event.IntegrationEvent;
import com.technia.tif.enovia.integration.event.IntegrationListener;
import com.technia.tif.enovia.integration.event.ObjectEvent;
import com.technia.tif.enovia.integration.event.RelationshipEvent;

public class MyListener implements IntegrationListener {

    @Override
    public void handleEvent(IntegrationEvent event) {
        switch (event.getType()) {
            case OBJECT_UPDATED:
                String oid = ((ObjectEvent) event).getObjectId();
                if (getValueFromObject(oid).equals("Bad")) {
                    throw new TIFRuntimeException("Bad value detected. Aborting");
                }
            ....
        }
    }
}
In order to register your listener, use the listener attribute on the root element:
<CreateConfiguration listener="com.acme.MyListener" ...>
    ...
</CreateConfiguration>
1.19.2. Business Object Finder
During the processing of a create/update integration, the integration will at certain places try to find business objects from the database in order to map them to the incoming payload.
You may override the find logic by providing a class that implements the interface
com.technia.tif.enovia.integration.create.BusinessObjectFinder. The default implementation
is com.technia.tif.enovia.integration.create.impl.DefaultBusinessObjectFinder.
<CreateConfiguration>
  ...
  <Config>
    <ObjectFinder className="com.acme.MyFinder" />
    ...
  </Config>
</CreateConfiguration>
1.19.3. Business Object Processor
A business object processor is involved for the creation, updating or revising an object.
You may override this logic by providing a class that implements the interface
com.technia.tif.enovia.integration.create.BusinessObjectProcessor. The default implementation
is com.technia.tif.enovia.integration.create.impl.DefaultBusinessObjectProcessor.
<CreateConfiguration>
  ...
  <Config>
    <ObjectProcessor className="com.acme.MyObjectProcessor" />
    ...
  </Config>
</CreateConfiguration>
1.19.4. Relationship Processor
Similar to a business object processor, a relationship processor is used for the creation, updating and deletion of connections between business objects.
To override the default logic you can provide a custom class that implements the interface
com.technia.tif.enovia.integration.create.RelationshipProcessor.
The default implementation is com.technia.tif.enovia.integration.create.impl.DefaultRelationshipProcessor.
<CreateConfiguration>
  ...
  <Config>
    <Connections>
      <Connection>
        <RelationshipProcessor className="com.acme.MyRelProcessor" />
        ...
      </Connection>
      ...
    </Connections>
    ...
  </Config>
</CreateConfiguration>
1.19.5. File Processor
A file processor is responsible for the checkin file operation.
To override the default logic you can provide a custom class that implements the interface
com.technia.tif.enovia.integration.create.FileProcessor.
The default implementation is com.technia.tif.enovia.integration.create.impl.DefaultFileProcessor.
<CreateConfiguration>
  ...
  <Config>
    <FileProcessor className="com.acme.MyFileProcessor" />
    ...
  </Config>
</CreateConfiguration>
1.20. Debugging
When "TRACE" log level is enabled, create / update integration provides more information to TIF’s log file. This can be useful for testing and development purposes.
You may change run time log settings from Admin UI. See sections "Admin UI" and "TIF Core" / "Log Settings" in the documentation.
| "TRACE" log level is not intended to be used in the production use as detailed logging might negatively affect the performance. |