TIF Administration and Configuration Guide
11 January 2016
Table of Contents
- 1. TIF Overview
- 2. TIF Server - Initial Setup
- 3. Database
- 4. Configure Mail Settings
- 5. Configure Shutdown Port
- 6. HTTP/HTTPS Support
- 7. HTTP/HTTPS Client
- 8. Kerberos and Spnego Configuration
- 9. Configure Destinations
- 10. Log Settings
1. TIF Overview
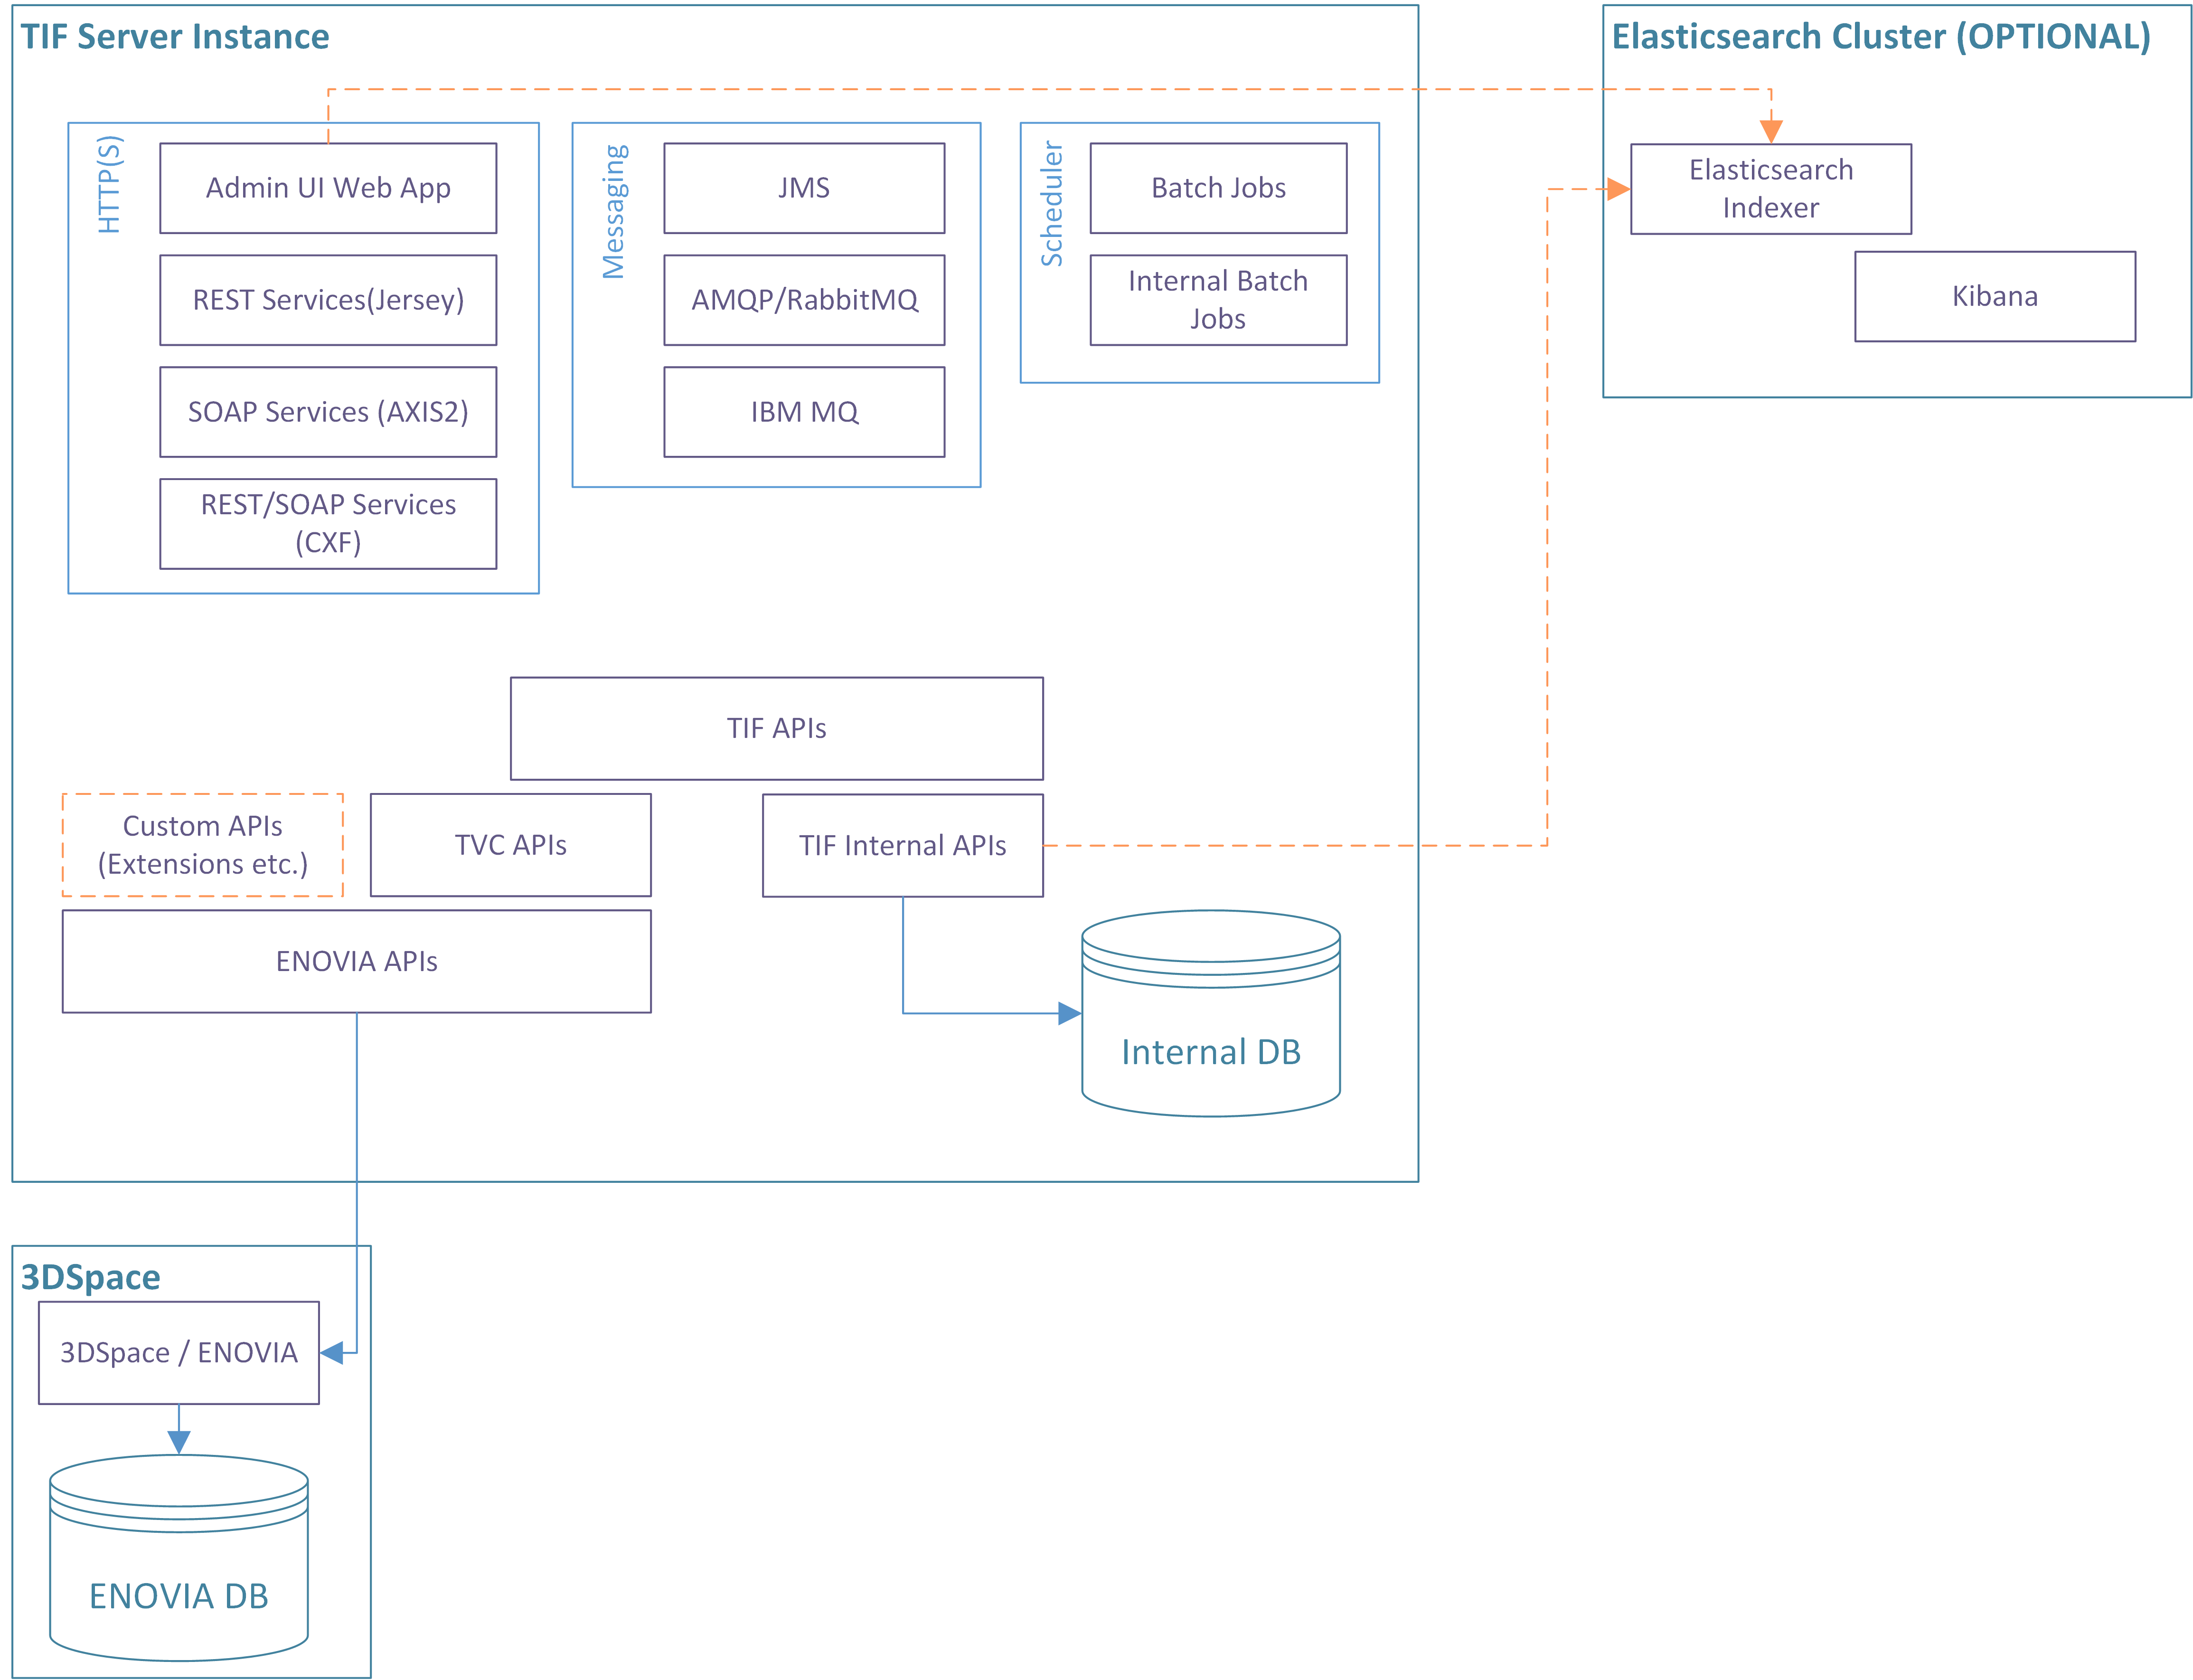
The TIF application is a Java application running inside it’s own JVM. It is not an application hosted inside an Application server like Tomcat, Websphere, JBoss etc.
Below is an image showing an overall view of a single TIF instance.
Figure 1. Overview
Each TIF instance contains a HTTP/HTTPS component (Jetty), which enables:
-
An Administration UI for inspection and validating the health of your integrations
-
Running SOAP or REST services inside either an Apache Axis2, Apache CXF or Jersey container
-
Hosting custom built web-applications
There are also support for using different kind of Messaging technologies in order to send or receive data via a message broker.
TIF also have an internal scheduler that allows running jobs at certain points in time.
Additionally, TIF also contains components such as an internal database in order to track executions of integration jobs over time. TIF is using the TVC Core API to perform ENOVIA queries and operations.
There is also a non-mandatory option also to have an Elasticsearch instance connected with TIF in order to make the Administration UI really fast.
2. TIF Server - Initial Setup
In order to use TIF, you need to configure a couple of things before taking it into use.
The main configuration files inside the TIF server is located under:
-
${TIF_ROOT}/etc -
${TIF_ROOT}/modules/enovia/etc
The sub chapters describe the required setup.
| In general, don’t modify the configuration files that are part of the TIF distribution. You can in most cases create a new file with a different name containing the customized configurations. For example: |
-
Don’t modify the file
${TIF_ROOT}/etc/tif.propertiesdirectly.-
Create instead a new file in the same directory called
${TIF_ROOT}/etc/tif.custom.properties.
-
-
Create/use the file
${TIF_ROOT}/modules/enovia/etc/module.propertiesinstead-
Create/use the file
${TIF_ROOT}/modules/enovia/etc/module.custom.propertiesinstead.
-
-
And also the file
${TIF_ROOT}/modules/enovia/etc/tvc.properties-
Create/use the file
${TIF_ROOT}/modules/enovia/etc/tvc.custom.propertiesinstead.
-
These custom files are merged with the original file meaning that the content of the custom file takes precedence over the original file.
2.1. Macros in Property Files
The property values in the property files may contain macros that resolves to a value.
The macro are defined using a ${} construct.
You can reference other properties from the same file.
Example properties
one=1
two=2
three=3
twenty_three=${two}${three}
dont_resolve=$${two}
When resolving properties from ${TIF_HOME}/etc/tif.properties,
then macros are also resolved from system properties. Example:
Resolve from system properties
directory=${user.home}/subdir2.2. Multiple TIF Instances
To support horizonal scaling, you can setup multiple TIF instances.
Internally, a TIF instance is defined by its node id and instance id. The node id is equal to the hostname, which the TIF server binds to. The instance id is either automatically assigned or defined.
The data related to one TIF instance is stored below ${TIF_ROOT}/data/${NODE_ID}/${INSTANCE_ID}, and
every TIF instance must have its own data directory.
The first time TIF is started up, TIF will assign an instance id (unless the INSTANCE_ID has been defined, see below how the instance id is resolved) and create the directory.
You should NOT try to start two different instances using the same node id and instance id combination. A simple (and naive!) solution is to duplicate the TIF installation directory and simply start up the instances in the normal way. The auto generated instance id’s will be unique, however, you then have two TIF installations to setup and configure so this is not recommended.
The recommended approach is to use one installation base, and simply use different start scripts to start each instance with. See below how to specify the instance-id within a start-script.
| The ENOVIA Connector have some additional things to concern when setting up multiple instance. Please read more here. |
2.2.1. Resolving the Instance Id
The instance id is default set to auto within the file ${TIF_ROOT}/etc/tif.properties.
If you want to change this value to something else, you should do so in the custom
properties file ${TIF_ROOT}/etc/tif.custom.properties.
You can also provide this parameter as a runtime parameter in the TIF start script like this:
java -Dtif.instance.id=auto -Dtif.http.port=8080 ...The latter is useful in case you have one installation base and via different start scripts wants.
2.2.2. Production Mode
Per default, TIF starts in production mode. To start TIF in development mode, use the "productionMode" parameter.
Either set this property in ${TIF_HOME}/etc/tif.custom.properties, or as a Java system parameter as shown below.
java -Dtif.productionMode=false ...2.2.3. HTTP / HTTPS Port
Running different TIF instances on the same network address requires you to configure TIF to bind the HTTP/HTTPS server to a unique port.
This is then set via these Java system parameters:
java -Dtif.https.port=443 -Dtif.http.port=8181 ...| See also Multiple Admin UI webapps on same host. |
2.2.4. Shutdown Listen Port
TIF listens for shutdown signals by default at port 9005. To change this port, which is needed in case you launch multiple TIF instances on the same machine, set the value as a Java system parameter like this:
java -Dtif.shutdownListener.port=9006 ...2.2.5. Example Start Script
Below is an example start script where additional parameters are defined.
@echo off
setlocal

set ENOVIA_HOME=c:\apps\ENOVIA\V6R2016X\Server
set JAVA_HOME=c:\apps\jdk64\7
set WEBAPP_ROOT=c:\webapps\2016X

set EXTRA_OPTS=-Dtif.instance.id=TIF-2 -Dtif.http.port=8282 -Dtif.shutdownListener.port=9005 (1)
set START_ARGS=-Xdebug -Xrunjdwp:transport=dt_socket,address=8000,server=y,suspend=n (2)
set STOP_ARGS= (3)

call tif.bat run| 1 | EXTRA_OPTS is handled in the tif.bat script and is appended to the Java argument list |
| 2 | START_ARGS works similar to EXTRA_OPTS, however they are only set if the TIF server is started |
| 3 | STOP_ARGS are only added to the argument list if the TIF server is stopped |
3. Database
The TIF application has an embedded database, where most of the data is persisted. This database is an Apache Derby database.
3.1. Backup
You can perform database backups using standard Operating System commands. However, this should only be done when the database is offline.
3.2. Maintenance
Prior to doing database maintenance, you need to first shutdown the running TIF instance.
To run maintenance of the internal database, you can use the scripts "tif.bat" or "tif.sh" available in the "bin" folder.
This script accepts an argument: dbmaintenance. If supplying this, the data base maintenance task will start.
If you have multiple instances of TIF, you must perform the maintenance per instance.
Below is an example script (Windows) showing how to run the maintenance task for the instance TIF-1.
|
@echo off
setlocal
set EXTRA_OPTS=-Dtif.instance.id=TIF-1 (1)
call tif.bat dbmaintenance| 1 | Specify the instance ID here |
There are some properties within the tif.properties file that are related to this task.
These properties are described in the properties file.
4. Configure Mail Settings
The mail settings are defined inside ${TIF_ROOT}/etc/tif.properties.
There you see the following properties:
mail.disabled = false
mail.smtp.host = smtp.company.com
mail.smtp.port = 25
mail.from.address = tif@company.com
mail.from.name = TIF
To define these properties, create a file called ${TIF_ROOT}/etc/tif.custom.properties within the same directory unless already created.
Specify the correct values for the keys above in this file.
You can also add additional "mail." properties in this file to be passed over to the Java Mail API.
Below is an example how to pass in extra auth settings for SMTP.
mail.debug=true
mail.smtp.auth=true
mail.smtp.user=user_id
mail.smtp.password=the_secret_word
5. Configure Shutdown Port
The TIF server sets up a shutdown listener on a dedicated socket on the machine it runs at. To configure the port use the following properties inside ${TIF_ROOT}/etc/tif.custom.properties.
shutdownListener.port = 9005
shutdownListener.host = localhost
You might need to do this if this port already is used by another service on the same machine, or, if you have multiple TIF instances running on this machine (each must have it’s own port number).
6. HTTP/HTTPS Support
6.1. Configure HTTP Support
The place where to configure the core HTTP settings are in the ${TIF_ROOT}/etc/tif.custom.properties file.
Below is a list of properties TIF support today.
# Setting port < 1 disables HTTP support
http.port = 8181
http.maxIdleTime = 30000
http.requestHeaderSize = 8192
6.2. Configure HTTPS Support
The place where to configure the core HTTPS settings are in the ${TIF_ROOT}/etc/tif.custom.properties file.
By default the HTTPS support is disabled since the default value of https.port is set to -1. To enable it, you need to specify the port (probably use port 443), a keystore and its password and alias.
Below is a list of all parameters that can be set.
#https.port=-1
#https.keyStore.path=<path to keystore, example: etc/keystore>
#https.keyStore.password=secret
#https.keyStore.type=
#https.keyStore.provider=
#https.keyManager.password=
#https.trustStore.path=<path to the trust-store, example: etc/keystore>
#https.trustStore.password=secret
#https.trustStore.type=
#https.trustStore.provider=
#https.certAlias=
#https.includeCipherSuites=<comma separated list>
#https.excludeCipherSuites=<comma separated list>
#https.maxIdleTime=30000
For further details around SSL/TLS please refer to this page.
6.2.1. SSL Enabling Example
Assuming that you have a valid certificate including a private key, available in the files
-
server.crt
-
server.key
Then you need to create a Java keystore from these files.
First, you need to convert the certificate into PKCS12 format. Below is an example how to do so with openssl. Note that you will be asked for passwords that you will have to remember.
openssl pkcs12 \
  -export \
  -in server.crt \
  -inkey server.key \
  -out server.p12 \
  -name tif
The next step is to use keytool from the Java installation in order to import the PKCS12 certificate into a Java keystore. Below is an example showing how to do so. Note that the password secret should be changed.
keytool \
  -importkeystore \
  -deststorepass secret \
  -destkeypass secret \
  -destkeystore keystore \
  -deststoretype PKCS12 \
  -srckeystore server.p12 \
  -srcstoretype PKCS12 \
  -srcstorepass secret \
  -alias tif
Then, copy the keystore file into the directory ${TIF_HOME}/etc/.
Finally, add into ${TIF_HOME}/etc/tif.custom.properties these properties.
https.port=443
https.keyStore.path=etc/keystore
https.keyStore.password=secret
https.certAlias=tif
Start TIF and ensure that it works correctly with HTTPS on port 443 (which is the default port for HTTPS).
6.2.2. Configure Self Signed Certificate
Simply setting up TIF with a self signed certificate is simple and useful for testing. Just follow these steps:
-
Use keytool to create the keystore
cd $TIF_HOME/etc
keytool -keystore keystore -alias tif -genkey -keyalg RSA -sigalg SHA256withRSA
Then you will be asked for some information like shown below.
Enter keystore password: Re-enter new password: What is your first and last name? [Unknown]: What is the name of your organizational unit? [Unknown]: What is the name of your organization? [Unknown]: What is the name of your City or Locality? [Unknown]: What is the name of your State or Province? [Unknown]: What is the two-letter country code for this unit? [Unknown]: Is CN=Unknown, OU=Unknown, O=Unknown, L=Unknown, ST=Unknown, C=Unknown correct? [no]: yes Enter key password for <tif> (RETURN if same as keystore password): -
Modify
${TIF_HOME}/etc/tif.custom.propertieshttps.port=443 https.keyStore.path=etc/keystore https.keyStore.password=password https.certAlias=tif
Done
7. HTTP/HTTPS Client
TIF is also used as a HTTP/HTTPS client in case you have integrations that will communicate via HTTP.
There are some global settings you may need to adjust for this client discussed in the sub-chapters below.
7.1. Proxy Configuration
To configure using proxy servers when creating outbound HTTP calls from TIF,
you can set this from ${TIF_HOME}/etc/tif.custom.properties
There are two properties to use, e.g
http.proxy-
Defines proxy server for plain HTTP calls.
https.proxy-
Defines proxy server for secure HTTP calls.
8. Kerberos and Spnego Configuration
Different web-applications running inside a TIF instance may support single-sign-on via Spnego/Kerberos authentication for users on a Windows or Active Directory based network.
In order to support this, one need to configure the underlying Kerberos/Spnego modules within the JDK with a number of settings.
Please note that this setup is somewhat fragile and you need to test your configurations…asfag
8.1. Active Directory Configurations
On your Active Directory server, you need to do some administration and generate a so called "keytab" file.
You need the following information
-
hostname of machine, which your TIF instance is running from
-
Example:
tifserver.exampledomain.com
-
-
An Active Directory user
-
Example:
tifuser
-
First, you need to run the setspn command (https://technet.microsoft.com/en-us/library/cc731241(v=ws.11).aspx).
setspn -A HTTP/tifserver.exampledomain.com tifuserNext step is to create/generate the keytab file.
| This keytab file should be transferred to the TIF server and kept securely and not readable for the "world". |
Creating the keytab is used by the command ktpass. (https://technet.microsoft.com/en-us/library/cc753771(v=ws.11).aspx)
ktpass -out c:\dir\krb5.keytab -princ HTTP/tifserver.exampledomain.com@EXAMPLEDOMAIN.COM -mapUser tifuser -mapOp set -pass THE_SECRET_PASSWORD -crypto RC4-HMAC-NT -pType KRB5_NT_PRINCIPAL| change the hostname + username/password and also the "-out" argument above to match your environment. |
8.2. TIF Properties
Within the file ${TIF_ROOT}/etc/tif.custom.properties you will have some property keys to set.
These keys corresponds to Java System properties, and you can if wanted use the Java system property
and specify them via "-D" parameters on the command line. However, that requires modifying the start
scripts for TIF so the recommended approach is to apply these within the tif.custom.properties file.
Required properties:
| TIF Property Key | Java System Property | Description |
|---|---|---|
kerberos.enabled |
- |
A boolean flag indicating if to enable kerberos via TIF property key/values. You can still configure Kerberos via Java system parameters as usual, however, you need to set this property to true in order to let TIF configure the kerberos module through properties specified in here. |
kerberos.conf |
java.security.krb5.conf |
Points out the file configuring the underlying kerberos setup. |
kerberos.authLoginConfig |
java.security.auth.login.config |
Configures Spnego vs Kerberos |
kerberos.authUseSubjectCredsOnly |
javax.security.auth.useSubjectCredsOnly |
This one is by default set to FALSE and should be in this case. |
kerberos.debug |
sun.security.spnego.debug |
Used to enable debugging from the JDK layer. Default is false. Should only be used for debugging during setup, otherwise your log-files will be filled quite fast. |
| If a Java system property already has been defined, TIF will never re-assign that value. |
8.3. Example Configurations
Below is a working example how to setup all. Note that we have tested with a Windows 2008 server setup, other versions may need other configuration values or switches/arguments to setspn/ktpass.
${tif.home}/etc/tif.custom.properties
kerberos.enabled=true (1)
kerberos.conf=${tif.home}/etc/kerberos/krb5.ini (2)
kerberos.authLoginConfig=${tif.home}/etc/kerberos/spnego.conf (3)| 1 | Required to enable setting up kerberos via TIF properties |
| 2 | Points out a kerberos configuration file |
| 3 | Points out a Spnego configuration file |
${tif.home}/etc/kerberos/krb5.ini
[libdefaults]
default_realm = EXAMPLEDOMAIN.COM
default_keytab_name = FILE:c:/apps/tif-server/etc/spnego/krb5.keytab
permitted_enctypes = aes128-cts aes256-cts arcfour-hmac-md5
default_tgs_enctypes = aes128-cts aes256-cts arcfour-hmac-md5
default_tkt_enctypes = aes128-cts aes256-cts arcfour-hmac-md5

[realms]
EXAMPLEDOMAIN.COM= {
    kdc = 192.168.0.123
    admin_server = 192.168.0.123
    default_domain = EXAMPLEDOMAIN.COM
}

[domain_realm]
exampledomain.com= EXAMPLEDOMAIN.COM
.exampledomain.com = EXAMPLEDOMAIN.COM

[appdefaults]
autologin = true
forwardable = true
${tif.home}/etc/kerberos/spnego.conf
com.sun.security.jgss.initiate {
     com.sun.security.auth.module.Krb5LoginModule required
     principal="HTTP/tifserver.exampledomain.com@EXAMPLEDOMAIN.COM"
     useKeyTab=true
     keyTab="c:/apps/tif-server/etc/spnego/krb5.keytab"
     storeKey=true
     isInitiator=false;
};

com.sun.security.jgss.accept {
     com.sun.security.auth.module.Krb5LoginModule required
     principal="HTTP/tifserver.exampledomain.com@EXAMPLEDOMAIN.COM"
     useKeyTab=true
     keyTab="c:/apps/tif-server/etc/spnego/krb5.keytab"
     storeKey=true
     isInitiator=false;
};
Please read more from the link below regarding additional properties:
8.4. Tips
Setting up kerberos/spnego is a "fragile" task and its easy to do something wrong. The debugging information you will see from the JDK level is far from helpful in some cases.
Below are some URLs with information that might help:
A last recommendation is to NOT test the setup with the client and server on the same machine!
9. Configure Destinations
Transferring data to another system requires you to declare the destination endpoints somewhere.
This is done within one centralized file located at ${TIF_ROOT}/etc/destinations.xml.
This file is not part of the installation, instead, we provide an example configuration called ${TIF_ROOT}/etc/destinations.xml.sample.
This configuration file is of XML format, and the root element of this file is <Destinations>.
The currently supported destinations are:
- File
-
Used to store data into a generated file inside a particular directory
- FTP
-
Transfer data to a FTP site
-
Transfer data via mail to a recipient
- HTTP
-
Used to transfer the data to some destination via HTTP protocol. E.g. a REST service or similar.
- SOAP Service
-
A defines SOAP endpoint.
- JMS
-
Used to transfer the data to a JMS topic or queue.
- Rabbit MQ (AMQP)
-
Used to transfer the data to a Rabbit MQ server via the AMQP protocol.
- Websphere MQ / Native MQ
-
Used for transfer the data to a IBM-MQ broker via the Native-MQ protocol. Note that IBM MQ also supports the JMS protocol.
Each destination within this configuration file is associated with an identifier. This identifier must be unique across all destinations.
Example: ${TIF_ROOT}/etc/destinations.xml
<Destinations>

    <JMS id="erp-01"
         initialContextFactory="org.apache.activemq.jndi.ActiveMQInitialContextFactory"
         providerURL="tcp://erp01.company.com:61616">
        <Queue name="released_parts" jndiKey="queue.%s"/>

        <Env key="..." value="..."/>
        <Env key="..." value="..."/>
    </JMS>

    <RabbitMQ id="SAP"
              uri="amqp://userName:password@hostName:portNumber/virtualHost"
              routingKey="rk1">
        <Queue name="q1" autoDelete="false" durable="true" exclusive="false"/>
        <Exchange name="e1" autoDelete="false" durable="true" type="direct"/>
    </RabbitMQ>

</Destinations>
The implementation specific JAR files should be stored inside the folder ${TIF_ROOT}/lib/custom
|
9.1. File Destination
A file destination is used to define a location where files are either written to or read from.
Below is an example configufiration of a File destination.
<Destinations>
    <File id="file1"
          directory="/var/transfer/tif"
          filePrefix="ECO_"
          fileSuffix=".xml"/>
</Destinations>
The table below shows the available attributes on the File destination element.
| Attribute | Description | Required |
|---|---|---|
id |
A unique identifier. |
Yes |
directory |
The directory, which the files will be generated inside. You may use the following macros inside the value:
Use absolute paths, unless using a macro. |
Yes |
filePrefix |
The prefix, which the generated file will get. Note The length of the prefix must be at least three characters long. |
No |
fileSuffix |
The suffix, which the generated file will get. |
No |
fileName |
A static filename to be used if you want this destination to use the same file over and over again. |
No |
append |
True/false to append data. May be useful in combination with the fileName attribute |
No |
If your destination is used for writing data into,
then either the fileName or filePrefix attributes must be used.
|
9.2. HTTP Destination
A HTTP destination is used to transfer data into a remote server via HTTP.
Below is an example configuration of a HTTP destination that transfers data via HTTP/POST.
<Destinations>
    <Http id="http-1"
          url="http://server:port/app/servlet/test"
          retryCount="3"
          retryDelay="3000"
          timeout="30000">
        <Header name="Authorization" value="Bearer ABCDEF" />(1)
    </Http>
</Destinations>| 1 | Optional headers can be applied |
The table below shows the available attributes on the HTTP destination element.
| Attribute | Description | Required |
|---|---|---|
id |
A unique identifier. |
Yes |
url |
The URL of the HTTP endpoint that will receive the data. |
Yes |
retryCount |
The number of times to retry sending if the remote server does not answer |
No |
retryDelay |
The delay in ms to wait between to retry attempts |
No |
timeout |
The connect timeout in ms |
No |
method |
Request method. Default is POST if not defined. |
No |
The HTTP destination also supports authentication using either Basic or Digest methods. Below is an example illustrating how to accomplish this.
<Destinations>
    <Http>
        <Authentication> (1)
            <Basic/> (2)
            <UserName>name of user</UserName> (3)
            <Password>the password</Password> (4)
            <Realm>the realm</Realm> (5)
        </Authentication>
</Http>| 1 | Defines the authentication block |
| 2 | Either Basic or Digest can be used |
| 3 | Specifies user name |
| 4 | Specifies the password |
| 5 | Specifies the authentication realm |
The password can be stored in encoded formats such as base 32 or base 64 values, or encoded using the ENOVIA MQL command "encrypt password". If a encoding strategy is used, the encoded password must be prefixed with the encoding format like this:
<Destinations>
    <Http>
        <Authentication>
            <Basic/>
            <UserName>name of user</UserName>
            <Password>b64:aGVsbG8gd29ybGQ=</Password>
            ...
        </Authentication>
    </Http>
The valid prefixes are:
-
plain
-
b64
-
b32
-
enovia
-
For passwords envoded with a MQL client prior to version 19xHF2
-
-
enovia-19x
-
For passwords encoded with a MQL client between the version 19xHF2 and 20x
-
-
enovia-21x
-
For passwords encoded with a MQL client of version 2021x or later.
-
The password can also be entered without prefix.
9.2.1. SSL Configuration
By default, all SSL certificates are trusted when transferring data to HTTPS destination. To improve security, you can change the behavior by configuring settings in ${TIF_ROOT}/etc/tif.custom.properties.
To configure settings, it is required to stop trusting all certificates:
https.client.disableTrustAll=true
When https.client.disableTrustAll is set true, the available settings are:
https.client.keyStore.path=<path to keystore, example: etc/keystore>
https.client.keyStore.password=secret
https.client.keyStore.type=
https.client.keyStore.provider=
https.client.keyManager.password=
https.client.trustStore.path=<path to the trust-store, example: etc/keystore>
https.client.trustStore.password=secret
https.client.trustStore.type=
https.client.trustStore.provider=
https.client.includeCipherSuites=<comma separated list>
https.client.excludeCipherSuites=<comma separated list>
At least a keystore and the password needs to be configured.
9.2.2. Preempt Basic Authentication
By default, when transferring data to a HTTP destination for the first time, TIF’s HTTP client does the following conversion with the destination:
-
The client sends a request.
-
The destination issues a challenge by responding with status code 401 and the header "WWW-Authenticate".
-
The client sends similar request, but with "Authorization" header.
If the authentication is successful, it is cached and reused for subsequent requests.
It is possible to preempt basic authentication by setting attribute preempt to true in element <Authentication>. In this case, the "Authorization" header is added immediately to the request without additional roundtrip to the destination.
9.3. JMS Destination
An example JMS destination is shown below:
<Destinations>
    <JMS id="jms-1"
         initialContextFactory="org.apache.activemq.jndi.ActiveMQInitialContextFactory"
         providerURL="tcp://server:61616">

        <Queue name="TestQueue1" jndiKey="queue.%s"/> (1)
</JMS>| 1 | The JMS element must contain either a <Topic> or a <Queue> child element. |
The attributes, which the JMS elements support, are shown in the table below:
| Attribute | Description | Note |
|---|---|---|
id |
A unique identifier. |
|
initialContextFactory |
The fully qualified name of the class that your JMS provider provides as InitialContextFactory. |
The JAR files that your JMS provider provides, should be put inside the folder |
providerURL |
The URL to your JMS broker |
|
user |
Optional user name |
Not required unless your JMS provider requires this when establishing the connection. |
password |
Optional password |
|
connectionFactoryKey |
When looking up the ConnectionFactory from the JNDI registry, a key is used for this lookup. By default, the key is assumed to be |
Not required. |
extensionId |
May be used to separate different implementation classes from each other. See below |
Not required |
The Queue or Topic element may have these attributes:
| Attribute | Description | Note |
|---|---|---|
name |
The name of the queue or topic to use |
Required |
jndiKey |
The key used to lookup this destination from the JNDI registry. By default this value is If your JMS provider uses a different naming convention for the JNDI lookup key of the destination, you need to configured this attribute accordingly. |
Optional |
Additional JNDI environment variables can be set via nested <Env> elements as shown below. This element supports two attributes: key and value. Example:
<JMS ...>
    <Queue name="testqueue" jndiKey="destination.%s"/>
    <Env key="a key" value="a value"/>
    <Env key="another key" value="another value"/>
</JMS>
9.3.1. Separation of Classes
Normally, the JMS provider specific classes should be put into ${TIF_HOME}/lib/custom. However,
if there are some collisions of classes, one can instead put these into a folder like this ${TIF_HOME}/extensions/<name-of-extension>.
Then you need to specify the name of the extension on the extensionId attribute on the JMS destination itself.
So if you put your implementation JAR files below ${TIF_HOME}/extensions/sib then your JMS destination needs the attribute extensionId="sib".
9.4. Rabbit MQ Destination
An example RabbitMQ destination is shown below:
<Destinations>
    <RabbitMQ id="rabbitmq-1"
          uri="amqp://userName:password@hostName:portNumber/virtualHost"
          routingKey="rk1">
        <Queue name="q1" autoDelete="false" durable="true" exclusive="false"/>
        <Exchange name="e1" autoDelete="false" durable="true" type="direct"/>
    </RabbitMQ>
The attributes for the <RabbitMQ> element is described in the table below:
| Attribute | Description | Note |
|---|---|---|
id |
A unique identifier. |
|
uri |
The AMQP URI |
|
userName |
The user name |
Not required if complete URI is defined |
password |
The password |
Not required if complete URI is defined |
hostname |
The host name of the Rabbit MQ server |
Not required if complete URI is defined |
port |
The port number of the Rabbit MQ server |
Not required if complete URI is defined |
virtualHost |
The virtual host name |
Not required if complete URI is defined |
routingKey |
The routing key to be used |
This can typically be overridden when the RabbitMQ destination is being used |
mandatory |
The mandatory flag |
Boolean (default: false) |
immediate |
The immediate flag |
Boolean (default: false) |
Attributes for the <Queue> element is described in the table below:
| Attribute | Description | Note |
|---|---|---|
name |
The name of the queue |
|
autoDelete |
||
durable |
||
exclusive |
Attributes for the <Exchange> element is described in the table below:
| Attribute | Description | Note |
|---|---|---|
name |
The name of the exchange |
|
autoDelete |
||
durable |
||
type |
The AMQP API supports providing arguments.
These can be declared on the <Queue> and <Exchange> elements as shown below:
<Destinations>
    <RabbitMQ ...>
        <Queue ...>
            <Arg name="argument-name"
                 value="value of argument"
                 type="string | int | double | boolean | long | float"/>
            ...
        </Queue>
    </RabbitMQ>
</Destinations>
9.5. SOAP Destination
The SOAP destination type is used when you post data to a SOAP based webservice.
To configure such destination, the syntax is shown below:
<Destinations>
    <SOAP id="soap-1">
        <ServiceURL>http://server:8080/axis2/services/PartInfoService/update</ServiceURL>

        <Namespace prefix="part" uri="http://www.technia.com/part"/>
        <Namespace prefix="doc" uri="http://www.technia.com/document"/>
        ...

        <!-- To support basic authentication
        <Authentication>
            <UserName>A User</UserName>
            <Password>The Password</Password>
        </Authentication>
        -->

        <!-- following required for SOAP 1.1
        <ActionBaseURL>http://localhost:8080/axis2/services/</ActionBaseURL>
        <Action>PartInfoService</Action>
        <Method>update</Method>
        -->
    </SOAP>
</Destinations>
Some restrictions
-
The "ServiceURL" is mandatory.
-
Currently, you also need to specify the used XML namespaces in the payload. That is accomplished via the Namespace element.
-
The Authentication element is used to provide support for Basic authentication
-
Finally, if you call a SOAP 1.1 service, you need to specify SOAPAction header that is constructed of ActionBaseURL, Action and Method elements using format <ActionBaseURL><#><Action><:><Method>. See table below:
| Element | Description | Note |
|---|---|---|
ActionBaseURL |
Base URL appended to header |
Element must exist (with or without content) to include SOAPAction header |
Action |
Action appended (with leading # delimiter if ActionBaseURL is not empty) to header |
Optional |
Method |
Method appended (with leading : delimiter if ActionBaseURL and/or Action is not empty) to header |
Optional |
| To include an empty SOAPAction header, use empty element <ActionBaseURL/> and leave Action and Method unspecified. |
9.6. Native MQ / Websphere MQ /IBM MQ Destination
If you must send data to a IBM MQ queue using the Native MQ protocol, then you must declare a NativeMQ destination. An exaple of so is shown below:
<Destinations>

    <NativeMQ id="mq1-partdata-req"
              queueManagerName="QM_acme_mq"
              hostName="192.168.1.10"
              port="1414"
              characterSet="1208"
              encoding="546"
              channel="S_acme_mq"
              connectOptions="">
        <Queue name="partdata_req" options="INPUT_AS_Q_DEF,OUTPUT"/>
    </NativeMQ>

</Destinations>
Attributes for the <NativeMQ> element is described in the table below:
| Attribute | Description | Note |
|---|---|---|
id |
The unique identifier |
|
queueManagerName |
The name of the MQ queue manager |
Required |
channel |
The channel to be used |
Required |
hostName |
Required |
|
port |
The port, which your queue manager uses |
Required |
characterSet |
Default message character set |
|
encoding |
Default message encoding |
|
priority |
Default message priority |
|
expiracy |
Default expiracy value |
|
connectOptions |
Optional additional connect options |
|
ccsid |
The <Queue> element supports these attributes:
-
name: The name of the queue -
optionsComma separated list of MQOO option (MQ Open Options)Example:
INPUT_AS_Q_DEF,OUTPUT
9.7. Email destination
An email destination is used to send data to one or more email recipients. Below is an example configuration.
<Destinations>

    <Email id="email-1" subject="My Test Message">
        <To>example1@technia.com</To>
        <To>example2@technia.com</To>
        <Cc>example3@technia.com</Cc>
        <Bcc>example4@technia.com</Bcc>
    </Email>

</Destinations>
The table below describes the available attributes for element Email.
| Attribute | Description | Required |
|---|---|---|
id |
A unique identifier. |
Yes |
subject |
The "Subject" header field of message. |
No |
The table below describes the available sub elements for element Email.
| Element | Description | Required |
|---|---|---|
To |
The "To" (primary) recipient. At least one must be defined. |
Yes |
Cc |
The "Cc" (carbon copy) recipient. One or more can be defined. |
No |
Bcc |
The "Bcc" (blind carbon copy) recipient. One or more can be defined. |
No |
|
Mail Settings
Mail settings must be configured to enable email destination. See chapter Configure Mail Settings. |
9.8. FTP destination
An FTP destination is used to send data to a file located in an FTP(S) server. Below is an example configuration.
<Destinations>

    <FTP id="ftp-1"
        hostName="myHost"
        port="21"
        userName="myUserName"
        password="myPassword"
        directory="myDir/mySubDir"
        filePrefix="myPrefix-"
        fileSuffix=".xml"
        existStrategy="replace"
        useSSL="false"
        implicit="false"
        usePROTP="true" />

</Destinations>
The table below describes the available attributes for element FTP.
| Attribute | Description | Required | Default Value |
|---|---|---|---|
id |
A unique identifier. |
Yes |
|
hostName |
Host name of a FTP(S) server. |
Yes |
|
port |
Port number of the server. Default one is used if not defined. |
No |
|
userName |
Name of a user that is logged in. |
No |
|
password |
User’s password. |
No |
|
directory |
A directory to which the file is uploaded. If not defined, default working directory is used. |
No |
|
fileName |
A static name for the uploaded file. If defined, |
No |
|
filePrefix |
A prefix which the uploaded file will get. If |
No |
|
fileSuffix |
A suffix which the uploaded file will get. If |
No |
|
existStrategy |
Defines what happens if a file with You may use the following values:
|
No |
fail |
useSSL |
Defines if an SSL connection is used to communicate with the FTP Server. Use value "true" or "false". |
No |
false |
implicit |
Defines if implicit security mode is used. Use value "true" to enable implicit mode or "false" for explicit mode. If |
No |
false |
usePROTP |
Defines if command "PROT P" is executed in the server. This means private security mode is used. Use value "true" or "false". If |
No |
false |
Either fileName or filePrefix is required. If fileName is not defined, the name of uploaded file will consist of filePrefix, a random string and optional fileSuffix.
|
TLS session presumption is not supported when PROT P (usePROTP) is used.
|
9.9. Handling Delivery Failures
If a delivery fails to some destination, you can configure an error handler per each destination.
To do so, use the XML format as shown below: (Example used for RabbitMQ, but applies to all destination types).
<Destinations>
    <RabbitMQ ...>
        <OnError> (1)
            <SendMail>
               <Subject>Unable to use RabbitMQ destination</Subject>
               <TO>support@company.com</TO>
               <TO>another@company.com</TO>
               <CC>tif.admin@company.com</CC>
               <ContentType>text/plain</ContentType>
               <Message>
                  An error occured. Error message was: ${ERROR_MESSAGE} (2)

                  Pls look at the stack trace below.
                  ${STACK_TRACE} (2)
               </Message>
            </SendMail>
        </OnError>
    </RabbitMQ>
</Destinations>| 1 | The <OnError> element is supported on all destinations. |
| 2 | The macros ERROR_MESSAGE and STACK_TRACE refers to the exception raised during the use of the destination. |
An alternative approach is to implement a custom ErrorHandler
<Destinations>
    <RabbitMQ ...>
        <OnError>
            <Handler>name of class</Handler> (1)
        </OnError>
    </RabbitMQ>
</Destinations>| 1 | The class specified here must implement com.technia.tif.core.error.ErrorHandler |
10. Log Settings
Log settings are configured in file logback.xml that is located in ${TIF_ROOT}/etc.
The file can be modified to configure where TIF log messages will be written. Also, you can configure log level for each package.
10.1. Logging from Custom Classes
Use classes org.slf4j.Logger and org.slf4j.LoggerFactory when logging and add your Java package name along with a suitable log level to logback.xml.
For example:
package com.acme;

import org.slf4j.Logger;
import org.slf4j.LoggerFactory;

public class YourClass {

    private static final Logger logger = LoggerFactory.getLogger(YourClass.class);

    public void yourMethod() {
        // The following will construct a debug message 'This is your debug message'.
        String yourParam = "your debug message";
        logger.debug("This is {}", yourParam);
    }

}
Add a logger with the package name to logback.xml:
<configuration>
    ...

    <logger name="com.acme" level="DEBUG"/>

    ...
</configuration>