${TIF_ROOT}/modules/enovia/cfg/soapservice
TIF ENOVIA Connector - Inbound Integration Jobs
23 August 2013
Table of Contents
- 1. Inbound Integration Jobs
- 1.1. Configurable SOAP Web Services
- 1.2. Hosting SOAP Web Service
- 1.3. Directory / File Listener
- 1.4. JMS Listener / Message Receiver
- 1.5. RabbitMQ Listener / Message Receiver
- 1.6. IBM MQ Listener / Message Receiver
- 1.7. Configurable RESTful Web Services
- 1.7.1. URL to a service
- 1.7.2. Context Path to REST services
- 1.7.3. Example Configuration
- 1.7.4. Configuration
- 1.7.5. Lifecycle of a Call
- 1.7.6. Credentials
- 1.7.7. Access
- 1.7.8. Id Locators
- 1.7.9. Operation
- 1.7.10. Payload Read Operation
- 1.7.11. File Read Operation
- 1.7.12. File Update Operation
- 1.7.13. Create new Job Operation
- 1.7.14. HTTP Status Codes
- 1.8. Hosting RESTful Web Service
- 1.9. Apache CXF Base Web Application
- 1.10. Reply Handler
- 1.11. Create / Update Integration
- 1.11.1. Contextual or Non-Contextual
- 1.11.2. Configuration File
- 1.11.3. Input Formats
- 1.11.4. Entry Point
- 1.11.5. Config
- 1.11.6. IdentityMatch
- 1.11.7. CreateValues
- 1.11.8. UpdateValues
- 1.11.9. CustomField
- 1.11.10. Connections
- 1.11.11. EmbeddedFiles
- 1.11.12. ValueMapper
- 1.11.13. Namespaces
- 1.11.14. Revising
- 1.11.15. Example Configuration
- 1.11.16. Trigger a Create/Update Integration via REST
- 1.11.17. Trigger a Create/Update Integration via JMS
- 1.11.18. Trigger a Create/Update Integration via File
- 1.11.19. Extension Points
- 1.11.20. Debugging
1. Inbound Integration Jobs
Inbound integration jobs in TIF are based upon some external event resulting in some kind of job taking place at the TIF server.
Such job typically performs some update to the ENOVIA™ database, for example creates or updates business objects and/or connections between business objects. It may however also be a job that only fetches data from ENOVIA™, for example some external system requests some data from ENOVIA™ via a JMS message or a Webservice request.
The use cases varies. The child pages describes the current possibilities to handle this within the TIF server.
1.1. Configurable SOAP Web Services
TIF includes an Apache Axis2 installation in order to support SOAP based web-services.
In addition to the standard distribution of Apache Axis2, TIF provides some extended Axis2 functionality that supports creation and deployment of some different kind of SOAP based web-services solely defined in XML file. E.g. no need to implement the webservice in Java, compile and package it as a AAR file.
The kind of configurable web-services you can use in the current TIF release are:
-
Export of data from business object(s).
-
The configuration format allows specifying criteria used to find the business object(s) to export
-
Also, you configure what data to be exported for these objects.
-
It is also possible to point out a Payload Definition that defines the returned meta-data
-
-
-
Update of business object(s) data
-
The configuration format allows specifying criteria used to find the business object(s) to update
-
Also, you configure what fields / attributes the web-service client may update and some rules for the values.
-
The first service is called "configurable export service" and the second is called "configurable update service".
These are described in more detail in the child pages.
1.1.1. Location of Configurable Web Service’s
A configurable web-service is defined in an XML file that should be put inside the following folder:
By default, TIF has enabled hot-deployment and hot-update of the Axis2 application meaning that you can add new configurable web-services or update existing at runtime of TIF.
1.1.2. From Definition to Implementation
The web-service definition is defined by you and consists of an XML file. When this file is put into the directory "soapservice", the TIF deployer in Axis2 will pick up the file and scan it. The following actions will take place then:
-
Parse and validate definition
-
Generate a WSDL
-
Compile the WSDL into Axis Data Binding classes (ADB)
-
Generate Java code implementing the service classes.
-
Compiles all source code.
-
Packages all compiled artifacts along with necessary resource into a so called AAR file (Axis archive).
-
The AAR file is deployed into Apache Axis2.
-
Service is ready for use
The final AAR files are stored internally under the following folder inside TIF:
${TIF_ROOT}/data/${TIF_INSTANCE_ID}/axis2/services
1.1.3. Common Settings
There are some common settings possible to define on a configurable web service. These are defined as attributes on the root-element in the XML definition.
The attributes are:
| Attribute Name | Description | Required |
|---|---|---|
namespace |
Used to specify the namespace of the schema in the WSDL. |
No |
package |
Unless defined, a default package name for the generated Java classes will be used. Note that if you define your package name, ensure that it is unique and will not collide with existing web-service’s. |
No |
keepSource |
A boolean flag that may be used to keep the generated source files. This might be useful for debugging purposes. |
No |
debug |
If set to true the source code is generated with some debug information. |
No |
serviceDescription |
Gives the service a more human friendly description. Unless specified, the service description will be the same as the service name. |
No |
1.1.4. URL to a Configurable Web Service
The URL to a configurable web service depends on what hostname your TIF server uses, the port TIF will be using (8181 is default), the context path to the jaxws application and finally the name of the XML definition that defines the webservice.
Assuming your configurable webservice is defined in a file called ProductQueryService.xml and the default configurations are used, the URL becomes
http(s)://tif-server:8181/enovia/jaxws/services/ProductQueryServiceTo obtain the WSDL file for this service, just append the ?wsdl at the end of the URL.
Axis2 Installation Details
The Apache Axis2 installation is part of the TIF installation. The place where the Axis2 related files are installed is:
${TIF_ROOT}/modules/enovia/webapps/jaxws|
TIF has made some changes into the Axis2 configuration files. If you do any changes in the Axis2 configuration files, ensure that you don’t remove or destroy the TIF specific additions. |
1.1.5. Configurable Export Service
The configurable export web-service support is used to quickly setup a SOAP based web-service that can be used by a client to export business object meta data.
Each configuration results in one web-service to be exposed. This kind of web service may have one or two operations (or methods) that can be invoked remotely, namely:
-
Extracting data based upon a list of object id’s
-
Extracting data from object(s) based upon query parameters deciding what object’s to be exported
Below is a sample configuration illustrating some concepts.
<ExportServiceDefinition>
     <Credentials required="true" />
     <ObjectId max="100" />
     <Query>
        <Params>
            <Limit min="1" max="50" />
            <Name allowWildCard="true" />
        </Params>
        <Defaults>
            <Limit>25</Limit>
            <Type>type_Product</Type>
            <Vault>vault_eServiceProduction</Vault>
            <Revision>*</Revision>
            <Where>current matchlist 'Release,Obsolete' ','</Where>
        </Defaults>
    </Query>
     <Extract payload="tvc:payload/ProductDetails.xml"/>
 </ExportServiceDefinition>
The root element of this file must be <ExportServiceDefinition>.
The available child elements are listed in the table below.
| Child Element | Description | Example |
|---|---|---|
|
Defines if the client of this web-service must provide a user name / password for an ENOVIA user. If the definition does not contain this element or has the attribute required set to false, the query and data extract will be performed with super-user privileges. |
No but recommended. |
|
Defines if an operation in the web-service called "getDataForObjectId" should be available. This method allows passing in ENOVIA object-id’s to the service in order to extract data. Note that the service will not perform any check of the validity of these object-id’s. For example, a client might pass object-id’s pointing to for example business objects of type Part to a service that normally deals with Products. |
No but either this or the <Query> element must be present. |
|
Defines if an operation in the web-service called "query" should be available. Depending on the content of this element, the query method can accept a wide range of different input. See below for further details. |
No but either this or the <ObjectId> element must be present. |
|
Defines what to be extracted from this web-service. You may point out a payload configuration or define selectables directly in the configuration. |
Yes |
|
Defines a custom Java class OR a custom Script file that can be used to perform additional validations. |
No |
Credentials
If this element is omitted or if the attribute required is set to false then the operations or methods of this web service will be executed with admin privileges.
Example:
<ExportServiceDefinition>
    <Credentials required="true"/>
If credentials is required, the user calling the web-service operation is required to enter a valid ENOVIA user id / password combination.
It is also possible to use container managed authentication (basic authentication). See [Container Managed Credentials] for more information.
ObjectId
If the <ObjectId> element is present, this will result in that an operation called getDataForObjectId() is available on the web service.
This element may have one attribute defined called "max". This attribute may be used to limit the number of object-id’s that are allowed to pass in to the operation.
The default value is "-1", meaning that there is no upper limit.
Example:
<ExportServiceDefinition>
    ...
    <ObjectId max="-1"/
Query
If the <Query> element is present, this will result in that an operation called "query" is available on the web service.
The query method will accept some input arguments, which are defined by the definition. Lets take a closer look what child elements you may have for the <Query> element:
| Child Element | Description | Required |
|---|---|---|
|
Defines what parameters the client may pass in. See below for details. |
No, but probably always used. |
|
Defines some default settings for the query, such as default where expression or default type pattern etc. |
No, but for security reasons recommended as you may not want the client to be able to search upon any data inside the ENOVIA database. |
These child elements are described below.
Params
The <Params> element defines what input arguments the client may pass in.
The possible child elements are shown in the table below:
| Child Element | Description | Attributes | Required | Example |
|---|---|---|---|---|
|
Used to allow the client to define a query limit. You may also say what the min and max value for the limit can be. |
min max value |
No |
|
|
If present, allows the client to define a type pattern for the query. The attribute "wildcardAllowed" may be used to specify if characters such as * and/or ? may be used in the pattern. The attribute "name" may be used to give this parameter a different name. |
wildcardAllowed name |
No |
|
|
Same as |
See above |
No |
|
|
Same as |
See above |
No |
|
|
Same as |
See above |
No |
|
|
Same as |
See above |
No |
|
|
Defines an argument that affects the where clause of the query. The Arg element has a child element called The name attribute is used to provide this argument a valid name. The required attribute specifies if the client must provide this value or not. The type attribute may be one of: string, integer, decimal, boolean The rangeLoader attribute may be used to point out a custom range value provider.
The class must implement the interface: |
name required type rangeLoader |
No |
|
Arg / Where
Within the where clause of the argument, you use the %s (String.format is used for this) to be replaced with the real value. Note that you might use other format options if you are familiar with the Formatter / String.format in Java.
Defaults
The <Defaults> element defines the default search criteria.
The possible child elements are shown in the table below:
| Child Element | Description | Required | Example |
|---|---|---|---|
|
Specifies the default find/query limit |
No |
|
|
Defines a type in the type pattern. Each type in the pattern is defined inside it’s own Type tag. |
No |
|
|
See |
No |
|
|
See |
No |
|
|
See |
No |
|
|
See |
No |
|
|
Defines the default part of the where clause. Note: This where expression will be added first to the where clause, before any custom arguments. |
No |
|
Extract
The <Extract> element defines what data to be extracted for the objects found via the query (or the objects provided by the getDataForObjectId() operation).
You have two different options to perform the extract, either point out a payload definition that specifies what data to be extracted, or define it in this configuration.
For the first alternative, e.g. using a payload definition, you configure that scenario like shown below:
<ExportServiceDefinition>

    <Extract payload="tvc:payload/MyPayload.xml" />
or
<Extract payload="MyPayload.xml"/>For the other alternative, the possible child elements are shown in the table below:
| Child Element | Description | Attributes | Required | Example |
|---|---|---|---|---|
|
Defines that the basic data from the business object(s) may be part of the extracted data, if the client wants it. You may define certain basic properties to be excluded by using the The name attribute is default set to "basics". The default attribute is default set to "include". |
name default |
No |
|
|
Defines that the attributes from the business object(s) may be part of the extracted data, if the client wants it. You may define certain attributes to be excluded by using the <Exclude> child element The name attribute is default set to "attributes". The default attribute is default set to "include". |
name default |
No |
|
|
Defines custom extraction arguments. See details below. |
name default dataType select |
No |
|
Arg
The <Arg> element is used to specify custom extract arguments. E.g. one argument may map to one or multiple select expressions. You may also refer to a "table column definition", which defines complex data extraction rules.
The following table shows the available attributes on the <Arg> element.
| Attribute Name | Description | Example |
|---|---|---|
select |
Defines a single select expression |
|
dataType |
Defines the data type of the returned data. One of:
|
|
multiple |
A boolean indicating if the returned data contains one or multiple values. If a select expression starts with "from[", "to[" or "relationship[", this value will by default be set to true. |
|
The possible child elements are shown in the table below:
| Child Element | Description | Required | Example |
|---|---|---|---|
|
Defines a select expression that should be used for extraction of the data |
No |
|
|
Defines a table column that is used for extraction of the data |
No |
|
Handler
The handler element allows pointing out a custom Java class or a custom script for validation/custom handling of the web service. The latter is a convenient way to quickly implement custom validation without having to compile any code.
To define a custom Java class, configure it like shown below:
<ExportServiceDefinition>
    <Handler>com.acme.integrations.ws.ProductDataExportHandler</Handler>
This class must either implement the interface com.technia.tif.enovia.jaxws.api.export.QueryServiceHandler or extend from the default implementation com.technia.tif.enovia.jaxws.api.export.DefaultQueryServiceHandler.
The default implementation is implemented like shown below:
import java.util.Map;
import com.technia.tif.enovia.jaxws.api.Value;
import com.technia.tif.enovia.jaxws.api.Webservice;
import com.technia.tvc.core.db.Query;

public class DefaultQueryServiceHandler implements QueryServiceHandler {

    public void validateInput(Webservice service, Object input) {
    }

    public void validateQuery(Webservice service, Query query) {
    }

    public void handleBasicsMap(Webservice service, Map<String, Value> valueMap) {
    }

    public void handleAttributesMap(Webservice service, Map<String, Value> valueMap) {
    }

    public boolean isAuthorized(Webservice service, String userId) {
        return true;
    }
}
If you want to implement the same handler in a script file, for example a Javascript file you can point out such script like shown below (different syntaxes shown).
<ExportServiceDefinition>
    <Handler>script:MyHandler.js</Handler>
    <Handler>tvc:script/MyHandler.js</Handler>
    <Handler>script:tvc:script/MyHandler.js</Handler>

    <Handler>tvc:script:acme/MyHandler.js</Handler>
The first three variants all refers to the same script file, e.g. ${TIF_ROOT}/modules/enovia/cfg/script/MyHandler.js
The last example refers to the file: ${TIF_ROOT}/modules/enovia/cfg/acme/script/MyHandler.js
You may chose what functions to implement in your script, below is an example:
function validateInput(service, input) {
    var qp = input.getQueryParams();
    var arg1 = qp.getArg1(), arg2 = qp.getArg2();
    if (arg1 == "1" && arg2 == "1") {
        throw "Arg1 and Arg2 may not both be set to 1";
    }
}

function isAuthorized(service, uid) {
    if (uid == "creator") {
        return false;
    }
    return true;
}
1.1.6. Configurable Update Service
The configurable update web-service support is used to quickly setup a SOAP based web-service that can be used by a client to update business object meta data in ENOVIA™.
Each configuration results in one web-service to be exposed. This kind of web service will have one operation that can be invoked remotely. This method is called "update".
Below is a sample configuration illustrating some concepts.
<UpdateServiceDefinition>
    <Credentials required="true" />

    <Query>
        <Params>
            <Arg name="unitOfMeasure" required="true" type="String">
                <Where>${attribute[attribute_UnitofMeasure]} == "%s"</Where>
            </Arg>
        </Params>
        <Defaults>
            <Limit>100</Limit>
            <Type>type_Part</Type>
            <Vault>vault_eServiceProduction</Vault>
        </Defaults>
    </Query>

    <Update>
        <Field
            name="unitOfMeasure"
            type="string"
            attribute="attribute_UnitofMeasure"/>
        <Field
            name="test"
            type="string"
            required="false"
            java="com.technia.tif.enovia.jaxws.api.update.TestUpdater"/>
    </Update>

    <ReturnFormat>
        <OnSucess>
            <Status>OK:${COUNT}</Status>
        </OnSucess>
        <OnError>
            <Status>FAILED</Status>
            <Message>${ERROR}</Message>
        </OnError>
    </ReturnFormat>
 </UpdateServiceDefinition>
The root element of this file must be <UpdateServiceDefinition>.
The available child elements are listed in the table below.
| Child Element | Description | Required |
|---|---|---|
|
Defines if the client of this web-service must provide a user name / password for an ENOVIA™ user. If the definition does not contain this element or has the attribute required set to false, the query and data extract will be performed with super-user privileges. |
No but recommended |
|
Defines the query parameters, e.g. the query that returns the objects which is subject for being updated. |
Yes |
|
Defines what to be updated, e.g. what input the client must provide and what this input maps to. |
Yes |
|
Defines the response/return value from the service. You may configure the success message and error message / status. |
No |
|
Defines a custom Java class OR a custom Script file that can be used to perform additional validations. |
No |
Credentials
If this element is omitted or if the attribute required is set to false then the operations or methods of this web service will be executed with admin privileges.
Example:
<UpdateServiceDefinition>
    <Credentials required="true"/>
    ...
If credentials is required, the user calling the web-service operation is required to enter a valid ENOVIA™ user id / password combination.
It is also possible to use container managed authentication (basic authentication). See [Container Managed Credentials] for more information.
Query
The details of the <Query> element is described within the Configurable Export Service chapter.
Update
The <Update> element defines what to be updated.
The following table shows the possible child elements of this element.
| Child Element | Description | Required | Example |
|---|---|---|---|
<Field> |
Defines the "fields" that contains the update settings |
At least one present |
|
Field
The <Field> element has a number of attributes used to control the behavior of the field. The following table shows the available attributes on the <Field> element.
| Attribute Name | Description | Example | Required |
|---|---|---|---|
name |
Defines the name of the field. Note that the name must only contain the characters a-z and or A-Z or digits. The first character must be a letter. |
|
Yes |
type |
Defines the data-type for the value sent by the client. The possible values are:
|
|
No, defaults to String |
attribute |
Specifies an attribute, which the field maps to. |
|
- |
basic |
Specifies a basic property, which the field maps to. |
|
- |
java |
Specifies a Java class, which the field maps to. See below for details |
|
- |
script |
Specifies a Script file, which the field maps to. See below for details |
|
- |
| Exactly one of the attributes "attribute", "basic", "java" and "script" must be set. |
The Java attribute, if used, must contain the fully qualified classname of a class implementing the interface com.technia.tif.enovia.jaxws.api.update.Updater.
This interface is defined as below:
package com.technia.tif.enovia.jaxws.api.update;

import com.technia.tif.enovia.jaxws.api.Webservice;

/**
 * The updater interface used by the configurable update webservice.
 * @author Technia
 */
public interface Updater {
    /**
     * Performs the update of the field.
     *
     * @param service The service, which is calling this updater.
     * @param objectId The id of the object to update
     * @param field The field name to be updated
     * @param value The value sent by the client.
     * @throws Exception If unable to perform the update operation, for some reason.
     */
    void update(Webservice service, String objectId, String field, Object value) throws Exception;
}
Using the script attribute lets you define the update logic inside a script file instead. Below is an example of such:
importClass(com.technia.tvc.core.db.BusinessObjectUtils);

function update(service, objectId, field, value) {
    var type = BusinessObjectUtils.select(objectId, "type.kindof");
    if (type == "Part") {
        if (value < "1") {
            throw "Invalid value: " + value;
        }
        BusinessObjectUtils.setAttribute(objectId, "Target Cost", value);
    }
}
ReturnFormat
The <ReturnFormat> element allows defining how the response should look alike when the web-service has been invoked.
You can control the success status and the error status and message. See below for syntax:
<UpdateServiceDefinition>
    <ReturnFormat>
        <OnSucess>
            <Status>OK:${COUNT}</Status>
        </OnSucess>
        <OnError>
            <Status>FAILED</Status>
            <Message>${ERROR}</Message>
        </OnError>
    </ReturnFormat>
</UpdateServiceDefinition>
The ${COUNT} macro refers to the number of objects being updated.
The ${ERROR} macro may be used in the <OnError> section to include the error message.
Handler
The <Handler> element is described in the Configurable Export Service chapter.
1.1.7. Credentials
The <Credentials> element contains the following attributes:
- containerManaged
-
A boolean value. Specifies if authentication is carried out via the servlet container. See chapter below how to configure this.
- runAs
-
A string value. Defines the name of the ENOVIA™ user that we will run the service as.
- runAsSuperUser
-
A boolean value. Useful together when
containerManaged=trueand you want to run the service as a super user, while authentication is required.
Valid child elements are defined in the table below
| Element | Description | Mandatory |
|---|---|---|
|
Used for defining the ENOVIA/3DExperience security context. See below how to configure this. |
No |
|
In case container managed authentication is enabled, you may define additional roles, which the authenticated user must have in order to gain access. These roles are typically not ENOVIA/3DExperience roles, in case of Kerberos authentication these will be roles from your Active Directory. Note that if you specify multiple roles, the user is only required to have one of the listed roles in order to get access. Example below: |
No. |
|
Specify additional ENOVIA/3DExperience assignments the user must have in order to proceed. Example below: |
No |
Security Context
Via the <SecurityContext> element you define what security context to use.
You may do the following.
-
Point out a mapping file
-
Or use a default mapping file
-
-
Specify a named security context
-
Or use the "default" security context as configured for the ENOVIA user
To point out a mapFile use the syntax below.
The file is relative to ${TIF_ROOT}/modules/enovia/etc
|
<SecurityContext mapFile="sec-mapping.xml" />Use the default mapping file.
The default file is specified via the property securityMapping.defaultFile, and the default value is security-context-mapping.xml.
The file is relative to ${TIF_ROOT}/modules/enovia/etc
|
<SecurityContext useDefaultMapFile="true" />The format of the mapping file is shown below:
<Contexts>
    <Context name="Design Engineer.Company Name.GLOBAL">
        <User is="user1" />(1)
        <User is="user2" />
        <User is="user3" />

        <Role is="engineer" /> (2)
        <Role is="designer" />

        <Parameter name="test" is="something" /> (3)
        <Parameter name="x" is="y" />
    </Context>
    <Context name="...">...</Context>
    <Context name="...">...</Context>
</Contexts>
NOTE that specifying user and role requires having enabled container managed authentication (Kerberos or Basic Authenticaton etc.)
| 1 | Specifies certain users to match against |
| 2 | Specifies additional roles the user should have |
| 3 | Specifies additional parameters and value to be evaluated In case of a REST service, the parameters are the request parameters passed to the service. |
The evaluation logic is:
-
User list is EMPTY or user is in list
-
Role list is EMPTY or user have one of the roles in the list
-
Parameter list is EMPTY or one of the parameters have the expected value
If A AND B AND C is satisfied, then use the security context defined for this "rule".
To use a specific Security Context:
<SecurityContext use="Design Engineer.Company Name.GLOBAL" />Specify using the default security context.
<SecurityContext useDefault="true" />Container Managed Security
You can enable security on the servlet container level and either use Kerberos/SPNego authentication OR use Basic authentication and authenticate against the ENOVIA™ database.
Configure Security Realm
Within the ${TIF_ROOT}/modules/enovia/etc/module.custom.properties, you need
to specify what login service to be used including its realm and optionally some
extra parameters.
The login services currently supported are
- enovia
-
A login service that will authenticate the remote user against the ENOVIA™ database.
- ldap
-
A login service that will authenticate the remote user against a LDAP directory (for example Active Directory)
- spnego
-
A login service supporting Single Sign On against Active Directory.
| In order to use Spnego authentication, also read this document in order to setup the core parts of Spnego/Kerberos. |
LDAP Authentication
If the "loginService" is set to "ldap", TIF will authenticate users against a LDAP directory.
http.webapp.jaxws.loginService=ldap
http.webapp.jaxws.realm=Webservices
The second value defines the "realm". (See https://www.ietf.org/rfc/rfc2617.txt for more information about realms and basic authentication).
There are some additional LDAP settings required to be defined. You can specify global LDAP parameters and/or web application specific LDAP parameters. In most cases you will be fine with only global LDAP settings.
For convenience, the application specific parameters will be merged with the global LDAP parameters. Hence you only need to override/define the parameters that is different on the application level.
Please see the table below.
The global parameter name is ldap., while the application specific parameter
are named like http.webapp.<APP_NAME>.ldap.
|
| Parameter | Description | Required |
|---|---|---|
ldap.server |
Defines the server or list of LDAP servers. Separate with space if using multiple. |
Yes |
ldap.rootDN |
Defines the root dn, where all LDAP searches starts from. If we can start a search starting at a sub-node (as opposed to root), you get a better performance because it narrows down the scope of a search. This field specifies the DN of such a subtree. |
No |
ldap.userSearchBase |
The relative DN (From the root DN) that further narrow down searches to the sub-tree. If you do specify this value, the field normally looks something like "ou=people". |
No |
ldap.userSearchFilter |
This field determines the query to be run to identify the user record. The query is almost always "uid={0}" as per defined in RFC 2798, so in most cases you should leave this field empty and let this default kick in. If your LDAP server doesn’t have uid or doesn’t use a meaningful uid value, try "mail={0}", which lets people login by their e-mail address. If you do specify a different query, specify an LDAP query string with marker token "{0}", which is to be replaced by the user name string entered by the user. |
Yes |
ldap.groupMembershipAttribute |
If the user entry in the LDAP tree contains an attribute with the group membership, then specify that attribute here. Otherwise we need to query for the groups a user belongs to. |
Either this or the groupSearchBase / groupSearchFilter needs to be defined. |
ldap.groupSearchBase |
This field determines the query to be run to identify the organizational unit that contains groups. The query is almost always "ou=groups" so try that first, though this field may be left blank to search from the root DN. |
Not needed, but if the groupMembershipAttribute is undefine you can use this to make the group query faster. |
ldap.groupSearchFilter |
Defines the search filter for groups. In case we need to search the LDAP tree for group membership this needs to be defined. The marker token "{0}" is replaced with the current user’s DN. Example:
|
Yes unless groupMembershipAttribute is defined. |
ldap.managerDN |
If your LDAP server doesn’t support anonymous binding, then we would have to first authenticate itself against the LDAP server. A DN typically looks like CN=MyUser,CN=Users,DC=mydomain,DC=com although the exact sequence of tokens depends on the LDAP server configuration. It can be any valid DN as long as LDAP allows this user to query data. |
Probably Yes |
ldap.managerSecret |
The password for the manager DN |
Probably Yes |
ldap.displayNameLDAPAttribute |
The attribute holding the display name. Per default we use the CN of the user entry. |
No |
ldap.emailAddressLDAPAttribute |
The attribute holding the email value. Per default we use the field This field is currently not used so you can leave it blank. |
No |
ldap.pooled |
Whether or not to pool the LDAP connections |
No |
Example setup below for Active Directory.
ldap.server=ldapserver.yourdomain.com:3268
ldap.rootDN=DC=yourdomain,DC=com
ldap.managerDN=CN=nameofuser,CN=groupforuser,DC=yourdomain,DC=com
ldap.managerSecret=the_very_secret_string
ldap.userSearchBase=
ldap.userSearchFilter=(&(objectClass=person)(|(sAMAccountName={0})(userPrincipalName={0}@*)))
ldap.emailAddressLDAPAttribute=mail
ldap.displayNameLDAPAttribute=displayName
ldap.groupMembershipAttribute=memberOf
#ldap.groupSearchBase=OU=groups
#ldap.groupSearchFilter=(&(member={0})(objectClass=group))|
The managerSecret value can either be defined in plain text, or you can encrypt the password from an MQL client using the "mql encrypt" feature.
The encrypted value can be used in the configuration file if you add the prefix
Eg.
|
ENOVIA Authentication
If the "loginService" is set to "enovia", TIF will authenticate users against the ENOVIA database.
http.webapp.jaxws.loginService=enovia
http.webapp.jaxws.realm=Webservices
The second value defines the "realm". (See https://www.ietf.org/rfc/rfc2617.txt for more information about realms and basic authentication).
Spnego Authentication
Secondly, an example for spnego:
http.webapp.jaxws.loginService=spnego
http.webapp.jaxws.spnego.targetName=HTTP/tifserver.exampledomain.com
http.webapp.jaxws.realm=Webservices| Instead of specifying the targetName you may instead point out a property file that holds that value under the key targetName. See below: |
http.webapp.jaxws.loginService=spnego
http.webapp.jaxws.spnego.config=${tif.home}/etc/kerberos/spnego.properties
http.webapp.jaxws.realm=Webservices
The spnego.properties defines the targetName like this:
${tif.home}/etc/kerberos/spnego.properties
targetName = HTTP/tifserver.exampledomain.comConfigure Security Constraints in WEB.XML
Within the "web.xml" file (webapps/jaxws/WEB-INF/web.xml) you need to setup the rules for the application.
If you have not started TIF, you will not find the web.xml file, instead
it will be found under webapps/jaxws/WEB-INF/web.xml.template. Upon start, TIF
will copy over the template file unless the web.xml file is found.
|
Below is an example when using ENOVIA/Basic authentication and how such might look like.
Note that in this example, each user that is supposed to use the web-services must have the role "WS-Integration-User". Note that depending on login service used (ldap or enovia), the role is either a LDAP role or a ENOVIA role.
<security-constraint>
    <web-resource-collection>
        <web-resource-name>blocked</web-resource-name>
        <url-pattern>/service/*</url-pattern>
    </web-resource-collection>
    <auth-constraint>
        <role-name>WS-Integration-User</role-name>
    </auth-constraint>
    <user-data-constraint>
        <transport-guarantee>NONE</transport-guarantee>
    </user-data-constraint>
</security-constraint>
<login-config>
    <auth-method>BASIC</auth-method>
    <realm-name>Webservices</realm-name>
</login-config>
Below is an example for Spnego:
<security-constraint>
    <web-resource-collection>
        <web-resource-name>blocked</web-resource-name>
        <url-pattern>/service/*</url-pattern>
    </web-resource-collection>
    <auth-constraint>
        <role-name>EXAMPLEDOMAIN.COM</role-name>
    </auth-constraint>
</security-constraint>
<login-config>
    <auth-method>SPNEGO</auth-method>
    <realm-name>Webservices</realm-name>
</login-config>
1.2. Hosting SOAP Web Service
TIF allows deploying custom SOAP Webservice’s.
1.2.1. Custom Axis Archive (AAR)
If you have built a Webservice and packaged it as an AAR file, you can simply drop your AAR file with in the directory:
${TIF_ROOT}/modules/enovia/webapps/jaxws/WEB-INF/services
These services are then automatically deployed during startup.
1.2.2. @WebMethod Annotated Classes (JSR 181)
It is also possible host web services that are implemented by JSR 181 annotated Java classes.
The web service classes needs to be compiled with the help of the Apache Axis2 libs in to a JAR file.
The web service is deployed by dropping the compiled JAR file into ${TIF_ROOT}/modules/enovia/webapps/jaxws/WEB-INF/servicejars.
For example:
package com.acme.tif;

import javax.jws.WebMethod;
import javax.jws.WebParam;
import javax.jws.WebService;
import javax.jws.soap.SOAPBinding;

@SOAPBinding(style = SOAPBinding.Style.RPC)
@WebService(serviceName = "MyWebService", targetNamespace = "http://technia.com")
public class MyWebService {
	@WebMethod(operationName = "myMethod")
	public String myMethod(@WebParam(name = "yourString") String yourString) {
		return yourString + " received";
	}

}
1.2.3. Custom Web-application
An alternative to use Apache Axis and AAR files, is to use Apache CXF and host the CXF application inside TIF.
You deploy custom webapps by creating a new folder below ${TIF_ROOT}/modules/enovia/webapps.
By default, the URL to such webapp is following this format
http://hostname:8181/enovia/name-of-folder/...
Note that you can customize the context path per webapp via ${TIF_ROOT}/modules/enovia/etc/module.custome.properties.
1.2.4. Apache CXF Base Web Application with Logging Support
There is a Apache CXF base webapp under ${TIF_ROOT}/modules/enovia/webapps/cxf that can be used as base/template for CXF based web services.
There are own servlet filters for SOAP and RESTFul web services that can be used for logging web service calls to TIF DB. See web.xml for filter details. Also, there is cxf-servlet.xml that contains configurations for example web services.
| If you have not started TIF, you will not find the web.xml or cxf-template.xml file, instead there are template files. Upon start, TIF will copy over the template file unless the web.xml or cxf-template.xml file is found. |
1.2.5. Logging
Hosted SOAP web service is automatically logged in the TIF database. It appears as a SOAP service in Admin UI.
For example, http://localhost:8181/enovia/jaxws/services/myService is visible in Admin UI as "myService" SOAP service.
Limiting Logged Payload
There are configurable webapp init parameters to set maximum length for logged inbound (request) and outbound (response) payloads. Parameters help to limit usage of heap memory and storage by preventing to persist too large payloads to TIF DB.
See parameters "inboundPayloadMaxLength" and "outboundPayloadMaxLength" in web.xml.
|
Default value for parameters is 1 000 000 bytes, if not defined. |
1.3. Directory / File Listener
Some legacy systems communicate with each other by creating files in certain directories in the file system. TIF provides built-in support for setting up one or several listeners that will listen to changes in a directory (or directories) in the file-system and then perform some action.
You can listen to events in the file system like CREATE or MODIFY. By default, a directory listener will react upon the CREATE event.
When a directory listener receives an event, the processing of the file will take place a few moments later according to the configured pickup-delay (default is 3000 ms.). This pickup delay will ensure that we do not react upon multiple events for the same file, which may be the case on some Operating Systems (Windows using file-shares for example).
1.3.1. Configuration Details
You can set-up several directory listeners, each will then listen to different directories within the file-system.
| Do not configure multiple listeners that will listen to the same or a sub-directory as another directory listeners is configured for. |
The preferred way of configuring such listener is to use the XML configuration format.
E.g. adding a file within the directory ${TIF_ROOT}/modules/enovia/cfg/directorylistener.
By default, this directory is scanned upon startup and all configured listeners therein will be registered automatically.
You can configure this behaviour within ${TIF_ROOT}/modules/enovia/etc/module.custom.properties via the following properties:
| Property | Type | Default | Description |
|---|---|---|---|
resources.directorylistener.autoRegister |
boolean |
True |
Use this property to disable the auto registration |
resources.directorylistener.excluded |
Comma separated list |
Comma separated list of resources to be excluded. |
|
resources.directorylistener.included |
Comma separated list |
Comma separated list of resources to be included. |
By default, auto registration is enabled and no resources are excluded.
XML Configuration Format
The root element is <DirectoryListener>. The table below lists the allowed child elements:
| Element | Required | Description | Example |
|---|---|---|---|
|
Yes |
Defines a user friendly name of this configuration |
|
|
No |
Defines the pickup delay in milliseconds. Default is 3000. |
|
|
No |
Can be used to define a File Destination that defines the directory where to listen from. Either this is defined OR the |
|
|
Yes, unless a |
Defines input/output/error paths. |
See below. |
|
No |
Define file system events to react upon. Default is CREATE event only. |
|
No |
Defines if to establish an ENOVIA context |
|
|
Yes |
Defines the handler containing your businesslogic that is processing the message |
|
|
The <Paths> element supports the following attributes.
- recurse
-
A boolean specifying if to register to sub-directories also. Default is true
- processExistingOnStartup
-
A boolean specifying if to process files in the input directory upon startup. Default is true.
- registerNewDirectories
-
A boolean specifying if to register new directories created within the monitored file-area. Default is true.
- delete
-
Whether or not to delete the file after it has been processed.
If donePath and/or errorPath has been set then the file is moved instead of being deleted, even if delete flag is set to true.
|
The <Paths> element supports the following child elements.
| Element | Required | Description | Example |
|---|---|---|---|
|
Yes |
Defines input directory. Use multiple |
|
|
No |
Defines a directory, which files are moved to upon successful processing |
|
|
No |
Defines a directory, which files are moved to upon an error |
|
The <Events> element supports the following child elements.
| Element | Required | Description |
|---|---|---|
|
No |
React upon create events |
|
No |
React upon modify events |
|
No |
React upon delete events |
| Leaving the Events out implies reacting upon Create events. |
The <WithContext> element supports the following attributes.
| Attribute | Required | Description |
|---|---|---|
user |
No |
If omitted, the super user will be used |
securityContext |
No |
Defines the security context to be used |
useDefaultSecurityContext |
No |
If set to true, the default security context for the user will be used. The used user must have a default security context otherwise an error will be raised. |
The <Handler> element supports one of these three attributes
- className
-
The name of a class implementing
com.technia.tif.enovia.file.WatcherHandler. See chapter below. - script
-
Name of a script resource. Example:
script="tvc:script/MyHandler.js". See chapter below. - type
-
Name of a pre-defined type. Example:
type="SomePredefinedType"
Example configuration:
<tif:DirectoryListener
    xmlns:tif="http://technia.com/TIF/DirectoryListener"
    xmlns:xsi="http://www.w3.org/2001/XMLSchema-instance"
    xsi:schemaLocation="http://technia.com/TIF/DirectoryListener file:///C:/apps/tif-server/modules/enovia/schema/DirectoryListener.xsd">
    <tif:Name>Test Listener</tif:Name>
    <tif:Paths>
        <tif:Input>/test/a/input</tif:Input>
        <tif:Output>/test/a/done</tif:Output>
        <tif:Error>/test/a/error</tif:Error>
    </tif:Paths>
    <tif:WithContext />
    <tif:Handler className="com.acme.integrations.part.DefaultMessageReceiver" />
</tif:AMQPListener>| You can change a definition at runtime, but you need to restart the corresponding service activator from within the Administration UI in order to pick up the changes. |
Registration via Module Properties
The recommended way of registering a directory listener is to use the XML configuration format as described in the previous chapter.
However, you may still register a listener from with the module properties file. E.g. using the file
${TIF_ROOT}/modules/enovia/etc/module.custom.properties.
Below is an example configuration:
directoryListener.0.enabled = true
directoryListener.0.name = A User Friendly Name
directoryListener.0.directories = /var/integration/erp
directoryListener.0.recurse = true
directoryListener.0.className = com.acme.integrations.ERPDirectoryListener
directoryListener.0.context = true
directoryListener.0.context.user = ...
directoryListener.0.context.securityContext = ..
directoryListener.0.context.useDefaultSecurityContext = true|false
The prefix of a directory listener is directoryListener.<ID>. where <ID> is a unique identifier containing letters and/or digits.
The available property suffices are shown in the table below.
| Property Suffix | Description | Required | Default |
|---|---|---|---|
name |
Defines a user friendly name of the service, used for example in the Admin UI |
No |
Default the name is equal to the ID |
enabled |
Defines if the directory listener should be enabled or not. |
No |
True |
directories |
The directories to listen for changes in. Use ";" (semi-colon) on Windows to separate multiple directories and ":" (colon) on UNIX. |
Yes |
|
recurse |
Whether or not if to recursively listen to changes in directories below the specified. |
No |
True |
deleteFile |
Whether or not to delete the file after it has been processed. Note that if the |
No |
False |
donePath |
Specifies a directory, to which successfully processed files will be moved into |
No |
|
errorPath |
Specifies a directory, to which processed files that failed will be moved into |
No |
|
events |
Specifies a comma separated list of events that we should react upon. Possible values are
|
No |
create |
pickupDelay |
Specifies the delay in milliseconds to delay the processing of the file |
No |
3000 |
processExistingOnStartup |
Specifies if to process existing files in the directories we watch upon startup. Note that this flag should not be set to true in case you choose to NOT delete the files nor move it after processing. Otherwise the same files will be processed every time you start TIF, or restart the particular service. |
No |
True |
registerNewDirectories |
Specifies if to register new directories being added as being watched. Note that this will only have effect if also the recurse flag is set to true. |
No |
True |
context |
A boolean value indicating if an ENOVIA context object should be allocated when the handler is invoked. |
No. |
False. |
context.user |
An optional name of a ENOVIA user (used if context = true). May be omitted to indicate that the default ENOVIA system-user should be used. |
No |
Defaults to the system user. |
context.securityContext |
Specify ENOVIA securtity context. |
No |
|
context.useDefaultSecurityContext |
Specify to use the default securtity context on the user. |
No |
False |
className |
Defines a fully qualified class name of a Java class implementing "com.technia.tif.enovia.file.WatcherHandler". See below. |
One of the attributes |
|
script |
A script that implements the same functionality as a corresponding Java class. See below. |
Example registration:
${TIF_ROOT}/modules/enovia/etc/module.custom.properties
directoryListener.0.enabled = true
directoryListener.0.directories = /var/integration/erp
directoryListener.0.recurse = false
directoryListener.0.context = true
directoryListener.0.donePath = /var/integration/erp/succeeded
directoryListener.0.errorPath = /var/integration/erp/failed
directoryListener.0.className = com.acme.tif.FileProcessor
1.3.2. Java Class
The Java class pointed out via the className attribute must implement the interface com.technia.tif.enovia.file.WatcherHandler in TIF. This Watcher-Handler API looks like:
package com.technia.tif.enovia.file;

import java.nio.file.Path;

/**
 * @author Technia
 */
public interface WatcherHandler {

    /**
     * @param event The event causing this call
     * @param p The path
     */
    void handleEvent(WatchEvent event, Path p);
}
The first argument to the "handleEvent" is an enum instance, which may have the following values:
WatchEvent.CREATE
WatchEvent.MODIFY
WatchEvent.DELETE
1.3.3. Script
Instead of implementing the WatcherHandler as a traditional Java class you may implement this in a script file.
Scripts are stored and handled as a XML resource file, described in chapter [XXX].
Example:
directoryListener.TEST.script = DirectoryListener.js
or
directoryListener.TEST.script = tvc:script/DirectoryListener.js
or
directoryListener.TEST.script = tvc:script:domain/DirectoryListener.js
A directory listener implemented as a script has the same method signature as the corresponding Java-class implementation.
function handleEvent(type, path) {
    if (type == "CREATE") {

    } else if (type == "DELETE") {

    } else if (type == "MODIFY") {

    }
}
The last argument is an object of type java.nio.file.Path
1.4. JMS Listener / Message Receiver
You may want to listen to a JMS queue or topic from TIF. This page describes how to set-up a so called JMS Message Receiver in TIF.
1.4.1. Configuration Details
You can set-up several JMS listeners, each will then listen to different queues or topics.
The preferred way of configuring such listener is to use the XML configuration format.
E.g. adding a file within the directory ${TIF_ROOT}/modules/enovia/cfg/jmslistener.
By default, this directory is scanned upon startup and all configured listeners therein will be registered automatically.
You can configure this behavior within ${TIF_ROOT}/modules/enovia/etc/module.custom.properties via the following properties:
| Property | Type | Default | Description |
|---|---|---|---|
resources.jmsListener.autoRegister |
boolean |
True |
Use this property to disable the auto registration |
resources.jmsListener.excluded |
Comma separated list |
Comma separated list of resources to be excluded. |
|
resources.jmsListener.included |
Comma separated list |
Comma separated list of resources to be included. |
By default, auto registration is enabled and no resources are excluded.
XML Configuration Format
The root element is <JMSListener>. The table below lists the allowed child elements
| Element | Required | Description | Example |
|---|---|---|---|
|
Yes |
Defines a user friendly name of this configuration |
|
|
Yes |
Defines what destination to listen from |
|
|
No |
Defines if to establish an ENOVIA context |
|
|
Yes |
Defines the handler containing your businesslogic that is processing the message |
|
|
No |
Can be used to specify a selector, which then will limit the messages based upon the criteria in the selector. |
|
|
No |
Defines number of concurrent consumers. Typically used with destination listening to a queue. |
|
|
No |
Boolean defining if to share connection per destination with other JMS listeners. The common default value can be configured with property |
|
|
Yes |
Defines a user friendly name of this configuration |
|
The <WithContext> element supports the following attributes.
| Attribute | Required | Description |
|---|---|---|
user |
No |
If omitted, the super user will be used |
securityContext |
No |
Defines the security context to be used |
useDefaultSecurityContext |
No |
If set to true, the default security context for the user will be used. The used user must have a default security context otherwise an error will be raised. |
The <Handler> element supports one of these three attributes
- className
-
The name of a class implementing
com.technia.tif.enovia.jms.MessageReceiver. See chapter below. - script
-
Name of a script resource. Example:
script="tvc:script/MyMessageReceiver.js". See chapter below. - type
-
Name of a pre-defined type. Example:
type="SomePredefinedType"
Example configuration:
<tif:JMSListener
    xmlns:tif="http://technia.com/TIF/JMSListener"
    xmlns:xsi="http://www.w3.org/2001/XMLSchema-instance"
    xsi:schemaLocation="http://technia.com/TIF/JMSListener file:///C:/apps/tif-server/modules/enovia/schema/JMSListener.xsd">
    <tif:Name>Test Listener</tif:Name>
    <tif:Destination id="part-from-erp" />
    <tif:WithContext />
    <tif:Handler className="com.acme.integrations.part.DefaultMessageReceiver" />
</tif:JMSListener>| You can change a definition at runtime, but you need to restart the corresponding service activator from within the Administration UI in order to pick up the changes. |
| Currently, there is no support for adding new or deleting existing definitions at runtime. Such change requires a restart of the TIF server in order to reflect the new state. |
| Too high consumer count will result in performance degradation. |
Registration via Module Properties
The recommended way of registering a JMS listener is to use the XML configuration format as described in the previous chapter.
However, you may still register a listener from with the module properties file. E.g. using the file
${TIF_ROOT}/modules/enovia/etc/module.custom.properties.
Below is an example configuration:
jmsListener.0.enabled = true
jmsListener.0.className = com.technia.tif.enovia.jms.TestReceiver
jmsListener.0.destination = jms-1
jmsListener.0.context = true
jmsListener.0.name = Service Name
The prefix of a JMS listener is jmsListener.<ID>. where <ID> is a unique identifier containing only letters and/or digits.
The available property suffices are shown in the table below.
| Property Suffix | Description | Required |
|---|---|---|
enabled |
Defines if the directory listener should be enabled or not. |
No. Default is true |
destination |
The ID of a JMS destination defined in the "destination.xml" file. See Configure Destinations for details how to register destinations. |
Yes |
context |
A boolean value indicating if an ENOVIA context object should be allocated when the message receiver is invoked. |
No. Default is false. |
context.user |
An optional name of a ENOVIA™ user (used if context = true). May be omitted to indicate that the default ENOVIA system-user should be used. |
No. Defaults to the system user. |
context.securityContext |
Specify ENOVIA securtity context. |
No |
context.useDefaultSecurityContext |
Specify to use the default securtity context on the user. |
No |
name |
Name of the service. Used in the Admin UI. |
No. |
messageSelector |
Optional string used for selecting messages. See this page for additional information. |
No. |
className |
Defines a fully qualified class name of a Java class either:
See below. |
One of the attributes className or script must be defined. |
script |
A script that implements the same functionality as a corresponding Java class. See below. |
1.4.2. Java Class
The Java class pointed out via the className attribute must implement the interface MessageReceiver in TIF. This API looks like:
package com.technia.tif.enovia.jms;

import javax.jms.JMSException;
import javax.jms.Message;
import javax.jms.Session;

import com.technia.tif.core.annotation.API;

/**
 *
 * @author Technia
 * @since 2 maj 2013
 */
@API
public interface MessageReceiver {

    /**
     * Called prior to the JMS connection and session is closed. Note that there
     * is no guarantee that this method is invoked, however, you can implement
     * this method if you need to release any resource you have opened.
     */
    void close();

    /**
     * @return True if to use transactions.
     */
    boolean isTransacted();

    /**
     * @return The acknowledgemode. Must be any of the integer constants defined
     *         in the Session class.
     */
    int getAcknowledgeMode();

    /**
     * Called when a new message appears.
     *
     * @param message The message to handle
     * @throws Exception
     */
    void onMessage(Message message) throws Exception;

    /**
     * If an exception occurs, this method is called.
     *
     * @param exception The JMS exception
     */
    void onException(JMSException exception);

    /**
     * Called upon creation of a response message.
     *
     * @param session
     * @param message
     * @return
     * @throws JMSException
     * @since 2015.3.0
     */
    Message createResponseMessage(Session session, Message message) throws JMSException;
}
For convenience, there is an adapter class available called com.technia.tif.enovia.jms.MessageReceiverAdapter that can be used instead. This adapter class only has one abstract method, namely "onMessage". This adapter class returns false for the "isTransacted" and "Session.AUTO_ACKNOWLEDGE" for the acknowledge mode as default.
For incoming messages that has a replyTo destination set, TIF will call the createResponseMessage method, which allows you to create the proper message to be re-delivered back to the sender.
|
1.4.3. Script
Instead of implementing the MessageReceiver as a traditional Java class you may implement this in a script file.
Scripts are stored and handled as a XML resource file, described at [XXX].
Examples:
jmsListener.TEST.script = JMSListener.js (1)
jmsListener.TEST.script = tvc:script/JMSListener.js (2)
jmsListener.TEST.script = tvc:script:domain/JMSListener.js (3)
| 1 | refers to the file cfg/script/JMSListener.js |
| 2 | refers to the file cfg/script/JMSListener.js |
| 3 | refers to the file cfg/domain/script/JMSListener.js |
The script you write must as a minimum implement the "onMessage" method, and you may implement the others defined in the interface. The default value for "isTransacted" is FALSE and "Session.AUTO_ACKNOWLEDGE" for the "acknowledge mode".
Example:
function onMessage(msg) {
    // do something
}

function isTransacted() {
    return false;
}
1.5. RabbitMQ Listener / Message Receiver
You may want to receive messages from a Rabbit MQ message broker. This page describes how to set-up a so called RabbitMQ Message Receiver in TIF allowing you to do so.
1.5.1. Configuration Details
You can set-up several RabbitMQ listeners, each will then listen to different queues or topics.
The preferred way of configuring such listener is to use the XML configuration format.
E.g. adding a file within the directory ${TIF_ROOT}/modules/enovia/cfg/rabbitmqlistener.
By default, this directory is scanned upon start-up and all configured listeners therein will be registered automatically.
You can configure this behaviour within ${TIF_ROOT}/modules/enovia/etc/module.custom.properties via the following properties:
| Property | Type | Default | Description |
|---|---|---|---|
resources.rabbitmqlistener.autoRegister |
boolean |
True |
Use this property to disable the auto registration |
resources.rabbitmqlistener.excluded |
Comma separated list |
Comma separated list of resources to be excluded. |
|
resources.rabbitmqlistener.included |
Comma separated list |
Comma separated list of resources to be included. |
By default, auto registration is enabled and no resources are excluded.
XML Configuration Format
The root element is <AMQPListener>. The table below lists the allowed child elements
| Element | Required | Description | Example |
|---|---|---|---|
|
Yes |
Defines a user friendly name of this configuration |
|
|
Yes |
Defines what destination to listen from |
|
|
No |
Defines if to establish an ENOVIA context |
|
|
Yes |
Defines the handler containing your businesslogic that is processing the message |
|
|
No |
Some handlers might accept arguments. |
|
The <WithContext> element supports the following attributes.
| Attribute | Required | Description |
|---|---|---|
user |
No |
If omitted, the super user will be used |
securityContext |
No |
Defines the security context to be used |
useDefaultSecurityContext |
No |
If set to true, the default security context for the user will be used. The used user must have a default security context otherwise an error will be raised. |
The <Handler> element supports one of these three attributes
- className
-
The name of a class implementing
com.technia.tif.enovia.rabbitmq.MessageReceiver. See chapter below. - script
-
Name of a script resource. Example:
script="tvc:script/MyMessageReceiver.js". See chapter below. - type
-
Name of a pre-defined type. Example:
type="SomePredefinedType"
Example configuration:
<tif:AMQPListener
    xmlns:tif="http://technia.com/TIF/AMQPListener"
    xmlns:xsi="http://www.w3.org/2001/XMLSchema-instance"
    xsi:schemaLocation="http://technia.com/TIF/AMQPListener file:///C:/apps/tif-server/modules/enovia/schema/AMQPListener.xsd">
    <tif:Name>Test Listener</tif:Name>
    <tif:Destination id="part-from-erp" />
    <tif:WithContext />
    <tif:Handler className="com.acme.integrations.part.DefaultMessageReceiver" />
</tif:AMQPListener>| You can change a definition at runtime, but you need to restart the corresponding service activator from within the Administration UI in order to pick up the changes. |
| Currently, there is no support for adding new or deleting existing definitions at runtime. Such change requires a restart of the TIF server in order to reflect the new state. |
Registration via Module Properties
The recommended way of registering a Rabbit-MQ listener is to use the XML configuration format as described in the previous chapter.
However, you may still register a listener from with the module properties file.
E.g. using the file ${TIF_ROOT}/modules/enovia/etc/module.custom.properties.
Below is an example configuration:
rabbitmqListener.0.enabled = true
rabbitmqListener.0.className = com.technia.tif.enovia.rabbitmq.TestReceiver
rabbitmqListener.0.destination = rabbitmq-1
rabbitmqListener.0.context = true
rabbitmqListener.0.name = Service Name
The prefix of a RabbitMQ listener is rabbitmqListener.<ID>. where <ID> is a unique identifier containing only letters and/or digits.
The available property suffices are shown in the table below.
| Property Suffix | Description | Required |
|---|---|---|
enabled |
Defines if the directory listener should be enabled or not. |
No. Default is true |
destination |
The ID of a RabbitMQ destination defined in the "destination.xml" file. See Configure Destinations for details how to register destinations. |
Yes |
context |
A boolean value indicating if an ENOVIA context object should be allocated when the message receiver is invoked. |
No. Default is false. |
context.user |
An optional name of a ENOVIA™ user (used if context = true). May be omitted to indicate that the default ENOVIA system-user should be used. |
No. Defaults to the system user. |
context.securityContext |
Specify ENOVIA securtity context. |
No |
context.useDefaultSecurityContext |
Specify to use the default securtity context on the user. |
No |
name |
Name of the service. Used in the Admin UI. |
No. |
className |
Defines a fully qualified class name of a Java class that implements "com.technia.tif.enovia.rabbitmq.MessageReceiver". See below. |
One of the attributes className or script must be defined. |
script |
A script that implements the same functionality as a corresponding Java class. See below. |
1.5.2. Java Class
The Java class pointed out via the className attribute must implement the interface MessageReceiver in TIF. This API looks like:
package com.technia.tif.enovia.rabbitmq;

/**
 * This interface must be implemented to handle messages received by RabbitMQ
 * listener.
 *
 * @since 2015.3.0 Initial version
 * @since 2020.2.0 Refactored to support better message control
 */
public interface MessageReceiver {

    /**
     * Called when a new message appears.
     *
     * @param msg The message to handle
     * @return The result of the operation. Depending on the result, the message
     *         will either be acknowledged (with multiple flag set or not),
     *         not-acknowledged (rejected) (with multiple flag set or not) or
     *         nothing is done.
     * @throws Exception If a failure occurs.
     */
    Result onMessage(Message msg) throws Exception;

    /**
     * If an exception occurs, this method is called. The default implementation
     * does nothing and returns a {@link Result#NACK} value.
     *
     * @param e The exception
     * @param msg The message
     */
    default Result onException(Exception e, Message msg) {
        return Result.NACK;
    }

}
The return value enum constants are described below.
- DO_NOTHING
-
Do nothing
- ACK
-
Acknowledges the current message
- NACK
-
Rejects the current message
- NACK_REQUEUE
-
Rejects the current message and requeues it
- ACK_MULTIPLE
-
Acknowledges multiple messages, e.g. all messages that have not yet been ack/nack’ed
- NACK_MULTIPLE
-
Rejects multiple messages.
- NACK_MULTIPLE_REQUEUE
-
Rejects multiple messages and requeues all.
1.5.3. Script
Instead of implementing the MessageReceiver as a traditional Java class you may implement this in a script file.
Scripts are stored and handled similar to any other configuration resource file, e.g. below the cfg folder.
The scripts goes into the folder script, e.g. ${TIF_HOME}/modules/enovia/cfg/script.
You may also use domains, as for the other configuration files. See below:
Examples:
rabbitmqListener.TEST.script = RabbitMQListener.js (1)
rabbitmqListener.TEST.script = tvc:script/RabbitMQListener.js (2)
rabbitmqListener.TEST.script = tvc:script:domain/RabbitMQListener.js (3)
| 1 | refers to the file cfg/script/RabbitMQListener.js |
| 2 | refers to the file cfg/script/RabbitMQListener.js |
| 3 | refers to the file cfg/domain/script/RabbitMQListener.js |
The script you write must implement "onMessage" and "onException" methods.
Example:
function onMessage(msg) {
    // Logic goes here.
    return com.technia.tif.enovia.rabbitmq.Result.ACK;
}

//Override if needed to handle exception
//function onException(e,  msg) {
//
//    return com.technia.tif.enovia.rabbitmq.Result.NACK;
//}
1.6. IBM MQ Listener / Message Receiver
You may want to listen for messages from a IBM MQ queue from TIF. This page describes how to set-up a so called IBM-MQ/NativeMQ/WebsphereMQ Message Listener in TIF.
1.6.1. Configuration Details
You can set-up several MQ listeners, each will then listen to different queues or topics.
The preferred way of configuring such listener is to use the XML configuration format.
E.g. adding a file within the directory ${TIF_ROOT}/modules/enovia/cfg/mqlistener.
By default, this directory is scanned upon startup and all configured listeners therein will be registered automatically.
You can configure this behavior within ${TIF_ROOT}/modules/enovia/etc/module.custom.properties via the following properties:
| Property | Type | Default | Description |
|---|---|---|---|
resources.mqlistener.autoRegister |
boolean |
True |
Use this property to disable the auto registration |
resources.mqlistener.excluded |
Comma separated list |
Comma separated list of resources to be excluded. |
|
resources.mqlistener.included |
Comma separated list |
Comma separated list of resources to be included. |
By default, auto registration is enabled and no resources are excluded.
XML Configuration Format
The root element is <MQListener>. The table below lists the allowed child elements
| Element | Required | Description | Example |
|---|---|---|---|
|
Yes |
Defines a user friendly name of this configuration |
|
|
Yes |
Defines what destination to listen from |
|
|
No |
Defines if to establish an ENOVIA context |
|
|
Yes |
Defines the handler containing your businesslogic that is processing the message |
|
|
No |
Some handlers might accept arguments. |
|
The <WithContext> element supports the following attributes.
| Attribute | Required | Description |
|---|---|---|
user |
No |
If omitted, the super user will be used |
securityContext |
No |
Defines the security context to be used |
useDefaultSecurityContext |
No |
If set to true, the default security context for the user will be used. The used user must have a default security context otherwise an error will be raised. |
The <Handler> element supports one of these three attributes
- className
-
The name of a class implementing
com.technia.tif.enovia.nativemq.MessageReceiver. See chapter below. - script
-
Name of a script resource. Example:
script="tvc:script/MyMessageReceiver.js". See chapter below. - type
-
Name of a pre-defined type. Example:
type="SomePredefinedType"
Example configuration:
<tif:MQListener
    xmlns:tif="http://technia.com/TIF/MQListener"
    xmlns:xsi="http://www.w3.org/2001/XMLSchema-instance"
    xsi:schemaLocation="http://technia.com/TIF/MQListener file:///C:/apps/tif-server/modules/enovia/schema/MQListener.xsd">
    <tif:Name>Test Listener</tif:Name>
    <tif:Destination id="part-from-erp" />
    <tif:WithContext />
    <tif:Handler className="com.acme.integrations.part.DefaultMessageReceiver" />
</tif:MQListener>| You can change a definition at runtime, but you need to restart the corresponding service activator from within the Administration UI in order to pick up the changes. |
| Currently, there is no support for adding new or deleting existing definitions at runtime. Such change requires a restart of the TIF server in order to reflect the new state. |
Registration via Module Properties
The recommended way of registering a Rabbit-MQ listener is to use the XML configuration format as described in the previous chapter.
However, you may still register a listener from with the module properties file. E.g. using the file
${TIF_ROOT}/modules/enovia/etc/module.custom.properties.
This is configured within the "module.properties" file within the etc folder. See page this page for details how to modify this file.
Below is an example configuration:
wmqListener.0.enabled = true
wmqListener.0.className = com.technia.tif.enovia.nativemq.TestReceiver
wmqListener.0.destination = mq-1
wmqListener.0.context = true
wmqListener.0.name = Service Name
The prefix of a MQ listener is wmqListener.<NAME>. where <NAME> is a unique name containing only letters and/or digits.
The available property suffices are shown in the table below.
| Property Suffix | Description | Required |
|---|---|---|
enabled |
Defines if the directory listener should be enabled or not. |
No. Default is true |
destination |
The ID of a NativeMQ destination defined in the "destination.xml" file. See Configure Destinations for details how to register destinations. |
Yes |
context |
A boolean value indicating if an ENOVIA context object should be allocated when the message receiver is invoked. |
No. Default is false. |
context.user |
An optional name of a ENOVIA™ user (used if context = true). May be omitted to indicate that the default ENOVIA system-user should be used. |
No. Defaults to the system user. |
context.securityContext |
Specify ENOVIA securtity context. |
No |
context.useDefaultSecurityContext |
Specify to use the default securtity context on the user. |
No |
name |
Name of the service. Used in the Admin UI. |
No. |
className |
Defines a fully qualified class name of a Java class that implements |
One of the attributes className or script must be defined. |
script |
A script that implements the same functionality as a corresponding Java class. See below. |
1.6.2. Java Class
The Java class pointed out via the className attribute must either
implement the interface com.technia.tif.enovia.nativemq.MessageReceiver
or extend the class com.technia.tif.enovia.nativemq.MessageReceiverAdapter.
Example skeleton below:
import com.ibm.mq.MQMessage;

public class TestReceiver extends MessageReceiverAdapter {

    @Override
    public void onMessage(MQMessage message) {

    }
}
1.6.3. Script
Instead of implementing the MessageReceiver as a traditional Java class you may implement this in a script file.
Scripts are stored and handled as a XML resource file, described at [XXX].
Examples:
wmqListener.TEST.script = MQListener.js (1)
wmqListener.TEST.script = tvc:script/MQListener.js (2)
wmqListener.TEST.script = tvc:script:domain/MQListener.js (3)
| 1 | refers to the file cfg/script/MQListener.js |
| 2 | refers to the file cfg/script/MQListener.js |
| 3 | refers to the file cfg/domain/script/MQListener.js |
The script you write must implement at least the "onMessage" method.
Example:
function onMessage(msg) {
   // do something
}
1.7. Configurable RESTful Web Services
RESTful web services are created with XML configuration files. The services are used to expose information available in ENOVIA.
1.7.1. URL to a service
The base URL for services are (by default):
http://server:8181/enovia/jaxrs/service
| The example above uses the default context path /enovia/jaxrs. This path may be different in your environment since it can be configured. See the next chapter for more information how to change this. |
A list of available services can be retrieved by accessing the base URL. Services are listed in JSON format. Example using cUrl:
curl -X GET http://server:8181/enovia/jaxrs/service
Every service has a unique service name which is used when accessing it.
For example, a service with the name part is available on:
http://server:8181/enovia/jaxrs/service/part
Any information after the service name in the URL is interpreted as PathParameters. Example of URL using PathParameters:
http://server:8181/enovia/jaxrs/service/part/Resistor/1200-0001/1
1.7.2. Context Path to REST services
By default, the context path to the REST applications is /enovia/jaxrs/.
Within the file ${TIF_ROOT}/modules/enovia/etc/modules.custom.properties,
this can be changed using the property below.
http.webapp.jaxrs.contextPath = /enovia/jaxrs
            ^^^^^
As an alternative you could also change the path for all applications by using the below example.
http.webapp.contextPath.default = /tif/%2$s
The %2$s refers to the name of the webapp folder.
1.7.3. Example Configuration
<Rest>
    <DisplayName>Part</DisplayName>
    <ServiceName>part</ServiceName>
    <IdLocator type="tnr">
        <AllowWildcards>false</AllowWildcards>
    </IdLocator>
    <Read payload="tvc:payload:tix/PartData.xml" />
    <Events>...</Events>
</Rest>
1.7.4. Configuration
Configuration files are stored in the folder restservice. The root element of
the XML file is <Rest>. The available child elements are listed in the table
below.
| Element | Description | Mandatory |
|---|---|---|
|
User friendly name of the service. Used for instance the Admin UI. |
No, but recommended. |
|
Defines the name of the service. It is used by clients to access the service. The name must be unique across all services. It may only consist of alfanumerical characters and forward slashes (/). |
No |
Defines how to find the object/s the client is interested in. Read more in the IdLocator chapter. |
No |
|
Defines how to read data. Read more in the Read Operation chapter. |
Yes |
|
See page Job Events for details. |
No |
|
Defines the credentials that will be used when running the REST service. Read more in the Credentials chapter. |
Yes. |
|
|
Defines the type of transaction to use while running the REST service. The possible values are:
|
No. An inactive (no transaction) is used. |
|
May be used to define additional access rules on the REST service. Example; only allow this REST service to operate on objects in a particular state, or in a particular vault. Or, restrict access to users assigned to a particular role or group. Read more in the Access chapter. |
No. |
If the <ServiceName> element is omitted, the name of the service is calculated based on its location in the filesystem.
For example, if a RestService is stored in the folder cfg/restservice/foo/bar/test.xml then its service name / path is calculated to foo/bar/test.
And in case a RestService is stored in the folder cfg/restservice/part-data.xml then its service name / path is calculated to part-data.
1.7.5. Lifecycle of a Call
-
Client sends HTTP request. The request include information about which service that is of interest along with addtional PathParameters/QueryParamters.
-
The RESTful web services corresponding to the request is located. TIF maintains a registry of all configurable services.
-
Optional: The IdLocator is executed. It is responsible for finding the object the client is requesting based on the PathParamters/QueryParameters.
-
The operation is executed. For example, extracting information for the Part found by the IdLocator.
-
The response is sent back to the client.
1.7.6. Credentials
The <Credentials> element contains the following attributes:
- containerManaged
-
A boolean value. Specifies if authentication is carried out via the servlet container. See chapter below how to configure this.
- runAs
-
A string value. Defines the name of the ENOVIA™ user that we will run the service as.
- runAsSuperUser
-
A boolean value. Useful together when
containerManaged=trueand you want to run the service as a super user, while authentication is required.
Valid child elements are defined in the table below
| Element | Description | Mandatory |
|---|---|---|
|
Used for defining the ENOVIA/3DExperience security context. See below how to configure this. |
No |
|
In case container managed authentication is enabled, you may define additional roles, which the authenticated user must have in order to gain access. These roles are typically not ENOVIA/3DExperience roles, in case of Kerberos authentication these will be roles from your Active Directory. Note that if you specify multiple roles, the user is only required to have one of the listed roles in order to get access. Example below: |
No. |
|
Specify additional ENOVIA/3DExperience assignments the user must have in order to proceed. Example below: |
No |
Security Context
Via the <SecurityContext> element you define what security context to use.
You may do the following.
-
Point out a mapping file
-
Or use a default mapping file
-
-
Specify a named security context
-
Or use the "default" security context as configured for the ENOVIA user
To point out a mapFile use the syntax below.
The file is relative to ${TIF_ROOT}/modules/enovia/etc
|
<SecurityContext mapFile="sec-mapping.xml" />Use the default mapping file.
The default file is specified via the property securityMapping.defaultFile, and the default value is security-context-mapping.xml.
The file is relative to ${TIF_ROOT}/modules/enovia/etc
|
<SecurityContext useDefaultMapFile="true" />The format of the mapping file is shown below:
<Contexts>
    <Context name="Design Engineer.Company Name.GLOBAL">
        <User is="user1" />(1)
        <User is="user2" />
        <User is="user3" />

        <Role is="engineer" /> (2)
        <Role is="designer" />

        <Parameter name="test" is="something" /> (3)
        <Parameter name="x" is="y" />
    </Context>
    <Context name="...">...</Context>
    <Context name="...">...</Context>
</Contexts>
NOTE that specifying user and role requires having enabled container managed authentication (Kerberos or Basic Authenticaton etc.)
| 1 | Specifies certain users to match against |
| 2 | Specifies additional roles the user should have |
| 3 | Specifies additional parameters and value to be evaluated In case of a REST service, the parameters are the request parameters passed to the service. |
The evaluation logic is:
-
User list is EMPTY or user is in list
-
Role list is EMPTY or user have one of the roles in the list
-
Parameter list is EMPTY or one of the parameters have the expected value
If A AND B AND C is satisfied, then use the security context defined for this "rule".
To use a specific Security Context:
<SecurityContext use="Design Engineer.Company Name.GLOBAL" />Specify using the default security context.
<SecurityContext useDefault="true" />Container Managed Security
You can enable security on the servlet container level and either use Kerberos/SPNego authentication OR use Basic authentication and authenticate against the ENOVIA™ database.
Configure Security Realm
Within the ${TIF_ROOT}/modules/enovia/etc/module.custom.properties, you need
to specify what login service to be used including its realm and optionally some
extra parameters.
The login services currently supported are
- enovia
-
A login service that will authenticate the remote user against the ENOVIA™ database.
- ldap
-
A login service that will authenticate the remote user against a LDAP directory (for example Active Directory)
- spnego
-
A login service supporting Single Sign On against Active Directory.
| In order to use Spnego authentication, also read this document in order to setup the core parts of Spnego/Kerberos. |
LDAP Authentication
If the "loginService" is set to "ldap", TIF will authenticate users against a LDAP directory.
http.webapp.jaxrs.loginService=ldap
http.webapp.jaxrs.realm=Webservices
The second value defines the "realm". (See https://www.ietf.org/rfc/rfc2617.txt for more information about realms and basic authentication).
There are some additional LDAP settings required to be defined. You can specify global LDAP parameters and/or web application specific LDAP parameters. In most cases you will be fine with only global LDAP settings.
For convenience, the application specific parameters will be merged with the global LDAP parameters. Hence you only need to override/define the parameters that is different on the application level.
Please see the table below.
The global parameter name is ldap., while the application specific parameter
are named like http.webapp.<APP_NAME>.ldap.
|
| Parameter | Description | Required |
|---|---|---|
ldap.server |
Defines the server or list of LDAP servers. Separate with space if using multiple. |
Yes |
ldap.rootDN |
Defines the root dn, where all LDAP searches starts from. If we can start a search starting at a sub-node (as opposed to root), you get a better performance because it narrows down the scope of a search. This field specifies the DN of such a subtree. |
No |
ldap.userSearchBase |
The relative DN (From the root DN) that further narrow down searches to the sub-tree. If you do specify this value, the field normally looks something like "ou=people". |
No |
ldap.userSearchFilter |
This field determines the query to be run to identify the user record. The query is almost always "uid={0}" as per defined in RFC 2798, so in most cases you should leave this field empty and let this default kick in. If your LDAP server doesn’t have uid or doesn’t use a meaningful uid value, try "mail={0}", which lets people login by their e-mail address. If you do specify a different query, specify an LDAP query string with marker token "{0}", which is to be replaced by the user name string entered by the user. |
Yes |
ldap.groupMembershipAttribute |
If the user entry in the LDAP tree contains an attribute with the group membership, then specify that attribute here. Otherwise we need to query for the groups a user belongs to. |
Either this or the groupSearchBase / groupSearchFilter needs to be defined. |
ldap.groupSearchBase |
This field determines the query to be run to identify the organizational unit that contains groups. The query is almost always "ou=groups" so try that first, though this field may be left blank to search from the root DN. |
Not needed, but if the groupMembershipAttribute is undefine you can use this to make the group query faster. |
ldap.groupSearchFilter |
Defines the search filter for groups. In case we need to search the LDAP tree for group membership this needs to be defined. The marker token "{0}" is replaced with the current user’s DN. Example:
|
Yes unless groupMembershipAttribute is defined. |
ldap.managerDN |
If your LDAP server doesn’t support anonymous binding, then we would have to first authenticate itself against the LDAP server. A DN typically looks like CN=MyUser,CN=Users,DC=mydomain,DC=com although the exact sequence of tokens depends on the LDAP server configuration. It can be any valid DN as long as LDAP allows this user to query data. |
Probably Yes |
ldap.managerSecret |
The password for the manager DN |
Probably Yes |
ldap.displayNameLDAPAttribute |
The attribute holding the display name. Per default we use the CN of the user entry. |
No |
ldap.emailAddressLDAPAttribute |
The attribute holding the email value. Per default we use the field This field is currently not used so you can leave it blank. |
No |
ldap.pooled |
Whether or not to pool the LDAP connections |
No |
Example setup below for Active Directory.
ldap.server=ldapserver.yourdomain.com:3268
ldap.rootDN=DC=yourdomain,DC=com
ldap.managerDN=CN=nameofuser,CN=groupforuser,DC=yourdomain,DC=com
ldap.managerSecret=the_very_secret_string
ldap.userSearchBase=
ldap.userSearchFilter=(&(objectClass=person)(|(sAMAccountName={0})(userPrincipalName={0}@*)))
ldap.emailAddressLDAPAttribute=mail
ldap.displayNameLDAPAttribute=displayName
ldap.groupMembershipAttribute=memberOf
#ldap.groupSearchBase=OU=groups
#ldap.groupSearchFilter=(&(member={0})(objectClass=group))|
The managerSecret value can either be defined in plain text, or you can encrypt the password from an MQL client using the "mql encrypt" feature.
The encrypted value can be used in the configuration file if you add the prefix
Eg.
|
ENOVIA Authentication
If the "loginService" is set to "enovia", TIF will authenticate users against the ENOVIA database.
http.webapp.jaxrs.loginService=enovia
http.webapp.jaxrs.realm=Webservices
The second value defines the "realm". (See https://www.ietf.org/rfc/rfc2617.txt for more information about realms and basic authentication).
Spnego Authentication
Secondly, an example for spnego:
http.webapp.jaxrs.loginService=spnego
http.webapp.jaxrs.spnego.targetName=HTTP/tifserver.exampledomain.com
http.webapp.jaxrs.realm=Webservices| Instead of specifying the targetName you may instead point out a property file that holds that value under the key targetName. See below: |
http.webapp.jaxrs.loginService=spnego
http.webapp.jaxrs.spnego.config=${tif.home}/etc/kerberos/spnego.properties
http.webapp.jaxrs.realm=Webservices
The spnego.properties defines the targetName like this:
${tif.home}/etc/kerberos/spnego.properties
targetName = HTTP/tifserver.exampledomain.comConfigure Security Constraints in WEB.XML
Within the "web.xml" file (webapps/jaxrs/WEB-INF/web.xml) you need to setup the rules for the application.
If you have not started TIF, you will not find the web.xml file, instead
it will be found under webapps/jaxrs/WEB-INF/web.xml.template. Upon start, TIF
will copy over the template file unless the web.xml file is found.
|
Below is an example when using ENOVIA/Basic authentication and how such might look like.
Note that in this example, each user that is supposed to use the web-services must have the role "WS-Integration-User". Note that depending on login service used (ldap or enovia), the role is either a LDAP role or a ENOVIA role.
<security-constraint>
    <web-resource-collection>
        <web-resource-name>blocked</web-resource-name>
        <url-pattern>/service/*</url-pattern>
    </web-resource-collection>
    <auth-constraint>
        <role-name>WS-Integration-User</role-name>
    </auth-constraint>
    <user-data-constraint>
        <transport-guarantee>NONE</transport-guarantee>
    </user-data-constraint>
</security-constraint>
<login-config>
    <auth-method>BASIC</auth-method>
    <realm-name>Webservices</realm-name>
</login-config>
Below is an example for Spnego:
<security-constraint>
    <web-resource-collection>
        <web-resource-name>blocked</web-resource-name>
        <url-pattern>/service/*</url-pattern>
    </web-resource-collection>
    <auth-constraint>
        <role-name>EXAMPLEDOMAIN.COM</role-name>
    </auth-constraint>
</security-constraint>
<login-config>
    <auth-method>SPNEGO</auth-method>
    <realm-name>Webservices</realm-name>
</login-config>
1.7.7. Access
The access restriction can be defined based upon following:
-
Role Assignment
-
Group Assignment
-
Person (A named user)
-
Access Mask (Access mask for the current object)
-
Access Program (A JPO that evaluates the access rights)
-
Access Expression (MQL expression that evaluates the access)
The example below illustrates how you can construct the access restriction:
<Access>
    <Role>role_FirstRole</Role>
    <Role>role_SecondRole</Role>
    <Group>group_SomeGroup</Group>
    <Mask>modify,checkout</Mask>
</Access>
Or use an access program:
<Access>
    <Program name="MyJPO" method="checkAccess"/>
</Access>
Or use an access expression:
<Access>
    <Expression><![CDATA[owner == context.user]]></Expression>
</Access>| The expression will only be possible to utilize on service’s that operates on one (1) business object. If your service would use an ID locator that returns multiple objects, the expression has no affect. |
1.7.8. Id Locators
The IdLocator is responsible for locating the object the client is requesting. This is done by using the PathParameters and/or QueryParameters associated in the request. For example, the parameters includes type, name and revision of the object or interest.
There are a number of built-in strategies for locating the object. It is also possible to write a custom IdLocator.
| IdLocators are optional. For example, a service returning all countries in the system does not require an IdLocator. |
Dataset
Uses a dataset to locate the object/s. The PathParameters/QueryParameters and the requested mimetype is available when using parameterized datasets. More information about parameterized datasets is available in the TVC Core Admin Guide.
The first PathParameter is available with the key pathparam_0, second one with
key pathpararm_1 and so on. The QueryParameters are available with the same
key as in the request to the service. The requested mime type uses the key mimetype.
- Example REST Config
<Rest>
    <ServiceName>product</ServiceName>
    <IdLocator dataset="tvc:data/ProductInStateFinder.xml" />
    ...
</Rest>- Example Dataset Config
<DataSet>
    <LatestInState>
        <State>$(pathparam_1,empty=false)</State>
        <Query>
            <NamePattern>
                <Name>$(pathparam_0,empty=false)</Name>
            </NamePattern>
            <Limit>1</Limit>
        </Query>
    </LatestInState>
</DataSet>TNR
- Name
-
tnr
- Required PathParamters
-
3 (type/name/revision)
- Description
-
Uses type, name and revision to identify the object. A query is used in the background to find the matching object.
- Settings
| Name | Description | Default |
|---|---|---|
AllowWildcards |
Defines if wildcards are allowed in the paramters. |
false |
Limit |
Maximum number of objects that can be found |
100 |
Where |
Where clause to use in query.
Example: |
- Example Config
<Rest>
    <ServiceName>product</ServiceName>
    <IdLocator type="tnr">
        <Where>revision==last"</Where>
        <Limit>1</Limit>
    </IdLocator>
    ...
</Rest>Value
- Name
-
value
- Required PathParamters
-
1 (value)
- Description
-
Identifies the object using a value on an attribute/basic. Uses a query in the background to find the matching object. For example, it can be a unique product number stored in an attribute.
- Settings
| Name | Description | Default |
|---|---|---|
Limit |
Maximum number of objects that can be found |
100 |
Match |
Defines what attribute/basic to use to find the object of interest. This setting is mandatory. Example: |
|
Type |
Defines a type that object must be of. |
* |
Where |
Where clause to use in query. Example: |
- Example Config
<Rest>
<ServiceName>product</ServiceName>
<IdLocator type="value">
<Match>$<attribute[attribute_ProductId]></Match>
</IdLocator>
...
</Rest>- Example URL
http://server-name:8181/enovia/jaxrs/service/product/9857847
Object Id
- Name
-
objectid
- Required PathParamters
-
1 (objectid)
- Description
-
Uses an object id to locate the object.
- Example Config
<Rest>
    <ServiceName>product</ServiceName>
    <IdLocator type="objectid" />
    ...
</Rest>- Example URL
http://server-name:8181/enovia/jaxrs/service/product/1234.5678.9123.4567
Custom IdLocator
Specify the qualified java class name in the attribute className. The java class must implement the interface com.technia.tif.enovia.jaxrs.service.idlocator.IdLocator.
/**
 * Responsible for identifying objects requested by the client of a configurable
 * REST web service.
 *
 * @since 2015.3.0
 */
public interface IdLocator {

    /**
     * Locates object id/s based on the provided input.
     *
     * @param ctx Information about this REST call
     * @return The object id/s
     * @throws IdLocatorException Thrown if problem occur. For example, if no
     *         object was found.
     * @since 2015.3.0
     */
    Collection<String> locateIds(ExecutionCtx ctx) throws IdLocatorException;
}
Implement the interface com.technia.common.xml.XMLReadable if your id locator support configuration settings.
|
1.7.9. Operation
The operation is the actual job to perform. For example, read information about an object.
1.7.10. Payload Read Operation
The payload read operation extracts information from ENOVIA for the object/s. Note that object id/s only are available in case the REST service contains an IdLocator.
To read payload, configure attribute type with value payload.
In addition, specify a payload using the attribute payload.
See page [Payload Definition] for details on how to define the payload definition.
Example
<Rest>
    ...
    <Read type="payload" payload="tvc:payload/Product.xml" />
</Rest>
Produce XML / JSON
The read operation supports generating content in XML or JSON format. The Accept header is used to determine which format to use.
| Accept Header Value | Description |
|---|---|
application/xml |
Generates content in XML format. This is the default, if no format is specified. |
application/json |
Generates content in JSON format. |
To disable automatic payload transform based on the Accept header, set attribute autoTransform to false.
Example
<Rest>
    ...
    <Read type="payload" payload="tvc:payload/Product.xml" autoTransform="false" />
</Rest>| It is also possible to define response content type explicitly in payload configuration. See Payload Definition. |
1.7.11. File Read Operation
The file read operation can be used to extract files that are checked into an object. The extraction is done from one object per request. Therefore, exactly one object id is required. Object id is specified by an IdLocator.
To extract files, configure attribute type with value file. In addition, it can be configured with the following attributes which files should be included or excluded.
| Attribute | Description |
|---|---|
|
A comma separated list of file formats that should be used to include files. |
|
A comma separated list of file names that should be used to include files. Wildcards can be used. The wildcard matcher uses the characters '?' and '*' to represent a single or multiple wildcard characters. This is the same as often found on Dos/Unix command lines. The check is case-insensitive by default. |
|
A comma separated list of file names that should be used to exclude files. Wildcards can be used. The wildcard matcher uses the characters '?' and '*' to represent a single or multiple wildcard characters. This is the same as often found on Dos/Unix command lines. The check is case-insensitive by default. |
|
Defines if the extraction result should be compressed into a ZIP file if the result contains only one file. If there are more than one file, the result will compressed into a ZIP file regardless of this setting. Use values "true" or "false". Default is "false", if not configured. |
|
Configures "Content-Disposition" header in the response. Valid values are Value Default is |
Example
<Rest>
    ...
    <Read type="file"
          includeFormats="generic,zip"
          includeFileNames="text*.txt,package*.zip"
          excludeFileNames="*.doc"
          zipOnlyFile="true"/>
</Rest>
Client may also add one or more request specific query parameters, that can be used to include or exclude files even more detailed per request. It should noticed that request specific filters cannot be used to extract files that configured filters do not allow. The following query parameters are supported.
| Query Parameter | Description |
|---|---|
|
File format that should be used. |
|
Name of file that should be included. Wildcards can be used. The wildcard matcher uses the characters '?' and '*' to represent a single or multiple wildcard characters. This is the same as often found on Dos/Unix command lines. The check is case-insensitive by default. |
|
Name of file that should be exluded. Wildcards can be used. The wildcard matcher uses the characters '?' and '*' to represent a single or multiple wildcard characters. This is the same as often found on Dos/Unix command lines. The check is case-insensitive by default. |
|
Can be used to override default content disposition configuration. See previous table for details. |
Client may also pass a list of filters by using multiple parameters.
- Example Query
http://server-name:8181/enovia/jaxrs/service/product/Sales+Item/1200-1000/A?includeFormat=generic&includeFileName=*123.txt&excludeFileName=*.zip
1.7.12. File Update Operation
The file update operation can be used to check in files to an object. Check in can be done to one object per request. Therefore, exactly one object id is required. Object id is specified by an IdLocator.
A request should be done with method "PUT" and using multipart/form-data encoding.
To check in files, configure attribute type with value file.
Example
<Rest>
    ...
    <Update type="file"
            format="generic"
            existStrategy="newversion"
            append="true"
            useCDM="true"
            unzip="false" />
</Rest>
In addition, it should be configured with the following attributes how files are checked in.
| Attribute | Description | Required |
|---|---|---|
|
Defines what should happen if a file with same name is already checked in. Use value "fail" if the operation should cause the request to fail. Use value "overwrite" if file should be overwritten. Use value "newversion" if new version of file should be created. In this case attribute "useCDM" must be "true". |
Yes |
|
Defines in which format file is checked in. |
Yes |
|
Defines if file should be appended to the object. If "false", then other files in same format are removed from object. Use value "true" or "false". If disabled, attribute "useCDM" or "unzip" cannot be "true". |
No, default is "true". |
|
Defines if Common Document Model or CDM is applied. Use value "true" or "false". If enabled, attribute "append" cannot be "false". |
No, default is "false". |
|
Defines if zipped uploaded files are extracted and their contents are checked in instead. Files are retrieved from the root level of ZIP package. Use value "true" or "false". If enabled, attribute "append" cannot be "false". |
No, default is "false". |
1.7.13. Create new Job Operation
The create new job operation can be used to execute/run a new integration job. The request may be done context-less or in context of one or more objects; this all depends on how you have configured your REST job regarding IdLocator.
Example Configuration
<Rest>
    ...
    <NewJob jobcfg="TheJobCfgName.xml" />
</Rest>| When using this operation, you will see a minimum of two log entries in the Admin UI. One is for the actual REST job itself and the other is for the job(s) that you execute. |
A request should be done with the "POST" method. Example:
curl -X POST http://server:8181/enovia/jaxrs/service/new-job-from-rest/Part/EV-000001/A
The following attributes can be used on the <NewJob> element
| Attribute | Description | Required |
|---|---|---|
|
Defines the Job configuration name to be used |
True |
|
This flag defines if the REST job should wait for the job to complete. Default is TRUE, e.g. do not wait for completion. Note that if your configuration resolves to multiple context objects, the job will be executed asyncronously anyway. |
No |
|
This flag can be used to specify that you want to return the generated payload from the job execution. Setting this to true, requires you to run the job synchronously.
E.g. the |
No |
1.7.14. HTTP Status Codes
HTTP status codes are used to communicate the status of the call to the client.
In case an error occurs a status code other than 200 is returned along with a description of the problem.
| Code | Description |
|---|---|
200 |
All ok |
400 |
One of the following:
|
415 |
Unsupported media type. The service is unable to produce content on the media type requested by the client. |
404 |
No object found. The provided PathParamters/QueryParamters didn’t match any object in ENOVIA. |
500 |
Unexpected error. View the response for details. |
501 |
Unsupported operation. The requested operation is not supported. |
1.8. Hosting RESTful Web Service
TIF allows deploying RESTful Webservice’s.
1.8.1. Deployment
You have to package your RESTful services in a JAR file together with a special file within the "META-INF/" folder of the JAR file that defines what packages TIF should scan for the annotated RESTful service classes.
The file inside the META-INF folder should have the name jax-rs-packages.properties and this file should contain the package names (one per line in the file).
- jax-rs-packages.properties
com.acme.integrations.erp.rest
com.acme.integrations.sap.rest
The JAR file should be dropped into the ${TIF_ROOT}/modules/enovia/webapps/jaxrs/WEB-INF/lib directory. Upon startup of TIF, the REST services will be initialized.
Custom Resource and Provider Classes
Custom resource and provider classes can be registered by creating file jax-rs-classes.properties into "META-INF/" folder. It should contain the class names one per line in the file.
- jax-rs-classes.properties
com.acme.provider.MyProvider
com.acme.resource.MyResource
JAR file(s) containing registered classes must be dropped into the ${TIF_ROOT}/modules/enovia/webapps/jaxrs/WEB-INF/lib directory.
|
1.8.2. Accessing a RESTful Service
The default context URL to a RESTful service is shown below.
- JAXRS default context URL
The port number may be different, see this page for details how to change it.
The context path to a web-application may be changed, see [Module Settings] for more info.
Use the example JAXRS bundled with TIF to test that everything is correctly setup. The current date will be returned in case all is okay.
- URL to example JAXRS
1.8.3. Logging
Hosted RESTful web service is automatically logged in the TIF database. It appears as a REST service in Admin UI with display name that is a combination of invoked web service class and method name. The unique service name is constructed based on the values of Path annotation in both class and method. The service name is not visible in Admin UI, but it is used to identify the service.
For example:
import javax.ws.rs.GET;
import javax.ws.rs.Path;
import javax.ws.rs.PathParam;

@Path("/example")
public class MyExample {

    @Path("/{param}")
    @GET
    public String success(@PathParam("param") String param) {
        return param;
    }

}
Considering the above example, the service display name would be "MyExample/success" and service name is "example/{param}".
Limiting Logged Payload
There are configurable webapp init parameters to set maximum length for logged inbound (request) and outbound (response) payloads. Parameters help to limit usage of heap memory and storage by preventing to persist too large payloads to TIF DB.
See parameters "inboundPayloadMaxLength" and "outboundPayloadMaxLength" in web.xml.
|
Default value for parameters is 1 000 000 bytes, if not defined. |
1.9. Apache CXF Base Web Application
There is a Apache CXF base webapp under ${TIF_ROOT}/modules/enovia/webapps/cxf that can be used as base/template for CXF based web services.
There are own servlet filters for SOAP and RESTFul web services that can be used for logging web service calls to TIF DB. See web.xml for filter details. Also, there is cxf-servlet.xml that contains configurations for example web services.
| If you have not started TIF, you will not find the web.xml or cxf-template.xml file, instead there are template files. Upon start, TIF will copy over the template file unless the web.xml or cxf-template.xml file is found. |
1.9.1. Logging RESTFul Web Services
When using the CXF logger filter for RESTful web services, the web service call is logged in the TIF database. It appears as a REST service in Admin UI with display name that is a combination of invoked web service class and method name. The unique service name is constructed based on the values of Path annotation in both class and method. The service name is not visible in Admin UI, but it is used to identify the service.
For example:
import javax.ws.rs.GET;
import javax.ws.rs.Path;
import javax.ws.rs.PathParam;

@Path("/example")
public class MyExample {

    @Path("/{param}")
    @GET
    public String success(@PathParam("param") String param) {
        return param;
    }

}
Considering the above example, the service display name would be "MyExample/success" and service name is "example/{param}".
1.9.2. Logging SOAP Web Services
When using the CXF logger filter for SOAP web services, the web service call is logged in the TIF database. It appears as a SOAP service in Admin UI.
See the filter settings in ${TIF_ROOT}/modules/enovia/webapps/cxf/web.xml for details how the service name (visible in Admin UI) is constructed.
1.9.3. Limiting Logged Payload
There are configurable webapp init parameters to set maximum length for logged inbound (request) and outbound (response) payloads. Parameters help to limit usage of heap memory and storage by preventing to persist too large payloads to TIF DB.
See parameters "inboundPayloadMaxLength" and "outboundPayloadMaxLength" in web.xml.
|
Default value for parameters is 1 000 000 bytes, if not defined. |
1.10. Reply Handler
A reply handler is responsible for handling asynchronous replies from other systems and update the status of the job (which is the source for the reply) inside TIF. This is a crucial mechanism if you are interested in receiving events upon completion or failure of a integration job.
A typical use case is when you transfer data to a messaging queue and you expect a reply from the "other" system onto a reply-queue, then you need some functionality that consumes messages from the reply-queue in order to update the job status in TIF; e.g. mark the job as succeeded or failed.
Currently, you may handle replies using a configurable reply handler from following sources:
- File system
-
Support for receiving events from the OS when a file is changed/added in a directory may be used to communicate reply status.
- JMS
-
Consume messages from a particular JMS queue used for replies
- IBM/Native MQ
-
Consume messages from an IBM MQ queue used for replies
- RabbitMQ/AMQP
-
Consume messages from a Rabbit MQ queue
A reply handler will take care about most of the details regarding receiving the reply and perform the internal calls inside TIF but provide extension points were necessary. For example, allow evaluating if the reply represents a positive or negative response.
A reply handler works like this
-
Get/obtain message from some source
-
From the message and its source - map to the originating Job / Transfer
-
This is typically done either via correlation id or through some custom evaluation
-
-
Based upon the content of the message, evaluate if the response is successful or failing
-
This is the place were you will need to plugin some code that does this evaluation.
-
-
Update the TIF internally
1.10.1. Configuration Location
A reply handler is defined in an XML resource within the ${TIF_ROOT}/modules/enovia/cfg directory of type "replyhandler".
Example:
${TIF_ROOT}/modules/enovia/cfg/replyhandler/MyReplyHandler.xml
${TIF_ROOT}/modules/enovia/cfg/domain/replyhandler/MyReplyHandler.xml
these configuration files are referenced as
tvc:replyhandler/MyReplyHandler.xml
tvc:replyhandler:domain/MyReplyHandler.xml
1.10.2. Configuration Format
A configuration defines the following aspects:
-
The source
-
How the mapping between message and Job id is made
-
How to evaluate the status
-
If you need an ENOVIA™ context available during the execution. (default none is allocated)
Lets look at the configuration format. Note that this is not a valid example it just illustrates all configuration aspects.
<ReplyHandler>
    <Source>
        <JMS id="eco-reply" /> (1)
        <NativeMQ id="mq-eco-reply" />
        <RabbitMQ id="rabbitmq-eco-reply" />
        <File id="file-in-1" replyFor="file-out-1"/>
    </Source>

    <JobIdLocator className="com.acme.custom.MyJobLocator" /> (2)
    <JobIdLocator script="MyIDLocator.js" />
    <JobIdLocator script="tvc:script/MyIDLocator.js" />
    <JobIdLocator script="tvc:script:domain/AnotherIDLocator.js" />
    <JobIdLocator>
        importClass(com.technia.tif.enovia.job.reply.config.JobIDLocator.ID);

        function locate(msg) {
            ...
            return new ID(UUID.fromString(jobId), transferId);
        }
    </JobIdLocator>

    <StatusEvaluator className="com.acme.custom.MyStatusEvaluator" /> (3)
    <StatusEvaluator script="MyStatusEvaluator.js" />
    <StatusEvaluator script="tvc:script/MyStatusEvaluator.js" />
    <StatusEvaluator script="tvc:script:domain/AnotherStatusEvaluator.js" />
    <StatusEvaluator>
        function evaluate(ctx) {
            ctx.setResult(true, "OK");
        }
    </StatusEvaluator>

    <WithContext /> (4)

</ReplyHandler>| 1 | Either one of these sources can be used per reply handler |
| 2 | The JobID locator |
| 3 | The StatusEvaluator |
| 4 | Optionally element that, if present, will allocate a context for you. |
The <WithContext> element supports the following attributes.
| Attribute | Required | Description |
|---|---|---|
user |
No |
If omitted, the super user will be used |
securityContext |
No |
Defines the security context to be used |
useDefaultSecurityContext |
No |
If set to true, the default security context for the user will be used. The used user must have a default security context otherwise an error will be raised. |
Both the job-id locator and status-evaluator may be implemented in a few different ways:
-
A Java class implementing either
com.technia.tif.enovia.job.reply.config.JobIDLocatorfor JobIdLocator andcom.technia.tif.enovia.job.reply.config.StatusEvaluatorfor StatusEvaluator. -
A script stored inside its own file using the script resource type.
-
An inline script.
| In some cases you may not need a JobID locator. See next chapter(s). |
|
If you are using Java 8, the internal Java Script engine has been changed so you may need to change your old legacy scripts by adding the following at the top of your script:
|
1.10.3. JMS Source
The supported attributes on the JMS element are shown in the table below
| Attribute | Description | Required |
|---|---|---|
id |
The id of the corresponding destination |
Yes |
messageSelector |
A message selector that filters messages. See below for details |
No |
transacted |
Boolean defining transaction mode |
No. Default is false |
ackMode |
One of "auto","client" or "dups_ok" |
No. Default is auto |
consumerCount |
Defines number of concurrent consumers. Typically used with destination listening to a queue. |
No. Default is 1 |
shareConnection |
Boolean defining if to share connection per destination with other JMS listeners. The common default value can be configured with property |
No |
For handling of replies from a JMS messaging systems the correlation id is used to correlate the message to its "source" in TIF.
| If you have changed the format of the correlation id in the outgoing message, you need to apply changes in the reply handler. |
By default, the message selector that is used for a JMS Source is set to
JMSCorrelationID like '${tif.instance.id}|%'The macro is resolved at runtime to the id of the TIF instance.
This means that only messages matching this correlation id will be fetched from the TIF instance in question. This is particularly useful in situations where you have multiple TIF instances listening to the same queues. In such case it is important that only the TIF instance that sent the original message will receive the reply.
If you are using the default correlation id on the outgoing JMS message, you do not need to define a JobIdLocator at all since the mapping can be done automatically.
Example config for JMS source were response message is of type TextMessage and the status is provided as a property on the message object.
<ReplyHandler>
    <Source>
        <JMS id="eco-reply" />
    </Source>
    <StatusEvaluator>
        function evaluate(ctx) {
            var msg = ctx.getMessage().getText();
            var succeeded = ctx.getMessge().getBooleanProperty("success");
            ctx.setResult(succeeded, msg);
        }
    </StatusEvaluator>
</ReplyHandler>
1.10.4. Rabbit MQ Source
The supported attributes on the RabbitMQ element are shown in the table below
| Attribute | Description | Required |
|---|---|---|
id |
The id of the corresponding destination |
Yes |
Replies from a Rabbit MQ messaging system uses the correlation id of the message to correlate the message to its "source" in TIF.
| If you have changed the format of the correlation id in the outgoing message, you need to apply changes in the reply handler. |
By default, outgoing messages from TIF to RabbitMQ uses a correlation id that contains the following information
-
TIF instance id
-
Job id
-
Transfer id
The TIF instance id is needed in order to be able to correlate messages to the correct TIF instance. E.g ensure that the same TIF instance that sent the original message will handle the reply.
If you are using the default correlation id on the outgoing Rabbit MQ message,
you do not need to define a JobIdLocator at all since the mapping can be done automatically.
Example config.
<ReplyHandler>
    <Source>
        <RabbitMQ id="eco-reply" />
    </Source>
    <StatusEvaluator>
        function evaluate(ctx) {
            var msg = ctx.getMessage().getBodyAsString();
            var succeeded = ctx.getProperties().getHeaders().get("status");
            ctx.setResult(succeeded, msg);
        }
    </StatusEvaluator>
</ReplyHandler>
1.10.5. Native MQ Source
The supported attributes on the NativeMQ element are shown in the table below
| Attribute | Description | Required |
|---|---|---|
id |
The id of the corresponding destination |
Yes |
defaultMatchGroupId |
Whether or not if to match on group id’s. Note that per default this attribute is based upon the TIF setting See also this chapter. By default TIF will match messages based upon their group-id’s. |
No |
messageId |
Used to specify match option on the message-id |
No |
correlationId |
Used to specify match option on the correlation-id |
No |
groupId |
Used to specify match option on the group-id |
No |
seqNumber |
Used to specify match option on the sequence number |
No |
For handling of replies from a JMS messaging systems the correlation id is used to correlate the message to its "source" in TIF.
| If you have changed the format of the correlation id in the outgoing message, you need to apply changes in the reply handler. |
Example config for Native MQ source.
<ReplyHandler>
    <Source>
        <NativeMQ id="MQ.QM1.M3.REPLY" />
    </Source>
    <StatusEvaluator>
        function evaluate(ctx) {
            ....
            ctx.setResult(succeeded, msg);
        }
    </StatusEvaluator>
</ReplyHandler>
1.10.6. File Source
Some use cases involves creating files in folders that are watched by other applications. In order to receive status updates from such operation, you can use a File source to listen into a folder, which the other system is responding into.
<ReplyHandler>
    <Source>
        <File id="file-dest-2"
              replyFor="file-dest-1"/>
    </Source>
    <StatusEvaluator className="com.technia.tif.enovia.job.reply.config.SimpleFileStatusEvaluator" />
</ReplyHandler>
In this example we use the default ID locator, which assumes that the file name is the "job id" + an optional suffix.
In the destinations.xml file you may define the outgoing file destination like below in order to include the job-id in the outgoing file-name.
<Destinations>
    <File id="file-dest-1"
          directory="${tif.temp}/transfer/out"
          fileName="${job.id}.xml"/>

    <File id="file-dest-2"
          directory="${tif.temp}/transfer/in"/>
Moreover, we use a built-in status evaluator that has a very simple implementation:
    public void evaluate(ReplyHandlerContext ctx) {
        Path p = ctx.getMessage();
        String dirName = p.getParent().getFileName().toString();
        boolean error = "error".equalsIgnoreCase(dirName);
        ctx.setResult(!error, readFileContent(p));
    }
1.10.7. Startup of Reply Handler
Upon startup, TIF will automatically find all reply handler configurations that you have configured and deploy these. This method is called auto-registration and can be disabled if wanted. Below is a table of properties that are of interest.
| Property | Type | Default | Description |
|---|---|---|---|
resources.replyHandler.autoRegister |
boolean |
True |
Use this property to disable the auto registration |
resources.replyHandler.excluded |
Comma separated list |
Comma separated list of resources to be excluded. |
|
resources.replyHandler.included |
Comma separated list |
Comma separated list of resources to be included. |
By default, auto registration is enabled and no resources are excluded.
In earlier versions of TIF, you were forced to specify the reply handler configurations
to be started within the ${TIF_ROOT}/modules/enovia/etc/module.custom.properties file.
This method is still supported, although the preferred approach is to auto-register
all configurations without having to also do extra configuration within the "module.custom.properties" file.
To deploy a reply handler using the old approach, see instructions below:
Syntax of entry within ${TIF_ROOT}/modules/enovia/etc/module.custom.properties
replyHandler.<id>.<property> = <value>Below is an example where two different reply handlers has been configured.
replyHandler.0.config = ECOReply.xml
replyHandler.1.config = tvc:replyhandler:domain/PartReply.xml|
Refering to configurations in the default domain do not require the complete expanded name. E.g. |
|
Each reply handler may be stopped / restarted from the TIF Administration UI. |
The most common configurations requires only the "config" property to be defined. However, there are additional properties available as shown below:
replyHandler.<id>.enabled = true (1)
replyHandler.<id>.config = ... (2)
replyHandler.<id>.className = ... (3)| 1 | May be used to disable a particular reply handler |
| 2 | Specifies the reply handler configuration |
| 3 | Instead of a configuration, specify a Java class implementing com.technia.tif.enovia.job.reply.ReplyHandler |
|
The earlier supported properties called
Are no longer supported. You should configure this from within the reply handler instead using the |
1.11. Create / Update Integration
The create and/or update integration allows you to setup use cases, which will enable support for
-
Create or Update a single object
-
Create or Update multiple objects
-
Create or Update objects and relationships connected in a single or multi level fashion
The integration does not require a certain format of the incoming payload (the incoming data), instead it is via the create/update configuration you specify how the data is formatted and what actions that should be taken.
The create/update configuration is defined in an XML file, which should be stored
within a folder called "createconfig" below ${TIF_ROOT}/modules/enovia/cfg.
| You need to have some basic knowledge in XPath expressions, in order to understand how to write your configurations to match/map to the incoming payload data. |
1.11.1. Contextual or Non-Contextual
The create/update configuration can operate in two different modes depending on the use case, e.g. contextual and non-contextual. Contextual means that the integration runs in the context of a certain business-object, while in the other case it is the incoming payload that contains all information.
1.11.2. Configuration File
The create/update configuration contains on a high level:
-
Format of incoming data
-
Instructions from where in the incoming data to start the processing. This is done via
<EntryPoint>definitions. -
Rules depending on what data that has been matched. This is done via
<Config>definitions.
The root element within a create/update configuration is <CreateConfiguration>,
and this element supports the following attributes:
| Attribute | Description | Type | Default |
|---|---|---|---|
requiresInputObject |
Whether or not to run the integration in contextual mode or not. |
Boolean |
False |
runPrivileged |
Can be used to enforce running the integration as a super-user. This may be useful in situations where the current user do not have sufficient privileges to perform certain changes in the database. |
Booolean |
False |
historyOff |
May be used to turn off history logging while running the integration. |
Booolean |
False |
triggerOff |
May be used to turn off triggers while running the integration. |
Booolean |
False |
maxLevels |
May be used to restrict the integration to process structures deeper than this value. No restrictions are defined by default. |
Integer |
-1 |
txType |
The transaction type to be used while running the integration. Possible values are
|
String |
update |
dateFormat |
The default date format to be used when parsing date values from the incoming data. The value should either be a valid date pattern string, or one of the following pre-defined values:
|
String |
iso-date-time |
xpathFactory |
Define a custom XPathFactory to be used.
Either you point out a class using its fully qualified name, or use the short names
|
String |
Default is |
listener |
Name of class implementing
May be used to listen to event’s occurring during the integration execution |
String |
The allowed child elements are:
| Child Element | Cardinality | Required | Description |
|---|---|---|---|
|
0 or 1 |
No |
May be used to handle more complex input formats, for example ZIP input |
|
1+ |
Yes |
Defines entry points, e.g. where to look for the starting point within the incoming payload. |
|
1+ |
Yes |
Defines the create/update rules for a given kind of element. |
|
0+ |
No |
May be used to define different kind of translations of incoming values to ENOVIA™ understandable values. |
|
0 or 1 |
No |
May be used to point out an XML Schema to be used for validation of the incoming payload. |
|
0 or 1 |
No |
Configure the namespace context while evaluating XPath expressions during the processing. |
1.11.3. Input Formats
With the <InputFormats> element you can specify what kind of format the incoming
data should have. By default, if this is not specified, the incoming data is
assumed to be an XML file processed as-is.
If you omit the <InputFormats> element, we assume that the data passed
in to the create/update integration is XML data.
|
The following input formats are supported:
- Default
-
XML, which is handled as-is without any conversion
- XML
-
XML that is converted to another XML format using an XSLT stylesheet.
- JSON
-
JSON data that is converted automatically to XML
- CSV
-
Comma separated values. Automatically converted to XML.
- Zip
-
ZIP file containing the data
Allowed child elements are:
| Child Element | Supported Attributes | Description |
|---|---|---|
|
- |
Used to process ZIP input files. ZIP files may contain both meta-data and additional files, which for example may be checked-in to objects being created and/or updated during the process. |
|
|
Used for conversion of CSV data into XML for further processing |
|
|
Used for converting XML data into another XML format for further processing |
|
|
Used for converting JSON data into XML. |
|
- |
E.g. just use the default input, assumed to be XML without need for further conversion. |
ZIP Input
A ZIP file contains multiple files, and you need to specify what files within the ZIP archive that contains the data that should be processed by the create / update integration engine. You can either point out a single file by its path/name or use globbing pattern to match multiple files.
Exampe 1, ZIP format and starting point is the data.xml file in the root of the ZIP archive.
<InputFormats>
    <Zip>
        <InputFiles>data.xml</InputFiles>
    </Zip>
</InputFormats>
Note that if the data you are processing is in a different format, you need to transform it to XML. Supported transformers are CSV, XML and JSON.
Exampe 2, ZIP format and starting point are the files matching the pattern data/*.csv.
<InputFormats>
    <Zip>
        <InputFiles>data/*.csv</InputFiles>
        <Transformer> (1)
            <CSV charset="UTF-8" separator="," includesHeader="true" />
        </Transformer>
    </Zip>
</InputFormats>| 1 | For CSV data, we need to transform it to XML. |
JSON to XML
JSON data is converted to XML as shown in the examples below:
| JSON | XML |
|---|---|
|
|
|
|
| 1 | Any occcurence of invalid XML name character is removed when transforming a JSON property name into an XML element name. E.g. the space is being removed. |
| 2 | In this case, the whole name was invalid - hence we use the fallback element name. |
CSV to XML
CSV is fairly easy to transform into XML. Each row in the CSV data is mapped to a
<row> element and each field is contained in a <field> element.
See below for an example how the CSV data is converted to XML
Input data in CSV format
Part,A-0001,B,Release,45 g
Part,A-0002,C,Release,94 g
Results in this XML
<data>
  <row>
      <field>Part</field>
      <field>A-0001</field>
      <field>B</field>
      <field>Release</field>
      <field>45 g</field>
  </row>
  <row>
      <field>Part</field>
      <field>A-0002</field>
      <field>C</field>
      <field>Release</field>
      <field>94 g</field>
  </row>
</data>
1.11.4. Entry Point
Depending on if you run in contextual mode or not (by using the requiresInputObject attribute), you need to use the EntryPoint element in two different ways.
Lets start with the non-contextual mode, in this mode you only need to specify the select attribute and optionally the mode attribute. The select attribute specifies an XPath expression, which will select an element or a list of elements from the incoming payload. Below are some examples
<EntryPoint /> (1)
<EntryPoint select="/" /> (2)
<EntryPoint select="/Data/Items/Item" /> (3)| 1 | Implicitly selects the first level elements below the root element of the incoming payload. |
| 2 | Selects the root element of the incoming payload |
| 3 | Selects the elements (or element) matching the given XPath |
The optional mode attribute may be used to process the matched elements in a particular mode. We will discuss the mode attribute more further in the document.
Example:
<EntryPoint select="/Data/Items/Item" mode="root" />Alternative 2, when processing in contextual mode: In this case, you will not use the select nor the mode attributes. Instead, you will use one or more child elements below the EntryPoint element called ContextObject, which defines for what context object it is valid for and how the context object is connected to the incoming payload. Example:
<EntryPoint>
    <ContextObject match="type.kindOf[Part] AND current == 'Release'"> (1)
        <Connections>
            <Connection relationship="relationship_EBOM" select="/Data/BOM/rows" /> (2)
        </Connections>
    </ContextObject>
    <ContextObject match="type.kindOf[Product]'"> (3)
        ...
    </ContextObject>
    <ContextObject> (4)
        ...
    </ContextObject>
    ...
</EntryPoint>| 1 | Configuration used when context object matches the ENOVIA expression, e.g. for released Part’s. |
| 2 | Connection configuration (See later section for more details). Specifies for different kind of relationship(s) how to connect the context object with the incoming data. The select attribute defines an XPath expression that maps to data that represents objects that should be connected with this relationship. NOTE: You may have multiple Connection elements. |
| 3 | Configuration used when context object is of type Product. |
| 4 | Fallback configuration, which matches any context object. |
|
The match attribute must be a valid ENOVIA™ expression, which is evaluated against the database by TIF. You can test your expressions via MQL by using the following syntax. |
If you omit the match attribute, it implies that it will be valid for any kind of object.
However, the order a <ContextObject> definition is being resolved, is that the first one that matches will be used.
If none matched, but there is a configuration with an empty (or missing) match attribute,
that configuration will be used.
1.11.5. Config
The Config element describes what to actually do with the incoming data. A single Config definition is mapped to operate against a certain element (or elements) from the incoming payload.
This matching is done via the name of the current element that has been selected either via the EntryPoint or via a Connection
Below are some examples of such mapping.
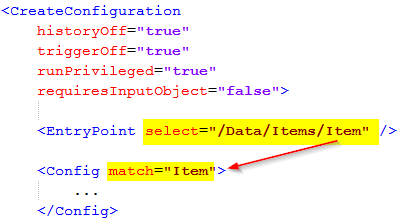
Figure 1. Basic mapping between EntryPoint and Config
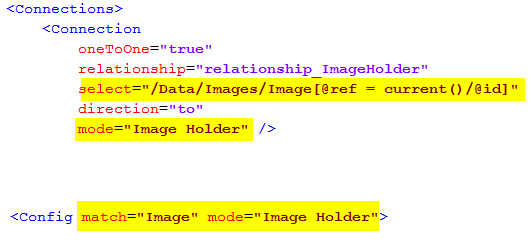
Figure 2. Mapping from Connection to Config using both select and mode
E.g. the select attribute on either the <EntryPoint> or <Connection> elements
consists of an XPath expression that is evaluated from the current position of the
incoming payload. The matched elements are then mapped to a certain <Config> element,
which contains instructions on how to handle the data.
| The mode attribute may be used to allow processing of an element using different configurations, depending on the current processing mode. |
The allowed attributes on the <Config> element are:
| Attribute | Description | Type | Default |
|---|---|---|---|
match |
Defines the name of the XML element from the incoming payload, which this config is valid for. |
String |
|
mode |
An optional value that defines the mode, which this config is valid for |
String |
The allowed child elements are:
| Child Element | Cardinality | Required | Description |
|---|---|---|---|
|
0 or 1 |
No |
Defines what to do, if the object the current element in the incoming payload represents exists in the ENOVIA™ database. Possible values are:
|
|
0 or 1 |
No |
Defines behavior when the current element in the incoming payload does not map to an object inside the ENOVIA™ database. Possible values are:
|
|
1 |
Yes |
Defines how to find the object inside the ENOVIA™ database based upon the incoming values. |
|
0 or 1 |
No |
Defines how to create the object inside the ENOVIA™ database based upon the incoming values. |
|
0 or 1 |
No |
Defines how to update the object inside the ENOVIA™ database based upon the incoming values. |
|
0 or 1 |
No |
Specifies optional connections that should be created or updated. |
|
0 or 1 |
No |
May be used to configure how to deal with file content that has been embedded within the incoming data. |
The logic follows this flow:
-
The rules inside the
<IdentityMatch>defines how to obtain values required for identifying the object inside the ENOVIA™ database. -
If no object could be mapped AND the
<CreateValues>section has been defined, TIF will try to create the object based upon the values given. Note that in the case for create, values defined within the<IdentityMatch>but not in the<CreateValues>section will be part of the create operation. -
If ONE object were found, TIF will if BOTH
<IfFound>is set to update and the<UpdateValues>has been defined, try to update the object inside the database. -
If more than one object were found, an exception will be raised and the processing will abort.
-
If
<IfNotFound>is set to revise, special revisioning rules are applied. See this chapter for more details.
1.11.6. IdentityMatch
The purpose of the <IdentityMatch> element is to define values used to identify
the object in ENOVIA.
The child elements are used to identify data that maps to certain fields inside ENOVIA. You may combine the elements as needed/required depending on the use-case.
Note that there are some common attributes shared by all child elements (except the CustomField).
- select
-
String, defines an XPath expression that is used to select the value from the incoming payload data.
- selectReturnType
-
String, May be used to declare a custom return type from the select expression. Particular if you are using xpath functions, this needs to be defined. Allowed values are: NODE, NODESET, STRING, NUMBER and BOOLEAN.
- fallbackValue
-
String, defines a fallback value to be used. May be used if you don’t expect the value to be present within the incoming payload data.
- valueMapper
-
String, defines an optional value-mapper definition, which is used to lookup the value against.
- resolveValue
-
Boolean, default is true for Type, Policy and Vault values. Defines if to treat value as a symbolic name, e.g. is to resolve it.
- allowEmptyValue
-
Boolean, default is false except for attribute fields and the description field. Defines if to allow empty values.
The table below shows the possible child elements and its additional attributes that may be of interest to use in the context of identity matching.
| Child Element | Valid Attributes in context of Identity Match | Notes |
|---|---|---|
|
|
|
|
|
|
|
Note: The attribute latest and last are used in conjunction to each other. If no revision in the given state was found, you can fallback to last revision. If this behavior is unwanted, set the last attribute to false. |
|
|
- |
|
|
- |
|
|
- |
|
|
|
|
|
- |
|
|
- |
|
|
- |
|
|
|
|
|
- |
No other fields are allowed in identity match. |
|
- |
No other fields are allowed in identity match. |
|
Up to implementation |
Below follows some examples how to construct an Identify Matching.
Example 1:
<Config match="Part">
  <IdentityMatch>
      <Type fallbackValue="Part"/>
      <Name select="@n" />
      <Revision select="@rev" />
  </IdentityMatch>
</Config>
This would work on data that is structured like this
<Part n="A-000101221" rev="C">
    ...
</Part>
Example 2:
<Config match="Part">
  <IdentityMatch>
      <Type select="Type/text()"/>
      <Name select="Name/text()" />
      <Revision latest="true" select="State/text()" />
  </IdentityMatch>
</Config>
This would work on data that is structured like this
<Part>
  <Type>Hardware Part</Type>
  <Name>A-000101221</Name>
  <State>Release</State>
  ...
</Part>
Example 3:
<Config match="Something">
  <IdentityMatch>
      <Attribute name="attribute_UUID" select="@uuid" />
  </IdentityMatch>
</Config>
This would work on data that is structured like this
<Something uuid="8a9616bc-ae81-4532-87f3-214993789016">
  ...
</Something>
1.11.7. CreateValues
The purpose of the <CreateValues> element is to define values used when creating
objects inside the ENOVIA™ database.
The child elements are used to identify data that maps to certain fields inside ENOVIA. You may combine the elements as needed/required depending on the use-case.
Fields defined within the <IdentityMatch> section will automatically be part
of the <CreateValues> unless they are overridden in the <CreateValues> section.
|
Note that there are some common attributes shared by all child elements (except the CustomField).
- select
-
String, defines an XPath expression that is used to select the value from the incoming payload data.
- selectReturnType
-
String, May be used to declare a custom return type from the select expression. Particular if you are using xpath functions, this needs to be defined. Allowed values are: NODE, NODESET, STRING, NUMBER and BOOLEAN.
- fallbackValue
-
String, defines a fallback value to be used. May be used if you don’t expect the value to be present within the incoming payload data.
- valueMapper
-
String, defines an optional value-mapper definition, which is used to lookup the value against.
- resolveValue
-
Boolean, default is true for Type, Policy and Vault values. Defines if to treat value as a symbolic name, e.g. is to resolve it.
- allowEmptyValue
-
Boolean, default is false except for attribute fields and the description field. Defines if to allow empty values.
| Child Element | Valid Attributes in context of Create |
|---|---|
|
- |
|
|
|
|
|
|
|
- |
|
- |
|
|
|
- |
|
- |
|
- |
|
|
|
|
|
|
|
|
|
Up to implementation |
Below are some examples how to construct a create value section.
Example 1:
<Config match="Part">

  <IdentityMatch> (1)
    <Type select="@t" valueMapper="type-mapping" />
    <Name select="@n" />
    <Revision latest="true" fallbackValue="Release" />
  </IdentityMatch>

  <CreateValues> (2)
    <Revision firstInSequence="true" />
    <State fallbackValue="Release" />
    <Policy fallbackValue="policy_ECPart" />
    <Owner fallbackValue="tiftest" />
    <Originated select="@created" dateFormat="iso-date" />
    <Vault fallbackValue="vault_eServiceProduction" />
  </CreateValues>

</Config>| 1 | Values set here but not in the <CreateValues> section are also part of
the create operation. In this case, the Revision field is the only overridden field. |
| 2 | Defines the necessary values to create the object. In this example static/fallback values are used heavily. |
1.11.8. UpdateValues
The purpose of the <UpdateValues> element is to define values used when updating
objects inside the ENOVIA™ database.
The child elements are used to identify data that maps to certain fields inside ENOVIA. You may combine the elements as needed/required depending on the use-case.
Note that there are some common attributes shared by all child elements (except the CustomField).
- select
-
String, defines an XPath expression that is used to select the value from the incoming payload data.
- selectReturnType
-
String, May be used to declare a custom return type from the select expression. Particular if you are using xpath functions, this needs to be defined. Allowed values are: NODE, NODESET, STRING, NUMBER and BOOLEAN.
- fallbackValue
-
String, defines a fallback value to be used. May be used if you don’t expect the value to be present within the incoming payload data.
- valueMapper
-
String, defines an optional value-mapper definition, which is used to lookup the value against.
- resolveValue
-
Boolean, default is true for Type, Policy and Vault values. Defines if to treat value as a symbolic name, e.g. is to resolve it.
- allowEmptyValue
-
Boolean, default is false except for attribute fields and the description field. Defines if to allow empty values.
| Child Element | Valid Attributes in context of Create |
|---|---|
|
- |
|
- |
|
|
|
- |
|
- |
|
- |
|
|
|
|
|
|
|
|
|
Up to implementation |
Below are some examples how to construct an update value section.
Example 1:
<Config match="Part">

  ....

  <UpdateValues>
    <Attribute name="attribute_Weight" select="@weight" />
    <Attribute name="attribute_UnitOfMeasure" select="@uom" />
    <Attribute name="attribute_SparePart" select="@sparePart" />
    <Modified select="@modified" dateFormat="iso" />
  </UpdateValues>

</Config>
If you don’t want to set the same values during create as in the update case,
set the attribute useForCreate="false" on the <UpdateValues> element.
|
1.11.9. CustomField
As seen in previous chapters related to the elements <IdentityMatch>, <CreateValues>
and <UpdateValues>, an element called <CustomField> has been mentioned.
This field may be used to handle more complex data. To use it, you use the following syntax:
<CustomField className="com.acme.SomeClass" />This class must implement the interface com.technia.tif.enovia.integration.create.def.Field.
1.11.10. Connections
You may use the create/update integration to create and/or update connections within the ENOVIA™ database.
The <Connections> element is valid to use either within a <Config> section or
within the <EntryPoint> section in case you run the integration within a context object.
The <Connections> element is just a place holder for one or more <Connection>
elements.
The <Connection> element supports the following attributes
| Attribute | Required | Description | Type | Default |
|---|---|---|---|---|
select |
Yes |
Defines an XPath expression that is used to select the "children" from the incoming payload |
String |
|
mode |
No |
Defines what mode to process the child nodes within (This relates to what |
String |
|
relationship |
Yes |
Defines the name of the ENOVIA relationship to be used (symbolic names are allowed) |
String |
|
direction |
No |
Default is FROM, may be used to switch direction to TO |
from or to |
from |
typePattern |
No |
Optional type pattern (comma separated list of type names) to be used when expanding data in ENOVIA and matching with incoming payload |
String |
|
objectWhere |
No |
Optional where clause to apply on objects used when expanding data in ENOVIA and matching with incoming payload |
String |
|
relationshipWhere |
No |
Optional where clause to apply on relationships used when expanding the data in ENOVIA and matching within incoming payload |
String |
|
disconnectExisting |
No |
A flag to indicate whether or not to disconnect existing relationships, that NOT is mapped to the incoming payload |
Boolean |
False |
oneToOne |
No |
A special attribute that can be used to indicated that the connection will always either have none or one object connected |
Boolean |
False |
The allowed child elements are:
| Child Element | Cardinality | Required | Description |
|---|---|---|---|
|
0 or 1 |
Yes, unless the special attribute oneToOne has been set to true |
Defines how to map the incoming data into a particular relationship inside ENOVIA. See below how to construct an identity matching for relationships |
|
0 or 1 |
No |
Defines how to create the relationship inside the ENOVIA™ database based upon the incoming values. |
|
0 or 1 |
No |
Defines how to update the relationship inside the ENOVIA™ database based upon the incoming values. |
The identity matching for relationships are constructed by defining a combination of values, where each value either is related to the object or from the relationship itself.
Example 1:
<Connection ...>
  <IdentityMatch>
    <Relationship>
      <Attribute name="attribute_FindNumber" select="@findNumber" />
    </Relationship>
    <Object>
      <Name select="@identifier" />
    </Object>
  </IdentityMatch>
</Connection>
This would construct an identity matcher, which will map the attribute findNumber from the incoming data to the "Find Number" attribute-value of the relationship in the database combined with the name on the related object mapped to the attribute identifier.
You may use either or both values from the relationship or the related object, in order to conduct the identity matching.
Allowed children of the <IdentityMatch>/<Relationship> element:
| Child Element | Description |
|---|---|
|
Maps to the relationship type |
|
Attribute from the relationship |
|
Ownership |
|
Ownership (altowner1) |
|
Ownership (altowner2) |
|
Modified date |
|
Originated date |
|
Custom field mapping |
Allowed children of the <IdentityMatch>/<Object> element:
| Child Element | Description |
|---|---|
|
Maps to object type |
|
Maps to object name |
|
Maps to object revision |
|
Maps to object policy |
|
Maps to object vault |
|
Maps to object state |
|
Maps to object description |
|
Maps to object owner |
|
Maps to object alt-owner1 |
|
Maps to object alt-owner2 |
|
Maps to object modified |
|
Maps to object originated |
|
Maps to object attribute |
|
Custom field mapping |
For the child elements <CreateValues> and <UpdateValues>, see previous chapters.
1.11.11. EmbeddedFiles
With the <EmbeddedFiles> element you can deal with files that is part of the payload.
The files may either be part of the payload itself, e.g embedded in the XML data,
or part of the ZIP file being used for processing the create/update use-case.
Three modes exists:
-
Files embedded directly in the payload, typically base-64 encoded file content
-
Files part of the ZIP file, and the payload refernces or uses files from it
-
Files part of the ZIP file, but no direct reference to the files from the payload, instead the files are mapped using a file-mapper.
It is not recommended to embed too many files within the incoming payload for performance reasons, choose instead to use a ZIP file when the amount of files are large or the size of the files are large.
The <EmbeddedFiles> element is just a container for one or more <File> elements.
The <File> elements supports these common attributes:
| Attribute | Description | Type | Default |
|---|---|---|---|
select |
Defines an XPath expression, used to obtain the element(s) representing the file content. |
String |
. |
cdm |
Defines if to use CDM mode or not. Default is to autodetect this. Possible values are:
|
String |
auto |
reuseVersion |
In case of CDM mode, this attribute can be used to enforce creation of new version |
Boolean |
False |
appendFile |
If to append the file |
Boolean |
True |
unlock |
If to unlock object |
Boolean |
True |
multiple |
May be used to specify if multiple files are expected from the incoming payload |
Boolean |
True |
nameSelect |
An XPath expression to be used to select the name of the file from the current element |
String |
|
nameSelectReturnType |
Allowed values are: NODE, NODESET, STRING, NUMBER and BOOLEAN. |
String |
NODE |
nameFallback |
A static value for the file-name, may only be used IF the multiple attribute has been set to FALSE |
String |
|
formatSelect |
An XPath expression used to select the format of the file |
String |
|
formatSelectReturnType |
Allowed values are: NODE, NODESET, STRING, NUMBER and BOOLEAN. |
String |
NODE |
formatFallback |
A static value for the format to be used |
String |
Embedding Files
To use embedded files mode, one need some additional attributes
| Attribute | Description | Type | Default |
|---|---|---|---|
contentSelect |
An XPath expression used to select the content of the file |
String |
|
contentEncoding |
The encoding used when converting the encoded string into bytes |
String |
UTF-8 |
encoding |
Specifies in what encoding format the content is encoded in. Currently only base64 is allowed/supported |
String |
base64 |
Lets look into an example how this could be utilized.
Example of incoming data, which would map to an objects image holder (note that the content has been cropped to reduce space). File content is embedded within the source XML data.
Incoming XML data
<Data>
    <Items>
        <Item id="fa-fe-2c-2d" t="Part" n="XZ-0001" rev="A" w="100 g">
            ...
        </Item>
    </Items>

    <Images>
        <Image ref="fa-fe-2c-2d">
            <Content format="mxImage" name="image.png">iVBORw0KGgoAAAANSUhEUgAAAQoAAAFmCAMAAACiIyTaAAABv1BMVEU...
The essential parts of the create/update configuration
<Config match="Item">
  ...
  <Connections>
      <Connection
          oneToOne="true"
          relationship="relationship_ImageHolder"
          direction="to"
          select="/Data/Images/Image[@ref = current()/@id]" (1)
          mode="Image Holder" />

<Config match="Image" mode="Image Holder"> (2)
    <CreateValues>
        <Type fallbackValue="type_ImageHolder" />
        <Name useSystemTime="true" prefix="auto_"/>
        <Revision fallbackValue="" />
        <Policy useFirst="true" />
        <Vault fallbackValue="vault_eServiceProduction" />
    </CreateValues>
    <EmbeddedFiles>
        <File (3)
            cdm="false"
            multiple="true"
            append="true"
            encoding="base64"

            select="Content"
            nameSelect="@name"

            formatSelect="@format"
            formatFallback="generic"
            contentSelect="text()" />
    </EmbeddedFiles>
</Config>| 1 | Connection defined for Item, used to create the image holder |
| 2 | Configuration for creation / updating of the Image Holder |
| 3 | File element that instructs how to find the files to be checked in. |
Referencing Files in ZIP from Payload
To use the file reference mode, one need some additional attributes
| Attribute | Description | Type | Default |
|---|---|---|---|
fileRefSelect |
Depends on input format. For example if you use ZIP input format, your data may refer to a file within the ZIP archive and this attribute specifies the XPath expression that would select the file reference name. The name is then used when querying the Content Handler for the used Input Format. |
String |
|
fileRefPrefix |
Can be used to prepend some path prefix to the selected value |
String |
|
fileRefSuffix |
Can be used to append some path suffix to the selected value |
String |
Example:
Incoming XML data
<Data>
    <Images>
        <Image name="..." rev="...">
          <File fileName="image1.png" format="Large"/>
          <File fileName="image2.png" format="Medium"/>
The essential parts of the create/update configuration
<Config match="Image">
    ...
    <EmbeddedFiles>
        <File
            cdm="false"
            multiple="true"
            append="true"

            fileRefSelect="File"
            fileRefPrefix="files/"
            nameSelect="@fileName"
            formatSelect="@format" />
    </EmbeddedFiles>
</Config>
During processing, the file handler will then look for the following files in the incoming ZIP data:
-
files/image1.png
-
files/image2.png
Mapping Files from ZIP
If the payload itself does not point out the files, one may map files from the ZIP data instead.
To use this mode you need to set the useFileMapper attribute on the <File> element to true.
<File useFileMapper="true" ...>
When this mode is defined, you need to specify some additional mapping rules as child elements.
| Child Element | Description | Required |
|---|---|---|
|
Defines mapping rules, e.g. where to look for files in the incoming ZIP file in context of the current object being processed |
True |
|
Defines additional filtering rules, e.g. files to exclude/include |
False |
The <FileMapper> element must contain at least one <PathItem> element.
The path items together builds up the search path to the files to be processed.
The table below shows the accepted attributes on a path item element.
| Attribute | Description | Example |
|---|---|---|
value |
Defines a static path item name |
|
select |
Defines an XPath expression that will select a value from the current context in the XML data |
|
mapsToFormat |
May be used to define that the name of the path at this level specifies the format for the file |
|
ignoreMissing |
May be used to ignore missing item without throwing exception. Default is true. |
|
| If neither the value nor the select attribute are defined, the path-item matches to any directory. |
Lets shown an example below:
Content of incoming ZIP file
│   payload.xml
│
└───files
    ├───TST-0001
    │   ├───generic
    │   │       file1.doc
    │   │       file2.xls
    │   │       file3.doc
    │   │
    │   └───JT
    │           test1.jt
    │           test2.jt
    │
    ├───TST-0002
    │   └───generic
    │           SomeFile.xlsx
    │
    ├───TST-0003
    └───TST-0004
Payload Content
<Specs>
    <Spec type="CAD Drawing" name="TST-0001" rev="A"/>
    <Spec type="CAD Drawing" name="TST-0002" rev="A"/>
    <Spec type="CAD Drawing" name="TST-0003" rev="A"/>
    <Spec type="CAD Drawing" name="TST-0004" rev="A"/>
</Specs>
Create/Update Configuration
<CreateConfiguration
    txType="update"
    runPrivileged="true"
    historyOff="true"
    triggerOff="true">

    <InputFormats>
        <Zip>
            <InputFiles>payload.xml</InputFiles>
        </Zip>
    </InputFormats>

    <EntryPoint select="/Specs/Spec" />

    <Config match="Spec">
        <IfFound>Update</IfFound>
        <IdentityMatch>
            <Type select="@type" />
            <Name select="@name" />
            <Revision select="@rev"/>
        </IdentityMatch>
        <CreateValues>
            <Policy fallbackValue="CAD Drawing"/>
            <Vault fallbackValue="vault_eServiceProduction" />
        </CreateValues>
        <EmbeddedFiles>
            <File reuseVersion="true"
                  formatFallback="generic"
                  useFileMapper="true"> (1)
                <FileMapper> (2)
                    <PathItem value="files" />
                    <PathItem select="@name" />
                    <PathItem mapsToFormat="true" />
                </FileMapper>
                <FileFilter excludedFormats="JT" />
            </File>
        </EmbeddedFiles>
    </Config>
</CreateConfiguration>| 1 | The useFileMapper must be set to true |
| 2 | The <FileMapper> element specifies the path to the files. Note that a path item can contain static names or dynamic names selected from the XML data.
A path item may also contain the format name, thush the mapsToFormat attribute can be used to specify that. |
1.11.12. ValueMapper
You may use so called value mappers to support translation of values. For example name of types or states may not be the same between two different systems.
You may define as many value mappers as you need, each is given an identifier, which you refer to on those fields representing values that needs to be translated.
The <ValueMapper> element must have an attribute called id containing a valid identifier.
Possible child elements to the <ValueMapper> element are (note you may combine them as you need):
| Child Element | Description |
|---|---|
|
Defines a reference to an external mapping file (see below) |
|
Defines inline rules (see below) |
|
Custom value mappers. Requires attribute className pointing to
class that implements the interface |
Using value lookup:
The <ValueLookup> element supports these attributes:
- name
-
The name of the extrernal file.
If the name starts with file:, then the value is assumed to be a file from the file system, where TIF is running. You may use macros like
${TIF.HOME}to refer to the root directory of the current TIF installation.If the name does not start with file:, it is assumed to be a resource stored within the
${TIF_ROOT}/modules/enovia/cfg/lookupdirectory. If the file ends with.propertiesit is assumed to be a standard Java properties file, otherwise, if it ends with.xmlit is assumed to be an XML file following this format:<Properties> <Property name="property-1" value="value1" /> <Property key="property-2" value="value2" /> <Property name="property-3">value 3</Property> <Group key="group1"> <Property key="p1" value=".." /> <!-- accessed via key group1.p1 --> </Group> </Properties> - keyPrefix
-
An extra string to be prepended to the value before performing the lookup
- keySuffix
-
An extra string to be appended to the value before performing the lookup
Using inline rules:
The <If> element can be used in the following way:
<ValueMapper id="...">
  <If is="something" caseSensitive="false">replace value</If>
  <If matches="a?c?e*">replace value</If>
  <If beginsWith="abc">replace value</If>
  <If endsWith="def">replace value</If>
  <If regexp="...">replace value</If>
</ValueMapper>
1.11.13. Namespaces
The <Namespaces> element can be used to configure the name-space context used when evaluating XPath expressions.
In case your incoming XML data contains namespace information, the XPaths may be difficult to define without the mapping of prefix/uri.
You can choose to either define all your Namespace mappings manually, or use the setting that will copy over the namespaces from the source document. The latter requires that you always know what prefixes are being used for the URIs.
To copy over the namespaces from the source (incoming data), then you should use the following attributes.
<CreateConfiguration>
    <Namespaces mapFromSource="true" mapFromRootElementOnly="true" />
    ...
</CreateConfiguration>
The mapFromRootElementOnly attribute is by default set to true, but in case your namespace declarations occurs later on in the document,
you may need to set this flag to false. That implies the whole document is being scanned for xmlns: declarations.
If you prefer declaring the namespaces manually, you can use the following syntax.
<CreateConfiguration>
    <Namespaces>
        <Namespace prefix="a" uri="http://the_uri_for_a" />
        <Namespace prefix="b" uri="http://the_uri_for_b" />
    </Namespaces>
    ...
</CreateConfiguration>
This will give you exact control over the prefix/uri mapping.
1.11.14. Revising
If an object could not be mapped through the identity values, the create/update integration can be configured to revise an earlier revision.
First, one need to configure the <IfNotFound> to revise. The default value for this setting is create.
When this mode is enabled, the create/update integration will try to find an object having the same TYPE and NAME as the object you try to match with.
Lets take an example. Below is a simple payload and a matching configuration.
Payload snippet
<Object>
    <Kind>Part</Kind>
    <Identifier>TEST-000001</Identifier>
    <Revision>C</Revision>
</Object>
Create/Update configuration snippet
<Config match="Object">
    <IfFound>update</IfFound>
    <IfNotFound>revise</IfNotFound> (1)

    <IdentityMatch>
        <Type select="Kind/text()" />
        <Name select="Identifier/text()" />
        <Revision select="Revision/text()" />
    </IdentityMatch>
</Config>
If the object Part/TEST-000001/C does not exist, the create update integration will perform a query like below to find an object to revise.
temp query bus Part TEST-000001 * where "revision == last" limit 1
If this query does NOT return any result, the object is created in the same way
as if the <IfNotFound> setting would have its value set to create.
If the query returns a result, that object is first revised and secondly, the revised object is updated according to configurations made.
Additional control over the revisioning can be specified using the <ReviseBehavior> elment as
shown below:
<Config match="Object">
    <IfFound>update</IfFound>
    <IfNotFound>revise</IfNotFound>

    <ReviseBehavior
        reviseWithFile="true"
        searchType="type_Part"
        searchExpandType="true" />
</Config>
The attribute supported on the <ReviseBehavior> element are:
| Name | Description |
|---|---|
reviseWithFile |
Defines the flag revise-with-file passed to the ENOVIA kernel upon revising the object. Default is FALSE. |
searchType |
Overrides the type used in the type pattern when quering for the revisions. By default we use the same type as the object you are targetting. Note however if your revision sequence may have objects of different type it may be useful here to specify a common root type that will be used in the query. |
searchVaultPattern |
Specifies a custom vault pattern, if you want to narrow the query over certain vaults. Default is all vaults. |
searchExpandType |
Whether or not to query for objects having a sub-type of the type used in the query. Default is TRUE. |
Advanced Revisioning - Build Revision Sequence
It is possible to as a part of the create/update integration use-case create the revision sequence on-the-fly. Example: you are requesting to create/update an object of revision E and you do not know if the past revisions are in the database. Hence you want to include information that there exists four earlier revisions and let the create/update integration create "placeholders" for these in the database.
Starting with an example, below is a payload snippet and a matching configuration snippet.
Payload Snippet
<Object>
    <Kind>Part</Kind>
    <Identifier>TEST-000002</Identifier>
    <Revision>E</Revision>
    <Revisions> (1)
        <Rev value="A" state="Obsolete">description...</Rev>
        <Rev value="B" state="Obsolete">description...</Rev>
        <Rev value="C" state="Obsolete">description...</Rev>
        <Rev value="D" state="Release">description...</Rev>
    </Revisions>
</Object>| 1 | The revisions are provided in this format (other format alternatives are supported) |
The create/config configuration below:
Create Update Configuration Snippet
    <Config match="Object">
        <IfFound>update</IfFound>
        <IfNotFound>revise</IfNotFound> (1)

        <ReviseBehavior> (2)
            <BuildSequence select="Revisions/Rev/@value"> (3)
                <States select="Revisions/Rev/@state" />
                <Descriptions select="Revisions/Rev/text()" />
            </BuildSequence>
</ReviseBehavior>| 1 | Remember to specify the if-not-found to revise |
| 2 | Supply <ReviseBehavior> to define advanced revisioning rules |
| 3 | The <BuildSequence> element is used to control the building of revision sequences. |
The attribute supported on the <BuildSequence> element are:
| Name | Required | Description |
|---|---|---|
select |
Yes |
An XPath expression used to select the revisions. The XPath starts from the contextual object you currently are locate on. |
splitBy |
No |
If the select expression maps to a single value containing for example a comma separated list, you need to speficy the delimiter to split by here. |
order |
No |
If the list for some reason is provided in reverse order, you can specify the value "reverse" here to indicate so. |
Allowed (optional) child elements are
-
<States>
-
<Descriptions>
These elements are used to provide additional data to be used when creating the revision sequence. E.g. you may want to specify the states of the objects.
| If a revision already exists in the database, the existing revision will not be updated regarding state or description, even though the data you provided is different. |
Both the <States> and <Descriptions> elements supports the exact same attributes as for the <BuildSequence> element, described above.
| The values selected for the revisions and the states and/or descriptions must have the same number of items. |
Below is an alternate payload and matching configuration:
Payload Snippet
<Object>
    <Kind>Part</Kind>
    <Identifier>TEST-000002</Identifier>
    <Revision seq="A,B,C,D">E</Revision>
</Object>
Create Update Configuration Snippet
    <Config match="Object">
        <IfFound>update</IfFound>
        <IfNotFound>revise</IfNotFound>

        <ReviseBehavior>
            <BuildSequence select="Revision/@seq" splitBy=","/>
        </ReviseBehavior>
1.11.15. Example Configuration
<CreateConfiguration
    txType="update"
    runPrivileged="true"
    historyOff="true"
    triggerOff="true">

    <EntryPoint select="/Data/Items/Item" />

    <ValueMapper id="type-mapping">
        <ValueLookup name="sap-key-values.properties" keyPrefix="type." />
    </ValueMapper>

    <Config match="Item">
        <IfFound>Update</IfFound>

        <IdentityMatch>
            <Type select="@t" valueMapper="type-mapping" />
            <Name select="@n" />
            <Revision latest="true" fallbackValue="Release" />
        </IdentityMatch>

        <CreateValues>
            <Revision firstInSequence="true" />
            <State fallbackValue="Release" />
            <Policy fallbackValue="policy_ECPart" />
            <Owner fallbackValue="tiftest" />
            <Originated select="@created" dateFormat="iso-date" />
            <Vault fallbackValue="vault_eServiceProduction" />
        </CreateValues>

        <UpdateValues useForCreate="true">
            <Attribute name="attribute_Weight" select="@w" ifNull="fail" />
            <Description base64Encoded="true" select="Description/text()"/>
            <RDO select="@rdo" />
        </UpdateValues>

        <Connections>
            <Connection relationship="relationship_EBOM"
                        select="Item"
                        disconnectExisting="true">
                <IdentityMatch>
                    <Relationship>
                        <Attribute
                            name="attribute_FindNumber"
                            select="@findNumber"/>
                    </Relationship>
                </IdentityMatch>
            </Connection>

            <Connection relationship="relationship_ReferenceDocument"
                        typePattern=""
                        select="Specs/Doc"
                        disconnectExisting="true">

                <IdentityMatch>
                    <Object>
                        <Name select="@docID" />
                    </Object>
                </IdentityMatch>

                <UpdateValues useForCreate="true">
                    <Attribute
                        name="attribute_DocumentClassification"
                        select="@classification" />
                </UpdateValues>
            </Connection>
        </Connections>
    </Config>

    <Config match="Doc">
        <IdentityMatch>
            <Type fallbackValue="Document"/>
            <Name select="@docID" />
            <Revision fallbackValue="*"/>
        </IdentityMatch>
        <CreateValues>
            <Policy fallbackValue="Document" />
            <Vault fallbackValue="eService Production" />
        </CreateValues>
    </Config>

 </CreateConfiguration>
1.11.16. Trigger a Create/Update Integration via REST
In order to trigger a create/update configuration via REST call, you need to
create a REST service configuration within ${TIF_ROOT}/modules/enovia/cfg/restservice.
Below is an example how to launch such use case without requiring any context object.
<Rest>
    <DisplayName>EBOM Create/Update Service</DisplayName>
    <ServiceName>ebom</ServiceName>
    <Credentials containerManaged="true" />
    <Create config="EBOM.xml" /> (1)
    <Create config="EBOM.xml" payload="tvc:payload/test1.xml"/> (2)
</Rest>| 1 | This points out the configuration tvc:createconfig/EBOM.xml |
| 2 | Alternative, when there is a need to generate custom response via payload configuration |
Below is an alternative REST service configuration showing how to use input/context object.
<Rest>
    <DisplayName>EBOM Create/Update service (single level)</DisplayName>
    <ServiceName>ebom-single-level</ServiceName>
    <IdLocator type="tnr"> (1)
        <Setting name="allowWildcards" value="false" />
    </IdLocator>
    <Credentials containerManaged="true" />
    <Create config="EBOM-single-level.xml" />
</Rest>| 1 | Here we require the type name and revision to be present on the URL. Note that alternative ways to map URL into id’s can be done. Please read the chapter describing configurable REST Services here. |
Using custom payload generation:
When you point out a custom payload, please note that you must use the "objectIdParam" attribute to lookup the correct ID´s. For relationships, use "relationshipIdParam" attribute instead.
<Payload rootElement="Response">
    <XMLSpec>
        <IncludeTableHeaders>false</IncludeTableHeaders>
        <IncludeTableGroups>false</IncludeTableGroups>
        <AddColumnId>false</AddColumnId>
        <AddCellIndex>false</AddCellIndex>
        <AddColumnRef>false</AddColumnRef>
        <AddCellValueSize>false</AddCellValueSize>
        <OmitCellValueElement>true</OmitCellValueElement>
        <OmitRowAttributes>true</OmitRowAttributes>
        <UseColumnName>true</UseColumnName>
        <TableDataElement/>
        <RowElement>${TYPE}</RowElement>
    </XMLSpec>

    <TableContent objectIdParam="createdObjectIds" outerElement="CreatedObjects"> (1)
        <Table>tvc:table/PartBasic.xml</Table>
    </TableContent>

    <TableContent objectIdParam="updatedObjectIds" outerElement="UpdatedObjects"> (2)
        <Table>tvc:table/PartBasic.xml</Table>
    </TableContent>

    <TableContent relationshipIdParam="createdRelationshipIds" outerElement="CreatedRelationships"> (3)
        <Table>tvc:table/RelBasic.xml</Table>
    </TableContent>

</Payload>| 1 | Use id’s of created business objects |
| 2 | use id’s of updated business objects |
| 3 | use id’s of created relationships |
The available parameters are:
-
createdObjectIds
-
revisedObjectIds
-
updatedObjectIds
-
allObjectIds
-
createdRelationshipIds
-
updatedRelationshipIds
-
allRelationshipIds
1.11.17. Trigger a Create/Update Integration via JMS
In order to trigger a create/update integration via JMS, you need to
add a JSM message listener within the directory ${TIF_ROOT}/modules/enovia/cfg/jmslistener.
Below is an example how to setup such a listener:
${TIF_ROOT}/modules/enovia/cfg/jmslistener/TestListener.xml
<JMSListener>
    <Name>Create Update EBOM via JMS</Name>
    <Destination id="jms-1" /> (1)
    <WithContext user="..." /> (2)
    <Handler type="CreateUpdateIntegration" /> (3)
    <Arguments>
        <Argument name="configuration" value="tvc:createconfig/EBOM.xml" /> (4)
        <!-- Below: Extra optional parameters -->
        <Argument name="payloadconfig" value="tvc:payload/EBOM_Response.xml" /> (5)
        <Argument name="objectidparam" value="oid" /> (6)
        <Argument name="responsemessagetype" value="text" /> (7)
    </Arguments>
</JMSListener>| 1 | This is the destination you will get messages from |
| 2 | If you want to run the integration as a certain user, specify so here |
| 3 | This will choose the correct message listener |
| 4 | Points out the create/update configuration to be used |
| 5 | Specify custom payload config used to produce the response |
| 6 | Specify custom header name to use for reading contextual object id |
| 7 | Type of return message, default is text. Use stream to force stream message |
Please see previous chapter for details regarding using a custom payload for creation of the response.
The response message is sent to the queue as specified within the Reply To header of the JMS Message.
|
1.11.18. Trigger a Create/Update Integration via File
It is also possible to trigger the create/update integration via file system integration.
To do so, you need to add a directory listener within the directory ${TIF_ROOT}/modules/enovia/cfg/directorylistener.
Below is an example how to setup such a listener:
${TIF_ROOT}/modules/enovia/cfg/directorylistener/TestListener.xml
<tif:DirectoryListener
    xmlns:tif="http://technia.com/TIF/DirectoryListener"
    xmlns:xsi="http://www.w3.org/2001/XMLSchema-instance"
    xsi:schemaLocation="http://technia.com/TIF/DirectoryListener http://products.technia.com/tif/schema/latest/DirectoryListener.xsd">

    <tif:Name>Create Update EBOM via File</tif:Name>
    <tif:Destination id="file-dest-in" /> (1)
    <tif:WithContext user="tiftest" /> (2)
    <tif:Handler type="CreateUpdateIntegration" /> (3)
    <tif:Paths delete="true" /> (4)
    <tif:Arguments>
        <tif:Argument name="configuration" value="tvc:createconfig/EBOM.xml" /> (5)
        <tif:Argument name="outputDestination" value="file-dest-out" /> (6)
        <tif:Argument name="errorDestination" value="file-dest-err" /> (7)
        <tif:Argument name="payloadconfig" value="tvc:payload/EBOM_Response.xml" /> (8)
    </tif:Arguments>
</tif:DirectoryListener>| 1 | This is the destination that configures the directory to listen for files from |
| 2 | If you want to run the integration as a certain user, specify so here |
| 3 | This will choose the correct directory listener that will trigger the integration correctly |
| 4 | Deletes the source file after completion |
| 5 | Points out the create/update configuration to be used |
| 6 | Defines a destination where the success response is written into. Note that the file-name remains the same as from the input directory. |
| 7 | Defines a destination where the error response is written into. Note that the file-name remains the same as from the input directory. |
| 8 | Specify custom payload config used to produce the response |
Please see previous chapter for details regarding using a custom payload for creation of the response.
Encoding
Encoding of input and success/error response payload can be optionally defined as arguments.
For example:
    ...
    <tif:Arguments>
        <tif:Argument name="inputEncoding" value="UTF-8" /> (1)
        <tif:Argument name="outputEncoding" value="UTF-8" /> (2)
    </tif:Arguments>
</tif:DirectoryListener>| 1 | Defines encoding of input payload. If not defined, default charset is used. |
| 2 | Defines encoding of success/error payload. If not defined, default charset is used. |
1.11.19. Extension Points
There are some possibilities within the create/update integration to plugin custom code in order to override certain behavior or add extra logic when something happens during the processing.
Custom listener
In order to listen to occurring events, one can specify a listener within the configuration as shown below.
Such listener must implement the interface com.technia.tif.enovia.integration.event.IntegrationListener.
This interface has one method that you need to implement:
void handleEvent(IntegrationEvent event);The event argument passed may be an instance of:
-
com.technia.tif.enovia.integration.event.ObjectEvent
-
com.technia.tif.enovia.integration.event.RelationshipEvent
-
com.technia.tif.enovia.integration.event.FileEvent
-
com.technia.tif.enovia.integration.event.FailureEvent
-
com.technia.tif.enovia.integration.event.XMLParsedEvent
From the event object, you can get the event type, which is an enum constant with the following values
| Enum Constant | Description |
|---|---|
OBJECT_CREATED |
A business object was created |
OBJECT_REVISED |
A business object was revised |
OBJECT_UPDATED |
A business object was modified |
OBJECT_DELETED |
A business object was deleted |
RELATIONSHIP_CREATED |
A relationship was created |
RELATIONSHIP_UPDATED |
A relationship was modified |
RELATIONSHIP_DELETED |
A relationship was deleted |
FILE_CHECKEDIN |
A file was checked-in to a business object |
STARTED |
The integration started |
COMPLETED |
The integration is complete |
FAILURE |
The integration failed |
TRANSACTION_START_UPDATE |
An update transaction has been started |
TRANSACTION_START_READ |
A read transaction has been started (not commonly used) |
TRANSACTION_COMMITTED |
The transaction was committed |
TRANSACTION_ABORTED |
The transaction was aborted |
XML_PARSED |
The XML data has been parsed |
OTHER |
Other unspecified event |
If you want to abort the processing of the integration, you can always throw an unchecked exception, example:
package com.acme;

import com.technia.tif.core.TIFRuntimeException;
import com.technia.tif.enovia.integration.event.FailureEvent;
import com.technia.tif.enovia.integration.event.IntegrationEvent;
import com.technia.tif.enovia.integration.event.IntegrationListener;
import com.technia.tif.enovia.integration.event.ObjectEvent;
import com.technia.tif.enovia.integration.event.RelationshipEvent;

public class MyListener implements IntegrationListener {

    @Override
    public void handleEvent(IntegrationEvent event) {
        switch (event.getType()) {
            case OBJECT_UPDATED:
                String oid = ((ObjectEvent) event).getObjectId();
                if (getValueFromObject(oid).equals("Bad")) {
                    throw new TIFRuntimeException("Bad value detected. Aborting");
                }
            ....
        }
    }
}
In order to register your listener, use the listener attribute on the root element:
<CreateConfiguration listener="com.acme.MyListener" ...>
    ...
</CreateConfiguration>
Business Object Finder
During the processing of a create/update integration, the integration will at certain places try to find business objects from the database in order to map them to the incoming payload.
You may override the find logic by providing a class that implements the interface
com.technia.tif.enovia.integration.create.BusinessObjectFinder. The default implementation
is com.technia.tif.enovia.integration.create.impl.DefaultBusinessObjectFinder.
<CreateConfiguration>
  ...
  <Config>
    <ObjectFinder className="com.acme.MyFinder" />
    ...
  </Config>
</CreateConfiguration>
Business Object Processor
A business object processor is involved for the creation, updating or revising an object.
You may override this logic by providing a class that implements the interface
com.technia.tif.enovia.integration.create.BusinessObjectProcessor. The default implementation
is com.technia.tif.enovia.integration.create.impl.DefaultBusinessObjectProcessor.
<CreateConfiguration>
  ...
  <Config>
    <ObjectProcessor className="com.acme.MyObjectProcessor" />
    ...
  </Config>
</CreateConfiguration>
Relationship Processor
Similar to a business object processor, a relationship processor is used for the creation, updating and deletion of connections between business objects.
To override the default logic you can provide a custom class that implements the interface
com.technia.tif.enovia.integration.create.RelationshipProcessor.
The default implementation is com.technia.tif.enovia.integration.create.impl.DefaultRelationshipProcessor.
<CreateConfiguration>
  ...
  <Config>
    <Connections>
      <Connection>
        <RelationshipProcessor className="com.acme.MyRelProcessor" />
        ...
      </Connection>
      ...
    </Connections>
    ...
  </Config>
</CreateConfiguration>
File Processor
A file processor is responsible for the checkin file operation.
To override the default logic you can provide a custom class that implements the interface
com.technia.tif.enovia.integration.create.FileProcessor.
The default implementation is com.technia.tif.enovia.integration.create.impl.DefaultFileProcessor.
<CreateConfiguration>
  ...
  <Config>
    <FileProcessor className="com.acme.MyFileProcessor" />
    ...
  </Config>
</CreateConfiguration>
1.11.20. Debugging
When "TRACE" log level is enabled, create / update integration provides more information to TIF’s log file. This can be useful for testing and development purposes.
You may change run time log settings from Admin UI. See sections "Admin UI" and "TIF Core" / "Log Settings" in the documentation.
| "TRACE" log level is not intended to be used in the production use as detailed logging might negatively affect the performance. |