<servlet>
    <servlet-name>tvcaction</servlet-name>
    <servlet-class>com.technia.tvc.core.TVCServlet</servlet-class>
    <!-- possible other init parameters -->
    <init-param>
        <param-name>tvc.core.plugins</param-name>
        <param-value>com.company.MyTVCPlugin</param-value>
    </init-param>
</servlet>
Developer Documentation
21 March 2016
1. Legal Notes
© Copyright 2003-2019 by TECHNIA AB
All rights reserved.
PROPRIETARY RIGHTS NOTICE: This documentation is proprietary property of TECHNIA AB. In accordance with the terms and conditions of the Software License Agreement between the Customer and TECHNIA AB, the Customer is allowed to print as many copies as necessary of documentation copyrighted by TECHNIA relating to the software being used. This documentation shall be treated as confidential information and should be used only by employees or contractors with the Customer in accordance with the Agreement.
This product includes software developed by the Apache Software Foundation. (http://www.apache.org/).
2. About this Documentation
This documentation contains examples and tips for how to extend the TVC functionality further, beyond what is currently doable by configuring the components according to their respective configurable options as described in the administration guides.
As this documentation has been created, a selected sub-set of the internal TVC API has been opened up for use.
| TVC contains a large amount of packages/classes/interfaces, not all of them has been made public, since many of them are not intended to be used elsewhere than internally within TVC. Usage of these classes are not supported. |
3. Technia Value Components Overview
The TVC contains following components:
-
Structure Browser
-
Collaboration
-
Grid Browser
-
File Manager
-
Report Generator
-
Graphic Reporting
-
Personal Browser
-
MCAD Optimizer
-
XBOM Manager
All these components are built upon a common platform, called Core.
The Core contains the common functionality required by the components,
including a layer around both the Matrix ADK API as well as the AEF.
TVC can be used without the AEF. However, some functionality like localization of schema names etc. is unavailable.
3.1. Where to start?
If you want to learn how to implement Data Handlers and/or Cell Renderer for the Structure Browser, please look into these chapters:
If you want to build your application on top of TVC and utilize the functionality provided by TVC then you should read following chapters:
-
If you are unfamiliar to the MVC design pattern, you should start read the chapter about the Architecture of TVC.
-
Read the chapter how to create a Plugins to TVC
-
For information how to handle the context object in a TVC please look into Context Handling
3.2. TVC License
The TVC license file is called technia.license, and is required when you attempt to install and/or run TVC.
The name of the license file were changed as of TVC 2011.1.0 due to that we have introduced license management within other softwares provided by TECHNIA.
When TVC is starting up, TVC will try to locate the license file within a couple of different places; the places being searched and the order is shown below:
The recommended location is to place the license file within WEB-INF/classes of your running application. This is the place where the TVC installer will put the file.
If you have JPOs that run TVC code you also need to make sure that the license file is available on the MX_CLASSPATH. In most cases, your MX_CLASSPATH variable is referring to the WEB-INF/lib and WEB-INF/classes folder, but as this might not always is the case, you will then need to ensure that this file gets copied to a folder that is in the MX_CLASSPATH.
When you upgrade to a newer version of TVC, you need to ensure that the license file is updated wherever you are using TVC.
3.3. Architecture
TVC is built on top of the Apache Struts Framework. This framework is based upon the MVC (Model-View-Controller) / Model 2 design pattern. The main purpose of this architecture is to separate database access code, page design code, and control flow code from each other.
The different pieces of a MVC based application could simply be describes as:
3.3.1. Model
The TVC components provides different set of classes that represents its model. These classes are all used for supporting the functionality in each component, however, many of the frequently used and common classes across the different components are available in the TVC core component. The Core component contains a lot of utility classes used for accessing the Matrix database.
3.3.2. View
The view is composed of mainly JSP pages, which are using JSP tags to produce the user interface. This layer is and should never access the database directly, it should only render the user interface based upon information available as beans within the page-, request- or session scope, provided by the controller.
3.3.3. Controller
The central part of TVC is the Action servlet. This servlet is responsible for both initializing TVC properly when the application starts up, as well as delegating requests to the different action handlers.
The TVC servlet is mapped to handle all requests matching this URL pattern: /tvc-action/*
Depending on the trailing part of an URL matching this pattern, the action servlet delegates the control to an action class. The mapping between URL and action classes, are made through configuration files, which are provided by each TVC component and possibly the custom plugin(s). All actions defined in this configuration file, are all part of the controller layer.
3.4. Plugins
If you want to build custom code based upon TVC, you should preferable implement this as a TVC plugin. By doing so, you will be able to take advantage of a rich set of features from TVC, which will solve and simplify a lot in your custom application.
A TVC plugin is a very tiny class that provides TVC with some meta-data about your plugin. The plugin is loaded when TVC is initialized, which happens either when the application server starts if you have set the load-on-startup attribute or when TVC is used the first time after startup.
For information how to implement a TVC plugin, see chapter Creating a Plugin
3.4.1. Plugin Features
The features you can use from TVC, when implementing your own plugin, is shown below:
Localization
Allows you to store localized application string resources in separate files and access these properties in a convenient way, using the same mechanism as TVC does internally.
See this chapter for more information
Actions
Allows you to register custom actions.
See this chapter for more information
Domain Object Model
Allows you to use the Domain Object Model in TVC, where you can map a certain business object type into a Java Class.
See this chapter for more information
Ajax Services
Allows you to define custom Ajax services using the Ajax framework in TVC
See this chapter for more information
Logging
Allows you to define custom loggers available for your code.
See this chapter for more information.
You don’t have to use all the capabilities mentioned above, you can simply use those you wish to use.
3.4.2. Plugin Registration
To register a plugin with TVC you simply have to register your plugin class through the deployment descriptor of your application (web.xml). The name of this system parameter is tvc.core.plugins. See this chapter for information how to apply system parameters.
An example of how to do so is shown below:
You can of course register more than one plugin, if so, just add all the plugin classnames as a comma (,) separated list as shown in the example below
<init-param>
    <param-name>tvc.core.plugins</param-name>
    <param-value>com.company.MyTVCPlugin,com.company.AnotherPlugin,com.company.AndAThirdPlugin</param-value>
</init-param>
3.4.3. Creating a Plugin
Creating a TVC plugin is done by either creating a class that implements the com.technia.tvc.core.TVCPlugin interface, or create a class that extends the com.technia.tvc.core.TVCPluginAdapter class.
The class you create must have a public no-arg constructor.
Consult the API for further details:
-
com.technia.tvc.core.TVCPlugin
-
com.technia.tvc.core.TVCPluginAdapter
3.4.4. Plugin Examples
Below, you will find a couple of different examples, which all shows how to create a plugin.
Plugin Example - 1
A simple plugin, which only provides string resources
    package com.acme.anapplication;

    import com.technia.tvc.core.TVCPlugin;
    import java.net.URL;

    public class MyPlugin implements TVCPlugin {
        public String getDescription() {
            return "Sample plugin for my application";
        }
        public String getDisplayName() {
            return "Application XYZ";
        }
        public String getName() {
            return "application";
        }
        public URL getActionConfigURL() {
            return null;
        }
        public URL getAjaxConfigURL() {
            return null;
        }
        public URL getTypeMappingsURL() {
            return null;
        }
        public String getStringResourceName() {
            return "com.acme.anapplication.resources.StringResources";
        }
    }
Plugin Example - 2
This plugin provides action configuration, type mapping, ajax configuration and string resources.
    package com.acme.anapplication;

    import com.technia.tvc.core.TVCPlugin;
    import java.net.URL;

    public class MyPlugin implements TVCPlugin {
        public String getDescription() {
            return "Sample plugin for my application";
        }
        public String getDisplayName() {
            return "Application XYZ";
        }
        public String getName() {
            return "application";
        }
        public URL getActionConfigURL() {
            return getClass().getClassLoader().getResource("com/acme/anapplication/resources/Actions.xml");
        }
        public URL getAjaxConfigURL() {
            return getClass().getClassLoader().getResource("com/acme/anapplication/resources/AjaxConfig.xml");
        }
        public URL getTypeMappingsURL() {
            return getClass().getClassLoader().getResource("com/acme/anapplication/resources/TypeMappings.properties");
        }
        public String getStringResourceName() {
            return "com.acme.anapplication.resources.StringResources";
        }
    }
Plugin Example - 3
This plugin does not implement the TVCPlugin interface directly, it extends a class called TVCPluginAdapter.
This class allows you to skip implementing functions that you are not interested in, and it also provides you with a simple way for settings up the logging of your application.
    package com.acme.anapplication;

    import com.technia.tvc.core.TVCPluginAdapter;
    import java.net.URL;

    public class MyPlugin extends TVCPluginAdapter {
        public MyPlugin() {
            /*
             * Setup logging
             * This will setup the logging for the domain "com.acme.anapplication"
             * using the DEBUG level, if TVC is running in development mode,
             * or ERROR level, if TVC is running in production mode.
             * The pattern (Log4J pattern) will be:
             * [plugin-name] [%t]%x %5p %d{HH:mm:ss,SSS} (%F:%L) - %m%n
             */
            setupLogger();
        }
        public String getName() {
            return "application";
        }
        public String getStringResourceName() {
            return "com.acme.anapplication.resources.StringResources";
        }
    }
3.4.5. Sample Plugin
Together with TVC, we provide a module called TVX. This module is available for anyone, and contains many examples for many of the TVC components.
TVX is a TVC plugin and contains a number of classes that can be used for reference.
The source code for TVX is available within the tvx.jar file.
TVX is a library of examples. The code is not a product that should be used out-of-the box in a production environment. You can however reuse the code or get some ideas from it and apply that to your application.
Also note that TVX is a product that we don’t provide support for, however, feel free to register issues if you find such, so that we can enhance it in coming releases.
3.5. Localization (i18n)
If you have implemented a TVC plugin, and your plugin provides string resources, you are able to take advantage of the localization support in TVC This chapter illustrates how to use localized messages in different situations.
First of all, you will need to create a plugin, which returns the name of the string resources file to be used. See this chapter for more information how to create a plugin. The string resource file itself, is a plain text file containing key/value pairs, in the same syntax as standard Java property files are written. Example:
com.acme.anapplication.atitle=This is the title for a page
com.acme.anapplication.anotherLabel=A label with one argument: {0}
com.acme.anapplication.yetAnotherLabel=A label with two arguments: {0} {1}
Translating the messages into other languages, follows the traditional
Java style. E.g. create a new file per language, and append the locale
suffix to the filename. For example, if your localization messages are
stored in the file com/company/resources/StringResources.properties,
then if you want to provide a german translation of this file then copy
the file into com/company/resources/StringResources_de.properties etc.
Please note that you should have a prefix of your localized message keys, which reduces the risk of having two different plugins overriding each other string resource message(s).
Don’t use tvc as a prefix for your keys, as these are used internally for TVC
On the other hand, in some cases you might want to override an existing localized message.
In such case, you can override such a key in your custom string resource property file without the need of touching the internal files in TVC (or another plugin).
|
New string resources properties can be added through global parameter like below: Example: If there is a file placed directly in classes folder following the pattern “tvc-*.properties” it also included as string resource. |
3.5.1. Localization in JSP Pages
From a JSP page, you can use the existing JSP tags for retrieval of localized messages. See the code example below:
<%@ taglib uri="/WEB-INF/tvc-struts-bean.tld" prefix="bean" %>
...
<bean:message key="com.acme.anapplication.atitle"/>
<bean:message key="com.acme.anapplication.anotherLabel" arg0="with an argument"/>
<bean:message key="com.acme.anapplication.yetAnotherLabel" arg0="with more arguments" arg1="second arg"/>
3.5.2. Localization in Java Code
In the Java code, you can also retrieve localized messages easy. See the code example below:
    import com.technia.tvc.core.util.MessageUtils;

    public void someMethod() {
        ...
        /*
         * There are several methods available in the MessageUtils class
         */
        String message = MessageUtils.getMessage(locale, "com.acme.anapplication.atitle");
        ...
    }
You can also create TVCExceptions that contains localized messages, see the code example below.
    import com.technia.tvc.core.TVException;

    public void someMethod() throws TVCException {
        /*
         * Throws an exception, using a localized message
         */
        throw new TVCException("The default message", "com.acme.anapplication.error");

        /*
         * This example is throwing an exception, using a localized message with additional arguments.
         */
        throw new TVCException("The default message", "com.acme.anapplication.error", new String[] {
            "optional", "arguments", "for", "the error message"
        });

        /*
         * Another example, which includes the "rootCause" (the exception that caused the TVCException to be thrown)
         */
        new TVCException("The default message", rootCause, "com.acme.anapplication.error", new String[] {
            "optional", "arguments", "for", "the error message"
        });
    }
The API documentation contains additional information regarding this topic.
-
com.technia.tvc.core.util.MessageUtils
-
com.technia.tvc.core.TVCException
3.6. Actions
As mentioned in the Architecture section, TVC is using the MVC pattern. This chapter describes how to create controller extensions, so called actions.
All TVC components provides actions, most of them are used internally for TVC but some of them can be re-used either as they are or as a base for your own custom actions. When creating new actions, these must be defined inside a so called action configuration descriptor file. The action configuration file defines the mapping between the URL and the action class. The URL’s to each action, will start with /tvc-action/, which is the end-point for the TVCServlet. The TVCServlet will depending on the trailing part of this URL forward the control to the actual action class that will handle the request.
Before you can add new actions into TVC you must create and configure a Plugins. A plugin should provide it’s own action configuration file, containing the mapping between the URL’s, according to the format specified later on.
Please remember that all your actions should have a prefix, which ensures that your actions are not overriding any of the default action mappings inside TVC.
See also the more comprehensive documentation provided by struts. See this resource (external link)
3.6.1. Action Configuration File
Assuming that you have created a plugin, where you have implemented the method getActionConfigURL(), and this URL points to a location where the action configuration file can be read, we are now able to look into the action configuration file structure.
The example below shows a simple action configuration file, which contains two defined actions.
<?xml version="1.0" encoding="ISO-8859-1" ?>
<!DOCTYPE struts-config PUBLIC
          "-//Apache Software Foundation//DTD Struts Configuration 1.1//EN"
          "http://jakarta.apache.org/struts/dtds/struts-config_1_1.dtd">
<struts-config>
    <action-mappings>
        <action path="/pathMapping1" type="com.mypackage.mysubpackage.actions.AnAction">
            <forward name="done" path="/app/function1/Done.jsp" redirect="false"/>
            <forward name="error" path="/app/function1/Error.jsp" redirect="false"/>
        </action>
        <action path="/pathMapping2" type="com.mypackage.mysubpackage.actions.AnotherAction">
            <forward name="step1" path="/app/function2/Step1.jsp" redirect="false"/>
            <forward name="step2" path="/app/function2/Step2.jsp" redirect="false"/>
            <forward name="done" path="/app/function2/Done.jsp" redirect="false"/>
            <forward name="error" path="/app/function2/Error.jsp" redirect="false"/>
        </action>
    </action-mappings>
</struts-config>
An action contains the path, which it maps to, as well as the name of the class that handles the request.
Further on, the action can have an arbitrary amount of forwards. Your action can, depending on some condition, forward to different pages. The redirect flag on the forward tag indicates if the browser should be redirected to the page, or if the forward is done using the normal internal forwarding.
These actions in this example maps to the following URL’s.
-
/tvc-action/pathMapping1
-
/tvc-action/pathMapping2
|
There will be only one instance created per action. E.g. you are not
allowed to store instance variables inside an action class. Also, you should never add the synchronized keyword to any of the methods inside an action. |
3.6.2. Obtaining the URL to an Action
To obtain the URL for a particular action, this can be done by:
From a JSP page:
<%@ taglib uri="/WEB-INF/tvc-core.tld" prefix="core" %>
<html>
<body>
<form action="<core:action path="/pathMapping1"/>" method="post">
...
</form>
</body>
</html>
From Java code:
import com.technia.tvc.core.utils.ActionUtils;
...
/*
* Get the absolute URL
*/
String url = ActionUtils.getActionURL(request, "/pathMapping1");

/*
* Get the relative URL (from the context-path)
*/
String url = ActionUtils.getActionURL(request, "/pathMapping1", false);
Creating an Action
An action must be derived, directly or indirectly, from the class called com.technia.tvc.struts.action.Action. However, normally you do not derive your action class directly from this base class, instead you will most often derive from any of these classes:
-
com.technia.tvc.core.actions.TVCAction
-
com.technia.tvc.core.actions.NewTxAction
The difference between these two actions is that the latter one will establish a so called transactional context meaning that during the execution of your action, you will have the possibility to access the Matrix database with a thread safe context.
You will normally extend the first action (TVCAction) in those cases when you do not need to access the database, for example in the case where you only want to validate parameters sent in the request for the purpose of letting the user continue to another page.
Also note that each TVC component might provide some convenient action classes, which you can use as a base, when you are extending functionality on top of that particular TVC component.
Recommendations
When you implement a custom action class, you should
-
Never store any instance variables inside an action
As there is only one instance of each action class, race conditions will appear if you store state inside instance variables. Store data using the request attributes collection, or possibly in the session.
-
Never mark any methods as synchronized
As there is only one instance of each action class, a synchronized method will only allow one user to perform the same action concurrently.
-
Strive to reduce the action class code to a minimum, as the action should be the layer between the request (Servlet API) and your model
Making the action classes too heavy, discourages reuse and makes the application too coupled with the servlet API.
-
Never pass the request or any of the other objects belonging to the Servlet API to the model layer.
Always collect the things you need in your action class, and possibly wrap them inside a data structure if there is a large number data, and/or complex data, and pass the data structure to your model.
-
Common code, used by several different action classes, should either be placed into an Utility class, or be shared inside a common action class, which your action classes in turn derives from.
Action Examples
Below, you will find a couple of different examples of action classes.
Example 1
A simple action class, which validates some request parameters and forwards to some page depending on if the parameters were ok or not.
    package com.company.anapplication.actions;

    import com.technia.tvc.core.actions.TVCAction;
    import com.technia.tvc.core.util.StringUtils;

    import com.technia.tvc.struts.action.ActionError;
    import com.technia.tvc.struts.action.ActionErrors;
    import com.technia.tvc.struts.action.ActionForm;
    import com.technia.tvc.struts.action.ActionForward;
    import com.technia.tvc.struts.action.ActionMapping;
    import javax.servlet.http.HttpServletRequest;
    import javax.servlet.http.HttpServletResponse;

    public class AnAction extends TVCAction {
        public ActionForward executeImpl(ActionMapping mapping,
                                         ActionForm form,
                                         HttpServletRequest request,
                                         HttpServletResponse response) throws Exception {

            String param1 = request.getParameter("param1");
            String param2 = request.getParameter("param2");

            /*
             * Validate params !
             */

            ActionErrors ae = new ActionErrors();
            if (!StringUtils.isInteger(param1)) {
                ae.add("param1", new ActionError("prefix.error.notAnInteger", param1));
            }

            if (StringUtils.isOnlyWhiteSpaceOrEmpty(param2)) {
                ae.add("param2", new ActionError("prefix.error.missingValue"));
            }

            /*
             * If no errors were found, forward to the next page.
             * Otherwise forward to the original page, which are able to show
             * these error messages.
             */
            if (ae.isEmpty()) {
                return findForwardOrTargetPage(request, mapping, "next-step");
            } else {
                addErrors(request, ae);
                return findForwardOrTargetPage(request, mapping, "dialog");
            }
        }
    }
Example 2
An example action class for revising/updating the revision of a domain object, unless the parameters are invalid (white space or empty).
    package com.company.anapplication.actions;

    import com.technia.tvc.core.TVCException;
    import com.technia.tvc.core.actions.NewTxAction;
    import com.technia.tvc.core.db.BusinessObjectUtils;
    import com.technia.tvc.core.db.transaction.TxContext;
    import com.technia.tvc.core.db.transaction.TxType;
    import com.technia.tvc.core.db.domain.DomainObject;
    import com.technia.tvc.core.util.RequestUtils;
    import com.technia.tvc.core.util.StringUtils;

    import com.technia.tvc.customerdb.model.access.Access;
    import com.technia.tvc.struts.action.ActionForm;
    import com.technia.tvc.struts.action.ActionForward;
    import com.technia.tvc.struts.action.ActionMapping;

    import javax.servlet.http.HttpServletRequest;
    import javax.servlet.http.HttpServletResponse;

    public class AnotherAction extends NewTxAction {
        public AnotherAction() {
            super(TxType.UPDATE);
        }

        public ActionForward execute(TxContext txc,
                                     ActionMapping mapping,
                                     ActionForm form,
                                     HttpServletRequest request,
                                     HttpServletResponse response) throws Exception {

            String objectId = RequestUtils.getObjectId(request);
            if (StringUtils.isOnlyWhitespaceOrEmpty(objectId)) {
                throw new TVCException("No objectId parameter in request");
            }
            DomainObject d = DomainObject.newInstance(objectId);
            DomainObject revised = d.revise();
            ...
            return findForwardOrTargetPage(request, mapping, "result");
        }
    }
3.7. Ajax
TVC contains an Ajax (Asynchronous JavaScript and XML) framework, which can be used by custom applications.
Ajax can be used to make web pages feel more responsive by exchanging small amounts of data with the server behind the scenes, so that the entire web page does not have to be reloaded each time the user requests a change. This is intended to increase the web page’s interactivity, speed, functionality, and usability.
The Ajax framework in TVC is very powerful but easy to use and requires very little, from a programming point of view, in order to be used from within your web-pages.
To be able to use the Ajax framework in TVC you have to create an Ajax configuration descriptor, which defines your Ajax services and methods. In order for TVC to know that you have such a descriptor, you need to create a plugin, which implements the getAjaxConfigURL() method, shown below:
public class MyPlugin implements TVCPlugin {
    ...
    public URL getAjaxConfigURL() {
        return getClass().getClassLoader().getResource("com/acme/anapplication/resources/AjaxConfig.xml");
    }
    ...
The returned URL should point to a resource, which contains the Ajax descriptor.
The content of the Ajax descriptor defines one or more services, where each service typically has one or more methods available. A service corresponds to an ordinary Java class, while a method refers to a method inside the service class.
The Ajax Service itself is implemented as a normal Java class.
3.7.1. Ajax Configuration
This chapter describes the Ajax configuration (descriptor) file.
The descriptor file is a XML file, which is structured as the example below:
<?xml version="1.0" encoding="UTF-8"?>
<ajax-config>
     <service name="myFirstAjaxService" class="com.company.anapplication.ajax.MyFirstAjaxService">
        <method name="getCurrentDate" context="no"/>
        <method name="getDate" context="yes" transaction="read"/>
        <method name="storeDate" context="yes" transaction="update"/>
     </service>
     ...
</ajax-config>
The ajax-config is the root element, holding the service element(s).
A service must be associated with a name, which must be a valid Java identifier. Also, the service must be mapped to a class,which has a public-no-arg constructor.
Further on, each service can have one or more service-methods. Each of these methods can be configured to have a so called transactional context available through the attribute context. When a method has been marked to require a transactional context, you can also specify the transaction type that this method requires. (Any of: read, update, none)
Please note that the name of your Ajax service must be unique across all Ajax services. Using the same name as another one has, will overwrite the definition of that Ajax service. E.g. the name can only map to one Ajax service class.
Also note that you can not have multiple methods with the same name. This is not a limitation of the Ajax framework itself, but a limitation in Java Script within the browsers.
3.7.2. Synchronous Invocation
An Ajax service method is normally invoked asynchronously, from the client perspective, unless specified. You can mark a method to execute synchronously, by setting the async attribute to false:
<ajax-config>
    <service ...>
        <method name="getCurrentDate" context="no" async="false"/>
    </service>
</ajax-config>
3.8. Implementing an Ajax Service
The Ajax service class is simple to implement.
The class you create must have a public no-arg constructor and there is no need to implement any interfaces.
Each of the service methods must be public, they are allowed to have any number of arguments in the method signature, it can either return something or not, and it is allowed for the service method to throw any kind of Exception during execution to indicate problems.
Since the Ajax services are called from Java Script code, all arguments passed to the service method as well as any return values from the service method must be converted from/to Java objects into/from Java Script. A large number of conversions can be made through the TVC Ajax framework, but you should definitely take a look into this section for more information about this topic.
3.8.1. Ajax Service Example
Below, you will find a couple of different examples, which all shows how an Ajax Service could be implemented.
Please note that in order to allow an Ajax Service to access the Matrix database, you must configure the service method through the Ajax descriptor that it needs a transactional context. Look at this chapter for more information.
public class MyAjaxService {

    public void doSomething() throws Exception {
        /*
         * Illustrates how to obtain reference to request, session, servlet-context
         * through the AjaxEngine.getAjaxContext()
         */
        AjaxContext ctx === AjaxEngine.getAjaxContext();
        HttpServletRequest request === ctx.getRequest();
        HttpSession session === ctx.getSession();
        ServletContext sctx === ctx.getApplication();
        ...
    }

    public String getString(String in, int i, boolean b) throws Exception {
        ...
        return s;
    }

    public Result getResult(String a, String b, String c, String d) {
        /*
         * Illustrates how to return a complex data structure...
         */
        ...
        return result;
    }

    public static class Result {
        private String value;

        public String getValue() {
            return value;
        }

        public void setValue(String value) {
            this.value === value;
        }
    }

}
3.8.2. Parameter Types
TVC Ajax Framework is capable of handling Literals, XML data, Arrays and Data structures. For more information about each of these types, and what kind of data types they can convert from/to, please look at the list below:
Whenever an Ajax service method is invoked, the arguments passed to the Java Script method is passed to the server. The Ajax framework tries to convert the arguments passed according to the signature on the service method. Look at the following Java Script example, and how it is being mapped on the server side.
<script type="text/javascript">
    function callAjax() {
        myService.simple1("a string", ...);                    // String
        myService.simple2(1234, ...);                          // number
        myService.simple3(true, ...);                          // boolean
        myService.array1([ "a", "b", "c" ], ...);              // Array
        myService.array2([ "a", "b", "c" ], [ 1,2,3,4 ], ...); // Array
        myService.complex({ height: 186, width: 161 }, ...);   // Complex Data Structure
    }
</script>
The corresponding Ajax service, could be implemented as:
public class MyService {
    public void simple1(String s) { ... }
    public void simple2(int i) { ... }
    public void simple3(boolean b) { ... }
    public void array1(String[] arr) { ... }
    public void array2(String[] arr, int[] i) { ... }
    public void complex(Size size) { ... }
}

public class Size {
    private int height, width;

    public Size() {}

    public void setHeight(int height) { this.height === height; }
    public int getHeight() { return height; }

    public void setWidth(int width) { this.width === width; }
    public int getWidth() { return width; }
}
When a service method has executed and returns some value, this value is transfered back to the client and converted to a Java Script object. For example, if you have a method that returns a complex data structure, you will be able to handle such as in the example below:
public Size getSize() {...}
You will be able to handle such a return value from within the Java Script code as in the example below:
<script type="text/javascript">
    function callAjax() {
        myService.getWidth(function(ret,success) {
            if (success) {
                alert("height: " + ret.height + ", width: " + ret.width);
            }
        });
    }
</script>
3.8.3. Using an Ajax service
To use an Ajax service on a JSP page, you have to
-
Include the
tvc-core.tldtaglibrary.This is needed as we will use the ajaxClient tag from this library.
-
Define the Ajax service to be used through the
<core:ajaxClient service="…"/>tag.Please note that this tag should be placed inside the <head> elements in your HTML code.
This tag will generate dynamic Java Scripts, which contains the stubs for your service methods.
If you need to use different services, simply add one
<core:ajaxClient>tag per service you need. -
You might need to build some Java Script function(s) around the generated Java Script stubs, in order to integrate the Ajax services with your page logic.
Normally, these consists of small wrapper functions, which simply delegates to the service methods, but handles the result of the Ajax method invocation.
Code template:
<%@ taglib uri="/WEB-INF/tvc-core.tld" prefix="core" %>
<html>
    <head>
        <core:ajaxClient service="myService"/>
    ...
Ajax Service Example
Lets say that you have a HTML document, which is structured as the example below.
<html>
    <body>
        <span id="s1"/>
        <button onclick="getCurrentDate()">Test Ajax</button>
    </body>
</html>
Now you would like to invoke an Ajax service method when the button is clicked. This method returns a string containing the current date in ISO format and you want to populate the <span> element with that value.
The complete code for this use case is shown below:
<%@ taglib uri="/WEB-INF/tvc-core.tld" prefix="core" %>
<html>
    <head>
        <core:ajaxClient service="myService"/>
        <script type="text/javascript">
            function showCurrentDate() {
                myService.getCurrentDate(function(ret,success) {
                    if (success) {
                        document.getElementById("s1").innerHTML ==== ret;
                    } else {
                        alert(ret.message);
                    }
                });
            }
        </script>
    </head>
    <body>
        <span id="s1"/>
        <button onclick="testAjax()">Test Ajax</button>
    </body>
</html>
The example above invokes the Ajax method asynchronously. The last argument to the Java Script method generated by the <core:ajaxClient/> tag must in that case be a reference to a Java Script function, which has the following signature: (in this case the function is passed as a closure)
function (ret,success)
The success argument in the function is a boolean, indicating whether or not the Ajax call were successfully completed. If it was successful, then the first argument contains the return value from the Ajax method. Depending on what your method returns, you might use the ret variable as-is or you might need to handle it somehow (remember that the Ajax method can return complex data structures or XML, in addition to simple properties such as strings, numbers etc.)
If the method was marked to be executed synchronously (in the descriptor), then you would not need to pass any function reference to the call. Instead, you could directly assign the value to a variable or use it directly, as the call would block any further processing until it has been carried out.
Example:
    ...
    <script type="text/javascript">
            function showCurrentDate() {
                var s1 ==== document.getElementById("s1");
                s1.innerHTML ==== myService.getCurrentDate();
            }
    </script>
There is no general rule, when to use asynchrous calls vs. synchronous calls. This depends highly upon the use of the Ajax service in your use case. Basically, if your application can be used without the need for blocking anything else, while carrying out the Ajax call, you could use the asynchronous approach.
The complete code required for this example is shown below:
The Ajax descriptor:
<?xml version="1.0" encoding="UTF-8"?>
<ajax-config>
    <service name="myService" class="com.company.anapplication.ajax.MyFirstAjaxService">
        <method name="getCurrentDate" context="no"/>
    </service>
</ajax-config>
The com.company.anapplication.ajax.MyFirstAjaxService class:
package com.company.anapplication.ajax;

import com.technia.tvc.core.db.DateUtils;
import java.util.Date;

public class MyFirstAjaxService {

    public MyFirstAjaxService() {
    }

    public String getCurrentDate() {
        return DateUtils.formatISO8601Date(new Date());
    }
}
3.9. Context Handling
The Context (matrix.db.Context) object is the most essential part of a Java based Matrix implementation, and improper usage of this could and will result in several obscure problems, such as instability issues, performance degradation or other unexpected/strange behavior. The Context object is used to authenticate users, retrieve data from the DB, start/commit/abort transactions and retrieve so called client-tasks (MQL error/warn/notice messages).
The TVC framework hides some complicated issues regarding how to handle the Context, such as creating thread-safe context instances, managing transactions and working with save points. Also, the design of TVC limits the need of passing the Context reference everywhere around the API just because there is a method deep in the chain that needs to query the database. The design of the TVC context handling, follows the transactional context pattern, which works in the similar way as when using a SQL-Connection to access a SQL database.
3.9.1. Transactional Context Pattern
The idea behind this pattern is to avoid always passing in the matrix.db.Context instance to every possible method around the application that might need to query the database. Instead, the method that might need to query the database should be able to retrieve the context through some other mechanism.
E.g. when you work with a standard SQL database, you do not normally have to pass the Connection instance to every possible method around the application, just because that at some point a database call will be made. I.e. the methods requiring access to the database will retrieve the connection from a connection pool or directly from the DriverManager when needed.
Also, the transactional pattern implementation makes the code much more flexible. Just think about the case where you have implemented a method that is called deep in the stack, which previously did not need to query the database, and you now need to query the database from this method. What you have to do in that case, is to change the method signature of all other methods in the chain that calls this method. This might in some cases require a lot of changes to your code base.
This requires that the code that needs the database access only can be executed while there is a transactional context allocated. A transactional context is (mainly) allocated in these cases:
-
During the execution of an Action if the action is a subclass of the NewTxAction.
-
While executing an Ajax service, if the Ajax service has been configured to allocate a transactional context.
-
When executing a JPO (see below for further details).
As no database operations should be made from JSP pages directly, there should not be a need for having a transactional context allocated while executing a JSP page. Instead, the necessary information needed to render a page should be stored in request or session scoped beans.
Whenever a method requires the Context instance, you are able to retrieve this from the com.technia.tvc.core.db.transaction.TxManager. The TxManager keeps a reference to the user’s context in the TxContext class.
If the method that requires a transactional Context is invoked while a transactional context hasn’t been allocated, an Exception will be thrown indicating so.
3.9.2. Transactional Context Pattern - Example
The sequence diagram illustrates how it works internally when working with transactional contexts. The diagram shows what happens in the case when we have a custom action called MyAction. This action is derived directly from the NewTxAction. Our custom action uses a helper class, SomeClass, which does some database calls. All operations marked in green, are those that happens in the TVC framework, while the yellow operations are those related to the custom code.
Basically, the only requirements needed for a custom action are
-
The custom action must be derived (indirectly or not) from the NewTxAction
-
The custom action should define what kind of transaction it needs. One of:
-
Update
-
Read
-
None (should not be used, unless you will handle start/commit on your own)
-
-
Once invoked, decide what to do. For example, collect request parameters, instantiate some class, perform some operations (in this case, dispatch to the SomeClass class)
-
Return the name of the forward (normally JSP page), which will render the user interface.
-
In case when some problem occur, for example an exception is thrown during execution or the transaction couldn’t be committed, define the target forward for this situation.
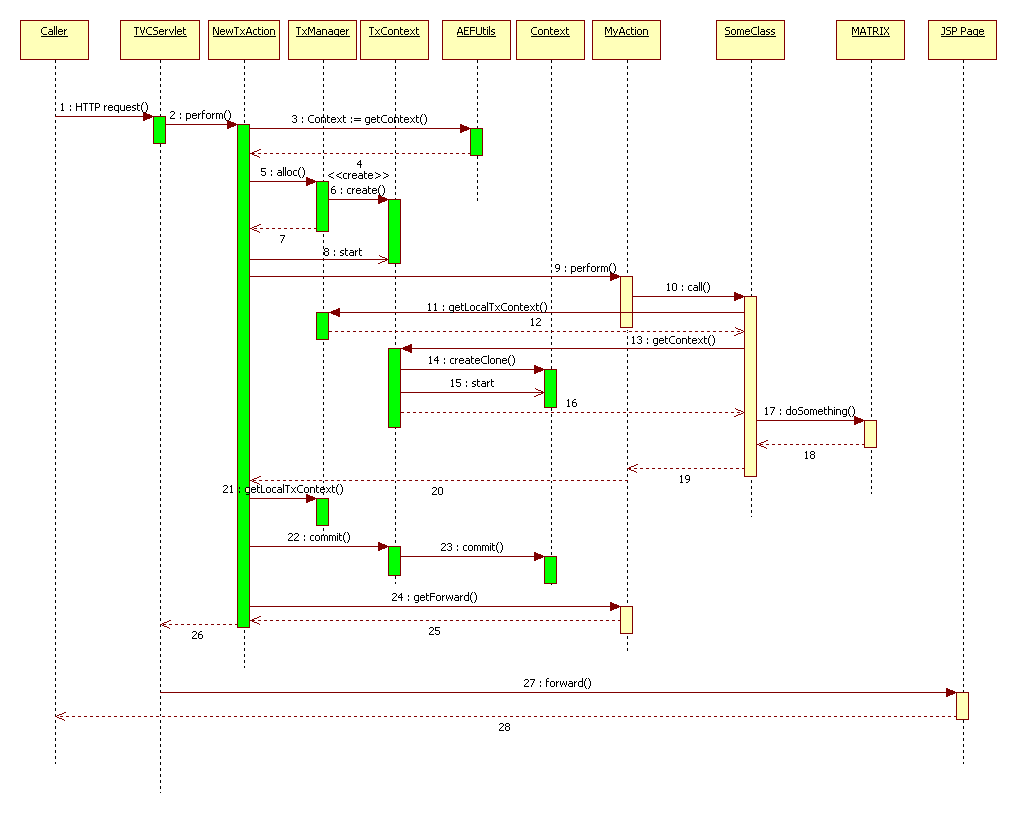
Each step is explained more in detail:
1 |
A HTTP request is made (/tvc-action/*) |
2 |
The TVC Servlet dispatches the call to the action mapped to the URL |
3-7 |
The NewTxAction allocates a transactional context using the Context object from the session. |
8 |
Mark the transaction type |
9 |
Dispatch to the execute method of the MyAction |
10 |
Dispatch to SomeClass |
11-13 |
As this class needs to get data from Matrix, it will need to obtain a reference to the Context object |
14-16 |
The first time the Context object is retrieved from a TransactionalContext object (TxContext), the Context is cloned and the transaction is started. |
17 |
Call Matrix… |
18-26 |
NewTxAction does the post process work, e.g. committing any ongoing transaction and forward to the view |
27 |
When completed, the control is finally forwarded to the JSP page, which renders the user interface |
3.9.3. Establish a Transactional Context Within an Action Class
To establish a transactional context, you must ensure that your action class is extending from the base class named:com.technia.tvc.core.actions.NewTxAction, or another action class which is deriving from this. The simple code sample below illustrates how to do so.
package mypackage;

import com.technia.tvc.core.actions.NewTxAction;
import com.technia.tvc.core.db.transaction.TxType;
import com.technia.tvc.core.db.transaction.TxContext;
import com.technia.tvc.core.db.BusinessObjectUtils;
import com.technia.tvc.struts.action.ActionForm;
import com.technia.tvc.struts.action.ActionForward;
import com.technia.tvc.struts.action.ActionMapping;
import javax.servlet.http.HttpServletRequest;
import javax.servlet.http.HttpServletResponse;

public class PromoteAction extends NewTxAction {
    public PromoteAction() {
        /*
         * Set the type of transaction this action requires
         */
        super(TxType.UPDATE); // TxType.READ or TxType.UPDATE or TxType.INACTIVE
    }

    public ActionForward execute(TxContext txc,
                                 ActionMapping mapping,
                                 ActionForm form,
                                 HttpServletRequest request,
                                 HttpServletResponse response)
                          throws Exception {
        String objectId = request.getParameter("objectId");
        BusinessObjectUtils.promote(objectId);
        return findForwardOrTargetPage(request, mapping, "done");
    }
}
3.9.4. Establish a Transactional Context from a JPO
If you want to allocate a transactional context through out the execution of a JPO, you would typically need to do this according to the example below:
import com.technia.tvc.core.TVCSystem;
import com.technia.tvc.core.db.transaction.TxAction;

public class ${CLASSNAME} {
    /**
     * A TxAction implementation
     */
    private static final class SampleAction implements TxAction {
        private final String[] args;

        private SampleAction(String[] args) {
            this.args = args;
        }

        public Object run() throws Exception {
            // Perform logic here... For example utilize TVC API.
            Map input = (Map) JPO.unpackArgs(args);
            ...
            return new Integer(1); // return something, or null if not of interest.
        }
    };

    /**
     * The JPO method invoked
     */
    public int doSomething(matrix.db.Context ctx, String[] args) throws Exception {
        return ((Integer) TVCSystem.execFromJPO(ctx, new SampleAction(args))).intValue();
    }
}
Since a JPO might be executed outside of the application server JVM (when Matrix is setup in RMI mode), TVC must be initialized before the TVC API can be used. This is also handled when you use the approach as shown below.
3.9.5. Transactional Contexts in Ajax Services
First of all, ensure that you have read the chapter about Ajax in TVC.
A transactional context is simply made available by modifying the Ajax descriptor. Look at the example below for different configuration.
<ajax-config>
    <service name="myAjaxService" class="com.company.ajax.MyAjaxService">
        <method name="getSomething"    context="yes" transaction="read"/>
        <method name="updateSomething" context="yes" transaction="update"/>
        <method name="calculate"       context="no"/>
    </service>
</ajax-config>
A transactional context can be made available by toggling the attribute context. If this value is set to true, you can also specify the transaction type by setting the transaction attribute to one of:
-
read
-
update
3.9.6. Transactional Contexts in JSP Pages
There is a quick and convenient way to establish a transactional context through the execution of a JSP page. The code example below illustrates how to do so.
<%@ taglib uri="/WEB-INF/tvc-core.tld" prefix="core" %>
<core:useContext>
<%
    // do the database calls here
%>
</core:useContext>
| From an architectural perspective we strongly discourage developers to write code that access the database layer on a JSP page. |
3.9.7. Commonly Functionality Related to Transactional Context
Testing if a Transactional Context is Available
If there is a need to get a reference to the actual matrix.db.Context instance, one can do as below:
if (!TxManager.available()) {
    throw new TVCException("A transactional context isn't available!");
}
Retrieving the Current Context
When you need to get a reference to the actual matrix.db.Context instance, you can retrieve this by:
TxContext txc = TxManager.getLocalTxContext();
Context ctx = txc.getContext();
This might be needed, when calling another API that requires the Context in the method signature - OR if using the Matrix ADK API directly (however, before doing that - take a look in TVC, there might be a good chance that the functionality you want already is implemented there).
Retrieving the User Name
String userName = TxManager.getCurrentUser();
// OR
String userName = TxManager.getLocalTxContext().getUser();
Working with Save-Points
During a transaction, there might be a need to add save points, which can be used to abort a certain update operation made to the database without affecting the outer transaction.
TxSavepoint savePoint = TxManager.savepoint();
// do some operation
// if needed, the save point can be aborted:
savePoint.abort();
Obtaining the ClientTaskList
The Client Task list can be obtained by:
ClientTaskList ctl = TxManager.getLocalTxContext().getClientTasks();
Please note that after the client task list has been retrieved, the client tasks has been consumed from the context object.
Performing a Privileged Operation
If you need to do an operation, which the normal user doesn’t have access to do, you can do this by either:
-
Using the TxManager.doPrivileged(TxAction) method.
public void someMethod(final String objectId) throws TVCException { TxManager.doPrivileged(new TxAction() { public Object run() throws Exception { BusinessObjectUtils.promote(objectId); return null; } }); } -
Or through the TxContext
public void someMethod(final String objectId) throws TVCException {
    TxManager.getLocalTxContext().doPrivileged(new TxAction() {
        public Object run() throws Exception {
            BusinessObjectUtils.promote(objectId);
            return null;
        }
    });
}
The latter example will perform the operation within the outer transaction (if any), while the first example will be performed independently of any outer transaction. Also, the first example does not require an already existing transactional context to be available.
Performing an Action as a Different User
If you wish to perform an action as a different user, you can do so by calling the doAs(…) from the existing transactional context.
public void someMethod(final String objectId) throws TVCException {
    TxManager.getLocalTxContext().doAs(new TxAction() {
        public Object run() throws Exception {
            BusinessObjectUtils.promote(objectId);
            return null;
        }
    }, "username", "password", "vault");
}
Explicitly Starting / Aborting / Committing Transactions
There are several methods available from the TxContext class, which allows you to handle the transactions on your own.
public void someMethod(String objectId) throws TVCException {
    ...
    // example 1: force an abort later on
    TxManager.getLocalTxContext().setAbort();

    // example 2: do the abort now!
    TxManager.getLocalTxContext().abort();

    // example 2: try commit the transaction
    TxManager.getLocalTxContext().commit();
}
API References
The following list contains links to the different parts of the API, which is related to Transactional Contexts.
-
com.technia.tvc.core.db.transaction.TxManager
-
com.technia.tvc.core.db.transaction.TxContext
-
com.technia.tvc.core.db.transaction.TxAction
-
com.technia.tvc.core.db.transaction.TxSavepoint
-
com.technia.tvc.core.actions.NewTxAction
-
com.technia.tvc.core.TVCSystem
3.10. System Parameters
The behavior of TVC is configurable by applying so called system parameters. A system parameter is a way for allowing changing the default behavior of certain aspects within the TVC logic. When TVC is running as a part of the AEF environment, some system parameters are picked up from the AEF configuration, hence those are not needed to configure. The following list shows those parameters that are automatically detected:
-
RMI Host and Port (or if RIP mode is being used)
-
Input Date Format
-
Matrix Date Format
When TVC is running in an environment that lacks the AEF, then these parameters must be defined.
The different TVC components provides a large set of different parameters that could be manipulated. Uncontrolled changes to some of these might result in decreased performance, or unpredicted behavior.
3.10.1. Applying a System Parameter
A system parameter is typically defined in the deployment description of your application, the web.xml file. A system parameter is defined as init-paramswithin the definition of the TVC servlet.
    <servlet>
        <servlet-name>tvcaction</servlet-name>
        <servlet-class>com.technia.tvc.core.TVCServlet</servlet-class>
        <init-param>
            <param-name>${NAME}</param-name>
            <param-value>${VALUE}</param-value>
        </init-param>
    </servlet>
Where the ${NAME} is the name of the system parameter, and ${VALUE} is the value to apply.
3.10.2. Applying a System Parameter - RMI
If you are using TVC code from JPO’s and your environment uses RMI mode, then settings made into the standard deployment descriptor can not be picked up from the RMI server.
The following list shows the environment variables that can be set to define a system parameter, which otherwise would be set through an init-parameter:
TVC_PRODUCTION_MODE
TVC_PLUGINS
TVC_LOGLEVEL
TVC_DATE_FORMAT
TVC_INPUT_DATE_FORMAT
4. Troubleshooting
4.1. Logging
TVC is using log4j as logging tool. When TVC is installed, the log-levels are typically set to ERROR for all components. The log-levels are defined by Log4j, and the possible values are:
-
OFF
-
FATAL
-
ERROR
-
INFO
-
DEBUG
The log-level should not be changed to INFO or DEBUG in a production environment, since these log-levels will generate thousands of lines, hence performance will degrade due to this.
However, if you encounter problems, you might need to change the log-level temporarily at runtime, this is described below. Also, in a test or development environment, you might find it useful to higher the log-level.
4.1.1. Defining the Log-Level
Within the deployment descriptor of your application (web.xml), you are able to define the default log level for TVC. You will first have to find the section, where the TVCServlet is defined, secondly, you need to either add an init-parameter or modify the existing init-parameters (if such are there already).
The log-level init-parameter is defined as the example below:
<servlet>
    <servlet-name>tvcaction</servlet-name>
    <servlet-class>com.technia.tvc.core.TVCServlet</servlet-class>
    <init-param>
        <param-name>tvc.core.logLevel</param-name>
        <param-value>DEBUG</param-value>
    </init-param>
</servlet>
The init-parameter tvc.core.logLevel will define the log-level for
the entire TVC.
You have also the possibility to define individual log levels for each TVC component. An example how to do so is shown below:
<servlet>
    <servlet-name>tvcaction</servlet-name>
    <servlet-class>com.technia.tvc.core.TVCServlet</servlet-class>
    <init-param>
      <param-name>tvc.core.logLevel.com.technia.tvc.core</param-name>
      <param-value>DEBUG</param-value>
    </init-param>
    <init-param>
      <param-name>tvc.core.logLevel.com.technia.tvc.structurebrowser</param-name>
      <param-value>ERROR</param-value>
    </init-param>
</servlet>
This will turn on DEBUG logging for Core while setting the log-level to ERROR for Structure Browser.
4.1.2. Define Log-Level during Runtime
In some cases you might want to change the log-level without having to modify web.xml, and re-start the application to get the new changes applied, there is a mechanism that allows you to set the log-level during runtime.
Turning on the log level at runtime is done requesting the following URL from your browser:
http(s)://server:port/ematrix/tvc-action/setLogLevel?logLevel=DEBUG
Optionally, the parameter logDomain could be added to explicitly define a specific component (similar as for the web.xml configuration).
http(s)://server:port/ematrix/tvcaction/setLogLevel?logLevel=DEBUG&logDomain=com.technia.tvc.reportgenerator
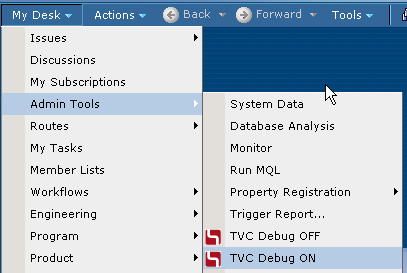
When TVC is installed into an AEF environment, a couple of convenient
commands are added to the My Desk → Admin Tools menu, which can
be used to turn on and off DEBUG logging. See screenshot below:
Change server and port and possibly the context path within the URL examples above to match your environment.
In order to be able to use the ability to set the log-level during runtime, you must be logged in as a user with any of the following access-rights:
-
A system administrator
-
A business administrator
-
A user, assigned to the AEF defined role called
Administration
Manager
If none of these requirements are satisfied, the requested URL will return the HTTP error code 403 (Forbidden).
4.1.3. Logging from Custom Code
Assuming that you have implemented your add-ons to TVC as a TVC Plugin (see this chapter for more information), you can take advantage of the logging functionality provided by TVC.
The code example below illustrates how to obtain a logger, and how to use it.
package com.mycompany.thepackage;

import com.technia.tvc.log4j.Logger;

public class MyClass {
    private static final Logger logger = Logger.getLogger(MyClass.class);

    public void someMethod() {
        if (logger.isDebugEnabled()) {
            logger.debug("About to do something...");
        }
        try {
            // do some operation
        } catch(Exception e) {
            logger.error("Unable to perform the operation, see stack trace below:", e);
        }
    }
}
4.2. Simplified Logging of Variables
Often it’s desirable to include variables in the logged message. The string needs to the be constructed. This can be done in a variety of ways. For example, String.format(), StringBuilder and pure string concatenation can be used. Ideally the string concatenation should only be done if the string actually will be written to the log files in order to improve performance. Logging statements are therefore wrapped in if statements checking if the log level is set to for instance debug.
An alternate approach is to use this signature:
void logger.debug(String format, Object... args);
The first parameter contains the format of the string to log. Use {} in the string to indicate where to insert variables. Variables are supplied as varargs. Make sure that the number of occurrences of {} matches the number of supplied variables.
This makes it possible to transform code looking like:
if (logger.isDebugEnabled()) {
    logger.debug(String.format("Using custom request-processor '%s'", requestProcessorClass));
}

if (logger.isDebugEnabled()) {
    logger.debug("Loaded pagination range from user preferences: " + range);
}
Into this code:
logger.debug("Using custom request-processor '{}'", requestProcessorClass);
logger.debug("Loaded pagination range from user preferences: {}", range);
| Equivalent methods are available for all log levels (ERROR, WARN, INFO and so on). |
4.2.1. Add User Name and IP to the Log
When the logging is turned on in an environment where several users are working, it might be hard to follow the output from the log, since the output from all users are mixed with each other.
There is a way to add the user name (Matrix user name) and IP address within each log statement. By default, this behavior is disabled, but can be turned on by setting the following init-parameter:
<servlet>
    <servlet-name>tvcaction</servlet-name>
    <servlet-class>com.technia.tvc.core.TVCServlet</servlet-class>
    <init-param>
      <param-name>tvc.core.logUser</param-name>
      <param-value>TRUE</param-value>
    </init-param>
</servlet>
When this setting is set to TRUE, the output will look like the example below:
[TVC] [pool-1-thread-11] [Test Everything - 192.168.0.165] DEBUG 10:22:31,639 .........
Hence, the output in the log could be parsed/filtered by some other tool.
4.2.2. Log Watcher
Sometimes, it is hard or impossible to find the file, which the log-output is written into due to restricted access or for some other reason. In such case, you might find it useful to use the Log Watcher tool that is built-in to TVC. This tool will allow you to access the generated log-statements directly through a separate browser window.
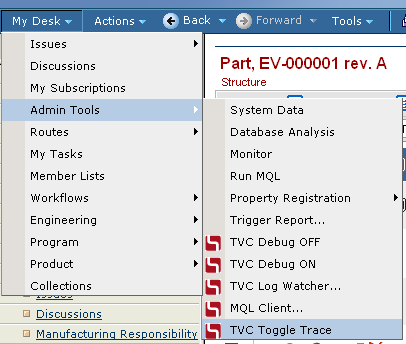
To open the Log Watcher, use the command saying TVC Log Watcher from
the menu shown below:
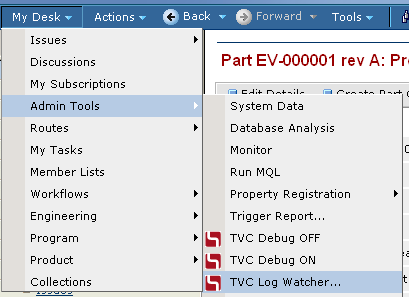
If you don’t have the AEF installed, or for some reason doesn’t have these commands available in the menu, you can also type in the following URL within a browser window:
http(s)://server:port/ematrix/tvc/core/tvcLogWatcher.jsp
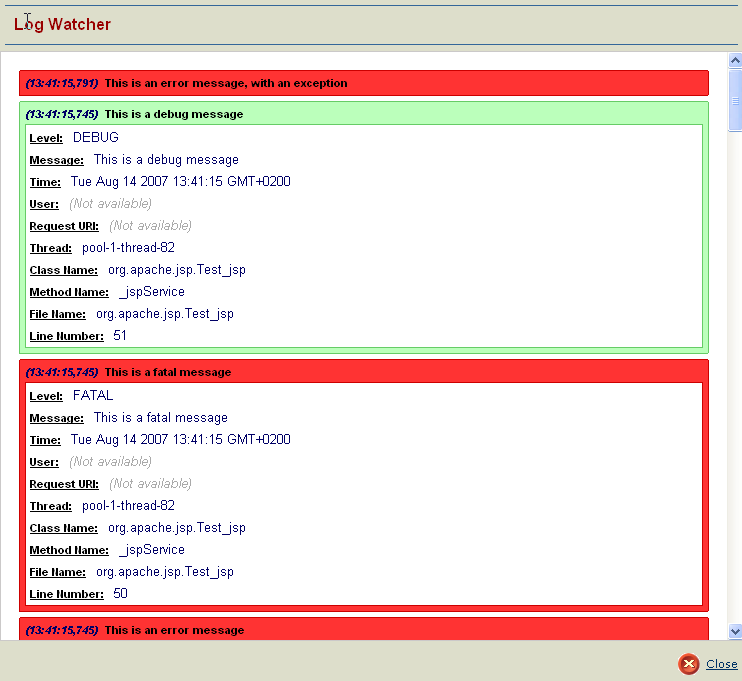
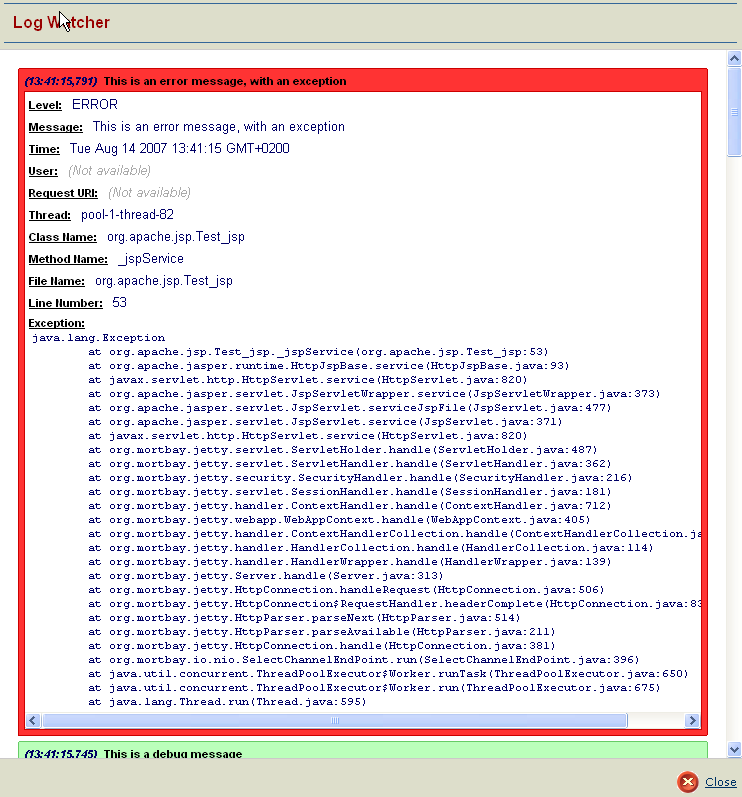
This command will open up a window, where all the log messages are shown. Each generated log message will appear to the top in the window, and you can click on each item to get detailed information about each log statement. See the examples, with some sample log messages below:
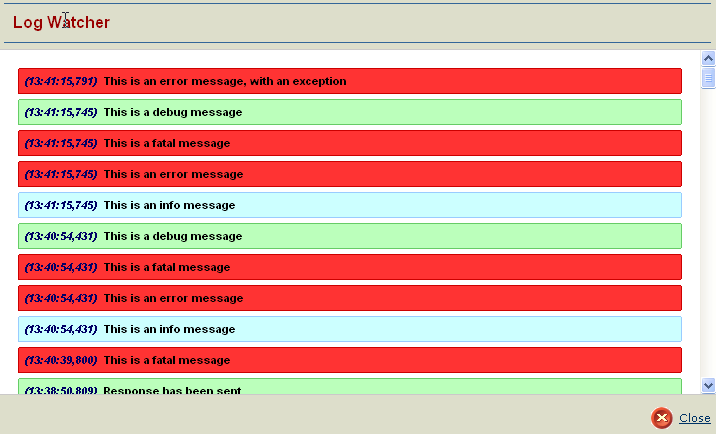
An example showing the output when an item has been expanded.
Also, an example of a log message with a supplied Exception (Stack Trace).
The shown messages within the log watcher window, depends on the current log level. I.e. before using it, you might need to turn on debugging, and after you close it, you should turn off the debugging output again.
4.2.3. Log Files
By default, TVC will also store the generated log output into a separate log file, in addition to in the log file, which typically all std-out messages might be re-directed into by your Application server.
The name of this log file is tvc.log, and the file is stored in a
directory named TVCLogs. Exactly where the TVCLogs directory is
located, depends highly on your application server. Typically, each
webapplication is supplied with a temp-directory by the application
server. Please consult your Application server documentation how to find
this folder.
The storage of the log output to a separate log file could be turned off, by supplying following init-parameter to the TVC Servlet.
<init-param>
    <param-name>tvc.core.logToFiles</param-name>
    <param-value>false</param-value>
</init-param>
4.3. Tracing
In some cases, you might be interested in investigating how much time a certain request takes, but also see where the most time within that particular request is used.
If so, then you could use the built-in functionality for tracing. When turning on the trace functionality, you will in the log-output be able to not only see how much time each request consumes, but also how much time individual code sections consumes.
Even though TVC has been designed to be as fast as possible, there might be situations when the performance is worse than expected. Also, there might exist bottlenecks where the root cause is not in TVC. For example, when TVC is about to invoke custom JPOs, or executing database-queries (queries, inquiries, expansions etc).
The tracing functionality can in these situations be used to find these or similar possibly bottlenecks.
4.3.1. Enabling the Trace
The trace can be enabled in two different ways.
(1) Within the deployment descriptor of your application (web.xml), you are able to turn on the tracing for TVC. You will first have to find the section, where the TVCServlet is defined, secondly, you need to either add an init-parameter or modify the existing init-parameters (if such are there already).
    <servlet>
        <servlet-name>tvcaction</servlet-name>
        <servlet-class>com.technia.tvc.core.TVCServlet</servlet-class>
        <init-param>
            <param-name>tvc.core.traceEnabled</param-name>
            <param-value>TRUE</param-value>
        </init-param>
    </servlet>
(2) In some cases you might want to turn on the tracing without having to modify web.xml, and re-start the application to get the new changes applied. There is a mechanism that allows you to toggle the trace during runtime.
This is accomplished by requesting the following URL from your browser:
http(s)://server:port/ematrix/tvc-action/toggleTrace
When TVC is installed into an AEF environment, a command is added to the
My Desk → Admin Tools menu, which can be used to toggle the
trace. See screenshot below:
The same command or URL is used to disable the tracing.
| Be careful when using tracing in a production environment, since this will not only fill the log files with redundant information, it will also decrease the general performance of the application. |
4.3.2. Example
This is an example of how the output might look like: (note that the output has been truncated in order to fit the page better).
    [TVC-TRACE] [pool-1-thread-139] [Test Everything - 192.168.0.165]  14:23:36,100
    Time:           235 ms - /viewTable
      Time:          62 ms - Processed forward [path=/tvc/structurebrowser/tvcTable.jsp...
      Time:         172 ms - com.technia.tvc.structurebrowser.actions.ViewTableAction
        Time:        78 ms - Evaluation [rows=11, columns=10]
          Time:      31 ms - Selected data from 11 objects:  [policy, current, current...
          Time:      47 ms - Selected data from 10 relationships:  [attribute[Find Number]...
        Time:        93 ms - Expanded node [levels=1, descendantCount=10]
          Time:      78 ms - MQLUtils.bosExecute [command=escape expand businessobject 1179...
In this case, we can see that 172 of 235ms were spent in expanding the structure (93ms) and retrieving the data for all rows/cells (78ms). The rest, 62ms, were consumed by the JSP page that renderer the user interface.
Not all parts of the code is traceable. Only those parts that normally involves database calls as well as some other parts that might consume time can be traced.
4.3.3. How to trace your own code?
You can also customize your own code, so that it could be traced too. Simply do as the example below:
import com.technia.tvc.core.Tracer;

public class MyClass {
      public void myMethod() throws SomeException {
          boolean traced = Tracer.startTrace();
          try {
              // code to be traced
          } finally {
              if (traced) {
                  Tracer.endTrace("The message to appear in the trace log...");
              }
          }
      }
}
|
When using the Tracer, you must ensure that the endTrace method is called before your method is terminating. Also, you should never call endTrace unless the trace really were started. This is important as if the startTrace/endTrace calls are unbalanced, it will generate incorrect measurements. |
4.4. Status Monitor
TVC has a built in status monitor, which could be used to trace problems related to the TVC functionality.
The status monitor is reached by requesting the following URL from your browser:
http(s)://server:port/ematrix/tvc-action/monitorStatus
The status monitor brings you information about the system you are running, and information about all the TVC components that has been installed.
5. Core
5.1. Domain Objects
5.1.1. Introduction
TVC has a domain object model, e.g. functionality for mapping business objects into Java objects.
To be able to use the Domain Object Model in TVC you need to create a few things, namely.
-
A mapping file, containing the mappings between business types and Java classes
The mapping file is a simple properties file, where each line of this file follows this syntax:
type_SymbolicTypeName=com.company.domain.TheDomainObject
-
Create a plugin, which returns the URL for the mapping file
-
Finally, implement the Domain Objects
An example how the method, which your plugin must implement, is shown in the code example below.
public class MyPlugin implements TVCPlugin {
    ...
    public URL getTypeMappingsURL() {
        return getClass().getClassLoader().getResource("com/acme/anapplication/resources/TypeMappings.properties");
    }
    ...
5.1.2. Creating a Domain Object
A type specific Domain Object, must be implemented according to the code example below
import com.technia.tvc.core.TVCException;
import com.technia.tvc.core.db.domain.DomainObject;

public class Part extends DomainObject {

    public Part(String objectId) {
        super(objectId);
    }

    public Part(String type,
                String name,
                String revision,
                String vault) throws TVCException {
        super(type, name, revision, vault);
    }

    // Add your domain object methods here...
}
The base class com.technia.tvc.core.db.domain.DomainObject provides a
large set of methods. Please look into the API for more information.
5.1.3. Instantiating Domain Objects
When obtaining a reference to a domain object, you will need to use any of the static methods with name newInstance(…), as shown below.
DomainObject d == DomainObject.newInstance(objectId);

// or, if you know directly the type:

Part part == (Part) DomainObject.newInstance(objectId);
There are several variants of the newInstance(…) methods, consult the API for details.
As most of the methods in the Domain Object class needs a transactional context available, you should not work with the Domain Objects from JSP pages. Instead, you need to access information from a Domain Object on a JSP page, after the execution of an Action, you should create a so called transfer object. A transfer object can be created as the example below:
import com.technia.tvc.core.db.domain.DomainObject;
import com.technia.tvc.core.db.domain.to.DomainObjectTO;
...

DomainObject d == DomainObject.newInstance(objectId);
...
DomainObjectTO t == d.getTransferObject();
request.setAttribute("object", t);
5.2. Number Generators
5.2.1. Introduction
TVC contains functionality for generating unique numbers (or names), which can be used when for example creating new business objects in the database.
A certain business-type, can have a set of number generators associated.
These numbergenerators are represented themselves by businessobjects of
type TVC Number Generator Settings.
To associate a new number generator to be used for when creating business objects of a certain type, simply add such a number generator by running following MQL/TCL code:
mql add bus                                 \
    "TVC Number Generator Settings"         \
    "type_MyType"                           \
    "A-Size"                                \
    vault "TVC Administration"              \
    policy "TVC Number Generator Settings"  \
    "TVC Number" "0"                        \
    "TVC Digits" "16"                       \
    "TVC Prefix" "A-"                       \
    "TVC Suffix" "-XXX"
This number generator is associated to the type (or any sub-type) registered through the symbolic name: type_MyType. You can either use symbolic names, or real names.
The name of this number generator is A-Size and the number generator
creates numbers according to this format: A-0000000000000001-XXX
Explanation:
When allocating new numbers using a number generator, you can simply do following:
    NumberGenerators ng == NumberGenerators.get(type);
    NumberGenerator gen == ng.getByName("A-Size");
    String number == gen.allocate();
OR:
    NumberGenerators ng == NumberGenerators.get(type);
    NumberGenerator gen == ng.findMostSuitable(1); // 1 == the number of "numbers" to generate
    String number == gen.allocate();
If you want to allocate more than one number, and you know the amount of numbers to be generated, then you can do so by using the following code example.
This approach is much faster than allocating the numbers in a loop, one-by-one.
    NumberGenerator gen == ...
    NumberRange range == gen.allocate(100); // allocate 100 numbers...
    Iterator itr == range.getNumbers();
    while (itr.hasNext()) {
        String number == (String) itr.next();
    }
For additional information, please look at the API docs.
5.3. UI Components
5.3.1. Tag Library
TVC contains a number of so called JSP custom tags, which you can use on your JSP pages.
tvc-core.tld
The table below contains useful tag libs, which are all found in the tvc-core.tld descriptor.
| Name | Attributes | Description |
|---|---|---|
checkLogon |
Checks if the user is logged on, if not, the user is redirected to the login page |
|
aefBase |
Generates a base tag element, which points to the AEF base directory |
|
aefCommonBase |
Generates a base tag element, which points to the common directory of the AEF |
|
tvcBase |
Generates a base tag element, which points to the tvc directory |
|
noCache |
Generates the HTTP headers that prevents caching of page |
|
action |
Generates the URL to an action |
|
absoluteURL |
Generates the URL to an action |
|
scriptEscape |
Can be used to escape the text inside the body content, when using it in Java Scripts |
|
xmlEscape |
Can be used to escape XML characters inside the body content text |
|
queryString |
Writes all request parameters formatted as a query-string to the JspWriter. |
Example code:
<%@ taglib uri="/WEB-INF/tvc-core.tld" prefix="core" %>
<%@ taglib uri="/WEB-INF/tvc-struts-bean.tld" prefix="bean" %>
<core:checkLogon/>
<core:noCache/>
<html>
    <head>
        <core:aefCommonBase/>
        <title><bean:message key='app.title.somePage'/></title>
    </head>
    <body>
        <ul>
            <li><a href="<core:action path='/someAction'/>">Some Action</a></li>
            <li><a href="<core:absoluteURL path='/app/MyPage.jsp'/>">Some JSP page</a></li>
        </ul>
    </body>
</html>
5.3.2. Dialogs
Dialog Pages
Dialog pages, as shown in the image below, are oftenly used in an application. Such a dialog page typically contains some form, which the user fills in, and contains buttons for either cancel or continue/create with the action.
Dialog page example
In many cases, these kind of dialog pages are made by a frameset page holding three frames (top, content, bottom). This means that you need to create four different pages for each dialog page you need. As the amount of dialog pages increases, the number of JSP pages grows fast. The dialog tags simplify the creation of dialog pages.
A template for creating a dialog page, is shown below.
<%@ taglib uri="/WEB-INF/tvc-dialog.tld" prefix="dialog" %>
<%@ taglib uri="/WEB-INF/tvc-core.tld" prefix="core" %>
<%@ include file="../../core/tvcSetContentType.jspf" %>
<core:checkLogon />
<dialog:page windowTitle="..."
             pageHeader="..."
             pageSubheader="">
    <dialog:style>
        ...
    </dialog:style>
    <dialog:script>
        ...
    </dialog:script>
    <dialog:content>
        ...
    </dialog:content>
</dialog:page>
Please note that when you are creating dialog pages with these tags, you should not and do not have to create the standard HTML tags that normally appears in a html document, such as: html, head and body, as these are created automatically by the custom tags.
Tag: <dialog:page>
On the root tag <dialog:page>, you can specify some properties, like the page title, header and sub header. Moreover, there are several attributes, shown in the list below, which can be used to configure the dialog page.
The following list shows additional attributes, which applies to how the buttons at the bottom right of the dialog page is configured.
Tag: <dialog:content>
The body content of this tag will be generated within the <body> tags in the generated HTML code. This is the place where you will put the html code that builds up your user interface.
<dialog:content>
    <table border=0 cellpadding=2 cellspacing=1>
        <tr>
            <td>this is a table in my dialog page...</td>
        </tr>
    </table>
</dialog:script>
You should not add any body tags, and the HTML you add should be valid. Otherwise the dialog page would not display properly.
Tag: <dialog:headContent>
This tag can be used for inserting any kind of data, which should reside inside the <head> tags within the generated HTML.
Example
<dialog:headContent>
    <%@ include file="..include some page here..." %>
</dialog:headContent>
Tag: <dialog:style>
This tag can be used for inserting styling information inline within the html document
The styles are provided within the body content of this tag, example:
<dialog:style>
    tr.odd {
        background-color: #ffffff;
    }

    tr.even {
        background-color: #eeeeee;
    }
</dialog:style>
Tag: <dialog:stylesheet>
This tag can be used for inserting references to a stylesheet file, example:
<dialog:stylesheet href="../app/styles/MyStylesheet.css"/>
Tag: <dialog:script>
This tag can be used for inserting Java Script inline with the generated HTML, or as a references to an external Java Script file, example(s):
<dialog:script href="../app/scripts/MyScript.js"/>
<dialog:script>
    function someFunction() {
        alert("hello world");
    }
</dialog:script>
Advanced: Adding a custom menubar
It is also possible to add a custom menubar into a dialog page. To do so, look at the example below.
<dialog:page ...>
    <core:inlineXmlMenuBar targetFrame="self"
                           maxLabelChars="20"
                           actionHandler="function(a) {eval(a.href.substring(11));}">
        <MenuBar>
            <Menu>
                <Command>
                    <Label><bean:message key='app.label.command0'/></Label>
                    <Href>javascript:command(0);void(0);</Href>
                </Command>
                <Command>
                    <Label><bean:message key='app.label.command1'/></Label>
                    <Href>javascript:command(1);void(0);</Href>
                </Command>
                <Command>
                    <Label><bean:message key='app.label.command2'/></Label>
                    <Href>javascript:command(2);void(0);</Href>
                </Command>
            </Menu>
        </MenuBar>
    </core:inlineXmlMenuBar>
    <dialog:script>
        function command(i) {
            switch(i) {
                case 0:...
                case 1:...
                case 2:...
            }
        }
    </dialog:script>
    <dialog:content>
        ...
    </dialog:content>
</dialog:page>
Dialog Page Example
<%@ taglib uri="/WEB-INF/tvc-dialog.tld" prefix="dialog" %>
<%@ taglib uri="/WEB-INF/tvc-core.tld" prefix="core" %>
<%@ include file="../../core/tvcSetContentType.jspf" %>
<core:checkLogon />
<dialog:page windowTitle="app.title.somePage"
pageHeader="app.pageHeader.somePage"
pageSubheader="">
<dialog:headContent>
<%@ include file="..include some page here..." %>
</dialog:headContent>
<dialog:style>
tr.odd {
background-color: #ffffff;
}
tr.even {
background-color: #eeeeee;
}
</dialog:style>
<dialog:script>
function submitForm() {
// this method is invoked when "continue" is clicked
}
</dialog:script>
<dialog:content>
<FORM ACTION="<core:action path='myAction'/>" METHOD="post">
<TABLE border="0" cellspacing="2" cellpadding="3" width="100%">
<TR>
<TH> </TH>
<TH><bean:message key="app.label.name"/></TH>
</TR>
<logic:iterate indexId="i" id="name" name="names" scope="request" type="java.lang.String">
<TR class="<%== i.intValue() % 2 === 0 ? "odd" : "even" %>">
<TD><INPUT TYPE="radio" NAME="theName" VALUE="<%== name %>" ID="<%== name %>_<%== i %>"></TD>
<TD><LABEL FOR="<%== name %>_<%== i %>"><%== name %></LABEL></TD>
</TR>
</logic:iterate>
</TABLE>
</FORM>
</dialog:content>
</dialog:page>
5.3.3. Tabbed Pages
Pages with tabs, as shown in the image below, are oftenly used in an application. Such page can easily be created using Technia Value Components

Figure 1. Tabbed Pages
Tab Page Example
A tab page can be created in different ways, the code example below illustrates how to use the tab-page taglib to construct the page.
<!DOCTYPE html>
<%@ include file="/tvc/core/tvcSetContentType.jspf" %>
<%@ taglib uri="/WEB-INF/tvc-core.tld" prefix="core" %>
<%@ taglib uri="/WEB-INF/tvc-tabpage.tld" prefix="tabpage"%>
<core:checkLogon />
<core:noCache />
<html>
    <head>
        <core:base/>
        <tabpage:headerResources/>
        <title>Tab Test Page</title>
    </head>
    <body>
        <div>
            This HTML code is shown above the tabs...
        </div>
        <tabpage:tabs>
            <tabpage:tab>
                <tabpage:href>http://www.technia.com</tabpage:href>
                <tabpage:label>Technia</tabpage:label>
            </tabpage:tab>
            <tabpage:tab>
                <tabpage:href>http://www.google.com</tabpage:href>
                <tabpage:label>Google</tabpage:label>
            </tabpage:tab>
            <tabpage:tab>
                <tabpage:href>http://www.yahoo.com</tabpage:href>
                <tabpage:label>Yahoo</tabpage:label>
            </tabpage:tab>
        </tabpage:tabs>
    </body>
</html>
Note: remember to add the JSP tag <tabpage:headerResources/> in the HEAD section of the HTML document, as this tag will add some Java Script and Stylesheet references. The tab page will not work without these.
The tag <tabpage:tab> supports some additional attributes:
Remember the Last Visited Tab
As of TVC 2009.3.0, a new feature were added in order to remember the users last visited tab.
To enable this behaviour, you need to assign the tabs and tab a unique ID, shown below:
<!DOCTYPE html>
<%@ include file="/tvc/core/tvcSetContentType.jspf" %>
<%@ taglib uri="/WEB-INF/tvc-core.tld" prefix="core"%>
<%@ taglib uri="/WEB-INF/tvc-struts-bean.tld" prefix="bean"%>
<%@ taglib uri="/WEB-INF/tvc-struts-logic.tld" prefix="logic"%>
<%@ taglib uri="/WEB-INF/tvc-tabpage.tld" prefix="tabpage"%>
<%@ taglib uri="/WEB-INF/tvx.tld" prefix="tvx"%>
<core:ensureStartedUp/>
<core:noCache/>
<core:checkLogon/>
<html>
    <head>
        <tabpage:headerResources/>
    </head>
    <body>
        <tabpage:tabs tabsId="tvx-home-page">
            <tabpage:tab tabId="collections">
                <tabpage:label><bean:message key="tvx.label.Collections"/></tabpage:label>
                <tabpage:href><core:action path='/showCollections'/>?portalMode=true</tabpage:href>
            </tabpage:tab>
            <tabpage:tab tabId="projects">
                <tabpage:label><bean:message key="tvx.label.Projects"/></tabpage:label>
                <tabpage:href><core:absoluteURL path='/tvx/pmc/Projects.jsp'/></tabpage:href>
            </tabpage:tab>
            <tabpage:tab tabId="my-parts">
                <tabpage:label><bean:message key="tvx.label.MyParts"/></tabpage:label>
                <tabpage:href><core:action path='/execInquiryToTable'/>?inquiry=tvc:inquiry:tvx:misc/MyParts.xml&pageConfig=tvc:pageconfig:tvx:misc/MyParts.xml&portalMode=true</tabpage:href>
            </tabpage:tab>
            <tabpage:tab tabId="my-documents">
                <tabpage:label><bean:message key="tvx.label.MyDocuments"/></tabpage:label>
                <tabpage:href><core:action path='/menuBasedTabPage'/>?menu=tvc:menu:tvx:misc/MyDocsTabs.xml</tabpage:href>
            </tabpage:tab>
        </tabpage:tabs>
    </body>
</html>
This is only required if you render a tab page from a JSP page using the custom tags provided. If you use tabs based upon a menu, as described below, the remembering of the last visited tab is automatically in use.
Tabs Loaded From a Menu
It is possible to load the tabs on a tab-page, using the commands from a defined Menu.
You simply create a URL/command pointing to the ${ROOT_DIR}/tvc-action/menuBasedTabPage, and provide the following parameters:
Example URLs:
-
${ROOT_DIR}/tvc-action/menuBasedTabPage?menu=NameOfMenu
-
${ROOT_DIR}/tvc-action/menuBasedTabPage?menu=NameOfMenu&targetPage=/custom/NameOfPage.jsp
The page that will render the page, will look similar to as:
<!DOCTYPE html>
<%@ include file="/tvc/core/tvcSetContentType.jspf" %>
<%@ taglib uri="/WEB-INF/tvc-core.tld" prefix="core" %>
<%@ taglib uri="/WEB-INF/tvc-tabpage.tld" prefix="tabpage"%>
<core:checkLogon />
<core:noCache />
<html>
    <head>
        <core:base/>
        <tabpage:headerResources/>
        <title>Tab Test Page</title>
    </head>
    <body>
        <div>
            This HTML code is shown above the tabs...
        </div>
        <tabpage:renderTabsFromMenu/>
    </body>
</html>
The JSP tag <tabpage:renderTabsFromMenu/> will render the tabs, based upon the commands within the menu as provided through the URL.
If you don’t use a custom targetPage, a default page is rendered that only will contain the tabs without any information above the tabs.
Dynamic Loading of Menu Based Tab Page
The actual menu being loaded, can be based upon the objectId provided in the request.
For example, you can have one menu for one kind of type, and another for other types. To enable this feature, you need to create a file with name tvc-tabpage.mapping in the folder WEB-INF/classes of the web-application, and configure it as:
<symbolic type name>=<menu name>|<target page name>
Example:
type_Part=tabmenu_Part|/custom/tab/Part.jsp
type_DOCUMENTS=tabmenu_DOCUMENTS|/custom/tab/Documents.jsp
...
The target page that will render the page, will look similar to as:
<!DOCTYPE html>
<%@ include file="/tvc/core/tvcSetContentType.jspf" %>
<%@ taglib uri="/WEB-INF/tvc-core.tld" prefix="core" %>
<%@ taglib uri="/WEB-INF/tvc-tabpage.tld" prefix="tabpage"%>
<core:checkLogon />
<core:noCache />
<html>
    <head>
        <core:base/>
        <tabpage:headerResources/>
        <title>Tab Test Page</title>
    </head>
    <body>
        <div>
            This HTML code is shown above the tabs...
        </div>
        <tabpage:renderTabsFromMenu/>
    </body>
</html>
Multiple Tabs Sections
It is possible to have multiple set of tab-sections on the same page.
Look at the code example below. The important attribute required to set, is the height attribute on the <tabpage:tabs> element itself. The last tab-section doesn’t need this attribute, as the height will be dynamically adjusted based upon the window size.
<!DOCTYPE html>
<%@ include file="/tvc/core/tvcSetContentType.jspf" %>
<%@ taglib uri="/WEB-INF/tvc-core.tld" prefix="core" %>
<%@ taglib uri="/WEB-INF/tvc-tabpage.tld" prefix="tabpage"%>
<core:checkLogon />
<core:noCache />
<html>
    <head>
        <core:base/>
        <tabpage:headerResources/>
        <title>Tab Test Page</title>
    </head>
    <body>
        <div>
            This HTML code is shown above the tabs...
        </div>
        <tabpage:tabs height="400">
            <tabpage:tab load="false">
                <tabpage:href>http://www.technia.com</tabpage:href>
                <tabpage:label>Technia</tabpage:label>
            </tabpage:tab>
            <tabpage:tab>
                <tabpage:href>http://www.google.com</tabpage:href>
                <tabpage:label>Google</tabpage:label>
            </tabpage:tab>
            <tabpage:tab>
                <tabpage:href>http://www.yahoo.com</tabpage:href>
                <tabpage:label>Yahoo</tabpage:label>
            </tabpage:tab>
        </tabpage:tabs>
        <tabpage:tabs>
            <tabpage:tab load="false">
                <tabpage:href>http://www.technia.com</tabpage:href>
                <tabpage:label>Technia</tabpage:label>
            </tabpage:tab>
            <tabpage:tab>
                <tabpage:href>http://www.google.com</tabpage:href>
                <tabpage:label>Google</tabpage:label>
            </tabpage:tab>
            <tabpage:tab>
                <tabpage:href>http://www.yahoo.com</tabpage:href>
                <tabpage:label>Yahoo</tabpage:label>
            </tabpage:tab>
        </tabpage:tabs>
    </body>
</html>
Styling tabs
It is possible to style the layout of individual tabs, by setting a CSS class on them. The below example shows how to write the relevant Setting tag (see the Core Administration Guide for more details).
<Command>
  <Label>...</Label>
  <URL action="...">
    <Param name="..." value="..."/>
  </URL>
  <Setting name="class" value="testCSSclass" />
</Command>
The DOM element receiving the CSS class is the <li> element, which in
turn contains sub-elements (a content div and a link element) which you
might want to target directly with your CSS selectors. Also note that
you might have to apply the !important CSS property for your
customizations to get precedence over the default theme values.
Similarly, for example you might have to remove the background-image
properties before your background-color attribute is honored, and so on.
5.3.4. Calendar
If you need a date picker on a HTML page, you should read this chapter.
Typically, when selecting a date, the shown date should be formatted according to the users locale settings. But the selected date should typically be transferred from the client to the server in a neutral format, like ISO format, for easy parsing.
The Pikaday library is used for selecting the dates. When creating the date picker a number of options are provided. These specify what field to associate the picker with, what should happen when a date is picked and other things. All available options are listed at the Pikaday site.
In order to use the date picker, please look at the following JSP code snippet.
<%@ taglib uri="/WEB-INF/tvc-core.tld" prefix="core" %> (1)
<html>
    <head>
        <core:aefCommonBase/> (2)
        <script type="text/javascript" src="../tvc/core/scripts/jquery.js"></script> (3)
        <link rel="stylesheet" type="text/css" href="../tvc/core/libs/uip-icons/colored/uip-icons-colored.css"/> (4)
        <core:calendarResources/> (5)
    </head>
    <body>
        <form action="<core:absoluteURL path='/tvc/core/tvcDebugRequest.jsp'/>" method="post">
            <input readonly type="text" id="dateField1"> (6)
            <i class="ti-c ti-calendar-c" onclick="editDate()"></i> (7)
            <i class="ti-c ti-delete-c" onclick="clearDate()"></i> (8)
            <input type="submit" value="Submit"/>
        </form>
        <script>
            var calendar;
            $().ready(function() { (9)
                var options = getCalendarOptions('dateField1');
                calendar = new TVCCalendar(options);
            });

            function getCalendarOptions(fieldId) {
                return {
                    field : document.getElementById(fieldId),
                    onSelect : function() {
                        var isoFormatted = this.toString('YYYY-MM-DD');
                        console.log('Date selected', this.getDate(), isoFormatted);
                    }
                };
            }

            function editDate() {
                calendar.show();
                // TVCCalendar.getPicker(getCalendarOptions('dateField1')).show(); (10)
            }

            function clearDate() {
                calendar.clear();
            }
        </script>
    </body>
</html>
| 1 | Include the tvc-core.tld taglibrary |
| 2 | The AEF common base tag is used in this example, as the hrefs to all scripts, images and stylesheets are made relative to this base URL |
| 3 | Include jquery library |
| 4 | Include icons displayed to the right of the date field |
| 5 | Include all calendar specific resources, e.g. Pikaday JS/CSS, locale and more |
| 6 | Field where date is entered |
| 7 | Opens the date picker |
| 8 | Clears the selected date |
| 9 | Initializes the date picker when the page is loaded |
| 10 | Alternate method for getting the picker associated with a field. It lazily initiates the date picker. |
5.3.5. Toolbar
The toolbar implementation in TVC can also be used on a custom JSP page. The example code below illustrates how to do so:
Just copy this code into a JSP page and launch it from your browser.
<%@ include file="/tvc/core/tvcSetContentType.jspf" %>
<%@ taglib uri="/WEB-INF/tvc-core.tld" prefix="core" %>
<%@ taglib uri="/WEB-INF/tvc-struts-bean.tld" prefix="bean" %>
<%@ taglib uri="/WEB-INF/tvc-struts-logic.tld" prefix="logic" %>
<core:checkLogon/>
<html>
<head>
<core:tvcBase/>
<link rel="stylesheet" href="core/styles/tvcMenubar.css" type="text/css">
<script type="text/javascript" src="core/scripts/tvcCommonScript.js"></script>
<script type="text/javascript" src="core/scripts/tvcMenubar.js"></script>
<script type="text/javascript">
    function actionHandler(href) {
        eval(href.href.substring(11));
    }
</script>
<core:inlineXmlMenuBar targetFrame="self"
                       maxLabelChars="40"
                       targetElement="menubarContainer"
                       actionHandler="actionHandler">
    <MenuBar>
        <Menu>
            <Menu>
                <Label>A Menu</Label>
                <Command>
                    <Href>javascript:alert(1);</Href>
                    <Label>First Command</Label>
                </Command>
                <Command>
                    <Href>javascript:alert(2);</Href>
                    <Label>Second Command</Label>
                </Command>
                <Command>
                    <Href>javascript:alert(3);</Href>
                    <Label>Third Command</Label>
                </Command>
                <Command>
                    <Href>javascript:alert(4);</Href>
                    <Label>Fourth Command</Label>
                </Command>
            </Menu>
            <Menu>
                <Label>Another Menu</Label>
                <Command>
                    <Href>javascript:alert(5);</Href>
                    <Label>First Command</Label>
                </Command>
                <Command>
                    <Href>javascript:alert(6);</Href>
                    <Label>Second Command</Label>
                </Command>
                <Command>
                    <Href>javascript:alert(7);</Href>
                    <Label>Third Command</Label>
                </Command>
                <Command>
                    <Href>javascript:alert(8);</Href>
                    <Label>Fourth Command</Label>
                </Command>
            </Menu>
        </Menu>
        <ContextButton>
            <Image>../tvc/core/images/buttons/excelexport.gif</Image>
            <Href>javascript:alert('Excel Export...');</Href>
        </ContextButton>
    </MenuBar>
</core:inlineXmlMenuBar>
</head>
<body>
<div style="width:100%;height:100%;padding:4px;">
<div id="menubarContainer" style="padding-right:10px;"></div>
</div>
</body>
</html>
5.4. Auto Complete
5.4.1. Introduction
The autocomplete feature is intended to make it easier to enter values in fields. This might for example be when specifying what kind of Part the user wants to create (basic), enter the Responsible Design Organization (related object) for a part or select units of measure for a part (ranges).
On server side the AutoCompleteHandler (handler) is responsible for providing available values for a field. The value consist of the actual value that is stored in the database, ex. object id, and a display value which the user is presented with. TVC comes with a number of built-in handlers:
-
type
-
user
-
dataset
-
ranges
-
organization
-
businessobject
Selectize is used on client side to render the field where user can enter values along with the dropdown containing available options. The plugin has a high level of configurability making it possible to set for instance how many options that should be presented, how to render them, ordering of options and much much more. See the Selectize Usage options page for a full list of available settings.
5.4.2. Flow chart
-
User enters a value in the field
-
AJAX request is sent to the server. The request includes the text entered by the user, which AutoCompleteHandler to use and other configuration information.
-
The AJAX service reads the arguments, locates the AutoCompleteHandler and executes the
process()method. -
The AutoCompleteHandler identifies suitable values matching the arguments. Ex. the type handler uses the
TypeInfocache, the businessobject executes a query against the Enovia db. -
Values are sent to the client.
-
Selectize displays the values.
5.4.3. AutoCompleteHandler
The autocomplete handler is responsible to deliver values the user can choose from. There are a number of built-in handlers to support most use cases, for instance selecting types and users. The most flexible handler is the DataSet one which allows you to configure a dataset of objects that the user can choose from.
The autocomplete handlers are configured with a number of settings. Some settings are common across all handlers, e.g. the name and limits of how values to return. Other settings are specific for a handler, e.g. for the type handler you specify the root types to search within.
Built-in AutoComplete Handlers
Common Settings
| Name | Description | Default |
|---|---|---|
name |
Defines the AutoCompleteHandler to use. Enter either the name of a built-in handler or specify the qualified name of your java class. |
user |
caseSensitive |
Should searches be case sensitive. |
false |
contains |
Must the search criteria match the value exactly. |
true |
limit |
Maximum amount of results that is returned from server. |
10 |
localize |
true |
User
Settings
| Name | Description | Default |
|---|---|---|
assignments |
Users must be assigned the role/group to be displayed. |
<none> |
returnOid |
Returns object id instead of user name as value for the users. |
false |
Type
Settings
| Name | Description | Default |
|---|---|---|
rootTypes |
Defines types to be included in the search. All sub types are returned as well |
All types |
returnAbstractTypes |
Defines if abstract types should be returned. |
false |
DataSet
Uses a dataset to define available search options. If the field is in context of an object, e.g. in a top panel, the object id will be available to the dataset making it possible to do dataset operations that requires input. That can for example be an expansion.
| Name | Description | Default |
|---|---|---|
dataset |
Name of the dataset to use, ex.tvc:dataset:tvx:enc/MyParts.xmlThis field is required. |
|
value |
Select expression selecting the value. |
id |
label |
Defines what data to display in value. Use macros to define it. Examples:
label : $<attribute[attribute_MarketingName]> ($<name>) |
$<name> |
select |
Defines addtional data to fetch and return to the UI. Define it by adding one or more select expressions. Examples:
select : ['id', 'description', '$<attribute[attribute_MarketingName>'] The selected data can be used to make more advanced option rendering at client using the Selectize settings rendering options. |
Example configuration in TVC Forms to specify Part Family for a Part:
<ConnectField>
    <Label>Part Family</Label>
    <Relationship>
        <Name>relationship_ClassifiedItem</Name>
        <Direction>to</Direction>
    </Relationship>
    <SearchForm>tvc:searchconfig:tvx:enc/AddToPartFamily.xml</SearchForm>
    <AutoComplete>true</AutoComplete>
    <AutoCompleteHandler>dataset</AutoCompleteHandler>
    <AutoCompleteSettings><![CDATA[{
            handler : {
                dataset : 'tvc:dataset:tvx:enc/PartFamilies.xml',
                value : 'id',
                label : '$<name>'
            }
        }]]></AutoCompleteSettings>
</ConnectField>
Example configuration in TVC Forms which selects additional data and has custom rendering:
<ConnectField>
    <Label>ECO to release</Label>
    <Relationship>
        <Name>relationship_AffectedItem</Name>
        <Direction>to</Direction>
    </Relationship>
    <SearchForm>tvc:searchconfig:tvx:enc/AddToECO.xml</SearchForm>
    <AutoComplete>true</AutoComplete>
    <AutoCompleteHandler>dataset</AutoCompleteHandler>
    <AutoCompleteSettings><![CDATA[{
            handler : {
                dataset : 'tvc:dataset:tvx:enc/ECOs.xml',
                value : 'id',
                select : ['$<name>', '$<attribute[attribute_Severity]>', '$<attribute[attribute_Priority]>']
            },
            labelField : 'name',
            searchField : ['name', 'select_2', 'select_3'],
            render : {
                option : function(item, escape) {
                    var option = [];
                    option.push('<div style="border-bottom: 1px solid #ccc;">');
                    option.push(escape(item.name) + "<br/><b>Severity:</b> " + escape(item.select_2) + "<br/><b>Priority:</b> "+ escape(item.select_3));
                    option.push('</div>');
                    return option.join('');
                }
            }
        }]]></AutoCompleteSettings>
</ConnectField>
Note that the select statements are replaced with select_1, select_2 and so on. This is done because complex select statement doesn’t comply with JSON naming conventions.
BusinessObject
Searches for business objects using a query. Most often you enter some criteria to limit the search result, for example you will add a typePattern and whereClause to only get the first revision of parts.
Settings
| Name | Description | Default |
|---|---|---|
typePattern |
Type pattern to search for |
|
namePattern |
Name pattern to search for |
|
revisionPattern |
Revision pattern to search for |
|
vaultPattern |
Vault pattern to search for |
|
whereClause |
Where clause to use |
|
matchOn |
||
expandType |
true |
|
displayMacro |
||
searchType |
How the search criteria will operator. Available values:containsstartsWithendsWith |
Path Object
Searches for Path objects using a path query. Most often you enter some criteria to limit the search result, for example you will add a Path Type, selectable and whereClause to get the path owner.
Settings
| Name | Description | Default |
|---|---|---|
PathType |
Type of Path to search for |
|
PathSelect |
expression to get the respective id |
id |
QueryKind |
how the query will operate on subpath |
containsany |
vault |
Vault to search for |
|
where |
Where clause to use |
|
ElementInquiry |
name of the inquiry to the elements for query |
5.4.4. Settings
There are two categories of settings:
-
Selectize. These controls the behavior of the Selectize plugin. See the Selectize usage page for a full reference.
-
AutoCompleteHandler. Defines which handler to use and other configurations related to it. Handler settings are wrapped in a handler object to don’t collide with Selectize settings. These settings are described in detail in the previous chapter.
Example intializing AutoComplete with the type handler for a field with id my-autocomplete-field.
var settings = {
    // Settings from Selectize
    maxItems : 5,
    delimiter : ',',
    onChange : function() {
        console.log("AutoCmplete Values", this.getValue());
    },

    // Settings passed to AutoCompleteHandler
    handler : {
        name : 'type',
        rootTypes : ['type_Part', 'type_DOCUMENTS']
    }
};
$('#my-autocomplete-field').tvcselectize(settings);
Example populating a hidden field when values are changed
var settings = {
    delimiter : ',',
    onChange : function() {
        $('#my-hidden-field').val(this.getValue());
    },

    // Settings passed to AutoCompleteHandler
    handler : {
        name : 'user'
    }
};
$('#my-autocomplete-field').tvcselectize(settings);
Custom rendering of options
It’s possible to get complete control of how the options are rendered by supplying a javascript function in the settings.The function is called once for each option to render and all data passed from the server is available to use. This feature plays well in combination with the dataset handler which allows you to select additional data.
Custom rendering of options using dataset handler
var settings = {
    handler : {
        name : 'dataset',
        value : 'id',
        select : ['name', '$<attribute[attribute_MarketingName>']
    },
    render : {
        option : function(item, escape) {
            var option = [];
            option.push('<div>');
            option.push(escape(item.name) + " : " + escape(item.select_1]));
            option.push('</div>');
            return option.join('');
        }
    },
    searchField : ['name', 'select_1']
}
Filtering of what options to display is done at both server and client
side (both must think it’s a suitable option in order to the option to
appear). By default Selectize is configured to search the label but in
cases when custom rendering is used you need to specify what data to
search on. This is done with the the setting searchField.
If the select statement contains special characters the returned value
will be returned with a key on with the format select_n where n is the
index of the select statement.
5.4.5. Structure Browser Tables
On the table column you can specify if you wish to use autocomplete by
setting the columntype to autocomplete. Specify which handler to use
with the element AutoCompleteHandler.
Example using autocomplete to specify the owner
<Column xmlns="http://technia.com/TVC/Table" xmlns:xsi="http://www.w3.org/2001/XMLSchema-instance"
    xsi:schemaLocation="http://technia.com/TVC/Table http://products.technia.com/tvc/schema/latest/TableColumn.xsd">
    <Name>owner</Name>
    <Label>Owner</Label>
    <Expression>owner</Expression>
    <ColumnType>autocomplete</ColumnType>
    <AutoCompleteHandler>user</AutoCompleteHandler>
</Column>
Custom settings for Selectize and handler can be specified using the
element AutoCompleteSettings. See previous chapter on available
settings.
Example with custom settings
<Column xmlns="http://technia.com/TVC/Table" xmlns:xsi="http://www.w3.org/2001/XMLSchema-instance"
    xsi:schemaLocation="http://technia.com/TVC/Table http://products.technia.com/tvc/schema/latest/TableColumn.xsd">
    <Name>owner</Name>
    <Label>Owner</Label>
    <Expression>owner</Expression>
    <ColumnType>autocomplete</ColumnType>
    <AutoCompleteHandler>user</AutoCompleteHandler>
    <AutoCompleteSettings>{
        maxItems : 1,
        delimiter : ','
    }</AutoCompleteSettings>
</Column>
Structure Browser tables only supports selecting one item (setting maxItems).
Column type: relatedobject
By default this column types has autocomplete support. Specify an
AutoCompleteHandler which supplies available values.
Using the organization handler to supply available values
<Column xmlns="http://technia.com/TVC/Table" xmlns:xsi="http://www.w3.org/2001/XMLSchema-instance"
    xsi:schemaLocation="http://technia.com/TVC/Table http://products.technia.com/tvc/schema/latest/TableColumn.xsd">
    <Name>design_organization</Name>
    <Label>RDO</Label>
    <Editable>true</Editable>
    <Setting name="Relationship" value="relationship_DesignResponsibility" />
    <Setting name="Direction" value="to" />
    <Setting name="Select" value="name" />
    <MatchRangeOnObjectId>true</MatchRangeOnObjectId>
    <ColumnType>relatedobject</ColumnType>
    <AutoCompleteHandler>organization</Setting>
    <AutoCompleteSettings>{ maxItems : 1 }</Setting>
</Column>
Using ranges for table cell as available values
<Column xmlns="http://technia.com/TVC/Table" xmlns:xsi="http://www.w3.org/2001/XMLSchema-instance"
    xsi:schemaLocation="http://technia.com/TVC/Table http://products.technia.com/tvc/schema/latest/TableColumn.xsd">
    <Name>design_organization</Name>
    <Label>RDO</Label>
    <Editable>true</Editable>
    <Setting name="Relationship" value="relationship_DesignResponsibility" />
    <Setting name="Direction" value="to" />
    <Setting name="Select" value="name" />
    <MatchRangeOnObjectId>true</MatchRangeOnObjectId>
    <ColumnType>relatedobject</ColumnType>
    <AutoCompleteHandler>ranges</Setting>
    <AutoCompleteSettings>{ maxItems : 1 }</Setting>
    <RangeHandlerClass><![CDATA[dataset:tvc:dataset:tvx:enc/Organizations.xml|$<name> : $<revision>]]></RangeHandlerClass>
</Column>
5.4.6. Top Panel
Configuring a field where users can specify types. Note that only types deriving from Part can be selected
<Field>
    <Label>Type:</Label>
    <Expression><![CDATA[$<type>]]></Expression>
    <Editable>true</Editable>
    <AutoCompleteHandler>type</AutoCompleteHandler>
    <AutoCompleteSettings>{handler : { rootTypes : 'type_Part' }}</AutoCompleteSettings>
</Field>
Field with ranges, in this case Unit of Measure
<Field>
<Label>emxEngineeringCentral.Part.UnitOfMeasure</Label>
<Expression>$<attribute[attribute_UnitofMeasure]></Expression>
<Editable>true</Editable>
<AutoCompleteHandler>ranges</AutoCompleteHandler>
<Settings>
<RegisteredSuite>EngineeringCentral</RegisteredSuite>
</Settings>
</Field>
Field using organization handler to set design organization
<Field>
    <Label>Design Organization:</Label>
    <Editable>true</Editable>
    <DataHandler>com.technia.tvc.core.gui.toppanel.form.builtin.RelatedObjectHandler</DataHandler>
    <FieldCellRenderer>com.technia.tvc.core.gui.toppanel.form.builtin.RelatedObjectRenderer</FieldCellRenderer>
    <AutoCompleteHandler>organization</AutoCompleteHandler>
    <Settings>
        <Setting name="Relationship">relationship_DesignResponsibility</Setting>
        <Setting name="Direction">to</Setting>
        <Setting name="Display Property">name</Setting>
        <Setting name="Show Type Icon">true</Setting>
        <Setting name="Show Link">true</Setting>
    </Settings>
</Field>
5.4.7. Forms
Configuring a field where users can specify types.
<TypeField>
    <Label>Type</Label>
    <DefaultValue>type_Part</DefaultValue>
    <TypePattern>type_Part</TypePattern>
    <TypePattern>type_DocumentationIssue</TypePattern>
    <TypePattern>type_HardwareIssue</TypePattern>
    <TypePattern>type_SoftwareIssue</TypePattern>
</TypeField>
Advanced example selecting additional data and custom rendering
<ConnectField>
    <Label>ECO to release</Label>
    <Relationship>
        <Name>relationship_AffectedItem</Name>
        <Direction>to</Direction>
    </Relationship>
    <SearchForm>tvc:searchconfig:tvx:enc/AddToECO.xml</SearchForm>
    <AutoComplete>true</AutoComplete>
    <AutoCompleteHandler>dataset</AutoCompleteHandler>
    <AutoCompleteSettings><![CDATA[{
           handler : {
              dataset : 'tvc:dataset:tvx:enc/ECOs.xml',
              value : 'id',
              select : ['$<name>','$<attribute[attribute_Severity]>','$<attribute[attribute_Priority]>']
           },
           labelField : 'name',
           searchField : ['name','select_2','select_3'],
           render : {
              option : function(item, escape) {
                 var option = [];
                 option.push('<div style="border-bottom:1px solid #ccc;">');
                 option.push(escape(item.name) + "<br/><b>Severity:</b> " + escape(item.select_2) + "<br/><b>Priority:</b>"+ escape(item.select_3));
                 option.push('</div>');
                 return option.join('');
              }
       }
    }]]></AutoCompleteSettings>
</ConnectField>
5.4.8. Live Examples
TVC comes bundled with examples to get a feel what the autocomplete can
accomplish. It is reached through
<app-name>/tvc/core/tvcAutoCompleteTest.jsp.
5.4.9. Custom AutoCompleteHandler
Create a custom autocomplete handler in case any of the built-it doesn’t
meet your requirements. The java class must extend
com.technia.tvc.core.gui.autocomplete.AutoCompleteHandler.The process
method in your class is invoked each time a search is performed. A
context object is passed to the method form which you can read the query
entered by the user, context object id, arguments and other things. The
method returns a Result object which contains the with the options the
user can choose from.
Example
public class ExampleHandler extends AutoCompleteHandler {
    @Override
    public Result process(Context ctx) throws TVCException {
        Result result = new Result(ctx);
        final Random r = new Random();
        final int max = 100;
        for (int i = 0; i < max; i++) {
            int value = r.nextInt(max);
            if (result.filter("Value " + value, "Text " + value)) {
                break;
            }
        }
        return result;
    }
}
5.5. Running TVC From a Standalone Application
It is possible to create a standalone Java class, that is using TVC. The
simplest approach is to extend
the com.technia.tvc.core.util.cmdline.TVCCmdlineClient as this class
will handle the basics, such as establishing context, initializing TVC
etc.
Simply create a Java class as the example below illustrates. The start method is invoked from the main method, and after the initialization, the performmethod is invoked.
package com.acme;

import com.technia.tvc.core.util.cmdline.TVCCmdlineClient;
import com.technia.tvc.core.db.MQLUtils;

public class Test extends TVCCmdlineClient {
    public Test() {
    }

    public static void main(String args[]) {
        new Test().start(args);
    }

    protected int perform(String args[]) throws Exception {
        /*
         * Prints the matrix version to the console...
         */
        System.out.println(MQLUtils.mql("version"));
    }
}
In order to execute such a class, you will need to have at least the eMatrixServletRMI.jar, the tvc-core-*.jar and the tvc.license file within the classpath. You might also need some other resources, depending on the need you have.
The below (Windows) batch script illustrates how to invoke the class. Note about the arguments required to pass on the command line, in order to establish the context and initialization of TVC.
set CP=.;eMatrixServletRMI.jar;tvc-core-6.3.0.jar
set class="com".acme.Test
java -classpath %CP% %CLASS% -host=rmi://127.0.0.1:10800 -user=creator -pass=xyz
Following arguments can be defined:
The batch script above assumes that you have both the tvc.license file as well as the required JAR files within the current directory.
5.5.1. Call JPO From a Standalone Application
If you need to invoke a JPO from a command line application, this can simply be done as the example below illustrates.
set CP=.;eMatrixServletRMI.jar;tvc-core-6.3.0.jar
set class="com".technia.tvc.core.util.cmdline.JPOExecutor
set JPO_NAME=My JPO
set JPO_METHOD=mxMain
java -classpath %CP% %CLASS% -host=rmi://127.0.0.1:10800 -user=creator -pass=xyz "-jpo=%JPO_NAME%" -method=%METHOD%
5.5.2. Execute a MQL Statement From a Standalone Application
If you need to execute a single MQL statement from a command line application, this can simply be done as the example below illustrates.
set CP=.;eMatrixServletRMI.jar;tvc-core-6.3.0.jar
set class="com".technia.tvc.core.util.cmdline.RunMQL
set MQL=list vault
java -classpath %CP% %CLASS% -host=rmi://127.0.0.1:10800 -user=creator -pass=xyz "-mql=%MQL%"
6. Structure Browser
6.1. Data Handler
6.1.1. Data Handler Overview
The data in a TableBean, is retrieved by an Evaluator from the database during the evaluation process (also referred to as thevalidation process).
The evaluation process refers to the process when selecting the information on all the objects and relationships within the table, as defined through the select statements defined by all the columns, e.g. the data handlers, within the table.
The purpose with the Data Handler concept, is to provide a powerful but simple mechanism to integrate with the more complex evaluation logic. The evaluation logic has to deal with several issues, which a Data Handler does not to have to consider. Also, not to forget, one additional and very important aspect; the Data Handler concept is performing much better than, for example, a JPO program does. See this section for a deeper discussion regarding performance.
A Data Handler is mainly responsible for three things, namely:
-
Inform the evaluator what select statements it needs
-
Create the Cell, which will hold the selected data
-
Populate the cell with data, which the evaluator has retrieved from the database
Moreover, a Data Handler can also influence how the new value that the user entered in in-cell editing for a particular cell is stored in the database. It is also the Data Handlers responsibility to evaluate whether a user will have edit access to a cell, granted that the column is editable.
A column in a system table can have a custom Data Handler registered. If no custom datahandler is defined, the default Data Handler will be used. E.g. all columns in a table has a datahandler, either explicitly defined or implicit.
6.1.2. When is a Data Handler Needed?
A Data Handler is needed when any of the following criteria is true.
-
You need to select more information from a business object or relationship than you can by using a standard expression as defined in the table-column.
When defining an expression in a table-column, only one expression could be defined.
-
You need to select information from both the relationship and the business object. For example, the relationship contains the quantity value and the business object contains the unit of measure. Then you can use a datahandler to retrieve both these values.
-
You need to perform some calculation/processing of the data retrieved. For example, if you have an attribute containing a temperature value and the value is stored as Celsius; then the datahandler could be used to convert it to Fahrenheit.
-
You need to attach special logic, needed for being able to support in-cell-editing of the value(s) in the cell.
-
If you currently have a JPO in a table column, and want to increase performance.
6.1.3. Data Formatting
Another reason why you should use Data Handlers instead of JPOs is that you gain much more control over the cells in the column. With a JPO you can only produce cells containing pure text or HTML. With a Data Handler you have full control over the data type of each cell.
A datahandler should only retrieve and store the data it gets from the evaluator. It should never store any additional formatting instructions, such as HTML, in the table cells as it has several drawbacks, such as:
-
The data can only be presented correctly in a HTML page. Hence, you will not be able to produce printable pages in PDF or exportable data; as the formatting instructions will break the presentation of the cell value in any other format than HTML.
-
You are not able to distinguish the actual data from the formatting instructions, hence editing the cell value is not possible.
-
You will not be able to use the chart function, and possible other built-in functions, as these functions would then not work as expected as the cells contains formatting data.
-
The formatting instructions will consume unnecessary memory, as the size of the formatting instructions might be high.
If you need to perform formatting of the data, adding mark-up tags etc., you should combine using the DataHandler with a Table Cell Renderer.
By doing so, you can from your Data Handler create a cell that holds all the necessary data you need for the presentation, and let the Table Cell Renderer format the data when the table is rendered.
This allows you to format the data in one way on the HTML page and in another way on the exported page or printer friendly page.
6.1.4. Data Handler Performance
As many of you already know you can use Java Program Objects (JPOs) that resides inside the Matrix database to produce content in table columns. However, there are problems with this approach that can be solved through the use of Data Handlers.
The most important problem that Data Handlers aim to solve is performance. The general rule is that for performance reasons you should always make as few queries as possible into the database to get the information that your program need. This rule is painfully true when it comes to producing content in table columns.
Any JPO will have to make at least one or two queries to get the information that that particular JPO needs. Hence, the more JPOs you add to a table, the more queries will be made into the database. (There are JPOs that make a lot more than one or two queries into the database to get the information that it needs to produce content in just one table column, this behavior must be avoided at all cost since it will scale poorly resulting in disastrous performance). Data Handlers are designed in a way that all information that is required for the entire table will be selected in at most two queries.
There are other performance reasons for not using JPOs, such as the horrible serialization and de-serialization of arguments and return values that happens whenever a JPO is invoked.
Also, keep in mind that if you have a table containing several columns that uses JPOs, there is a big risk that each of these JPOs are selecting the same information as a previous JPO did (for example, type, name, revision, current and possibly other selectables). There is no way to streamline the database calls, as each JPO call is an atomic operation unaware of eachother.
If the data required for a column can’t be fetched using standard select statements, for example you need to perform some calculation based upon information deeper in the structure; such as different roll-up calculations. You should not implement such a logic inside a table; as this would require additional database calls, such as expands or similar.
6.1.5. Table Bean
Data, such as business objects lists, can be stored inside classes that
implements the com.technia.tvc.core.table.FlatTableBean interface.
Structured data, e.g. business objects with connections to each other,
are typically stored inside classes that implements
the com.technia.tvc.core.table.StructureBean interface. Both these
interfaces inherits from the same root interface,
namely com.technia.tvc.core.table.TableBean.
Each row in a TableBean is represented by
a com.technia.tvc.core.table.TableData instance. In the case when a
StructureBean is used, the actual TableData instance is an instance of
a com.technia.tvc.core.structure.StructureBeanNode (which is a subclass
to TableData).
The TableData in turn, contains a reference to
its com.technia.tvc.core.gui.table.Row, which normally has at least
one com.technia.tvc.core.gui.table.Cell attached. The cells are created
when a system table has been evaluated over the set of
objects/relationships, which the TableBean contains.
Each Cell can have several values, where each value is represented as
a com.technia.tvc.core.gui.table.CellValue. In most situations, a Cell
contains only one CellValue, however, when a Cell contains values
selected from related object(s); depending on the number of related
objects, the corresponding amount of CellValues will be created.
For example, selecting from[EBOM].to.name on a business object will
return the names of all objects connected via the EBOM relationship.
Hence, the cell will contain one CellValue for each name returned.
The CellValue itself should, if the cell allows editing and is editable,
be able to update the value to the database. The default CellValue
implementations within TVC dispatches the update call to an
com.technia.tvc.core.db.table.evaluator.Updater, which performs the
update. Actually, the default updater being used is
the com.technia.tvc.core.db.table.evaluator.DefaultUpdater instance.
6.1.6. Data Handler Basics
Registration of a Data Handler
A Data Handler is a registered on a table column, by defining a setting
with name Data Handler Class, whose value must be the fully
qualified name of the Java class to be used for the particular column.
If you have defined your table in XML format, then you can register the Data Handler like this example:
<Table>
    <Column>
        ....
        <DataHandlerClass>com.company.MyDataHandler</DataHandlerClass>
    </Column>
</Table>
Important Information Regarding Data Handler
TVC will only create one instance of every Data Handler class being used. Thus, if many table columns define that they use the same Data Handler class they will also use the same Data Handler instance. A side effect of this is that you must not under any circumstances save state within the Data Handler instance during an evaluation or between evaluations (e.g., as instance fields), since it is shared by all threads and all users.
By saying this, you should now know that you never should use or rely
upon instance variables inside a datahandler. All fields within a Data
Handler should, be seen as being final, regardless if they have been
marked so or not.
How the Data Handler Works
A Data Handler is a regular Java class that implements
the com.technia.tvc.core.db.table.evaluator.DataHandler interface from
TVC Core. This interface defines three methods that you are required to
implement.
The methods are:
void prepareEvaluation(Column column, EvaluationInput input);

Cell createCell(Column column, EvaluatedData data);

void populateCell(Cell cell, EvaluatedData data);
These methods are invoked on the Data Handlers by TVC whenever a table is being evaluated.
The following picture illustrates the interaction between a Data Handler and the Evaluator within TVC.

|
Even though you are able to perform additional database calls, such as invoking JPO’s or performing other kind of database queries, within any of the methods in a Data Handler, you should never do so. If doing so, you will completely miss the whole idea of using Data Handler as the performance will be bad and the approach will scale very poorly. |
Please note that when you are creating your own data handler, most of
the column settings as described in the Administration Guide for
Structure Browser will not affect the cell’s at all, since those
column settings are mainly affecting the way
the com.technia.tvc.core.db.table.evaluator.DefaultDataHandler works.
However, you are of course able to sub-class the Default Data Handler, or handle those settings you need in your own datahandler. Look at this document for information how to do so.
Preparing the Evaluation
The first method that is invoked on the Data Handler is
theprepareEvaluation method. This method is invoked once per evaluation
before any data is queried from the database. In this method a Data
Handler will define what information it needs from the database. You can
do that, by using methods on
the com.technia.tvc.core.db.table.evaluator.EvaluationInput object.
The following example illustrates how to define selectables on both business objects and relationships.
...
public void prepareEvaluation(Column column EvaluationInput input) {
    input.addSelectBus("attribute[Unit of Measure]");
    input.addSelectRel("attribute[Quantity]");
    //Path selectables as <PathType>~<PathDirection>~<Expression>~<Selectable>
    input.addSelectPath("Proposed Activity.Where~owner~to[Proposed Activities].from.to[Change Action].from~name");
     //add Path selectables by using alternate element Physical Id as <PathType>~<PathDirection>~<Expression>~<Selectable>|<AlternatePhysicalIDExpression>
    input.addSelectPath("Proposed Activity.Where~owner~to[Proposed Activities].from.to[Change Action].from~name|to[Part Specification].from.physicalid");
}
...
When the Evaluator has invoked the prepareEvaluation method on all Data Handlers in the table being evaluated it will collect all select statements defined and query the database to retrieve the desired information.
Even if several columns are using the same select expression(s), you should always add all select expressions that you need in the prepareEvaluation method. E.g. you should not skip that just because a previous datahandler in the table also will add them. This is important as a user might hide a table column, and if that has been done, all columns are not evaluated, hence this might lead into runtime problems, which are hard to troubleshoot.
For simplicity, the example code above does not take advantage of using symbolic names when defining the selectables. This will be described later.
If the same Data Handler class has been associated with more than one column in the same table, then the prepareEvaluation method will be invoked once per column.
Create Cell
The next method that TVC will invoke on a Data Handler is createCell.
The purpose of this method is simply to create an instance of a class
that implements the com.technia.tvc.core.gui.table.Cell interface. You
can return an instance of a Cell class that you have created yourself,
just as long as it implements the Cell interface properly. However, the
different Cell implementations that comes with TVC will probably satisfy
your requirements most of the time.
The following list show the current Cell implementations available in TVC
The following examples illustrates how the createCell method might be implemented.
/**
 * 1: Create a string-cell, without any edit capabilities
 */
public Cell createCell(Column column, EvaluatedData data) {
    return new StringCell(column, null);
}
/**
 * 2: Create a string-cell, with the default updater
 */
public Cell createCell(Column column, EvaluatedData data) {
    return new StringCell(column, DefaultUpdater.INSTANCE);
}
/**
 * 3: Create a date-cell, with the default updater
 */
public Cell createCell(Column column, EvaluatedData data) {
    return new DateCell(column, DefaultUpdater.INSTANCE);
}
/**
 * 4: Creates a int-cell, with the default updater
 */
public Cell createCell(Column column, EvaluatedData data) {
    return new IntCell(column, DefaultUpdater.INSTANCE);
}
As mentioned earlier, a Data Handler can also define the behaviour how a
value within a cell is updated. When using the default Cell
implementations described above, you can supply
a com.technia.tvc.core.db.table.evaluator.Updater as second argument
(you can also supply null here, if not allowing updates at all). You can
either use the com.technia.tvc.core.db.table.evaluator.DefaultUpdater or
create your own variant, which would be able to allow modifications of
fields, which the default updater is unable to handle.
Furthermore, the createCell method will be invoked once per cell being evaluated in the column (or columns) that the Data Handler is associated with. However, if a cell is being re-evaluated (such as when the user clicks the reload button on the table in Structure Browser) TVC might choose to re-use the cell object that was created on a prior evaluation for that particular row and column, hence, this method is not guaranteed to be called upon each table evaluation.
Populate Cell
The last method that is invoked is populateCell. The purpose of this method is to add values to the Cell object that createCellreturned. Also this method is invoked once per cell being evaluated in the column (or columns) that the Data Handler is associated with. On most occasions a cell will only display a single value, but it is possible to display multiple values in a single cell if you are required to do so (e.g., when displaying the name - or some other property - of business objects connected with the business object on a particular row). Cell values are added with the addValue method on the Cell object.
Example code that will populate the cell with values as selected from the database.
public void populateCell(Cell cell, EvaluatedData data) {
    cell.setEditable(false); // disallow edit for all cells...
    SelectedData objectData = data.getObjectData();
    SelectedData relData = data.getRelationshipData();
    //to get path data
    SelectData pathSelect = cell.getColumn().usesBusinessObject() ? data.getPathData() : data.getRelPathData();
    if (relData != null && objectData != null) {
        String qty = relData.getSelectValue("attribute[Quantity]");
        String uom = objectData.getSelectValue("attribute[Unit of Measure]");
        if (qty != null && uom != null) {
            cell.addValue(qty + " " + uom);
        }
    }
}
Summary
As mentioned earlier, a Data Handler uses select statements to retrieve information from the business objects and/or relationships in a table. The prepareEvaluation method is invoked to query the Data Handlers what select statements should be selected. Here are a few examples of such select statements.
-
name
-
current
-
current.actual
-
description
-
attribute[ATTRIBUTE_NAME]
-
from[RELATIONSHIP_NAME].to.name
-
to[RELATIONSHIP_NAME].from[TYPE_NAME].attribute[ATTRIBUTE_NAME]
Example: A table has three columns. The first column has a DataHandler called A, the second column has a DataHandler called B, etc. When the table is being evaluated, TVC will ask all three Data Handlers what select statements should be selected.
After the select statements have been collected, TVC will select all select statements in at most two calls to the database (one call for select statements that should be selected on business objects and one call for select statements that should be selected on relationships).
Lets assume that Data Handler A adds the business object select
statements name and current, B adds the select statement
modified, and C adds the select statements current and
attribute[Quantity]. After TVC has invoked prepareEvaluationon all
three Data Handlers it will have the following list of business object
select statements:
-
name
-
current
-
attribute[Quantity]
-
modified
Notice that although current was added by two Data Handlers (A and
C) it will only be selected once. The next thing TVC does is to select
these four select statements on the business objects in the table, using
only one call to the database (in the ever ongoing struggle to achieve
the best possible performance in your code limiting the number of
database calls is usually the best approach).
When TVC has selected the information it will continue by invokingcreateCell and populateCell on the Data Handlers. This is where the Data Handlers process the information that was selected to create Cell instances and populate them with values. Hence, these methods will be invoked once per row being evaluated. E.g., if 100 rows are being evaluated createCell will be called 100 times on DataHandler A, 100 times on DataHandler B, and 100 times on DataHandler C. The same goes for the populateCellmethod.
When creating Cells there are a few built in Cell implementations to choose among, e.g., StringCell, DateCell, IntCell, RealCell, BooleanCell. While these implementations will handle most use cases there might come times when you have to implement your own Cell implementation, such as when the Cell needs to hold more complex data structures. Data structures that a custom CellRenderer then will display appropriately on the web page or in an export.
Also note that if a cell should have edit capabilities the DataHandler is required to assign an Updater to the cell when creating it. The Updater is responsible for saving the new values into the database. A DataHandler also has the responsibility to check if a certain user should have access to edit a Cell (e.g., checking if the user has modify access on the business object). The user will of course not be able to successfully edit a cell he/she doesn’t have proper access rights for in Matrix. I.e., TVC will not override Matrix access. The reason why a DataHandler should check if a user has access to edit a cell is only so that the cell will be rendered as an editable field when the table is shown in edit mode. If the user should have access to edit a Cell the DataHandler must call the setEditable(boolean) method on the Cell.
6.1.7. The Default Data Handler
The Default Data Handler can be extended, in order to reuse logic that is implementing and considering many of the standard settings that can be applied to a column. For example, support for:
-
Alternate OID Expression
-
Alternate Type Expression
-
Usage of Rules
-
Cell Editable Expression
-
Cell Showable Expression
-
Determining Edit access to objects/relationships
-
Handling the data type and creates corresponding Cell implementation
Override prepareEvaluation
You can override the prepareEvaluation method in order to add more selectables. However, do not forget to call the super class implementation of this method. Example:
public void prepareEvaluation(Column column, EvaluationInput input) {
    super.prepareEvaluation(column, input);

    // add more selectables...
    input.addSelectBus(...);
    input.addSelectRel(...);
    //add Path selectables as <PathType>~<PathDirection>~<Expression>~<Selectable>
    input.addSelectPath("Proposed Activity.Where~owner~to[Proposed Activities].from.to[Change Action].from~name");
}
Override createCell
If you want to create another Cell than what is created by default, you can override the createCellImpl method to return the appropriate Cell instance. The code below illustrates what happens in the DefaultDataHandler implementation:
protected Cell createCellImpl(Column col, EvaluatedData data, int dataType) {
    Updater updater = getUpdater();
    switch (dataType) {
        case AttributeConstants.TYPE_STRING:
            return new LocalizedCell(col, updater);
        case AttributeConstants.TYPE_INT:
            return new IntCell(col, updater);
        case AttributeConstants.TYPE_REAL:
            return new RealCell(col, updater);
        case AttributeConstants.TYPE_DATETIME:
            return new DateCell(col, updater);
        case AttributeConstants.TYPE_BOOL:
            return new BooleanCell(col, updater);
        case AttributeConstants.TYPE_UNKNOWN:
            if (col.getSettings().isColumnTypeProgramHTMLOutput()
                    || col.getSettings().isColumnTypeImage()) {
                return new HtmlCell(col);
            }
            return new UnknownCell(col, updater);
        default:
            throw new IllegalArgumentException("unknown type: " + dataType);
    }
}
Override populateCell
You should not override the populateCell method directly, instead, you should override one of the methods below:
-
protected void populateImpl(Cell cell, EvaluatedData data)
-
protected void internalAddCellValues(Cell cell, Iterator cellValues, Iterator alternateOids, Iterator alternateTypes)
The first method, populateImpl, is collecting some additional selected values such as alternate oid and type values before invoking the internalAddCellValues. In case you need to handle the alternate oid/type values, you should override the latter method; otherwise you can preferably override the first method. Example:
protected void populateImpl(Cell cell, EvaluatedData data) {
    // logic goes here...
}
6.1.8. Updater
The com.technia.tvc.core.db.table.evaluator.Updater is responsible for
updating a value into the database. The value could typically be stored
inside an attribute on the business object or relationship, or it could
be something else; for example the description, owner, another basic
property or possible information stored somewhere else (such as
information stored on a related object).
There is a default implementation of the Updater being used normally in TVC, which is capable of handling the following expressions:
-
Business Object Expressions
-
attribute[Attribute Name]
-
attribute[Attribute Name].value
-
description
-
owner
-
name
-
-
Relationship Expressions
-
attribute[Attribute Name]
-
attribute[Attribute Name].value
-
type
-
Moreover, if the column has been assigned an Update Program and
Update Function, such a JPO will be invoked instead when to perform
the update. In this case, it is up to the JPO to determine what kind of
expressions that are supported. However, due to performance issues,
please consider implementing the update logic inside a
custom Updater instead of implementing it in a JPO.
An Updater is, as mentioned, responsible for updating a value into the database. The updater should return a boolean indicating whether or not the update were successfully made, or in case of serious problems, throwing an exception of type TVCException.
Creating a Custom Updater
If the com.technia.tvc.core.db.table.evaluator.DefaultUpdater does not
support editing of the data you have in the cell, you might need to
implement a custom updater to allow so.
The source code below illustrates a template of how a custom updater could be implemented.
import com.technia.tvc.core.TVCException;
import com.technia.tvc.core.db.aef.env.Environment;
import com.technia.tvc.core.db.table.evaluator.Updater;
import com.technia.tvc.core.gui.table.CellValue;
import com.technia.tvc.core.gui.table.Column;
import com.technia.tvc.core.gui.table.Row;
import com.technia.tvc.core.gui.table.TableClient;

public class MyUpdater implements Updater {

    /**
     * The singleton instance.
     */
    public static final Updater INSTANCE = new MyUpdater();

    private MyUpdater() {}

    public boolean updateCellValue(TableClient.Entry entry,
                                   CellValue cellValue,
                                   String newValue,
                                   Environment env) throws TVCException {
        Row row = cellValue.getCell().getRow();
        Column column = cellValue.getCell().getColumn();
        String oldValue = cellValue.getValue();
        String objectId = cellValue.getObjectId();
        if (objectId == null) {
            objectId = row.getObjectId();
        }
        String relationshipId = cellValue.getRelationshipId();
        if (relationshipId == null) {
            relationshipId = row.getRelationshipId();
        }

        // PERFORM UPDATE LOGIC HERE...

        return true;
    }
}
Code Examples
This document shows a couple of different implementations of Data Handlers.
Example 1 - Combining Selected Values
This example selects the Quantity value from the relationship and the Unit of Measure from the business object. These values are concatenated, and added to the Cell.
import com.technia.tvc.core.TVCException;
import com.technia.tvc.core.db.aef.AEFUtils;
import com.technia.tvc.core.db.aef.macro.ParsedStatement;
import com.technia.tvc.core.db.aef.naming.Naming;
import com.technia.tvc.core.db.table.evaluator.DataHandler;
import com.technia.tvc.core.db.table.evaluator.EvaluatedData;
import com.technia.tvc.core.db.table.evaluator.EvaluationInput;
import com.technia.tvc.core.db.table.evaluator.SelectedData;
import com.technia.tvc.core.gui.table.Cell;
import com.technia.tvc.core.gui.table.Column;
import com.technia.tvc.core.gui.table.impl.StringCell;

import java.util.Locale;

public class QtyAndUnitHandler implements DataHandler {

    private static final ParsedStatement qty = new ParsedStatement(
            "$<attribute[attribute_Quantity].value>");

    private static final ParsedStatement uom = new ParsedStatement(
            "$<attribute[attribute_UnitofMeasure].value>");

    public void prepareEvaluation(Column column, EvaluationInput input) {
        input.addSelectRel(qty.get());
        input.addSelectBus(uom.get());
    }

    public Cell createCell(Column column, EvaluatedData data) {
        return new StringCell(column, null);
    }

    public void populateCell(Cell cell, EvaluatedData data) {
        /*
         * Get the quantity and unit value
         */
        SelectedData selectedData = data.getRelationshipData();
        if (selectedData != null) {
            String quantity = selectedData.getSelectValue(qty.get());
            String unit = getLocalizedUOM(data.getObjectData()
                    .getSelectValue(uom.get()), data.getEnv().getLocale());
            if (quantity != null && unit != null) {
                StringBuffer sb = new StringBuffer();
                sb.append(quantity);
                if (quantity.endsWith(".") || quantity.endsWith(",")) {
                    sb.append("0");
                } else if (quantity.length() == 0) {
                    sb.append("0.0");
                }
                sb.append(" ").append(unit);
                cell.addValue(sb.toString());
            }
        }
    }

    private static String getLocalizedUOM(String unit, Locale locale) {
        try {
            /*
             * Returns the localized value of the Unit of Measure
             * attribute. The localized value is picked up from the
             * emxFrameworkStringResources.properties files.
             */
            String localized = AEFUtils.getLocalizedRangeName(
                    Naming.resolve("attribute_UnitofMeasure"),
                    unit,
                    locale);
            if (localized != null) {
                return localized;
            }
        } catch (TVCException e) {
        }
        return unit;
    }
}
Comments to the classes used in the code example above.
Example 2 - Usage of Custom Settings
This example is showing how to use custom settings on the column to
configure the behavior of a Data Handler. This Data Handler will for
each state defined in the policy either show the actual or
the scheduled date. By using the setting Show Scheduled, you can
change between showing either the actual or scheduled date.
import com.technia.tvc.core.TVCException;
import com.technia.tvc.core.db.DateUtils;
import com.technia.tvc.core.db.aef.AEFUtils;
import com.technia.tvc.core.db.model.PolicyInfo;
import com.technia.tvc.core.db.table.evaluator.DataHandler;
import com.technia.tvc.core.db.table.evaluator.EvaluatedData;
import com.technia.tvc.core.db.table.evaluator.EvaluationInput;
import com.technia.tvc.core.db.table.evaluator.SelectedData;
import com.technia.tvc.core.gui.table.Cell;
import com.technia.tvc.core.gui.table.Column;
import com.technia.tvc.core.gui.table.ColumnSettings;
import com.technia.tvc.core.gui.table.impl.StringCell;
import com.technia.tvc.core.util.StringUtils;

import java.util.Locale;
import java.util.List;

public class StateDateHandler implements DataHandler {
    private static final String SHOW_SCHEDULED = "Show Scheduled";

    public void prepareEvaluation(Column column, EvaluationInput input) {
        /*
         * Depending on if we are showing scheduled or actual,
         * different select expressions are needed.
         */
        if (getShowScheduled(column)) {
            input.addSelectBus("state.scheduled");
        } else {
            input.addSelectBus("state.actual");
        }
    }

    public Cell createCell(Column column, EvaluatedData data) {
        return new StringCell(column);
    }

    public void populateCell(Cell cell, EvaluatedData data) {
        SelectedData objectData = data.getObjectData();
        if (objectData != null) {
            try {
                String selectSuffix = getShowScheduled(cell.getColumn()) ?
                        "scheduled" : "actual";
                PolicyInfo policy = PolicyInfo.getInstance(data.getObjectPolicy());
                List stateNames = policy.getStateNames();
                Locale locale = data.getEnv().getLocale();
                StringBuffer s = new StringBuffer();
                for (int i=0; i<stateNames.size(); i++) {
                    String stateName = (String) stateNames.get(i);
                    String localizedStateName =
                        getLocalizedStateName(policy.getName(),
                                stateName, locale);
                    String actualDate = objectData.getSelectValue("state["
                            + stateName
                            + "]."
                            + selectSuffix);
                    s.setLength(0);
                    s.append(localizedStateName);
                    s.append(": ");
                    if (StringUtils.isOnlyWhitespaceOrEmpty(actualDate)) {
                        /*
                         * Append the N/A string to indicate that the date is
                         * not set.
                         */
                        s.append("N/A");
                    } else {
                        /*
                         * Format the date retrieved according to the user locale
                         */
                        s.append(DateUtils.formatForDisplay(actualDate, locale));
                    }
                    cell.addValue(s.toString());
                }
            } catch(TVCException ignore) {
            }
        }
    }

    private static String getLocalizedStateName(String policy,
                                                String state,
                                                Locale locale) {
        /*
         * Returns the localized state name
         */
        String localized = AEFUtils
            .getLocalizedStateName(policy, state, locale);
        if (localized != null) {
            return localized;
        }
        return state;
    }

    protected boolean getShowScheduled(Column column) {
        ColumnSettings settings = column.getSettings();
        return settings.getSetting(SHOW_SCHEDULED, false);
    }
}
Comments to the classes used in the code example above.
The screenshot below shows a table containing the same Data Handler in two different columns. One that shows the actual date and one showing the scheduled date.
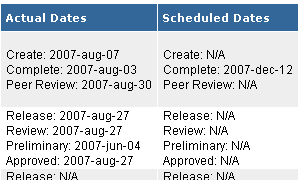
Example 3 - Combination of Data Handler / Cell Renderer and Custom Updater
In Example 2, you saw how to build a Data Handler that were able to display either the actual or the scheduled dates. This data handler only retrieved these values and presented them for the user. A slightly more advanced scenario, would occur if the user wants to, for example, edit the scheduled dates.
In a real world example, one would probably not want to open up the possibility to edit the actual dates. However, in order to support modifying the scheduled dates, we have to extend the example 2 a bit.
First of all, you need a way to support modifying these special dates. As the Default Updater is not able to modify scheduled dates, one need to implement an Updater that can do so. Moreover, in the user interface, you will typically need to add date-pickers for each state to be scheduled.
We will then need three things in place to accomplish this:
-
A Data Handler, similar to as we wrote in example 2
-
An Updater, which is capable of setting scheduled dates
-
A Cell Renderer. The Cell Renderer is responsible for creating the GUI.
Starting with the Data Handler, the source code for it will look like this:
import com.technia.tvc.core.TVCException;
import com.technia.tvc.core.db.DateUtils;
import com.technia.tvc.core.db.MQLUtils;
import com.technia.tvc.core.db.aef.env.Environment;
import com.technia.tvc.core.db.model.PolicyInfo;
import com.technia.tvc.core.db.table.evaluator.DataHandler;
import com.technia.tvc.core.db.table.evaluator.EvaluatedData;
import com.technia.tvc.core.db.table.evaluator.EvaluationInput;
import com.technia.tvc.core.db.table.evaluator.SelectedData;
import com.technia.tvc.core.db.table.evaluator.Updater;
import com.technia.tvc.core.gui.table.Cell;
import com.technia.tvc.core.gui.table.CellValue;
import com.technia.tvc.core.gui.table.Column;
import com.technia.tvc.core.gui.table.TableClient.Entry;
import com.technia.tvc.core.gui.table.impl.DateCell;
import com.technia.tvc.core.util.StringUtils;

import java.util.Date;
import java.util.List;

public class StateDateHandler implements DataHandler {
    public static final String SHOW_SCHEDULED = "Show Scheduled";

    /**
     * The Updater is created inline
     */
    private static final Updater SCHEDULED_DATE_UPDATER = new Updater() {
        public boolean updateCellValue(Entry entry,
                                       CellValue cellValue,
                                       String newValue,
                                       Environment env) throws TVCException {
            /*
             * Cast the CellValue to get the state-name.
             */
            StateInfoCell.StateInfoCellValue v =
                (StateInfoCell.StateInfoCellValue) cellValue;
            setDate(entry.getObjectId(), v.getStateName(), newValue);
            return true;
        }
        private void setDate(String objectId,
                             String state,
                             String date) throws TVCException {
            /*
             * Build the MQL command required for modifying the date.
             */
            StringBuffer mql = new StringBuffer();
            mql.append("escape modify businessobject ");
            mql.append(objectId);
            mql.append(" state \"");
            mql.append(MQLUtils.escapeString(state));
            mql.append("\" schedule \"");
            mql.append(date);
            mql.append("\"");

            /*
             * Perform the MQL command
             */
            MQLUtils.mql(mql.toString());
        }
    };

    /**
     * We need a special Cell implementation, which in addition
     * to holding the date values, also will hold the state names.
     */
    public static class StateInfoCell extends DateCell {
        private boolean scheduled;

        public StateInfoCell(Column column, boolean scheduled) {
            super(column, scheduled?SCHEDULED_DATE_UPDATER:null);
            this.scheduled = scheduled;
        }

        public boolean isScheduledDate() {
            return scheduled;
        }

        public void add(String state, Date date) {
            add(new StateInfoCellValue(state, date));
        }

        protected class StateInfoCellValue extends DateCellValue {
            private String stateName;
            private Date date;

            protected StateInfoCellValue(String stateName, Date date) {
                super(stateName, null, null, null);
                this.stateName = stateName;
                this.date = date;
            }

            public String getDisplayValue() {
                return date != null ? DateUtils.formatForDisplay(date,
                        getCell().getColumn().getLocale()) : null;
            }

            public String getValue() {
                return date!=null?DateUtils.format(date):null;
            }

            public String getStateName() {
                return stateName;
            }

            public Date getDateValue() {
                return date;
            }
        }
    }

    public void prepareEvaluation(Column column, EvaluationInput input) {
        if (getShowScheduled(column)) {
            input.addSelectBus("state.scheduled");
        } else {
            input.addSelectBus("state.actual");
        }
    }

    public Cell createCell(Column column, EvaluatedData data) {
        boolean scheduled = getShowScheduled(column);
        StateInfoCell cell = new StateInfoCell(column, scheduled);
        if (scheduled && cell.getColumn().getSettings().isEditable()) {
            /*
             * Set editable if we are handling scheduled dates, the column
             * is defined to be editable and the user has schedule-access.
             */
            cell.setEditable(data.getObjectAccessMask().hasScheduleAccess());
        } else {
            cell.setEditable(false);
        }
        return cell;
    }

    public void populateCell(Cell cell, EvaluatedData data) {
        StateInfoCell si = (StateInfoCell) cell;
        SelectedData objectData = data.getObjectData();
        if (objectData != null) {
            try {
                PolicyInfo policy = PolicyInfo.getInstance(data.getObjectPolicy());
                List stateNames = policy.getStateNames();
                Date date;
                String dateStr;
                String stateName;
                for (int i=0; i<stateNames.size(); i++) {
                    stateName = (String) stateNames.get(i);
                    if (si.isScheduledDate()) {
                        dateStr = objectData.getSelectValue("state["
                                + stateName
                                + "].scheduled");
                    } else {
                        dateStr = objectData.getSelectValue("state["
                                + stateName
                                + "].actual");
                    }
                    if (!StringUtils.isOnlyWhitespaceOrEmpty(dateStr)) {
                        date = DateUtils.parse(dateStr);
                    } else {
                        date = null;
                    }
                    si.add(stateName, date);
                }
            } catch(TVCException ignore) {
            }
        }
    }

    protected boolean getShowScheduled(Column column) {
        return column.getSettings().getSetting(SHOW_SCHEDULED, false);
    }
}
Explanation of the code above:
Starting with the Updater declared inline; This updater builds up a MQL command based upon the entered value and it will get the name of the state from the actual CellValue instance.
The StateInfoCell is a custom Cell implementation, derived from the
standard DateCell. The purpose of this cell, is to add the ability to
store the name of the state, in addition to the scheduled or actual date
for this state. The name of the state is needed when to modify the
value.
Compare this to how the second example were implemented, where the state
name and the date were concatenated into a string.
The Data Handler implementation itself is almost similar to as in example 2. Some differences though:
So far, we have a Data Handler that is creating StateInfoCellcells, and
allows updating the scheduled dates. If you would use this Data Handler
in a table, you will simply see the dates and in edit mode, the
scheduled dates would be shown as date input fields. However, we would
only see the dates, and not the state names. What we need to do as a
last step, is to create a Cell Renderer, which in addition to simply
showing the dates also would show the names of the states.
Even if this chapter is not about how to write a Cell Renderer, this
example would not be complete if not showing how such a Cell Renderer
could be written. However, the details about Cell Renderer could be
found in this document
The Cell Renderer source code that completes this example is shown below.
import com.technia.tvc.core.db.aef.AEFUtils;
import com.technia.tvc.core.gui.table.Row;
import com.technia.tvc.core.html.io.HtmlWriter;

import com.technia.tvc.structurebrowser.examples.StateDateHandler.StateInfoCell;
import com.technia.tvc.structurebrowser.examples.StateDateHandler.StateInfoCell.StateInfoCellValue;
import com.technia.tvc.structurebrowser.render.cell.TableCellRenderContext;
import com.technia.tvc.structurebrowser.render.cell.TableCellRenderer;

import java.util.Locale;

public class StateDateCellRenderer extends TableCellRenderer {
    public void renderCell(TableCellRenderContext rc) {
        StateInfoCell cell = (StateInfoCell) rc.getCell();
        int valueCount = cell.getValueCount();
        if (valueCount < 1) {
            return;
        }
        boolean editable = rc.isEdit() && cell.isEditable();
        HtmlWriter writer = rc.getHtmlWriter();
        if (valueCount > 1) {
            writer.startElement("table")
                .addAttribute("cellpadding", 1)
                .addAttribute("cellspacing", 0);
        } else if (writer.isElementActive("td")) {
            writer.addAttribute("nowrap");
        }
        boolean currentStateOrLater = false;
        for (int i = 0; i < valueCount; i++) {
            if (valueCount > 1) {
                writer.startElement("tr")
                    .startElement("td")
                    .addAttribute("align","right")
                    .addAttribute("nowrap");
            }
            StateInfoCellValue cv = (StateInfoCellValue) cell.getValueAt(i);
            Row row = rc.getTableData().getRow();
            if (row.getObjectState().equals(cv.getStateName())) {
                currentStateOrLater = true;
                writer.startElement("b");
                writer.addText(getStateName(row.getObjectPolicy(),
                        cv.getStateName(), rc.getLocale()));
                writer.endElement("b");
            } else {
                writer.addText(getStateName(row.getObjectPolicy(),
                        cv.getStateName(), rc.getLocale()));
            }
            if (valueCount > 1) {
                writer.endElement("td");
                writer.startElement("td");
                writer.addAttribute("nowrap");
            }
            if (currentStateOrLater && editable) {
                /*
                 * Use the toolkit to render the date picker.
                 */
                rc.getToolkit().renderDatePicker(rc, cv, null);
            } else {
                /*
                 * In edit mode, simply render the value as it is.
                 */
                writer.addText(cv.getDisplayValue());
            }
            if (valueCount > 1) {
                writer.endElement("td").endElement("tr");
            }
        }
        if (valueCount > 1) {
            writer.endElement("table");
        }
    }

    private String getStateName(String policy, String state, Locale locale) {
        String l = AEFUtils.getLocalizedStateName(policy, state, locale);
        if (l != null) {
            return l;
        }
        return state;
    }
}
Without going to deep in the details of how to implement a Cell Renderer, as this is out of scope for this document, you can in the code example above get a feeling for how a custom Cell Renderer can be used to work with custom Cells that has been created through a Data Handler
The screenshot below shows the final result of assigning a table column with the Data Handler and Cell Renderer from this example.
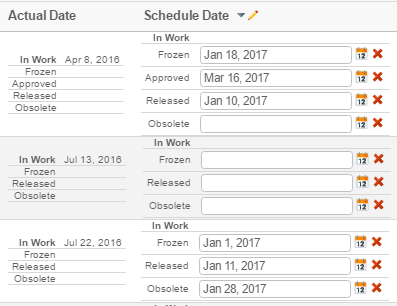
6.2. Cell Renderer
A Cell Renderer is responsible for rendering data within a table (i.e., cell values and column headers) into various formats. For example, whenever a table in Structure Browser is viewed on the web page, printed or exported the Cell Renderers assigned to the columns within that table decide how the columns look and feel.
Moreover, a Cell Renderer presents you with the possibility to render each cell differently depending on where (in what context) it is being rendered. For example, a Cell Renderer might choose to render a cell as: an image on the web page in view mode; a dropdown in edit mode; and text in CVS, PDF and HTML exports.
Each column in a table can have its own Cell Renderer assigned to it. If you don’t explicitly define that a Cell Renderer will be used for a particular column, TVC will automatically use the default Cell Renderer for that column.
6.2.1. When should you use a Cell Renderer?
You should use a Cell Renderer whenever you want to customize how a column (cell values or header) look and feel, either on the Structure Browser web page, in an export or both.
Before Cell Renderers became part of the TVC toolbox, the only way that you could customize how a cell looked was by creating cells that contained HTML markup. While the HTML within these cells displayed nicely when viewed on the Structure Browser web page, it did perhaps not display as nicely when exported or printed. To create cells that contained HTML you had to use your own Data Handler (or JPO), and while Data Handlers are perfect for retrieving information from the database they are rather poor at creating a suitable view of that information in all formats supported by Structure Browser (which is the main reason why Cell Renderers was introduced).
Thus, Cell Renderers will not replace Data Handlers. You use a Data Handler to customize how to get data from the database into the table, while you use a Cell Renderer to customize how that data is presented to the users of your application.
We highly recommend that you create Cell Renderers to customize the appearance of a cell rather than creating cells that contain HTML.
6.2.2. Cell Renderer Basics
A Cell Renderer is a Java class that extends a class in TVC called com.technia.tvc.structurebrowser.render.cell.TableCellRenderer.
package mycellrenderers;

import com.technia.tvc.structurebrowser.render.cell.TableCellRenderer;

public class MyCellRenderer extends TableCellRenderer {}
Within your Cell Renderer you may override methods from TableCellRenderer to customize the rendering or exporting process. There are many methods that you can override, each method has it’s own purpose, but you don’t need to override all of them. How many and which methods you decide to override is completely up to you. Here is a list of the methods that you can override.
How to register a Cell Renderer
You register a Cell Renderer on a table column by defining a setting with the name Cell Renderer Class, whose value must be the fully qualified name of the Java class of the Cell Renderer that you want to use.
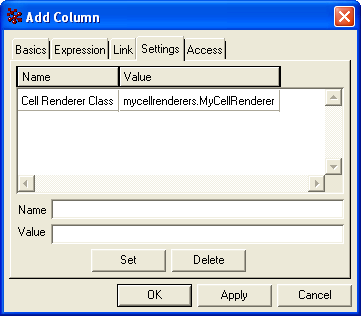
Similarly, if you have defined your table in the TVC XML format you register the Cell Renderer as follows:
<Table>
    <Column>
        ....
        <CellRendererClass>mycellrenderers.MyCellRenderer</CellRendererClass>
    </Column>
</Table>
6.2.3. Cell Rendering
How to customize rendering
There are four different methods within com.technia.tvc.structurebrowser.render.cell.TableCellRenderer that you may override to customize the rendering of a column. In addition to these there are two methods that you may override to include resources (e.g., javascripts, stylesheets) required for a column. The following sections will go through each of these methods in detail.
To each of these methods TVC will send an object that provides
contextual information and services to the Cell Renderer. For example,
the Cell Renderer may use this object to determine whether the table is
rendered: in view or edit mode; as a search result page; as a printer
friendly page; as a build structure target or source table; within a
channel on a portal page; and more. The Cell Renderer may also use this
object to gain access to the data that it is supposed to render (such as
the com.technia.tvc.core.gui.Cell or
the com.technia.tvc.core.gui.Column), or to gain access to the
com.technia.tvc.core.html.io.HtmlWriter to which all the HTML should be
written, or to gain access to other objects (such as the
HttpServletRequest)
and services (such
as com.technia.tvc.structurebrowser.render.TableRenderToolkit).
All non-absolute URLs within the HTML that a Cell Renderer produces will be relative from the common directory in the web application
(if the AEF is present, otherwise the URLs will be relative from the tvc directory).
Render table cell content
The renderCell method is called by TVC to render the cell values (within the column that the Cell Renderer has been assigned to) in view mode as well as edit mode, and to create a printer friendly page.
To this method TVC sends an object that implements the
com.technia.tvc.structurebrowser.render.cell.TableCellRenderContext interface.
Among other things, the Cell Renderer may use this object to gain access
to the Cell that is being rendered. The following code is a simple
example of how you may structure the code in your Cell Renderer to
render the cell differently in edit, view or printer friendly mode.
package mycellrenderers;

import com.technia.tvc.core.gui.table.Cell;
import com.technia.tvc.core.html.io.HtmlWriter;
import com.technia.tvc.structurebrowser.render.TableRenderToolkit;
import com.technia.tvc.structurebrowser.render.cell.TableCellRenderer;
import com.technia.tvc.structurebrowser.render.cell.TableCellRenderContext;

public class MyCellRenderer extends TableCellRenderer {
    public void renderCell(TableCellRenderContext rc) {

        // Get the cell that will be rendered
        Cell cell = rc.getCell();

        // Get the HtmlWriter to which we will write all the HTML
        HtmlWriter writer = rc.getHtmlWriter();

        // Get the toolkit that contains many useful methods
        TableRenderToolkit tk = rc.getToolkit();

        // Check how and where the table is being rendered
        if (rc.isEdit() && cell.isEditable()) {
            // TODO: render cell in edit mode
        } else if (rc.isPrinterFriendly()) {
            // TODO: render cell in printer friendly mode
        } else {
            // TODO: normal rendering
        }
    }
}
Render in-cell editing enabled fields
To render a cell in edit mode (with in-cell editing capabilities) we
encourage you to use one of the methods in
com.technia.tvc.structurebrowser.render.TableRenderToolkit to do the
actual rendering. The following methods are available to render an
editable field.
-
renderComboBox
-
renderDatePicker
-
renderTextArea
-
renderTextField
The following example uses the renderTextField method to render a regular text field in edit mode.
package mycellrenderers;

import java.util.Iterator;
import com.technia.tvc.core.gui.table.Cell;
import com.technia.tvc.core.gui.table.CellValue;
import com.technia.tvc.core.html.io.HtmlWriter;
import com.technia.tvc.structurebrowser.render.TableRenderToolkit;
import com.technia.tvc.structurebrowser.render.cell.TableCellRenderer;
import com.technia.tvc.structurebrowser.render.cell.TableCellRenderContext;
import com.technia.tvc.structurebrowser.render.cell.InputFieldType;

public class MyCellRenderer extends TableCellRenderer {
    public void renderCell(TableCellRenderContext rc) {
        Cell cell = rc.getCell();
        HtmlWriter writer = rc.getHtmlWriter();
        TableRenderToolkit tk = rc.getToolkit();
        if (rc.isEdit() && cell.isEditable()) {

            // Get all cell values
            Iterator i = cell.getValues();

            // Create a style for the input field (optional)
            InputFieldStyle style = new InputFieldStyle();
            style.setInputWidthInPixels(80);

            // For each cell value...
            while (i.hasNext()) {
                CellValue value = (CellValue) i.next();

                // ...render an editable text field
                tk.renderTextField(rc, value, InputFieldType.TEXT, style);
            }
        } else if (rc.isPrinterFriendly()) {
            // TODO: render cell in printer friendly mode
        } else {
            // TODO: normal rendering
        }
    }
}
Render clickable links
If you want to render a link in the cell that opens the href that has been specified on the corresponding column we encourage you to use the getURLForCell method in TableRenderToolkit that returns a URL for this purpose. You may use the value that is returned from this method as the value of the href attribute on an anchor tag.
package mycellrenderers;

import java.util.Iterator;
import com.technia.tvc.core.gui.table.Cell;
import com.technia.tvc.core.gui.table.CellValue;
import com.technia.tvc.core.html.io.HtmlWriter;
import com.technia.tvc.structurebrowser.render.TableRenderToolkit;
import com.technia.tvc.structurebrowser.render.cell.TableCellRenderer;
import com.technia.tvc.structurebrowser.render.cell.TableCellRenderContext;

public class MyCellRenderer extends TableCellRenderer {
    public void renderCell(TableCellRenderContext rc) {
        Cell cell = rc.getCell();
        HtmlWriter writer = rc.getHtmlWriter();
        TableRenderToolkit tk = rc.getToolkit();
        if (rc.isEdit() && cell.isEditable()) {
            // TODO: render cell in edit mode
        } else if (rc.isPrinterFriendly()) {
            // TODO: render cell in printer friendly mode
        } else {

            // Get all cell values
            Iterator i = cell.getValues();

            // For each cell value...
            while (i.hasNext()) {
                CellValue value = (CellValue) i.next();

                // ...get the URL...
                String url = tk.getURLForCell(rc, value);

                // ...and the display value...
                String displayValue = value.getDisplayValue();

                // ...and finally render the value as a clickable link
                writer.startElement("a")
                    .addAttribute("href", url)
                    .addText(displayValue)
                    .endElement("a");
            }
        }
    }
}
Render type icons
If you want to render a type icon in a cell you have two different methods in TableRenderToolkit to choose between, that each will return the URL to a type icon image. You may use the URLs returned from these methods as the value of the src attribute on image tags.
-
getIconURLForCell
-
getTypeIconURL
The method getIconURLForCell returns the type icon URL for the object represented in a particular cell (or cell value). Note that if the you have specified the Alternate Type Expression setting correctly on the column, the URL to the type icon of the type retrieved with this expression will be returned, otherwise the type icon URL for the type of the object represented on the row (in which the cell belongs) will be returned.
If you need more flexibility when rendering a type icon you may use the method getTypeIconURL, which will return the icon URL for the type that you pass to the method as its second argument.
package mycellrenderers;

import java.util.Iterator;
import com.technia.tvc.core.gui.table.Cell;
import com.technia.tvc.core.gui.table.CellValue;
import com.technia.tvc.core.html.io.HtmlWriter;
import com.technia.tvc.structurebrowser.render.TableRenderToolkit;
import com.technia.tvc.structurebrowser.render.cell.TableCellRenderer;
import com.technia.tvc.structurebrowser.render.cell.TableCellRenderContext;

public class MyCellRenderer extends TableCellRenderer {
    public void renderCell(TableCellRenderContext rc) {
        Cell cell = rc.getCell();
        HtmlWriter writer = rc.getHtmlWriter();
        TableRenderToolkit tk = rc.getToolkit();
        if (rc.isEdit() && cell.isEditable()) {
            // TODO: render cell in edit mode
        } else if (rc.isPrinterFriendly()) {
            // TODO: render cell in printer friendly mode
        } else {

            // Get all values on this cell
            Iterator i = cell.getValues();

            // For each cell value...
            while (i.hasNext()) {
                CellValue value = (CellValue) i.next();

                // ...get the type icon URL...
                String url = tk.getIconURLForCell(rc, value);

                // ...and the display value...
                String displayValue = value.getDisplayValue();

                // ...and finally render the image followed by the value
                writer.startElement("img")
                    .addAttribute("src", url)
                    .addText(" ") // add space between icon and value
                    .addText(displayValue);
            }
        }
    }
}
Render table headers
The renderHeader method is called by TVC to render the header of a
column. As headers can be quite sophisticated (e.g., clickable label to
change the sorting of the column, indicator that shows if and in what
direction the column is sorted, mass update link) we encourage you to
use one of the helper methods in
com.technia.tvc.structurebrowser.render.TableRenderToolkit to do the
actual rendering. Here is a list of the available helper methods.
-
renderHeader
-
renderHeaderHTML
-
renderHeaderImage
To the renderHeader method TVC sends an object that implements the
com.technia.tvc.structurebrowser.render.cell.TableCellHeaderRenderContext interface.
From this object the Cell Renderer may gain access to the Column that is
being rendered.
package mycellrenderers;

import com.technia.tvc.core.gui.table.Column;
import com.technia.tvc.structurebrowser.render.TableRenderToolkit;
import com.technia.tvc.structurebrowser.render.cell.HeaderSpec;
import com.technia.tvc.structurebrowser.render.cell.TableCellRenderer;
import com.technia.tvc.structurebrowser.render.cell.TableCellHeaderRenderContext;

public class MyCellRenderer extends TableCellRenderer {
    public void renderHeader(TableCellHeaderRenderContext rc) {

        // Get the column being rendered
        Column column = rc.getColumn();

        // Get the toolkit that contains many useful methods
        TableRenderToolkit tk = rc.getToolkit();

        // TODO: render the header
    }
}
Render headers with a different background color
To render a header with a different background color you can create an
object of the class
com.technia.tvc.structurebrowser.render.cell.HeaderSpec and pass it to
one of the helper methods on TableRenderToolkit. This object allows you
to customize a few things about the header, such as the background
color, the font color, whether the font should be italic or not, etc.
package mycellrenderers;

import com.technia.tvc.core.gui.table.Column;
import com.technia.tvc.structurebrowser.render.TableRenderToolkit;
import com.technia.tvc.structurebrowser.render.cell.HeaderSpec;
import com.technia.tvc.structurebrowser.render.cell.TableCellRenderer;
import com.technia.tvc.structurebrowser.render.cell.TableCellHeaderRenderContext;

public class MyCellRenderer extends TableCellRenderer {
    public void renderHeader(TableCellHeaderRenderContext rc) {
        Column column = rc.getColumn();
        TableRenderToolkit tk = rc.getToolkit();

        // Create a HeaderSpec instance
        HeaderSpec spec = new HeaderSpec();

        // Set the background color
        spec.setBackgroundColor("#00e");

        // Get the label from the column
        String label = column.getLabel();

        // Render the header with the specified background color
        tk.renderHeader(rc, label, spec);
    }
}
Render headers with an image instead of text
If you want to render a column header that contains an image instead of the normal text label you may use the renderHeaderImage method, which allows you to specify the URL to an image on the server. Note that all non-absolute URLs will be relative from the common directory in the web application (if the AEF is present, otherwise the URLs will be relative from the tvc directory).
package mycellrenderers;

import com.technia.tvc.core.gui.table.Column;
import com.technia.tvc.structurebrowser.render.TableRenderToolkit;
import com.technia.tvc.structurebrowser.render.cell.TableCellRenderer;
import com.technia.tvc.structurebrowser.render.cell.TableCellHeaderRenderContext;

public class MyCellRenderer extends TableCellRenderer {
    public void renderHeader(TableCellHeaderRenderContext rc) {
        Column column = rc.getColumn();
        TableRenderToolkit tk = rc.getToolkit();

        // Render the header as an image
        tk.renderHeaderImage(rc, "images/iconColHeadStatus.gif", null);
    }
}
Render mass update field
If you customize the rendering of a cell in edit mode you may sometimes also want to customize how it is rendered as a mass update field. A mass update field is the field that is displayed in the Structure Browser side panel when a user clicks on the mass update link in the header of a column that has enabled mass updates.
To customize the rendering of a mass update field you may override the renderMassUpdateField method. TVC calls this method on the Cell Renderer assigned to the column that the user has selected for mass update.
As when rendering a cell in edit mode with in-cell editing enabled fields, we encourage you to use one of the helper methods in file:///C:/TVC/devdocs/build/TVCDeveloperDocumentation/apidocs/com/technia/tvc/structurebrowser/render/TableRenderToolkit.html[TableRenderToolkit] to do the actual rendering of a mass update field. The following methods are available to render a mass update field.
-
renderComboBox
-
renderDatePicker
-
renderTextArea
-
renderTextField
package mycellrenderers;

import com.technia.tvc.core.gui.table.Column;
import com.technia.tvc.structurebrowser.render.TableRenderToolkit;
import com.technia.tvc.structurebrowser.render.cell.InputFieldType;
import com.technia.tvc.structurebrowser.render.cell.TableCellRenderer;
import com.technia.tvc.structurebrowser.render.cell.MassUpdateRenderContext;

public class MyCellRenderer extends TableCellRenderer {
    public void renderMassUpdateField(MassUpdateRenderContext rc) {

        // Get the column being rendered
        Column column = rc.getColumn();

        // Get the toolkit that contains many useful methods
        TableRenderToolkit tk = rc.getToolkit();

        // Render the mass update field
        tk.renderTextField(rc, InputFieldType.TEXT, null);
    }
}
Render popup cell values
The popup cell value refers to the cell value that is shown in the kind of popup that is displayed when you click on a more-link. To customize how this value is rendered you override a method in your Cell Renderer that is called renderPopupCellValue.
The more-link is rendered by the default Cell Renderer if the text inside a cell value is longer than the maximum allowed number of characters (which is defined as a setting on the column). If you click on this more-link the full (non-truncated) cell value is displayed in a popup
Thus, if you create your own Cell Renderer and want to support this behavior you might want to consider overriding the renderPopupCellValue method to customize how the cell value is rendered in the popup. Moreover, if you override renderCell and don’t invoke the default rendering of the cell (by calling renderCell on the superclass (i.e., TableCellRenderer), or by calling renderCellDefault on TableRenderToolkit), you will also have to render the more-link that opens the popup.
| Although the popup cell value is currently only used in association with the more-link functionality, you may use the popup cell value for other purposes as you wish. |
package mycellrenderers;

import com.technia.tvc.core.gui.table.CellValue;
import com.technia.tvc.structurebrowser.render.TableRenderToolkit;
import com.technia.tvc.structurebrowser.render.cell.TableCellRenderer;
import com.technia.tvc.structurebrowser.render.cell.PopupCellValueRenderContext;

public class MyCellRenderer extends TableCellRenderer {
    public void renderPopupCellValue(PopupCellValueRenderContext rc) {

        // Get the cell value
        CellValue value = rc.getCellValue();

        // Get the HtmlWriter to which we will write all the HTML
        HtmlWriter writer = rc.getHtmlWriter();

        // Render the popup cell value
        writer.addText(value.getDisplayValue());
    }
}
To render a link in renderCell that opens the popup cell value when clicked you are encouraged to use the getPopupURLForCell method in TableRenderToolkit. The URL that this method returns may be used as the value of the href attribute on an anchor tag.
When you render a popup cell value you can't rely on that any resources (e.g., javascripts, stylesheets) that you include on the page (by
overriding getResources) are available.
How to include resources
When you render a cell, column header or a mass update field you may use resources that you include on the web page. For example, the generated HTML might reference a style class inside a Cascading Style Sheet, or you might need to run some custom javascript function.
There are two methods that you may override inside a Cell Renderer that allows you to include this kind of resources on the generated web page.
-
getResources
-
getMassUpdateResources
These methods are quite similar, apart from the important difference that getResources allows you to include resources that you may use when rendering cell content or column headers, while getMassUpdateResources allows you to include resources that you may use when rendering the mass update field only.
package mycellrenderers;

import com.technia.tvc.core.gui.resource.Resource;
import com.technia.tvc.structurebrowser.render.cell.TableCellRenderer;
import com.technia.tvc.structurebrowser.render.cell.TableCellResourceContext;
import com.technia.tvc.structurebrowser.render.cell.MassUpdateResourceContext;

public class MyCellRenderer extends TableCellRenderer {
    public Resource[] getResources(TableCellResourceContext rc) {
        // TODO: return resources for cell content and header
        return null;
    }

    public Resource[] getMassUpdateResources(MassUpdateResourceContext rc) {
        // TODO: return resources for mass update field
        return null;
    }
}
Types of resources
The methods that include resources each return an array of
com.technia.tvc.structurebrowser.render.resource.Resource instances.
Resource itself is an abstract class (i.e., you can’t create any
instances of it), but there are a few available subclasses that you may
instantiate. These are:
-
com.technia.tvc.core.gui.AjaxService
-
com.technia.tvc.core.gui.resource.JavaScript
-
com.technia.tvc.core.gui.resource.JavaScriptRef
-
com.technia.tvc.core.gui.resource.StyleSheet
-
com.technia.tvc.core.gui.resource.StyleSheetRef
JavaScript and StyleSheet allows you to include a javascript or stylesheet that you define directly in the Java code (as java.lang.String instances). JavaScriptRef and StyleSheetRef allows you to include javascript or stylesheet files on the server (the URLs should be relative from the common directory in the web application if AEF is present). Lastly, AjaxService allows you to include client side javascripts required to invoke an Ajax service.
All resource subclasses except AjaxService has constructors that allows you to specify whether that resource should be included if the client browser is Internet Explorer, Mozilla or Google Chrome, or all (AjaxService resources are always supported on Internet Explorer, Mozilla and Google Chrome). This allows you to create javascripts or stylesheets that are browser dependent.
package mycellrenderers;

import com.technia.tvc.core.gui.resource.Resource;
import com.technia.tvc.core.gui.resource.JavaScriptRef;
import com.technia.tvc.core.gui.resource.StyleScriptRef;
import com.technia.tvc.core.gui.cell.TableCellRenderer;
import com.technia.tvc.core.gui.cell.TableCellResourceContext;

public class MyCellRenderer extends TableCellRenderer {

    // Create a static Resource array
    private static final Resource[] resources = new Resource[] { new JavaScriptRef("../acme/tableFunctions.js"), new StyleSheetRef("../acme/tableStyles.css"), new StyleSheetRef("../acme/tableStyles_Moz.css", false, true) };

    public Resource[] getResources(TableCellResourceContext rc) {
        // Return the resources
        return resources;
    }
}
6.2.4. Exporting
A Cell Renderer in Structure Browser supports four different export modes, and for each export mode there are two methods within the Cell Renderer that you can override. This means that there are a total of eight methods that you can override to customize how a cell is exported. The export modes are:
-
PDF
-
HTML
-
Text (CSV)
-
XML
Export to PDF
The PDF export mode is used when you create a printer friendly page in form of a PDF. To customize how the cell is exported into PDF you may override the following methods:
-
exportCell(com.technia.tvc.structurebrowser.render.cell.PDFExportCellContext)
-
exportHeader(com.technia.tvc.structurebrowser.render.cell.PDFExportCellHeaderContext)
package mycellrenderers;

import com.technia.tvc.core.gui.table.Cell;
import com.technia.tvc.core.gui.table.Column;
import com.technia.tvc.structurebrowser.render.PDFTableWriter;
import com.technia.tvc.structurebrowser.render.cell.TableCellRenderer;
import com.technia.tvc.structurebrowser.render.cell.PDFExportCellContext;
import com.technia.tvc.structurebrowser.render.cell.PDFExportCellHeaderContext;

public class MyCellRenderer extends TableCellRenderer {
    public void exportCell(PDFExportCellContext rc) {

        // Get the cell that will be rendered
        Cell cell = rc.getCell();

        // Get the PDFTableWriter that we use to export the cell to PDF
        PDFTableWriter writer = rc.getWriter();

        // TODO: export cell using addCell
    }

    public void exportHeader(PDFExportCellHeaderContext rc) {

        // Get the column that will be rendered
        Column column = rc.getColumn();

        // Get the PDFTableWriter that we use to export the header to PDF
        PDFTableWriter writer = rc.getWriter();

        // TODO: export header using addColumn
    }
}
To each of these methods TVC sends an object that allows you to access
information that your Cell Renderer requires for exporting a cell or a
header into PDF. For example, when you export a cell you will be able to
access the com.technia.tvc.core.gui.table.Cell object from
com.technia.tvc.structurebrowser.render.cell.PDFExportCellContext.
Similarly, when you export a column header you can get access to
the com.technia.tvc.core.gui.table.Column object from
the PDFExportCellHeaderContext.
To write content to the PDF document TVC supplies you with
a com.technia.tvc.structurebrowser.render.PDFTableWriter, which is a
specialized class aimed solely at exporting TVC tables to PDF documents.
For example, when you export the content of a cell you should use one of
the addCell methods that it provides.
-
addCell(String)
-
addCell(String,Color)
-
addCell(String[])
-
addCell(String[],int,boolean,PDFFontSpec[])
-
addCell(String[],int,boolean,PDFFontSpec[],Color)
package mycellrenderers;

import com.technia.tvc.core.gui.table.Cell;
import com.technia.tvc.structurebrowser.render.PDFTableWriter;
import com.technia.tvc.structurebrowser.render.cell.TableCellRenderer;
import com.technia.tvc.structurebrowser.render.cell.PDFExportCellContext;

public class MyCellRenderer extends TableCellRenderer {
    public void exportCell(PDFExportCellContext rc) {
        Cell cell = rc.getCell();
        PDFTableWriter writer = rc.getWriter();

        // Get the number of values in the cell
        int length = cell.getValueCount();

        // Create a string array that will hold the cell values
        String[] content = new String[length];

        // For each cell value...
        for (int i = 0; i < length; i++) {

            // ...set the display value in the array
            content[i] = cell.getValueAt(i).getDisplayValue();
        }

        // Add the cell to the PDF document
        writer.addCell(content);
    }
}
Similarly, when you export a column you should use one of
the addColumn methods that
the com.technia.tvc.structurebrowser.render.PDFTableWriter provides.
-
addColumn(String)
-
addColumn(String,PDFFontSpec,Color,int,boolean)
package mycellrenderers;

import com.technia.tvc.core.gui.table.Column;
import com.technia.tvc.structurebrowser.render.PDFTableWriter;
import com.technia.tvc.structurebrowser.render.cell.TableCellRenderer;
import com.technia.tvc.structurebrowser.render.cell.PDFExportCellHeaderContext;

public class MyCellRenderer extends TableCellRenderer {
    public void exportHeader(PDFExportCellHeaderContext rc) {
        Column column = rc.getColumn();
        PDFTableWriter writer = rc.getWriter();

        // Add the column to the PDF document
        writer.addColumn(column.getLabel());
    }
}
Export to HTML
The HTML export mode is used for the normal table export function (if the export settings define that HTML should be used) and also when you create a printer friendly page for Excel.
The HTML document that is created when you export the table in this mode is intended for Microsoft Excel. Please take into consideration that Microsoft Excel doesn’t always render HTML in the same way that you expect a regular Internet browser to render it. For example, the amount of colors that can be rendered in Microsoft Excel are far less than the amount that Internet Explorer can handle.
To customize how the cell is exported into HTML you may override the following methods:
-
exportCell(HTMLExportCellContext)
-
exportHeader(HTMLExportCellHeaderContext)
package mycellrenderers;

import com.technia.tvc.core.gui.table.Cell;
import com.technia.tvc.core.gui.table.Column;
import com.technia.tvc.core.html.io.HtmlWriter;
import com.technia.tvc.structurebrowser.render.cell.TableCellRenderer;
import com.technia.tvc.structurebrowser.render.cell.HTMLExportCellContext;
import com.technia.tvc.structurebrowser.render.cell.HTMLExportCellHeaderContext;

public class MyCellRenderer extends TableCellRenderer {
    public void exportCell(HTMLExportCellContext rc) {

        // Get the cell that will be rendered
        Cell cell = rc.getCell();

        // Get the HtmlWriter to which the cell will be exported
        HtmlWriter writer = rc.getWriter();

        // TODO: export cell
    }

    public void exportHeader(HTMLExportCellHeaderContext rc) {

        // Get the column that will be rendered
        Column column = rc.getColumn();

        // Get the HtmlWriter to which the column will be exported
        HtmlWriter writer = rc.getWriter();

        // TODO: export header
    }
}
To export the cell or column into HTML your Cell Renderer writes the HTML markup to the HtmlWriter very much in the same was as when you render the cell (in view mode) or column. Though sometimes the way that you normally render a cell isn’t suitable in an HTML export, considering that the exported document is opened in Microsoft Excel, with the result that links might be broken or that the colors might look different.
Export to Text (CSV)
The Text export mode is for creating text or CSV (Comma Separated Values) files. To customize how the cell is exported into text or CSV you may override the following methods:
-
exportCell(TextExportCellContext)
-
exportHeader(TextExportCellHeaderContext)
package mycellrenderers;

import com.technia.tvc.core.gui.table.Cell;
import com.technia.tvc.core.gui.table.Column;
import com.technia.tvc.structurebrowser.render.TextExportWriter;
import com.technia.tvc.structurebrowser.render.cell.TableCellRenderer;
import com.technia.tvc.structurebrowser.render.cell.TextExportCellContext;
import com.technia.tvc.structurebrowser.render.cell.TextExportCellHeaderContext;

public class MyCellRenderer extends TableCellRenderer {
    public void exportCell(TextExportCellContext rc) {

        // Get the cell that will be rendered
        Cell cell = rc.getCell();

        // Get the TextExportWriter to which the cell will be exported
        TextExportWriter writer = rc.getWriter();

        // TODO: export cell
    }

    public void exportHeader(TextExportCellHeaderContext rc) {

        // Get the column that will be rendered
        Column column = rc.getColumn();

        // Get the TextExportWriter to which the column will be exported
        TextExportWriter writer = rc.getWriter();

        // TODO: export header
    }
}
The com.technia.tvc.structurebrowser.render.TextExportWriter object that
TVC supplies when exporting to text or CSV, is a specialized writer to
which Cell Renderers export the content of a cell or the header of a
column. Use the writeText method that the writer provides to write text
to the text or CSV file.
package mycellrenderers;

import java.util.Iterator;
import com.technia.tvc.core.gui.table.Cell;
import com.technia.tvc.core.gui.table.Column;
import com.technia.tvc.structurebrowser.render.TextExportWriter;
import com.technia.tvc.structurebrowser.render.cell.TableCellRenderer;
import com.technia.tvc.structurebrowser.render.cell.TextExportCellContext;
import com.technia.tvc.structurebrowser.render.cell.TextExportCellHeaderContext;

public class MyCellRenderer extends TableCellRenderer {
    public void exportCell(TextExportCellContext rc) {
        Cell cell = rc.getCell();
        TextExportWriter writer = rc.getWriter();

        // Get all cell values
        Iterator i = cell.getValues();

        // For each cell value...
        while (i.hasNext()) {
            CellValue value = (CellValue) i.next();

            // ...write the display value...
            writer.writeText(value.getDisplayValue());

            // ...and a separator if there are more values to come
            if (i.hasNext()) {
                writer.writeText(", ");
            }
        }
    }

    public void exportHeader(TextExportCellHeaderContext rc) {
        Column column = rc.getColumn();
        TextExportWriter writer = rc.getWriter();

        // Write the column label
        writer.writeText(column.getLabel());
    }
}
Export to XML
The XML export mode is not used at all by default. However, there is a setting that you can define so that users will be able to select XML as export format for TVC table pages. If you know that you don’t support the XML export mode there is no need to customize how it’s handled. But if you do want to customize how a cell or column header is exported to XML you can override the following methods:
-
exportCell(XMLExportCellContext)
-
exportHeader(XMLExportCellHeaderContext)
package mycellrenderers;

import com.technia.tvc.core.gui.table.Cell;
import com.technia.tvc.core.gui.table.Column;
import com.technia.tvc.core.html.io.XMLWriter;
import com.technia.tvc.structurebrowser.render.cell.TableCellRenderer;
import com.technia.tvc.structurebrowser.render.cell.XMLExportCellContext;
import com.technia.tvc.structurebrowser.render.cell.XMLExportCellHeaderContext;

public class MyCellRenderer extends TableCellRenderer {
    public void exportCell(XMLExportCellContext rc) {

        // Get the cell that will be rendered
        Cell cell = rc.getCell();

        // Get the XMLWriter to which the cell will be exported
        XMLWriter writer = rc.getWriter();

        // TODO: export cell
    }

    public void exportHeader(XMLExportCellHeaderContext rc) {

        // Get the column that will be rendered
        Column column = rc.getColumn();

        // Get the XMLWriter to which the column will be exported
        XMLWriter writer = rc.getWriter();

        // TODO: export header
    }
}
6.3. SVG Rendering
A SVG Renderer can be used to render table data in a more appealing way when fit. SVG is part of the HTML 5 specification and is a good way to define dynamic images through xml. SVG supports CSS and JavaScript and most browsers do as well.
To leverage SVG rendering you need to create a class that implements the
com.technia.tvc.structurebrowser.render.display.svg.SVGRenderer interface
OR
if you need to dynamically return SVG Renderers create a class that
extends the com.technia.tvc.structurebrowser.render.display.svg.SVGTableRenderer
class
6.3.1. Registration
To use a SVG Renderer, you need to either configure the attribute TVC
Display Mode on the view, or if you prefer XML definitions a SVG
Renderer is registered like the example below:
<DisplayMode>svg:com.mycompany.MySVGRenderer</DisplayMode>
6.3.2. Examples
This section shows SVG Renderer examples such as implementing your own SVG Renderer.
Example 1 - SVG Renderer
Use the init function to register events such as on mouse over
The SVG function must return a point carrying the size of the resulting SVG image
Use the rendering context to render simple entities or to get the xml writer for complex rendering
package com.technia.tvx;

import com.technia.tvc.core.gui.resource.JavaScriptRef;
import com.technia.tvc.core.gui.resource.Resource;
import com.technia.tvc.core.gui.resource.StyleSheetRef;
import com.technia.tvc.core.table.TableBean;
import com.technia.tvc.core.table.TableData;
import com.technia.tvc.core.table.TableUtils;

import com.technia.tvc.structurebrowser.render.TableResourceContext;
import com.technia.tvc.structurebrowser.render.display.svg.SVGRenderContext;
import com.technia.tvc.structurebrowser.render.display.svg.SVGRenderer;

import com.technia.tvc.commons.collections15.IteratorUtils;

import java.awt.Point;
import java.util.Arrays;
import java.util.Collection;
import java.util.List;

public class MySVGRenderer implements SVGRenderer {
    public String getInitFunction(TableResourceContext ctx) {
        // Return the name of the Java Script function to execute on
        // initialization
        return "myInitFunction";
    }

    public Collection<Resource> getSVGViewResources(TableResourceContext ctx) {
        // Include JavaScript or StyleSheet resources
        return Arrays.asList(new Resource[]
            { new JavaScriptRef("../mysvgpath/custom.js"),
             new StyleSheetRef("../mysvgpath/custom.css") });
    }

    public Point svg(SVGRenderContext ctx) {

        // Get table bean
        TableBean t = ctx.getTableBean();

        // Get table data
        List td = IteratorUtils.toList(ctx.getTableBean().getTableData());
        int i = 0;
        for (; i < td.size(); i++) {
            TableData d = (TableData) td.get(i);
            // Get value from select data
            String myValue = TableUtils.getStringValue(t, d, "MyColumn");
            // Render SVG
            ctx.getWriter().renderText(new Point(10, (i + 1) * 10), myValue, "myClass", 0);
        }

        // Return image size
        return new Point(400, (i + 2) * 10);
    }
}
Example 2 - Abstract SVG Renderer
If there is no interest in defining custom resources there is an abstract svg renderer that can be extended
import com.technia.tvc.structurebrowser.render.display.svg.AbstractSVGRenderer;
import com.technia.tvc.structurebrowser.render.display.svg.SVGRenderContext;

import java.awt.Point;

public class MyAbstractSVGRenderer extends AbstractSVGRenderer {

    public Point svg(SVGRenderContext ctx) {
        ctx.getWriter().renderCircle(new Point(200, 200), "myClass", 150);
        return new Point(400, 400);
    }

}
6.3.3. SVG Table Renderer
This section shows a SVG Table Renderer example
Example 3 - SVG Table Renderer
Return svg renderer based upon bean type, select data or other
import com.technia.tvc.core.structure.AbstractStructureBean;
import com.technia.tvc.core.table.FlatTableBean;
import com.technia.tvc.core.table.TableBean;

import com.technia.tvc.structurebrowser.render.display.svg.SVGRenderer;
import com.technia.tvc.structurebrowser.render.display.svg.SVGTableRenderer;

public class MySVGTableRenderer extends SVGTableRenderer {

    @Override
    public SVGRenderer getRenderer(TableBean<?> t) {
        if (t instanceof FlatTableBean) {
            return new MySVGRenderer();
        } else if (t instanceof AbstractStructureBean) {
            return new MyAbstractSVGRenderer();
        }
        return null;
    }
}
6.4. Range Handler
A range handler can be used to provide custom range values to a column. Default, TVC will take the range values as defined on an attribute, however, in some cases these range values are not defined or there is a need to override those range values.
To do so, you need to create a class that implements the
com.technia.tvc.core.gui.table.RangeHandler interface.
6.4.1. Registration
To use a range handler, you need to either configure the setting Range
Handler Class on the column, or if you are using a Data Handler, you
can let the Data Handler itself implement the
interface com.technia.tvc.core.gui.table.RangeHandler.
If you are using XML table definitions, a range handler is registered like the example below:
<Table>
    ...
    <Column>
        <RangeHandlerClass>com.acme.MyRangeHandler</RangeHandlerClass>
        ...
    </Column>
</Table>
6.4.2. Examples
Example 1 - Basic Example
This example creates a range handler with some values that are mapped to an integer number
import com.technia.tvc.core.TVCException;
import com.technia.tvc.core.db.aef.env.Environment;
import com.technia.tvc.core.gui.table.Column;
import com.technia.tvc.core.gui.table.RangeHandler;
import com.technia.tvc.core.gui.table.RangeValue;

import java.util.ArrayList;
import java.util.List;

public class SampleRangeHandler implements RangeHandler {

    public List getRangeValues(Environment env, Column column) throws TVCException {
        int count = IntRangeValue.options.length;
        List l = new ArrayList(count);
        for (int i = 0; i < count; i++) {
            l.add(new IntRangeValue(i));
        }
        return l;
    }

    private static class IntRangeValue implements RangeValue {
        private static final String[] options = {
            "Undefined",
            "Very Low",
            "Low",
            "Medium",
            "High",
            "Very High"
        };

        private final int i;

        public IntRangeValue(int i) {
            this.i = i;
        }

        public String getDisplayValue() {
            return options[i];
        }

        public String getValue() {
            return Integer.toString(i);
        }

        public int compareTo(Object o) {
            return ((IntRangeValue)o).i-i;
        }
    }
}
6.5. Entry Processor
An entry processor is involved during the evaluation of a table, similar to a data handler. The difference between an entry processor and a datahandler, is that a data handler is working with columns while the entry processor is working with the rows.
The entry processor will, before the data is retrieved, inform the evaluator about all the select statements it needs from the objects and/or relationships in the table/structure.
The API contains further details about the
com.technia.tvc.core.db.table.evaluator.EntryProcessor.
6.5.1. Purpose
An entry processor can be used to define the behavior of the rows within the table, examples of such behaviors are:
-
Define if the row can be navigable or not (go there)
-
Define if the row can be selected or not
-
Define if the row is pre-selected
-
Define if the row should be highlighted
-
Define if the row should be in-visible
-
Store additional information on the row level, which might be retreived at a later time - for example when rendering a table/structure
6.5.2. Registration
To use an entry processor, one must provide the parameter entryProcessor with the value set to the class to be used.
This is typically done in the attribute TVC Custom Parameters of the
Page Configuration business object, like below:
entryProcessor=com.acme.entryprocessors.MyEntryProcessor
6.5.3. Examples
Example 1 - Basic Example
This example selects the type.kindof property and makes the row
navigable for Parts only, and selectable for Documents only.
import com.technia.tvc.core.db.select.Statement;
import com.technia.tvc.core.db.table.evaluator.EntryProcessor;
import com.technia.tvc.core.db.table.evaluator.EvaluatedData;
import com.technia.tvc.core.db.table.evaluator.EvaluationInput;
import com.technia.tvc.core.db.table.evaluator.SelectedData;
import com.technia.tvc.core.gui.table.Table;
import com.technia.tvc.core.gui.table.TableClient;

public class SampleEntryProcessor implements EntryProcessor {

    public void prepareEvaluation(EvaluationInput input) {
        /*
         * Select type.kindof
         */
        input.addSelectBus(Statement.TYPE_KINDOF);
    }

    public void process(EvaluatedData data, Table table, TableClient client) {
        TableClient.Entry entry = data.getEntry();
        SelectedData objectData = data.getObjectData();
        String kindOf = objectData.getSelectValue(Statement.TYPE_KINDOF);

        /*
         * only "Parts" are navigable
         */
        entry.setNavigable("Part".equals(kindOf));

        /*
         * only "Documents" are selectable
         */
        entry.setSelectable("DOCUMENTS".equals(kindOf));
    }
}
Example 2 - Making a row invisible
This example checks if the user has some required assignments. If the
user is not assigned to these groups/roles, the row is not visible
unless the current state is Available
import com.technia.tvc.core.TVCException;
import com.technia.tvc.core.db.Assignments;
import com.technia.tvc.core.db.select.Statement;
import com.technia.tvc.core.db.table.evaluator.EntryProcessor;
import com.technia.tvc.core.db.table.evaluator.EvaluatedData;
import com.technia.tvc.core.db.table.evaluator.EvaluationInput;
import com.technia.tvc.core.gui.table.Table;
import com.technia.tvc.core.gui.table.TableClient;

import com.technia.tvc.log4j.Logger;

public class SampleEntryProcessor2 implements EntryProcessor {
    private static final Logger logger = Logger
        .getLogger(SampleEntryProcessor2.class);

    /**
     * Instance variables should be used with care.
     * However, a thread-local, can sometimes be useful
     */
    private ThreadLocal assigned = new ThreadLocal();

    public void prepareEvaluation(EvaluationInput input) {
        assigned.set(Boolean.FALSE);
        try {
            Assignments assignments = Assignments.getInstance();
            if (assignments.isAssigned("group_SomeGroup") &&
                    assignments.isAssigned("role_SomeRole")) {
                assigned.set(Boolean.TRUE);
                input.addSelectBus(Statement.CURRENT);
            }
        } catch(TVCException t) {
            logger.warn("Unable to get user assignments", t);
        }
    }

    public void process(EvaluatedData data, Table table, TableClient client) {
        TableClient.Entry entry = data.getEntry();
        String current = data.getObjectData().getSelectValue(Statement.CURRENT);
        if (!current.equals("Available") && assigned.get() == Boolean.FALSE) {
            entry.setVisible(false);
        }
    }
}
6.6. Cell Editor
The cell editor concept can be used to add interaction with the user while updating cell values. In Technia Value Components you have the possibility to override the way a value actually is modified to the database, through defining a custom Updater. However, the updater itself can only perform the update, and either return true or false whether the update succeeded or not or throw an Exception to indicate severe problems.
A cell editor will be involved before the Updater on the column is
invoked. The cell editor itself will not reduce the need of the
Updater responsibilities, but it will add more possibilities to allow
pre-validation and/or interaction with the user before the actual update
takes place.
The cell editor interface is defined as:
public interface CellEditor {
    /**
     * @param table The table that owns the cell being edited.
     * @param data The table data (row) that should be edited.
     * @param cell The cell being edited.
     * @param valueIndex The value index
     * @param newValue The new value of the cell.
     * @return The edit response.
     */
    Response editCell(EditableTableBean table,
                      TableData data,
                      int cell,
                      int valueIndex,
                      String newValue);
}
Typical and common things that can be solved by using a cell editor are
-
Validate the input
-
Ask the user for confirmation before modifying the value in the database
-
Execute a Java Script after the update is done, such as reload the whole table page.
More information about the cell-editor and related classes are found in the javadoc.
You can instead of implementing the interface
com.technia.tvc.structurebrowser.edit.CellEditor, extend from the
com.technia.tvc.structurebrowser.edit.DefaultCellEditor.
6.6.1. Registering a Cell Editor
A cell-editor is either registered within the Custom Parameters
through the page configuration object, or by defining the setting on a
table column called Cell Editor Class. If you register it on the
page configuration object, the cell editor will be used when editing any
cell within any column.
Registering the cell editor through the custom parameters attribute on the page configuration object, is done as the example below:
cellEditor=com.acme.edit.MyCellEditor
Registering the cell editor through the table column settings, is done as the example below:
add table X system
    column
        setting "Cell Editor Class" "com.acme.edit.MyCellEditor"
If both are defined, the cell editor from the column settings will be used.
6.6.2. Examples
Basic Example
This shows how to do some validation of the input, and if the validation fails - an error message is generated.
import com.technia.tvc.core.table.EditableTableBean;
import com.technia.tvc.core.table.TableData;

import com.technia.tvc.structurebrowser.edit.CellEditor;
import com.technia.tvc.structurebrowser.edit.DefaultCellEditor;
import com.technia.tvc.structurebrowser.edit.Response;

public class Example1 implements CellEditor {

    public Response editCell(EditableTableBean table,
                             TableData data,
                             int cell,
                             int valueIndex,
                             String newValue) {
        if (isValueOk(newValue)) {
            return DefaultCellEditor.getInstance().editCell(table, data, cell,
                    valueIndex, newValue);
        } else {
            return Response.newError("Value is not ok...");
        }
    }

    private boolean isValueOk(String newValue) {
        // TODO Auto-generated method stub
        return false;
    }
}
Reload Example
This shows how to force a reload of the table page, after the edit has taken place.
import com.technia.tvc.core.table.EditableTableBean;
import com.technia.tvc.core.table.TableData;

import com.technia.tvc.structurebrowser.edit.CellEditor;
import com.technia.tvc.structurebrowser.edit.DefaultCellEditor;
import com.technia.tvc.structurebrowser.edit.Response;

public class Example1 implements CellEditor {
    public Response editCell(EditableTableBean table,
                             TableData data,
                             int cell,
                             int valueIndex,
                             String newValue) {
        Response response = DefaultCellEditor.getInstance().editCell(table, data, cell, valueIndex, newValue);
        if (response == null) {
            // The default editor returns null, in case all went fine
            response = Response.newReloadTable(true);
        }
        return response;
    }
}
Example with Confirm Message
This shows how to perform confirmation of cell value updates.
import com.technia.tvc.core.table.EditableTableBean;
import com.technia.tvc.core.table.TableData;

import com.technia.tvc.structurebrowser.edit.CellEditor;
import com.technia.tvc.structurebrowser.edit.ConfirmCallback;
import com.technia.tvc.structurebrowser.edit.DefaultCellEditor;
import com.technia.tvc.structurebrowser.edit.Response;

public class Example implements CellEditor {

    public Response editCell(final EditableTableBean table,
                             final TableData data,
                             final int cell,
                             final int valueIndex,
                             final String newValue) {
        if (isValueOk(newValue)) {
            return DefaultCellEditor.getInstance().editCell(table, data, cell,
                    valueIndex, newValue);
        } else {
            return Response.newConfirm("Confirm update", new ConfirmCallback() {
                public TableData getTableData() {
                    return data;
                }

                public Response accept() {
                    return DefaultCellEditor.getInstance().editCell(table,
                            data, cell, valueIndex, newValue);
                }

                public Response cancel() {
                    // TODO: Localize
                    return Response.newOk("Nothing updated!");
                }
            });
        }
    }

    private boolean isValueOk(String newValue) {
        // TODO Auto-generated method stub
        return false;
    }
}
6.7. Table Post Processing
A table post processor can be used to modify or replace the table bean after it has been initially loaded.
A post processor must implement the
com.technia.tvc.structurebrowser.postprocess.PostProcessor interface
6.7.1. Registration
The post processor to be used for a particular instance of the structure
browser, is defined within the attribute TVC Custom Parameters of
the Page Configuration Business Object being used.
The value is a comma separated list of either fully qualified classnames of a table post processor, or the short name of a pre-defined post processor. See the example below
postProcess=com.acme.MyPostProcessor,AnotherPostProcessor
To register short names of a post-processor, simply add init parameters
starting with the following
prefix: tvc.structurebrowser.tablePostProcessor.
<init-param>
    <param-name>tvc.structurebrowser.tablePostProcessor.AnotherPostProcessor</param-name>
    <param-value>com.acme.postprocessor.AnotherPostProcessor</param-value>
</init-param>
6.8. Expander
As of TVC release 2009.1, you can per view define how to expand a structure. The most common way to expand structures in TVC has been by using so called filters that define how the structure is being expanded.
Other possibilities, like expanding using a JPO or writing a custom StructureBean that implements the expand logic has also been possible. The drawback with that approach has been that you weren’t able to easily mix the expand modes used within the same Structure Browser instance.
Moreover, you will be able to decide per view how the filter chooser should behave e.g. if to allow combining multiple filters, or just select a single filter, or not being able to select any filter at all.
6.8.1. Expander Configuration
An Expander is configured on the View level. In a view, you can either choose to use standard filters, or decide to use an Expander.
Below is an example of how to define this on a view that is defined in XML. If you use business objects as configuration objects, there is a corresponding attribute that allows you to define the ExpandMode.
<View>
    <DisplayName>Latest Rev</DisplayName>
    <ExpandMode>java:com.technia.tvx.enc.expanders.Latest</ExpandMode>
    <Table default="true">tvc:table:tvx:enc/EBOM.xml</Table>
    <Table>tvc:table:tvx:enc/ECOECR.xml</Table>
    <Table>tvc:table:tvx:enc/Condensed.xml</Table>
    <Table>tvc:table:tvx:common/Simple.xml</Table>
</View>
Note that the example above uses a Java implementation of an expander. There are other types of Expanders that allows you to do different expansions, for example via:
-
Inquiries
-
JPOs
-
Shadow Expansions
Please consult the Structure Browser Administration Guide regarding
details for the other expand modes.
6.8.2. Expander API
You can either choose to implement the Expander interface directly, or extend from the base class AbstractExpander. The links to the API are shown below.
-
com.technia.tvc.core.structure.Expander
-
com.technia.tvc.core.structure.expand.AbstractExpander
The Expander interface is defined as:
public interface Expander {
    /**
     * Returns true if this expander allows full expand
     *
     * @param structure The {@link ExpanderBasedStructureBean}.
     * @return True if full expand is allowed.
     */
    boolean isFullExpandSupported(ExpanderBasedStructureBean structure);

    /**
     * Returns true if this expander allows multi-level expands.
     *
     * @param structure The {@link ExpanderBasedStructureBean}.
     * @return True if multi-level expands are supported.
     */
    boolean isMultiLevelExpandSupported(ExpanderBasedStructureBean structure);

    /**
     * Returns the filter mode.
     *
     * @param structure The current {@link ExpanderBasedStructureBean structure}
     */
    FilterMode getFilterMode(ExpanderBasedStructureBean structure);

    /**
     * Expands a node.
     *
     * @param ctx The {@link ExpandCtx context}
     * @param node The node to expand.
     * @param levels The number of levels to expand the node, zero for full
     *        expansion.
     * @throws TVCException If unable to expand the node.
     */
    void expandNode(ExpandCtx ctx, StructureBeanNode node, int levels) throws TVCException;

    /**
     * Collapses a node.
     *
     * @param ctx The {@link ExpandCtx context}.
     * @param node The node to collapse.
     * @since 2009.3
     */
    void collapseNode(ExpandCtx ctx, StructureBeanNode node);
}
6.8.3. Examples
This document shows a couple of different implementations of Expanders
Example 1 - Expanding the Latest Revisions
This example expands the structure and selects the id of the last revision for each object found in the expansion.
E.g. the structure that this expander creates, is in most cases not representing a real structure in matrix, as the object not always are connected. This is the case when the object in a structure has a later revision.
import com.technia.tvc.core.TVCException;
import com.technia.tvc.core.db.BusinessObjectUtils;
import com.technia.tvc.core.structure.Expander;
import com.technia.tvc.core.structure.ExpanderBasedStructureBean;
import com.technia.tvc.core.structure.StructureBeanNode;
import com.technia.tvc.core.structure.expand.AbstractExpander;
import com.technia.tvc.core.util.StringUtils;

import java.util.Iterator;

import matrix.db.RelationshipWithSelect;

public class Latest extends AbstractExpander {
    @SuppressWarnings("unchecked")
    public void expandNode(ExpandCtx ctx, StructureBeanNode node, int levels) throws TVCException {
        Iterator<RelationshipWithSelect> itr = BusinessObjectUtils.expandSelect(
                node.getObjectId(),
                "EBOM",
                "Part",
                StringUtils.toStringList(new String[] {
                        "id",
                        "last.id",
                }),
                StringUtils.toStringList(new String[] {
                        "id",
                }),
                false,
                true,
                1,
                null,
                null,
                false).getRelationships().iterator();
        RelationshipWithSelect rws;
        String relId, id, lastId;
        while (itr.hasNext()) {
            rws = itr.next();
            relId = rws.getSelectData("id");
            id = rws.getTargetSelectData("id");
            lastId = rws.getTargetSelectData("last.id");
            StructureBeanNode newNode = ctx.newStructureNode(relId, lastId, true);
            if (!id.equals(lastId)) {
                /*
                 * Make it possible for some cell-renderer or table-renderer
                 * to pick up this information.
                 */
                newNode.put(LatestInState.REAL_OBJECTID_KEY, id);
            } else {
                newNode.remove(LatestInState.REAL_OBJECTID_KEY);
            }
            node.addChild(newNode);
        }
    }

    public FilterMode getFilterMode(ExpanderBasedStructureBean s) {
        return Expander.FIXED;
    }

    public boolean isFullExpandSupported(ExpanderBasedStructureBean s) {
        return false;
    }

    public boolean isMultiLevelExpandSupported(ExpanderBasedStructureBean s) {
        return false;
    }
}
}
6.9. Javascript API
This document describes commonly used and convenient methods available in a frameset displaying a table or a structure.
6.9.1. Frameset Details
To understand the JS API, one must first understand how a table page is structured, since the JS function are located within different frames. Hence, when invoking a JS function, one must carefully consider where the function is located as well as from where it’s being invoked.
A table page is built up by a number of so called IFRAME elements, as illustrated below:
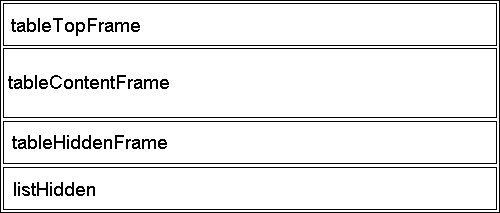
Details about each frame:
-
This frame contains the header, subheader and toolbar.
-
This frame contains the content of the table.
The frame contains nested IFRAME elements
-
A hidden frame, used for performing processing of certain actions.
-
Same as for item 3. This frame is added in order to support the same
Target Locationvalues as used by the AEF.
6.9.2. Java Script Functions
The following table describes the public available JS methods, which can be used in the Structure Browser.
| Name | Args | Frame Location | Description |
|---|---|---|---|
tvcReloadPage |
tableContentFrame |
Reloads the frame |
|
tvcReloadTableContent |
tableContentFrame |
Refreshes the content of the table from the database and reloads the frame |
|
addRow |
|
tableContentFrame |
Adds one row to the table/structure |
addRows |
|
tableContentFrame |
Adds one or more rows to the table/structure. |
addNode |
|
tableContentFrame |
Adds one node below another object (for structures) |
addNodes |
|
tableContentFrame |
Adds one or more nodes below another object (for structures) |
showProgress |
tableContentFrame |
Shows the progress bar |
|
showProgressMessage |
|
tableContentFrame |
Shows the progress bar together with a progress message. |
hideProgress |
tableContentFrame |
Hides the progress bar |
6.10. Standalone
There is a simple Java class provided in the structurebrowser that allows simple testing of a table. This can be useful during the development of data handlers etc.
The below (Windows) batch script illustrates how to invoke this class. Note about the arguments required to pass on the command line, in order to establish the context and initialization of TVC. See also this chapter for additional information.
@echo off
set USER=Test Everything
set PASSWORD=
set HOST=rmi://localhost:10800

set CP=eMatrixServletRMI.jar
set CP=%CP%;../classes
set CP=%CP%;tvc-core-6.3.0.jar
set CP=%CP%;tvc-structurebrowser-6.3.0.jar
set CP=%CP%;servlet-api.jar
set class="com".technia.tvc.structurebrowser.util.TableTest

java -classpath %CP% %CLASS% "-host=%HOST%" "-user=%USER%" "-pass=%PASSWORD%" -inquiry=Test
This class accepts some parameters, defining how to extract the data and how to present it.
If the argument -objectid= is left out, you need to supply the argument -inquiry=.
Moreover, if you do not supply the parameter -pageconfig, a default view and table is created for you. If you want to expand a structure you must use the argument -structure in addition to either -inquiry or -objectid. See the examples below:
java ... -structure -object=Part,EV-000001,A "-view=Part View"
java ... -structure -object=Part,EV-000001,A "-pageconfig=Navigate EBOM"
java ... -structure -objectid=1234.567.890.1234 "-pageconfig=Navigate EBOM"
The batch script above assumes that you have both the tvc.license file as well as the required JAR files within the current directory.
7. Structure Browser Forms
Here is an overview of the flow when a form is initialized:
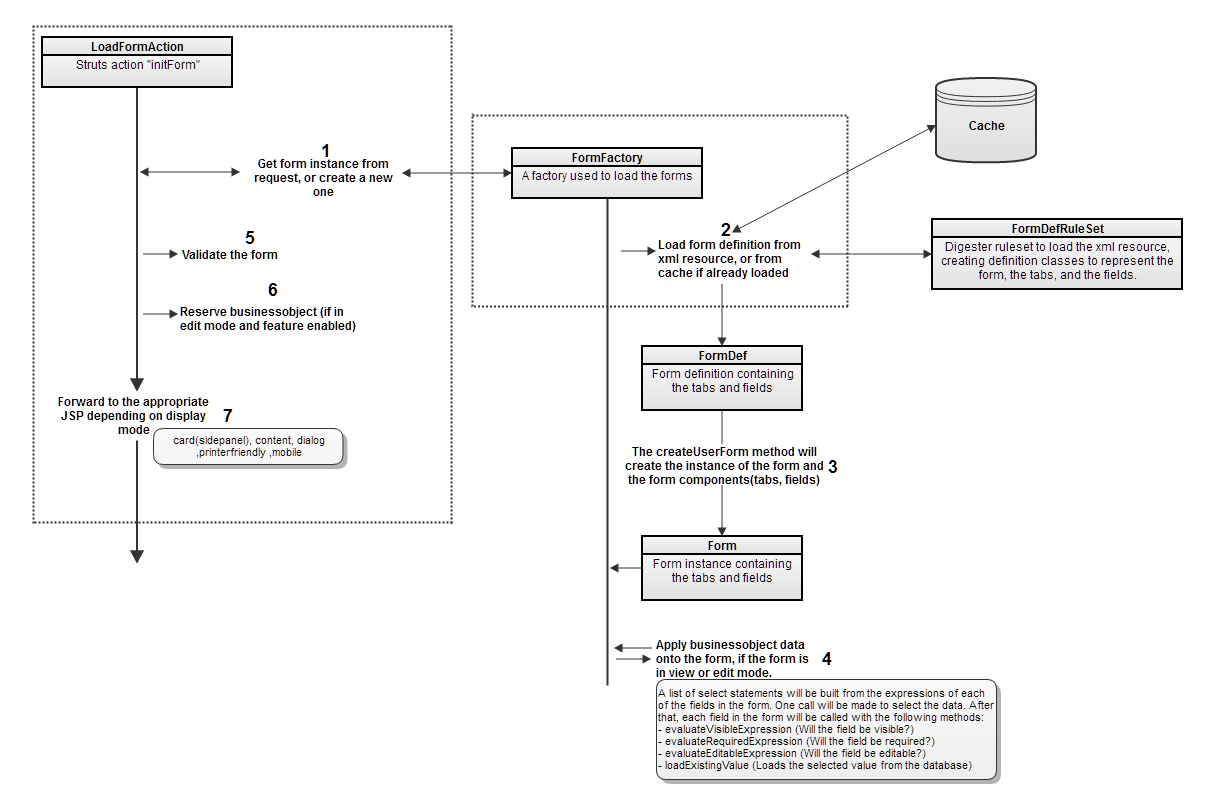
Here is an overview of the flow when a form is submitted:
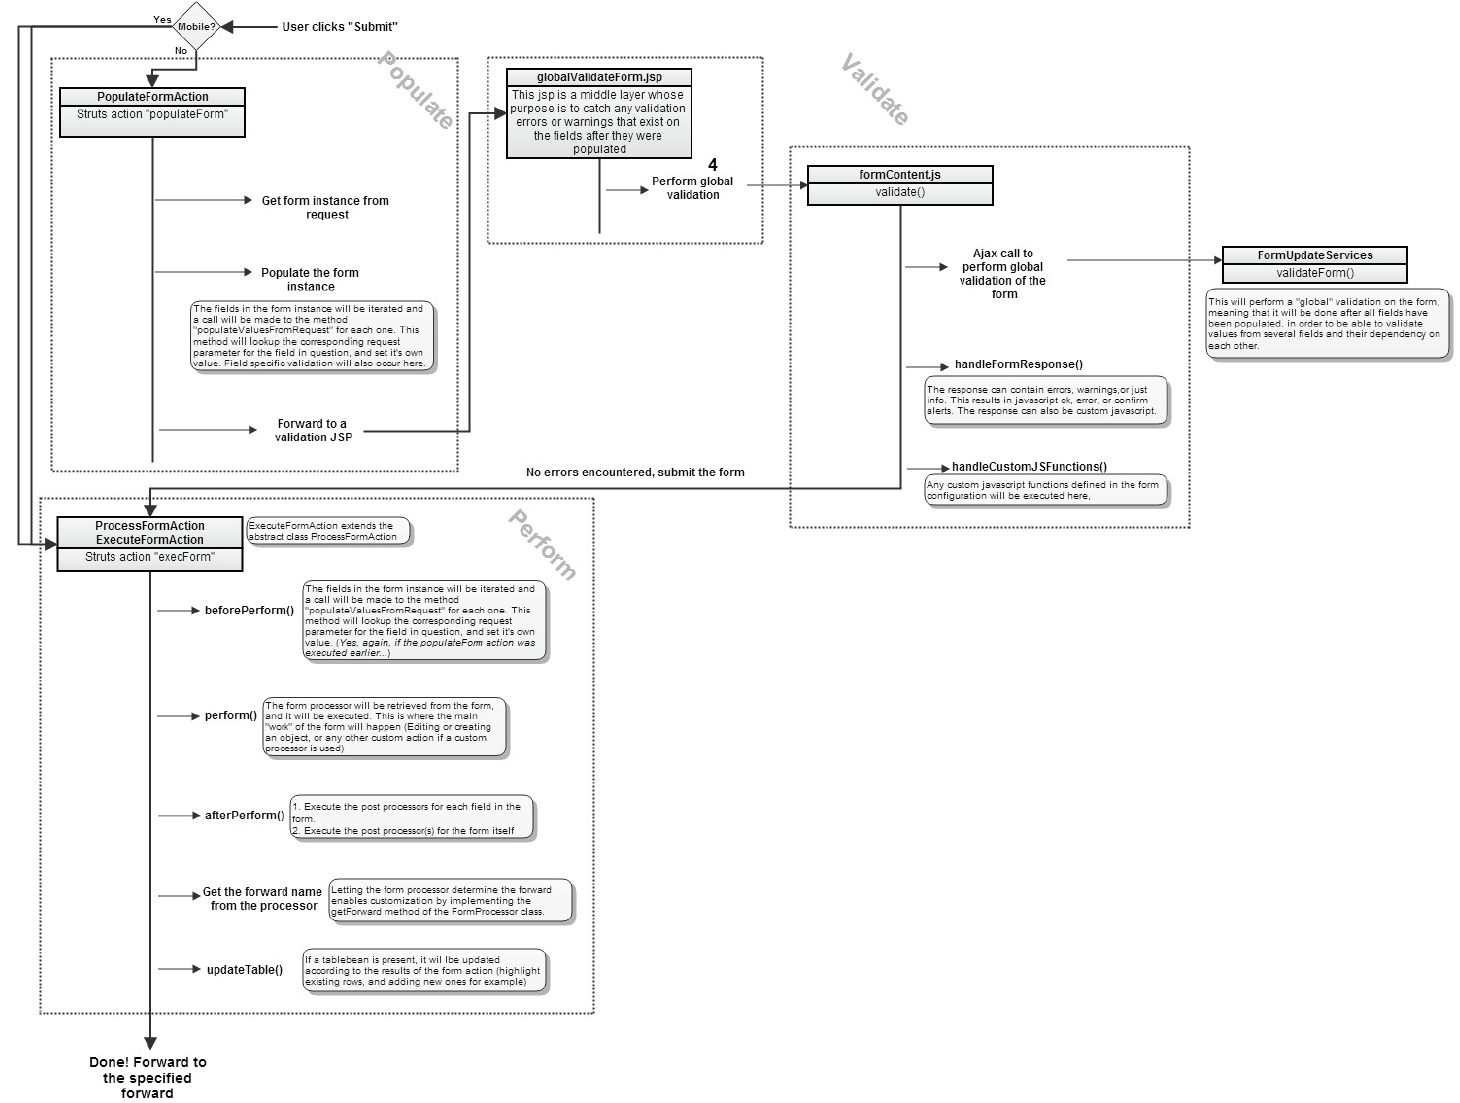
7.1. Access
Access to fields being editable or visible in a form can be controlled by using the Visible or Editable tags in the xml configuration for a field:
<Editable>true</Editable>
...
<Visible>false</Visible>
They can also contain expressions that are evaluated against the context object:
<Editable>type == "Screw Part"</Editable>
If more complex logic is needed to determine the access, it’s also possible to define an AccessHandler:
<Editable>java:com.acme.handler.MyCustomAccessHandler</Editable>
The defined class needs to implement the interface com.technia.tvc.structurebrowser.form.model.AccessHandler.
Here is a simple example:
/**
 * This access handler checks if the Weight attribute is between 1 and 10
 */
public class CheckPartWeightHandler implements AccessHandler {
 @Override
 public boolean validate(Form form) {
  String oid = form.getObjectId();
  try {
   String s = BusinessObjectUtils.select(oid, "attribute[Weight]");
         if (!StringUtils.isNumber(s)) {
             return false;
         } else {
          double weight = Double.parseDouble(s);
          if (weight <= 1.0 || weight > 10) {
           return false;
          }
         }
  } catch (TVCException e) {
   e.printStackTrace();
  }
  return true;
 }
}
7.2. Custom Fields
In some cases, the standard fields available in the Create/Edit Forms function are not enough.
There are 2 different ways in which to achieve more customized field logic:
-
Extend an already existing field class, and override one or more of it’s methods
-
Create a new field class
The logic for a field is divided into 3 main classes:
-
A definition class: com.technia.tvc.structurebrowser.form.def.FieldDef
-
A model class: com.technia.tvc.structurebrowser.form.model.Field
-
A renderer class: com.technia.tvc.structurebrowser.form.render.FieldRenderer
The definition class is responsible for initiating the model class, which will contain all the logic needed to load initial field values, update, validate, and possibly perform postprocess logic if needed. The rendering of the GUI is handled by the renderer class. The model class is responsible for defining a renderer class.
7.2.1. Configuration
The configuration for a field in a form needs to point to the
implemented custom class to use it. This is done by adding an attribute
called className to the Field element. All different field elements
in the form configuration XML can be assigned a custom field class.
<!-- Extend the existing field ConnectField -->
<ConnectField className="com.technia.tvc.structurebrowser.form.examples.ExtendedConnectfieldDef">
    ...
</ConnectField>

<!-- Creating a new field -->
<Field className="com.technia.tvc.structurebrowser.form.examples.TestFieldDef">
    ...
</Field>
7.2.2. Extending existing fields
Structure Browser contains a number of predefined fields, such as type, name, revision, and more complex ones, such as Connect fields. In some cases, the logic of these needs to be tweaked or built upon. Then they can be extended to achieve the desired behaviour.
To do this, extend the definition class first, then the model class. For example: Example
7.2.3. Creating new fields
When none of the existing fields can be extended to achieve the needed behaviour, new fields can be created. For example: Example
7.2.5. Extending existing fields Example
This shows how to extend the existing ConnectField, and add postprocess logic.
import com.technia.tvc.structurebrowser.form.def.ConnectFieldDef;
import com.technia.tvc.structurebrowser.form.def.FormComponentDef;
import com.technia.tvc.structurebrowser.form.exception.FormException;
import com.technia.tvc.structurebrowser.form.model.ConnectField;
import com.technia.tvc.structurebrowser.form.model.Form;
import com.technia.tvc.structurebrowser.form.model.FormComponent;
import com.technia.tvc.structurebrowser.form.process.ProcessResultsLog;

import java.util.List;

/**
 * Extends a ConnectField to enable additional postprocess logic
 *
 * @author <a href="mailto:pjo@technia.com">pjo</a>
 * @since 2010.2.0
 */
public class ExtendedConnectfieldDef extends ConnectFieldDef {

    @Override
    public FormComponent createFormComponent() throws FormException {
        // Make sure to return our custom Field class here
        return new ExtendedConnectField(this);
    }

    public class ExtendedConnectField extends ConnectField {

        public ExtendedConnectField(FormComponentDef def) throws FormException {
            super(def);
        }

        @Override
        public ProcessResultsLog postProcess(Form fc, List<String> oids) throws Exception {
            // Call the super method to perform the original post processing (which a connectfield already has)
            super.postProcess(fc, oids);

            // Add some extra post processing here, can be whatever based on the resulting oids...
            System.out.println("ExtendedConnectfieldDef.ExtendedConnectField.postProcess()");
            return null;
        }
    }
}
7.2.6. Creating a new field Example
This shows how to create a new field
package com.technia.tvc.structurebrowser.form.examples;

import com.technia.tvc.core.db.select.Statement;

import com.technia.tvc.structurebrowser.form.def.AttributeFieldDef;
import com.technia.tvc.structurebrowser.form.def.FormComponentDef;
import com.technia.tvc.structurebrowser.form.exception.FormException;
import com.technia.tvc.structurebrowser.form.model.Field;
import com.technia.tvc.structurebrowser.form.model.Form;
import com.technia.tvc.structurebrowser.form.model.FormComponent;
import com.technia.tvc.structurebrowser.form.model.NameField;
import com.technia.tvc.structurebrowser.form.process.ProcessResultsLog;
import com.technia.tvc.structurebrowser.form.render.field.FormComponentRenderer;

import java.util.List;

import javax.servlet.http.HttpServletRequest;

import matrix.db.BusinessObjectWithSelect;

/**
 * This is simply a test class to illustrate some possible ways to implement
 * custom field logic.
 *
 * @author <a href="mailto:pjo@technia.com">pjo</a>
 * @since 2010.2.0
 */
public class TestFieldDef extends AttributeFieldDef {

    @Override
    public FormComponent createFormComponent() throws FormException {
        // Make sure to return our custom Field class here
        return new TestField(this);
    }

    public class TestField extends Field {

        public TestField(FormComponentDef def) throws FormException {
            super(def);
        }

        @Override
        public FormComponentRenderer getRenderer() {
            // Return a custom renderer class
            return new TestFieldRenderer();
        }

        @Override
        public ProcessResultsLog postProcess(Form fc, List<String> oids) throws Exception {
            // Add post processing logic here
            return null;
        }

        @Override
        public String validate(Form fc, String value) {
            if (value.equalsIgnoreCase("test")) {
                // Returning a string will make the field invalid
                // and display the string as a message to the user in the field.
                return "You cannot specify test as a value!!!";
            }
            return null;
        }

        @Override
        public void update(Form fc, String value, boolean updateForm) {

            // Store the value to this field
            setValue(value);

            // The following optional logic here can update other fields in the form:
                // Update name field.
                NameField qf = (NameField)fc.getField(NameField.class);
                // Set the label to the value entered in this field
                qf.setLabel(value);
                // Set the value to be the same as for this field (Not that usable, only to show it can be done :) )
                qf.setValue(value);
                // Make sure to set the status to UPDATED,
                // otherwise the field won't be re-rendered in the GUI to reflect the change...
                qf.setStatus(UPDATED);
        }

        @Override
        public void load(Form configuration) throws FormException {
            // Set the initial value of the field
            this.setValue("test");
        }

        @Override
        public void populateValuesFromRequest(Form fc, HttpServletRequest request) {
            // This method is responsible for retrieving the correct value from the request
            // and change the value of the field accordingly.
            // If implementing custom fields, in many cases there might be custom GUI components
            // involved (text fields, select fields). So the interaction from these needs to be taken care
            // of. This is the place to do that.

        }

        @Override
        public void appendSelectStatementToList(List<String> list) throws FormException {
            // If the form is being used in edit mode, this method is responsible for adding the required
            // select statement(s) in order for the field to be populated, for example:
            list.add(Statement.DESCRIPTION.getStatement());
        }

        @Override
        public void loadExistingValue(Form configuration, BusinessObjectWithSelect bo) throws FormException {
            // If the form is being used in edit mode, this method is responsible for setting the field value
            // based on the given BusinessObjectWithSelect object. In this case using the select statement added
            // in the appendSelectStatementToList() method:
            updateFieldValue(configuration, bo.getSelectData(Statement.DESCRIPTION.getStatement()), false,
                    true);
        }

        @Override
        public void updateEventAction(Form fc, String key, String value) throws FormException {
            // TODO Auto-generated method stub
        }

        @Override
        public boolean validateConfigurationInput(Form configuration) throws FormException {
            // Use this method to add validation related to the configuration itself. This will be executed
            // when the form is being loaded.
            return true;
        }

    }
}
7.3. Default Values
Default values for fields are what will be used to determine which value will be preselected in fields representing range attributes. If the range attribute itself already has a default value in the database, that will of course be used, but if different default values are needed for different forms, this setting can be used instead.
Setting default values for fields can be achieved by configuration to set specific values:
<DefaultValue>type_Part</DefaultValue>
If more complex logic is needed to set the default value, it’s possible to use a java class for this:
< DefaultValueHandler>com.acme.handler.DefaultECOHandler</DefaultValueHandler>
The specified class must implement the interface com.technia.tvc.structurebrowser.form.model.DefaultValueHandler. Here is a simple example:
public class CustomDefaultValueHandler implements DefaultValueHandler {
 @Override
 public void setDefaultValue(Form form, Field f) {
  // Add some logic here, and set the value of the field
  String defaultValue = "a default value";
  f.setDefaultValue(defaultValue);
 }
}
Default value handlers run when the form is initialized. In theory, it can use the values of other fields to determine what the default value should be, but make sure that if several handlers are being used for multiple fields, they are in the correct order.
7.4. Field Renderer
In some cases, it is only necessary to implement a custom rendering of a
field, without adding any custom logic. In such cases, it is possible to
only implement the rendering class itself. To do this, add the element
FieldRendererClass to the field definition pointing to a java class
extending
com.technia.tvc.structurebrowser.form.render.field.FieldRenderer.
This class uses 2 methods for rendering the field. One for view mode and one for edit mode:
-
renderFieldForViewing(FormComponentRenderContext)
-
renderFieldForEditing(FormComponentRenderContext)
The example below shows how to extend an existing renderer, and override
the methods used to render the field in view mode and making the text
strong, leaving the original rendering and the edit mode untouched:
package com.technia.tvx.common.form.render;

import com.technia.tvc.structurebrowser.form.render.ctx.FormComponentRenderContext;
import com.technia.tvc.structurebrowser.form.render.field.NameFieldRenderer;

public class StrongNameRenderer extends NameFieldRenderer {
    @Override
    public void renderFieldForViewing(FormComponentRenderContext ctx) {
        ctx.getHtmlWriter().startElement("strong");
        super.renderFieldForViewing(ctx);
        ctx.getHtmlWriter().endElement("strong");
    }

}
7.5. Post Processor
Forms can implement post processing logic on both form level and field level. This enables logic to occur after the main processor (Creating or editing an object for example) of the form has executed . If the element PostProcessor is used in the form configuration under the Form element, it will execute logic unrelated to a field:
<Form>
...
    <PostProcessor>com.acme.postprocess.MyExamplePostProcess</PostProcessor>
...
</Form>
It can also be used inside a Field element, which will make the post process run within the context of that field:
<Field>
    <Label>Unit of Measure</Label>
    <MapsTo>attribute_UnitofMeasure</MapsTo>
    <PostProcessor>com.acme.postprocess.MyExamplePostProcess</PostProcessor>
</Field>
7.5.1. When will my post processor run?
-
If the post processor is defined for the entire form, it will execute after the main logic for the form has executed, and after the
This shows an example of a post processor. It needs to extend the class com.technia.tvc.structurebrowser.form.postprocess.PostProcess, and implement the perform method:
package com.technia.tvc.structurebrowser.form.examples;

import com.technia.tvc.core.db.BusinessObjectUtils;

import com.technia.tvc.structurebrowser.form.model.Field;
import com.technia.tvc.structurebrowser.form.model.FormComponent;
import com.technia.tvc.structurebrowser.form.model.Form;
import com.technia.tvc.structurebrowser.form.postprocess.PostProcess;
import com.technia.tvc.structurebrowser.form.process.ProcessResultsLog;

import java.util.List;

public class ChangeOwnerPostProcess extends PostProcess {

    @Override
    public ProcessResultsLog perform(Form fc,
                                     FormComponent field,
                                     List<String> parentObjectIds) throws Exception {

        // Change the owner for each object created by the form.
        for (String oid : parentObjectIds) {
            BusinessObjectUtils.changeOwner(oid, ((Field) field).getValue());
        }

        // The method can return an instance of a ProcessResultsLog if needed.
        // These can be used to add notification messages and table events (adding rows) to occur.
        // For the most part they are not needed, and the method can return null.
        return null;

    }

}

}
7.6. Processor
Forms use a processor that contains the logic being performed when submitting the form. The 2 default processors are used either to create and object or modify an object. However, it is possible to write your own processor to be enable the form to do other things, or possibly to extend one of the existing processors.
<Form>
...
    <Processor>com.acme.process.MyExampleProcessor</Processor>
...
</Form>
Classes used as processors need to extend com.technia.tvc.structurebrowser.form.process.FormProcessor, and implement the method perform(Form).
An example can be seen here:
package com.technia.tvc.structurebrowser.form.examples;
import com.technia.tvc.core.db.BusinessObjectUtils;
import com.technia.tvc.core.db.transaction.TxManager;
import com.technia.tvc.structurebrowser.form.model.Field;
import com.technia.tvc.structurebrowser.form.model.Form;
import com.technia.tvc.structurebrowser.form.process.FormProcessor;
import java.util.ArrayList;
import java.util.List;
import matrix.db.BusinessObject;
/**
 * An example processor that creates a business object.
 *
 */
public class ExampleProcessor extends FormProcessor {
    public ExampleProcessor(Form fc) {
        super(fc);
    }
    @Override
    public List<String> perform(Form form) throws Exception {
        List<String> resultIds = new ArrayList<String>();

        // Iterate through the form fields and do something
        List<Field> fields = form.getFields(true);
        for (Field field : fields) {
            String value = field.getValue();
            // Do something with this field's value, if needed
        }
        // Create an object
        BusinessObject bo = BusinessObjectUtils.create(type, name, revision,
                basics.getVAULT(), basics.getPOLICY(), TxManager.getCurrentUser(),
                objectAttributeList);
        BusinessObjectUtils.setDescription(bo, basics.getDESCRIPTION());
        // Add the object id to the results list
        resultIds.add(bo.getObjectId());

        return resultIds;
    }
}
A form processor can also be used to modify where the form should be forwarded after being successfully processed. To do this, override the method getForward:
public ActionForward getForward(Form fc,
                                    HttpServletRequest request,
                                    HttpServletResponse response) throws Exception {
 ActionForward fw = new ActionForward();
 /**
  * Evaluate the form, perhaps by retrieving the value of one of the fields, and implement logic to determine where to go from here
  * and then set the path of the forward.
  */
 fw.setPath("/ACME/MyCustomForward.jsp");
 return fw;
}
7.7. Validation
Besides from the standard validation(required values, min characters, max characters, invalid value, invalid characters) that can be done on fields, there are a few more advanced options to implement custom validation.
-
Implementing a java class to contain custom validation logic
<Field>
 <Validation>
  <Java>com.acme.validation.MyValidation</Java>
 </Validation>
</Field>
The validation class must implement the interface com.technia.tvc.structurebrowser.form.model.ValidationHandler.
Here is an example:
package com.technia.tvc.structurebrowser.form.examples;
import com.technia.tvc.core.util.StringUtils;
import com.technia.tvc.structurebrowser.form.exception.FormException;
import com.technia.tvc.structurebrowser.form.model.Field;
import com.technia.tvc.structurebrowser.form.model.Form;
import com.technia.tvc.structurebrowser.form.model.ValidationHandler;
/**
 * This validation handler checks if the selected type is a specific value, and
 * if so, the value cannot be empty.
 */
public class ValidationExample implements ValidationHandler {
    @Override
    public String validate(Form form, Field field, String value) {
        try {
            String type = form.getTypeFieldValue();
            if (type.equalsIgnoreCase("Bolt") && StringUtils.isOnlyWhitespaceOrEmpty(value)) {
                return "If you select a Bolt part, this field cannot be empty";
            }
        } catch (FormException e) {
            e.printStackTrace();
        }
        return null;
    }
}
-
Implementing a javascript to perform the validation on a field, by specifying a javascript function
<Field>
 <Validation>
  <JSFunction>checkSomething</JSFunction>
 </Validation>
</Field>
When using the JSFunction element, the function itself needs to be included as a resource in a separate javascript file. The file needs to be specified in the form definition:
<Form>
...
 <IncludeResources>
  <JavaScript>../tvx/enc/form/customvalidation.js</JavaScript>
 </IncludeResources>
...
</Form>
Note that any javascript functions that are referenced, needs to be defined to take one parameter. This parameter will contain the field id. It also needs to return a boolean. This controls whether the form is valid or not.
Here is an example javascript:
function checkSomething(fieldId) {
 var value = $("#" + fieldId).val();
 if (value.indexOf("Can I pass?") !== -1) {
  alert("You shall not pass!!");
  return false;
 }
 return true;
}
This can also be done on a global level. In that case, you need to
add the javascript function to the GlobalJSFunction element on the form:
<Form>
...
 <GlobalJSFunction>checkSomethingGlobal</GlobalJSFunction>
...
</Form>
The javascript for the global functions are a bit different from the ones on field level. This is because they need to receive all the field id’s and names, in order for something to be done on them.
Here is an example of such a function, that checks the value of the type field and the description field:
function checkSomethingGlobal(params) {
 if (params) {
  var type;
  var description;
  for (var id in params) {
   var label = params[id];
   var value = $("#" + id).val();
   if (label == "type") {
    type = value;
   }
   if (label == "description") {
    description = value;
   }
  };
  if (type == "Screw Part" && description.indexOf("I'm a screw") == -1) {
   alert("If the type is a Screw, then you need include 'I'm a screw' somewhere in the description!");
   return false;
  }
 }
 return true;
}
-
Implementing a class for
Globalvalidation. This will be used on form level, not on field level, and it can return a result as a warning, error or confirm message:
<Form>
...
<GlobalValidation>java:com.acme.validation.MyValidation</GlobalValidation>
...
</Form>
The java class to be used for validation needs to implement the interface com.technia.tvc.structurebrowser.form.model.GlobalValidation. The method validate will retrieve the whole form as input, so that it is possible to retrieve and check values of any field. The return object from this method decides if the validation results in a warning, an error, or a confirm message.
The following is a short example that checks if the selected type in a form is of a certain type:
package com.technia.tvc.structurebrowser.form.examples;
import com.technia.tvc.structurebrowser.form.exception.FormException;
import com.technia.tvc.structurebrowser.form.model.Field;
import com.technia.tvc.structurebrowser.form.model.Form;
import com.technia.tvc.structurebrowser.form.model.GlobalValidation;
import com.technia.tvc.structurebrowser.form.model.Response;
import com.technia.tvc.commons.lang.StringUtils;

public class TypeIsScrewPartConfirmMessage implements GlobalValidation {
    public Response validate(Form form) throws FormException{

        String type = form.getTypeFieldValue();
        String description = ((Field)form.getField("description")).getValue();

        if (!StringUtils.equalsIgnoreCase(type, "Screw Part")) {
            return Response.newConfirm("You didn't select a screw, is this correct? Submit form anyway? description was: " + description);
        }

        return null;
    }
}
8. Report Generator
The customization level is fairly high in the Report Generator. For example, you can create your own:
-
Data Handlers
-
Post processors
-
Output handlers
-
Custom Java reports
8.1. Post Processing
This page is a short introduction to building custom post processors.
A post processor can be used to modify the generated report. An example of this could be to apply security constraints to the generated PDF file, or compress the generated report with some compression tool like ZIP etc.
A post processor is registered within the page object called TVC
Report Generator Properties in the database. An example how to register
a new output handler is shown below:
postProcessor.test = com.acme.report.postprocess.MyPostProcessor
This will allow you to refer to the post processor called test in
your report definitions.
8.1.1. Implementing a Post Processor
The interface a com.technia.tvc.reportgenerator.postprocess.PostProcessor must implement looks like below:
public interface PostProcessor extends Serializable {

    void init(Report report);

    boolean isEnabled();

    void process(PostProcessorCtx ctx) throws IOException;
}
The init method is called at an early phase, before the report is being created. This allows the post processor to initialize it self properly.
The isEnabled method can be used to, at runtime, decide if to do the post processing. For example, you might have a pre-process page that allows the user to decide if to perform the logic implemented in the post processor.
It is inside the process method where all happens. Through the com.technia.tvc.reportgenerator.postprocess.PostProcessorCtx instance, you have access to the report instance + the generated file. You use the createOutputStream to get a new output stream, which the new report is being written into. The data written to this output stream will become the new report. For example in the ZIP post processor, the report is read through the input stream, then compressed and the ZIPped data is written to the outputstream. Any additional post-processor in use afterwards, will get ZIP data as input in the inputstream.
In case you want to cancel the post-processing and rollback the
operation, you need to invoke the rollback method on the
PostProcessorCtx instance.
8.2. Output Handler
This page is a short introduction to building custom output handlers.
An output handler is used to deliver/transfer the generated report to some place. The report generator includes a couple of pre-defined output handlers that can be used to send the report via mail, upload to an FTP server, check-in etc. (See the admin guide for more information). You can create and plugin your own output handler.
An output handler is registered within the page object called TVC
Report Generator Properties in the database. An example how to register
a new output handler is shown below:
outputHandler.test = com.acme.report.outputhandler.MyOutputHandler
This will allow you to refer to the output handler called test in
your report definitions.
8.2.1. Implementing an Output Handler
The interface a com.technia.tvc.reportgenerator.output.OutputHandler must implement looks like below:
public interface OutputHandler extends Serializable {

    void init(Report report);

    boolean isEnabled();

    void process(OutputHandlerCtx ctx) throws IOException, TVCException;

    boolean isAbortOnError();

    String getUIMessage();
}
The init method is called at an early phase, before the report is being created. This allows the output handler to initialize itself properly.
The isEnabled method can be used to, at runtime, decide if the output handler will be executed or not.
It is inside the process method where all happens. Through the com.technia.tvc.reportgenerator.output.OutputHandlerCtx instance, you have access to the report instance + the generated file.
The isAbortOnError() method defines if the report should be aborted
if any error occurs during the process phase- or if this could be
ignored.
The getUIMessage method returns a nicely formatted message to be presented for the user.
8.3. Data Handlers in Report Generator
In some cases, you might want the ability to generate more complex data among the raw XML data as generated by the Report Generator. That can be done by implementing a Data Handler in a table column.
The general information about Data Handler as provided in this chapter is valid for Data Handler used in the Report Generator as well.
8.3.1. Data Handler with XML output
If your Data Handler is generating XML formatted data, then you must apply the setting below to your column:
Preserve Output = true
Or, in case your table is defined in XML:
<PreserveOutput>true</PreserveOutput>
Below is an example of a Data Handler that generates XML data:
import com.technia.tvc.core.db.table.evaluator.DataHandler;
import com.technia.tvc.core.db.table.evaluator.EvaluatedData;
import com.technia.tvc.core.db.table.evaluator.EvaluationInput;
import com.technia.tvc.core.db.table.evaluator.SelectedData;
import com.technia.tvc.core.gui.table.Cell;
import com.technia.tvc.core.gui.table.Column;
import com.technia.tvc.core.gui.table.impl.StringCell;
import com.technia.tvc.core.html.io.XMLWriter;
import com.technia.tvc.core.html.io.XMLWriterFactory;

import java.io.StringWriter;

public class MyDataHandler implements DataHandler {
    public void prepareEvaluation(Column col, EvaluationInput input) {
        // add your selectables here...
    }

    public Cell createCell(Column col, EvaluatedData data) {
        return new StringCell(col); // the data is held in a StringCell
    }

    public void populateCell(Cell cell, EvaluatedData data) {
        SelectedData sd = data.getObjectData();
        StringWriter sw = new StringWriter();
        XMLWriter xml = XMLWriterFactory.newWriter(sw);

        xml.startElement("RootElement");
        xml.addAttribute("attribute1", "....");
        xml.addAttribute("attribute2", "...");

        xml.startElement("ChildElement");
        xml.addAttribute("attribute1", "....");
        xml.addAttribute("attribute2", "...");
        xml.addText("text...");
        xml.endElement();

        xml.endElement();

        xml.finish();
        cell.addValue(sw.toString());
    }
}
8.4. Custom Report
If you need to create specialized reports, which for some reason isn’t able to create using the default report types, you can solve this by creating a so called custom report. This report is implemented in Java, but is fully integrated with the report generator framework.
In order to create a custom report, you need to create a report
definition object of type TVC Custom Report. Within the definition
of this report, you need to specify the class name of the class you
write. See the example below:
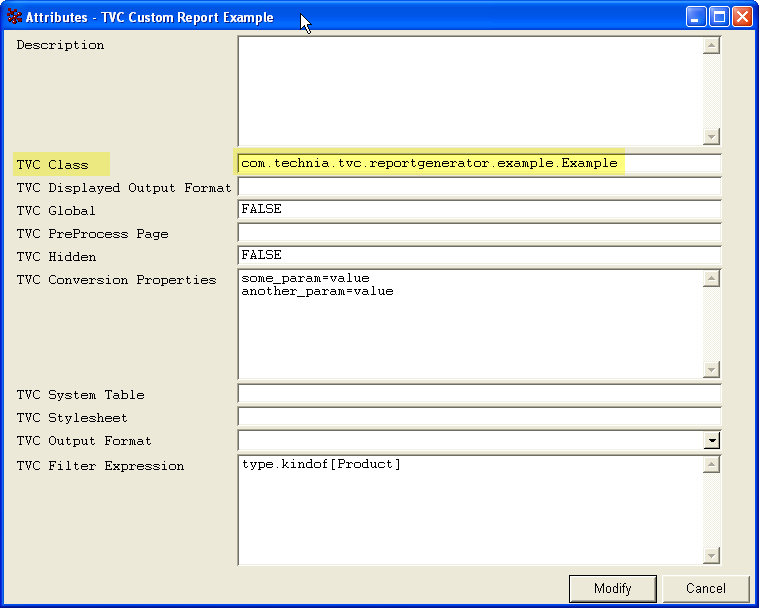
The class that you define, must be derived from the class:
com.technia.tvc.reportgenerator.impl.CustomReport
8.4.1. Custom Report Example
Within the report generator, there is an example implementation of a custom report. This report creates a graph, describing the data in the database and what kind of relationship they have to each other. See the figure below for an understanding of what data is presents:
This graph shows the number of instances of a certain business type in the database. Moreover, it also shows the different relationships from / to the type including the number of instances of them.
The graph is produced with a tool called GraphViz. The Java class just produces text output, which is sent to the GraphViz tool that converts the information to some other format; for example PDF.
You can try this report example, by creating a new report definition with the properties as shown in the picture below: (You will need the GraphViz installed, and modify the path within the report definition).
This report has only been made for educational purposes only. It is not intended to be used in a production environment.
Make Your Own GraphViz Report
There is a base class that can be extended if you want to create your own reports based upon the GraphViz toolkit. This class is called:
com.technia.tvc.reportgenerator.example.GraphWizReport
You need to download and install the Graphviz library and you also need
to specify in the GRAPHVIZ_HOME defining the path to the installation
base. This parameter can either be defined as a parameter to the JVM,
using the -DGRAPHVIZ_HOME=xxx or through the attribute TVC Conversion
Properties on the report definition instance.
The custom class that you implement will look similar to the code example below:
public class MyGraphVizReport extends GraphVizReport {
    private static final long serialVersionUID = 1L;

    public MyGraphVizReport() {
    }

    /**
     * Performs the data extraction
     */
    public void extract(DataExtractorCtx ctx) throws TVCException, IOException {
        /*
         * Get output stream, and create a print-writer...
         */
        PrintWriter pw = new PrintWriter(ctx.getOutputStream());
        pw.println("digraph G {");
        /*
         * IMPLEMENT LOGIC THAT CREATES THE GRAPH(s) HERE
         */
        pw.println("}");
        pw.flush();
        pw.close();
    }
}
9. Grid Browser
9.1. Rendering
The rendering of a Grid Browser instance, is handled by a special Table Renderer, which in turn delegates part of the rendering to a Grid Browser specific renderer that is of type com.technia.tvc.gridbrowser.render.GridBrowserRenderer.
The left hand side of a Grid Browser instance is rendered with the special Table Renderer part of Grid Browser. But the columns you display on the left side can take advantage of Cell Renderer’s if you want to customize that part.
To customize the rendering of the right hand side of a Grid Browser instance, e.g. the intersections, you can register a custom renderer within the Grid Browser configuration like shown below:
<GridBrowser>
    ...
    <Renderer>com.acme.gridbrowser.MyRenderer</Renderer>
</GridBrowser>
The class name specified here, must be a class that extends from com.technia.tvc.gridbrowser.render.GridBrowserRenderer.
There are several methods declared inside the base class
GridBrowserRenderer, however, the method that you typically will
override has the signature:
protected void renderElementContent(ElementRenderContext ctx)
9.2. Selecting Data
A possibility to plugin a class that works in a similar way as a Data Handler has been added as of release 2012.3.0 into the Grid Browser
The class you plugin must be a class that extends from com.technia.tvc.gridbrowser.model.IntersectionEvaluator.
To plugin such a class into the Grid Browser, this is done via the Grid Browser configuration as shown below:
<GridBrowser>
    ...
    <Intersection>
        <Evaluator>com.acme.gridbrowser.MyEvaluator</Evaluator>
        ...
    </Intersection>
    ...
</GridBrowser>
The methods you should override are:
public void prepareIntersectionDataEvaluation(EvaluationInput input)

public IntersectionData getIntersectionData(EvaluatedData data)
Within the first method, you specify what select statements to be selected on the intersections.
The second method is used to collect the selected values into a POJO and
return that instance. This POJO is made available via the a method
called getIntersectionData() on the
class com.technia.tvc.gridbrowser.model.Element.
Example:
package com.acme.gridbrowser;

import com.technia.tvc.gridbrowser.model.IntersectionEvaluator;
import com.technia.tvc.gridbrowser.model.IntersectionData;
import com.technia.tvc.core.db.table.evaluator.EvaluationInput;
import com.technia.tvc.core.db.table.evaluator.EvaluatedData;

public class MyEvaluator extends IntersectionEvaluator {

    public static class Data extends IntersectionData {

        private String a;

        private String b;

        public String getA() {
            return a;
        }

        public void setA(String a) {
            this.a = a;
        }

        public String getB() {
            return b;
        }

        public void setB(String b) {
            this.b = b;
        }
    }

    @Override
    public void prepareIntersectionDataEvaluation(EvaluationInput input) {
        input.addSelectRel("attribute[A]");
        input.addSelectRel("attribute[B]");
    }

    @Override
    public IntersectionData getIntersectionData(EvaluatedData data) {
        Data data = new Data();
        data.setA(data.getRelationshipData().getSelectValue("attribute[A]"));
        data.setB(data.getRelationshipData().getSelectValue("attribute[B]"));
        return data;
    }
}
10. XBOM
10.1. XBL
The XBL feature of the XBOM Manager component allows you to create baselines (snapshots) of business object structures from an ENOVIA database. The baseline data, e.g. the meta data for the business objects and connections, are serialized into an XML file, which is checked-in to the baseline object.
The XBL feature allows the user to create baselines on the fly, and later on either browse this structure in the same way as it would have been a traditional business object structure or use this information for comparison purposes, either between the real structure or against another baseline.
The most common use cases are implemented by configuring the XBL via the available configuration options as described in the XBOM Manager Administration Guide. In some specific cases, you might need to implement custom logic that helps the XBL feature to create the baseline. Within this document, you will find information about how to do so.
Please note that since TVC version 2009.3.0, a large number of improvements were made. The whole API for XBL were re-factored and changed compared to the earlier version. The previous extension points have been removed and replaced with other mechanisms.
For example, the Column Spec, which were used to handle custom
selectables has been removed and you should now use standard Data
Handler’s to solve this. This because the Data Handler are commonly
used in the Structure Browser and other components, and you can now
re-use old Data Handlers that has already been implemented. Also, since
we take advantage of Data Handlers, you will not need to learn any new
API as needed with the Column Spec. You can also use so
called Cell Renderer’s, which is used to format the data in the
table cells. Please look into the following chapters for further
information:
The other extension point that previously existed, called Custom Expander, has been removed. The need for this has been reduced, as you have better configuration options available in order to specify how to expand the structure (see the Administration Guide for XBOM Manager for further details about the available configuration options).
In some cases though, when you are dealing with very complex structures, you might programmatically define what data that should be included in an XBL. This can be achieved in two different ways:
-
Implement a so called Expander, which by the way is a common feature used in the Structure Browser component to perform expansions that are hard to do with standard filters OR standard expansions.
You can define a custom expander, from within the XBL configuration like in the example below:
<Configuration>
    ...
    <ExpandSpec>
        <Expander>java:com.acme.MyExpander</Expander>
    </ExpandSpec>
</Configuration>
The class com.acme.MyExpander is a class that implements the interface com.technia.tvc.core.structure.Expander or a subclass to com.technia.tvc.core.structure.expand.AbstractExpander.
-
Implement a so called Handler, which is a part of the XBL API.
You can define a handler, from within the XBL configuration like in the example below:
<Configuration>
    ...
    <Handler>com.acme.MyHandler</Handler>
</Configuration>
The class com.acme.MyHandler is a class that extends the class com.technia.tvc.xbom.xbl2.Handler.
See chapter Handler for more information on how to implement a Handler.
10.1.1. Handler
A handler can be used to customize how and what data to be included within a generate XBL. If you only need to customize the way the structure is being expanded, you can also use a so called Expander. See this document for some additional info on this. This document will describe how to implement a custom Handler.
Another feature with using a Handler, is that you can generate multiple data-sets (or sections of data) that is associated with an XBL. The normal use case is that an XBL is referring to one structure, but a handler can create complementary sections holding other kind of data related to the object, which the baseline is being created for.
The Handler is responsible for creating such complementary data, and the Handler needs to assign each added data-set with an ID. This, because you can load and show such section and view the data in the same way as you can with the standard XBL data.
To load a complementary data-set, you can use the following URL:
${ROOT_DIR}/tvc-action/xblShowBaseline?section=documents&...
Note that you still need to provide the object-id of the baseline being viewed in the URL above. This is however typically added automatically, unless you construct the URL manually in a link or similar.
Additionally, you can also provide a custom page configuration object, that gives the loaded table page a different look.
API
The Handler class is available in the package com.technia.tvc.xbom.xbl2.
This method has one method that you are required to implement. The signature of this method is:
public abstract TableBean create(HandlerCtx ctx) throws TVCException;
Below are some links to related classes, that might be of interest when implementing a custom Handler.
Below is a list of classes that you must understand when when implementing a handler
-
com.technia.tvc.core.table.TableBean
-
com.technia.tvc.core.table.FlatTableBean
-
com.technia.tvc.core.table.DefaultFlatTableBean
-
-
com.technia.tvc.core.structure.StructureBean
-
com.technia.tvc.core.structure.DefaultStructureBean
-
-
API Changes as of 2010.3.0
A minor API change as of 2010.3.0 was made. The change is related to how complementary data is handled. In previous version, the complementary data was added within the create
As of 2010.3.0, one should instead override two other methods in order to specify and handle the complementary data.
You should first override the getAdditionalSectionIds and return an array of ID’s that identifies a complementary section. See example below:
@Override
public String[] getAdditionalSectionIds(HandlerCtx ctx) {
    return new String[] {
        "documents",
        "ECOs",
        "ECRs",
    };
}
This will inform the XBL framework that you have three additional sections within the XBL, and the method getAdditionalData will be invoked for each of these sections. E.g. the method you should override to produce the additional data is shown below:
@Override
public TableBeanInfo getAdditionalData(HandlerCtx ctx, String id) throws TVCException {
    if (id.equals("documents")) {
        /*
         * Get document info...
         */
    } else if (id.equals("ECOs")) {
        /*
         * Get ECO info...
         */
    } else if (id.equals("ECRs")) {
        /*
         * Get ECR info...
         */
    }
    return null;
}
The reason for this change is to be able to query for a particular section without having to generate all sections as done previously in the create method.
Example 1
Below is an example implementation of a Handler that illustrates both how to add complementary data to the XBL, but also how you can take advantage of the Default Handler for performing the standard data extraction according to the XBL configuration.
The configuration that is used in the example below looks like:
<Configuration>
<DisplayName>EBOM & Part Specification</DisplayName>
<Description>
This is an example baseline configuration used to create baselines from an EBOM structure including Part Specifications
</Description>
<ValidFor>
<Type>Part</Type>
</ValidFor>
<ExpandSpec>
<Filter>tvc:filter:tvx:enc/EBOMFrom.xml</Filter>
<Filter>tvc:filter:tvx:enc/PartSpecificationFrom.xml</Filter>
<Depth>all</Depth>
</ExpandSpec>
<Tables>
<Table default="true">tvc:table:tvx:enc/xbl/EBOM.xml</Table>
<Table>tvc:table:tvx:enc/xbl/Condensed.xml</Table>
</Tables>
<Compare>
<Key relationship="relationship_EBOM">
<Field appliesToRel="true">$<attribute[attribute_FindNumber].value></Field>
</Key>
</Compare>
<Handler>com.technia.tvx.enc.xbom.EBOMHandler</Handler>
</Configuration>
And here comes the actual implementation of the Handler Class.
package com.technia.tvx.enc.xbom;

import com.technia.tvc.core.TVCException;
import com.technia.tvc.core.db.BusinessObjectUtils;
import com.technia.tvc.core.db.SelectUtils;
import com.technia.tvc.core.db.select.Statement;
import com.technia.tvc.core.table.DefaultFlatTableBean;
import com.technia.tvc.core.table.FlatTableBean;
import com.technia.tvc.core.table.TableBean;

import com.technia.tvc.xbom.xbl2.Handler;
import com.technia.tvc.xbom.xbl2.HandlerCtx;
import com.technia.tvc.xbom.xbl2.TableBeanInfo;
import com.technia.tvc.xbom.xbl2.impl.DefaultHandler;

import java.util.Iterator;

import matrix.db.RelationshipWithSelect;
import matrix.util.StringList;

import com.technia.tvx.enc.SchemaConstants;

/**
 * Sample XBL code.
 */
public class EBOMHandler extends Handler {

    @Override
    public String[] getAdditionalSectionIds(HandlerCtx ctx) {
        return new String[] {
            "documents"
        };
    }

    @Override
    public TableBeanInfo getAdditionalData(HandlerCtx ctx, String id) throws TVCException {
        /*
         * Load the documents from the source object into a separate section
         * within the XBL.
         */
        FlatTableBean documents = new DefaultFlatTableBean();
        StringList sl = SelectUtils.toStringList(Statement.ID);
        String objectId = ctx.getObjectId();
        Iterator<?> itr = BusinessObjectUtils.expandSelect(objectId, null,
                SchemaConstants.type_DOCUMENTS.get(), sl, sl, false, true, 1, null, null, true)
            .getRelationships()
            .iterator();
        for (RelationshipWithSelect rws; itr.hasNext();) {
            rws = (RelationshipWithSelect) itr.next();
            documents.addTableData(rws.getSelectData("id"), rws.getTargetSelectData("id"));
        }
        /*
         * We are here using the standard table available in the XBOM component.
         * Consider creating a custom table if you need to include additional
         * data that is not part of this table.
         */
        return TableBeanInfo.wrap(documents, new String[]
            { "tvc:table:xbom:xbl/Baseline_Documents.xml", });
    }

    @Override
    public TableBean<?> create(HandlerCtx ctx) throws TVCException {
        /*
         * Do the default expansion with the default handler, according to the
         * configurations made in the XBL config.
         */
        return DefaultHandler.getInstance().create(ctx);
    }
}
The first section expands the source object (a Part), and retrieves any connected object of type DOCUMENTS and adds these to a FlatTableBean.
The documents are added using the id documents
The second section uses the DefaultHandler to perform the data extraction. The DefaultHandler does the work according to the configurations made.
11. File Manager
11.1. Triggers
The TVC Office Integration allows using custom triggers to perform actions upon certain events. There are several different events, which a trigger can act upon. Those events are: (please refer to the administration guide for more details about the event types).
-
On Download
-
After Download
-
On Upload
-
On Validate Upload
-
After Upload
A trigger is a Java class that is executed on the application server. The Java class must extend from com.technia.tvc.office.server.trigger.Trigger.
11.1.1. Registration of Triggers
All triggers must be registered in either the file
WEB-INF/classes/TVCFileManager.xml or within a page object called
TVC File Manager.
If you have a file called WEB-INF/classes/TVCFileManager.xml, this
file will be read and the page object won’t be read.
Recommended is to always use the XML file approach.
Below is an example where three different triggers has been registered.
<FileManager>
    ...
    <Triggers>
        <Trigger name="Trigger 1" className="com.acme.tvc.office.triggers.Trigger1">
            <Matches fileName="*.xls"/>
            <Matches fileName="*.xlsx"/>
            <Matches fileName="*.ppt"/>
            <Matches fileName="*.pptx"/>
            <Matches fileName="*.doc"/>
            <Matches fileName="*.docx"/>
        </Trigger>

        <Trigger name="Trigger 2" className="com.acme.tvc.office.triggers.Trigger2">
            <Matches onlyIfCDM="true" format="format_generic">
                <Matches fileName="*.xls"/>
                <Matches fileName="*.ppt"/>
                <Matches fileName="*.doc"/>
            </Matches>
        </Trigger>

        <Trigger name="Trigger 3" className="com.acme.tvc.office.triggers.Trigger3">
            <Matches policy="policy_CADDrawing,policy_MyPolicy"
                     type="type_CADDrawing,type_MyType"
                     role="role_GlobalUser,role_CustomRole">
                <Matches fileName="*.xls"/>
                <Matches fileName="*.ppt"/>
                <Matches fileName="*.doc"/>
            </Matches>
        </Trigger>
    </Triggers>
</FileManager>
11.1.2. Trigger Example
Below is an example trigger that will set some properties. The uploaded properties are only printed out to the logger.
import com.technia.tvc.office.common.PropertyInfo;
import com.technia.tvc.office.server.trigger.AfterUploadInput;
import com.technia.tvc.office.server.trigger.OnDownloadInput;
import com.technia.tvc.office.server.trigger.Trigger;
import com.technia.tvc.office.server.trigger.TriggerAbort;
import com.technia.tvc.log4j.Logger;
import java.util.Date;
import java.util.Iterator;

public class MyTrigger extends Trigger {
    private static final Logger logger = Logger.getLogger(TestTrigger.class);

    @Override
    public void onDownload(OnDownloadInput ctx) throws TriggerAbort {
        ctx.addSetProperty(new PropertyInfo("property-1", true));
        ctx.addSetProperty(new PropertyInfo("property-2", new Date()));
        ctx.addSetProperty(new PropertyInfo("property-3", Math.PI));
        ctx.addSetProperty(new PropertyInfo("property-4", 123456789));
        ctx.addSetProperty(new PropertyInfo("property-5", "TVC property transfer test..."));
        ctx.addSetProperty(new PropertyInfo("property-6", false, true));
        ctx.addSetProperty(new PropertyInfo("property-7", new Date(0L), true));
        ctx.addSetProperty(new PropertyInfo("property-8", Math.E, true));
        ctx.addSetProperty(new PropertyInfo("property-9", 987654321, true));
        ctx.addSetProperty(new PropertyInfo("property-10", "lorem ipsum...", true));
    }

    @Override
    public void afterUpload(AfterUploadInput ctx) {
        Iterator<PropertyInfo> itr = ctx.getReturnProperties().iterator();
        while (itr.hasNext()) {
            PropertyInfo p = itr.next();
            logger.debug(">>>> Got property: '" + p.getName() + "' with value '" + p.getValue()
                    + "' (type=" + p.getType() + ")");
        }
    }
}
By default, properties are not sent back when the document is uploaded due to performance reasons. In many cases, the properties are only used down-stream, but to enable pushing the properties back to the server, you need to configure the File Manager to do so. You can do this in two different ways:
First alternative is to configure this by init-parameters within the TVC-servlet in WEB.XML:
<init-param>
    <param-name>tvc.office.client.propertyReadEnabled</param-name>
    <param-value>true</param-value>
</init-param>
The second alternative is to configure this within the
WEB-INF/classes/TVCFileManager.xml file:
<FileManager>
    ...
    <Client propertyReadEnabled="true" .../>
11.2. Drop Zone
The TVC File Manager contains a feature that can be used within a TVC Structure Browser table page, allowing the user to drop files into ENOVIA. The files can be dropped onto existing Document objects, or any other kind of object. In the latter case, the drop zone contains configuration possibilities to define how to create the Document that will be created.
In some cases, there is a need to override the behavior of the drop zone, for example being able to have full control over how the Document is created and possible also create additional objects. To do so, you will need to implement a so called Drop Zone Handler (com.technia.tvc.office.ui.dropzone.table.DropZoneHandler).
Another situation were you need to implement your own Drop Zone Handler is when you need to have a pre-processing UI. Then your custom drop zone handler will define what page to load and how to load it.
Such a drop zone handler is defined on a column as shown below:
<Column>
    <ColumnType>dropzone</ColumnType>
    <Setting name="dropzone:type_Part" value="java:com.acme.MyDropZoneHandler"/>
</Column>
If you want to customize the drop zone used above the table, then you can do so by modifying the PageConfig and add a parameter as shown below:
<Parameters>
    <Parameter name="dropzone:handler" value="java:com.acme.MyDropZoneHandler"/>
</Parameters>
11.2.1. The Drop Zone Handler
The DropZoneHandler class has a number of methods that must be implemented and some that can be implemented.
Some notes:
-
Depending on if your drop zone handler works within a column or above the table, different methods are used.
-
The methods that are used regardless if the drop zone handler is registered for a column or above the table are listed below:
-
When your drop zone handler is implemented for a column, you have some additional methods that can should implemented to determine if the drop zone is available or not:
11.2.2. Drop Zone Pre Processing
If you have a need to show a user interface (pre processing) for the
user after the files has been dropped, you will return such a UI from
the getPreProcessUI() method.
An example of such is shown below:
public UserInterface getPreProcessUI(DropCtx ctx) throws TVCException {
UserInterface ui = new UserInterface();
ui.setHref(ActionUtils.getActionURL("/myDropPreProcess"));
ui.setTarget(TargetLocation.SIDEPANEL);
ui.setSidePanelWidth(400);
return ui;
}The Drop Zone framework will explicitly add information about what row and column the drop were made on. This information is required later on when you call the drop zone callback Java Script.
For simplicity, we have provided a base action class that you can
extend from. This one is called
com.technia.tvc.office.ui.dropzone.actions.DropZonePreprocess.
The pre process page will show some user interface, typically in the
side panel, but could also be in a popup window. After the pre-process
page is complete, you need to invoke a Java Script within the table
frame with information about what files were dropped, what cell the
drop took place upon and some additional parameters that you most likely
want to access from your Drop Zone Handler.
var dataId = "<%= request.getParameter("dataId") %>";
var colIndex = <%= request.getParameter("col") %>;
var files = [];
<%
String[] fileNames = request.getParameterValues("file");
for (String fileName : fileNames) {
out.write(String.format("files.push('%s');", fileName));
}
%>
...
var args = {};
// collect the arguments in the args map...
var frame = parent.frames["tableContentFrame"].frames["tableBodyRight"];
frame.tvc.dropZone.afterPreprocess(dataId, colIndex, files, args);Take a look into the file /tvc/office/dropzone/tvcSelectFormat.jsp
that is part of the File Manager, which is a pre process page allowing
the user to select file-format.
11.3. File Package Download
The file package download (FPD), is a feature of the File Manager component, which allows downloading multiple files in a so called package to a folder in the client’s computer and to automatically open a pre-defined file from the package.
The files within such a package can consist of dynamic data from the Matrix database, and/or checked in files.
The File Package Download PDF guide contains a lot of information how to define what to include in a package. You can by only making an XML configuration be able to solve many common use cases, however, there are possibilities to implement a Java handler that allows you to have even better control of the generated package.
11.3.1. FPD Registration
A FPD configuration is an XML file containing the FPD definition. There are some different ways how to define this file. The simplest way is to store one configuration in a separate file, and store it under
/WEB-INF/tvc/fpd/MyFPD.xml
Or, if you use name spaces for resources (which is preferred), then store it as the example below shows:
/WEB-INF/tvc/mynamespace/fpd/MyFPD.xml
11.3.2. FPD Handler
To write a custom FPD handler, you need to create a Java class that
implements the interface called com.technia.tvc.office.server.fpd.Handler.
The only method, which your handler needs to implement, has the following signature:
package mypackage;
import com.technia.tvc.office.server.fpd.Handler;
import com.technia.tvc.office.server.fpd.HandlerCtx;
public class MyHandler implements Handler {
public void perform(HandlerCtx ctx) throws TVCException {
// logic goes here...
}
}Classes of interest are found from the API docs:
-
com.technia.tvc.office.server.fpd.Handler
-
com.technia.tvc.office,server.fpd.HandlerCtx
Within the perform method, you define what the package will contain.
Everything added to the package is defined as being either
a com.technia.tvc.office,server.fpd.HandlerCtx.PackageEntry or
a com.technia.tvc.office,server.fpd.HandlerCtx.PackageDependency.
The difference between a PackageEntry and a PackageDependency is that
while an Entry is a part of the Package, a Dependency is something that
is downloaded after the package has been created but before the package
is opened.
Currently the only dependency you can have is to a file checked-in to a business object in Matrix. The file might then be downloaded through the FCS server, if FCS is enabled in your environment. The benefit of not letting checked-in files being a part of the package, but being a dependency, is because of utilizing the benefits with the FCS architecture (i.e. reducing the need of transferring large amount of data over WAN).
Generally, one should reduce the size of the dynamic package if possible - because the package itself is always downloaded from the Main Collaboration Server (MCS), while dependencies can be downloaded from the File Collaboration Servers (FCS).
11.3.3. FPD Handler Example
Below is an example of a FPD handler. The code itself doesn’t perform any useful, just illustrating different ways to define the content of a package.
import com.technia.tvc.core.TVCException;
import com.technia.tvc.core.db.BusinessObjectUtils;
import com.technia.tvc.core.db.domain.DomainObject;
import com.technia.tvc.core.db.domain.to.FileTO;
import com.technia.tvc.core.html.io.XMLWriter;
import com.technia.tvc.core.util.XMLUtils;
import com.technia.tvc.office.server.fpd.Handler;
import com.technia.tvc.office.server.fpd.HandlerCtx;
import com.technia.tvc.office.server.fpd.HandlerCtx.PackageEntry;
import com.technia.tvc.office.server.fpd.HandlerCtx.TableExportEntry;
import com.technia.tvc.office.server.fpd.HandlerCtx.XMLWriterEntry;
import java.io.StringReader;
import java.util.List;
import javax.xml.parsers.ParserConfigurationException;
import org.w3c.dom.Document;
public class TestHandler implements Handler {
public void perform(HandlerCtx ctx) throws TVCException {
/*
* Test MQL
*/
String[] adminObjects = new String[]
{ "type", "attribute", "person", "role", "group", "page" };
for (int i = 0; i < adminObjects.length; i++) {
PackageEntry admin = ctx.addMQL("list " + adminObjects[i]);
admin.setSaveAs(adminObjects[i] + "s.txt");
admin.setSaveIn("admin");
}
/*
* Test URL
*/
PackageEntry url = ctx.addURL("/tvc/core/images/tvc_logo_big.gif");
url.setSaveIn("images");
url.setSaveAs("tvc_logo.gif");
/*
* Test adding input stream
*/
PackageEntry is = ctx.add(getClass().getResourceAsStream("TestHandler.class"));
is.setSaveIn("data");
is.setSaveAs("TestHandler.class");
/*
* Test adding reader
*/
PackageEntry reader = ctx.add(new StringReader("Hello world"));
reader.setSaveIn("misc");
reader.setSaveAs("helloworld1.txt");
/*
* Test adding plain string
*/
PackageEntry data = ctx.add("Hello World!");
data.setSaveIn("misc");
data.setSaveAs("helloworld2.txt");
/*
* Test adding page-object content
*/
PackageEntry page = ctx.addPageContent("TVC File Package Download Config");
page.setSaveAs("TVCFilePackageDownloadConfig.xml");
page.setSaveIn("admin");
/*
* Test XMLWriter
*/
XMLWriterEntry xml = ctx.addXML();
xml.setSaveIn("misc");
xml.setSaveAs("xmldata.xml");
XMLWriter xmlWriter = xml.getWriter();
xmlWriter.startElement("hello");
xmlWriter.startElement("world");
xmlWriter.finish();
/*
* Test adding a DOM Document
*/
try {
Document document = XMLUtils.createBuilder(null).newDocument();
document.appendChild(document.createElement("HelloWorld"));
document.getDocumentElement().appendChild(document.createElement("Test"));
PackageEntry doc = ctx.addXML(document);
doc.setSaveIn("misc");
doc.setSaveAs("doc.xml");
} catch (ParserConfigurationException pce) {
throw new TVCException(pce);
}
if (ctx.getUserData().getObjectIdCount() > 0) {
String ids[] = ctx.getUserData().getObjectIds();
for (int count = 0; count < ids.length; count++) {
process(ctx, ids[count]);
}
}
/*
* Test adding a CSV export of a simple query
*/
TableExportEntry tee = ctx.addTableData("Part", "*", "*", "*", "*", "", 100, true, null);
tee.setCSVOutput();
tee.setSaveIn("csv");
tee.setSaveAs("Parts_FromQuery.csv");
}
private void process(HandlerCtx ctx, String objectId) throws TVCException {
/*
* Table Export
*/
TableExportEntry tee = ctx.addExpandedData(objectId, "role_GlobalUser", new String[]
{ "EBOM From" }, 0, "TVC EBOM");
tee.setXMLOutput();
tee.setSaveAs("table_export.xml");
tee.setSaveIn(objectId);
/*
* Matrix Export
*/
String tnr[] = BusinessObjectUtils.getTNR(BusinessObjectUtils.newBusinessObject(objectId));
PackageEntry export = ctx.addExportBus(
tnr[0], tnr[1], tnr[2],
false, false, false, true,
true, true, true, false, null, null);
export.setSaveIn(objectId);
export.setSaveAs("export.xml");
/*
* Get related documents, if any, and do some additional testing.
*/
DomainObject dom = DomainObject.newInstance(objectId);
List<DomainObject> l = dom.getRelatedObjects("DOCUMENTS", "*", true, false);
for (int i = 0; i < l.size(); i++) {
DomainObject related = l.get(i);
/*
* Export again...
*/
PackageEntry exportEntry = ctx.addExportBus(
related.getType(),
related.getName(),
related.getRevision());
exportEntry.setSaveIn(objectId);
exportEntry.setSaveAs(String.format("%s_%s.xml",
related.getName(),
related.getRevision()));
/*
* Test file checkout
*/
FileTO files[] = related.getFiles();
for (int j = 0; j < files.length; j++) {
PackageEntry fileEntry = null;
if ((j % 2) == 0) {
fileEntry = ctx.addFileDependency(
related.getObjectId(),
files[j].getFormat(),
files[j].getFileName());
} else {
fileEntry = ctx.addFile(
related.getObjectId(),
files[j].getFormat(),
files[j].getFileName());
}
fileEntry.setSaveAs(files[j].getFileName());
fileEntry.setSaveIn(objectId + "/files");
}
}
}
}12. Graphic Reporting
12.1. Gadget interaction
12.1.1. Overview
Sometimes when an action is performed in a gadget there is a need to reload/manipulate one or more of the other gadgets. For example if you promote/demote issue state in one gadget you want to reload the other chart gadgets displaying issue state.
12.1.2. Dashboard
When loading the dashboard a javascript object is added to the window. The object is named dashboard and through this object you can access the public API. Today it is mainly used to get the gadgets.
Example of how to get gadgets with the config id set to `my-open-issues':
var gadgets = window.dashboard.getGadgetsWithConfigId('my-open-issues');
Note that the method returns an array of gadgets as the users might have added the gadget several times to the dashboard.
To access the window.dashboard you need to be on the same frame level as
the dashboard, i.e. in case you submit an action to a hidden frame in a
gadget the window.dashboard will not work.
TVC supplies a javascript file you can include to locate the dashboard
in the window stack. The javascript to include is
tvc/graphicreporting/scripts/tvcDashboardReload.js. Use the method
window.tvc.dashreload.getDashboard() to get the dashboard object.
Methods
| Name | Description |
|---|---|
getGadgetIds() |
Returns ids for all gadgets in dashboard. |
getGadget(id) |
Returns gadget to access the javascript API. |
getGadgetIdsWithConfigId(configIds) |
Returns an array with ids for gadgets with config id(s) set in configuration. Provide a string with a single config id or a string array for multiple config ids. Keep in mind that an array is returned as users might add a gadget several times. |
getGadgetsWithConfigId(configIds) |
Returns an array gadgets with config id(s). |
reloadGadgetsWithConfigId(configIds) |
Reload gadgets with config id(s). |
12.1.3. Gadget
On the gadgets you can perform a number of operations. For example you can reload the gadget and get the content DOM element.
Methods
| Name | Description |
|---|---|
content() |
Returns the content element as a jQuery object |
getID() |
Returns id of gadget. The id is generated and will change every time the dashboard is loaded. |
getConfigId() |
Returns configuration id of the gadget. The id is the one specified by the developer in the xml config file defining the gadget. |
getHeaderText() |
Returns the header text. |
getHeight() |
Returns the size of the gadget. note that this is not the actual height of the gadget content, but the preferred height of the gadget (while not maximized). |
getColumnSpan() |
Returns the column span. |
getContextPath() |
Returns the current context path. |
getActionURL(url) |
Returns an action URL |
isSuspended() |
Returns true if the gadget is suspended |
isMaximized() |
Returns true if the gadget is maximized |
loadJavaScript(src, onload) |
Loads a javascript and calls the specified function when it’s loaded. |
setMaximized(value) |
Sets the maximized state of the gadget. |
setHeight(value) |
Sets the height of the gadget in pixels. |
setColumnSpan(value) |
Sets the column span. |
setResizeHandlers(onBeginResize, onEndResize) |
Sets a javascript function that will be notified when the gadget is resized. |
setHeaderText(text) |
Sets the header text. |
showProgress() |
Shows the progress indicator. |
hideProgress() |
Hides the progress indicator. |
size() |
Returns the size of the content. |
reload() |
Reload the gadget. |
12.1.4. Using DashboardReloadAction
This easiest way to reload a number of gadgets is extend the action
DashboardReloadAction. In the perform() method you do the desired
action, e.g. promote issue, make a call to the business logic layer or
something else. The reloadConfigIds() defines the gadgets which needs
to be reloaded. Return the config ids defined in the configuration file.
Example (available in TVX):
PromoteIssueAction
package com.technia.tvx.pmc.actions;
import java.util.ArrayList;
import java.util.Collection;
import javax.servlet.http.HttpServletRequest;
import javax.servlet.http.HttpServletResponse;
import com.technia.tvc.core.TVCException;
import com.technia.tvc.core.db.BusinessObjectUtils;
import com.technia.tvc.core.db.MQLUtils;
import com.technia.tvc.core.db.aef.misc.TableRowIdParam;
import com.technia.tvc.core.db.transaction.TxType;
import com.technia.tvc.core.gui.dashboard.Dashboard;
import com.technia.tvc.graphicreporting.dashboard.actions.DashboardReloadAction;
/**
* Promotes an issue and updates related gadgets.
*
* @author <a href="mailto:thomas.bengtsson@technia.com">Thomas Bengtsson</a>
* @since 2014.1.0
*/
public class PromoteIssueAction extends DashboardReloadAction {
public PromoteIssueAction() {
super(TxType.UPDATE);
}
@Override
protected void perform(HttpServletRequest request,
HttpServletResponse response,
Dashboard dashboard) throws TVCException {
TableRowIdParam trip = new TableRowIdParam(request);
for (String issueId : trip.getObjectId()) {
BusinessObjectUtils.promote(issueId);
}
}
@Override
protected Collection<String> reloadConfigIds() {
Collection<String> ids = new ArrayList<String>();
ids.add("jqplot-issues-by-state-pie");
ids.add("jqplot-issues-by-state-bar");
ids.add("my-open-issues");
return ids;
}
}
The DashboardReloadAction always forwards to a jsp page which reloads the gadgets defined by the extended action class. The jsp page uses the public API for the dashboard and gadget to perform the reload.
12.1.5. Custom reload
When using the DashboardReloadAction a full reload of the gadget is perform (same as if you would click reload for the gadget). Using the public API you can access the gadgets and the content to have more granular control of what to do.
Example: Reload Structure Browser table
Example of how to reload a structure browser table (available in TVX):
AdvPromoteIssueAction
package com.technia.tvx.pmc.actions;
import java.util.ArrayList;
import java.util.Collection;
import javax.servlet.http.HttpServletRequest;
import javax.servlet.http.HttpServletResponse;
import com.technia.tvc.core.TVCException;
import com.technia.tvc.core.db.BusinessObjectUtils;
import com.technia.tvc.core.db.MQLUtils;
import com.technia.tvc.core.db.aef.misc.TableRowIdParam;
import com.technia.tvc.core.db.transaction.TxType;
import com.technia.tvc.core.gui.dashboard.Dashboard;
import com.technia.tvc.struts.action.ActionForward;
import com.technia.tvc.struts.action.ActionMapping;
/**
* Promotes an issue and updates related gadgets.
*
* @author <a href="mailto:thomas.bengtsson@technia.com">Thomas Bengtsson</a>
* @since 2014.1.0
*/
public class PromoteIssueAdvAction extends AdvDashboardReloadAction {
public PromoteIssueAdvAction() {
super(TxType.UPDATE);
}
@Override
protected ActionForward perform(ActionMapping mapping,
HttpServletRequest request,
HttpServletResponse response,
Dashboard dashboard) throws TVCException {
TableRowIdParam trip = new TableRowIdParam(request);
for (String issueId : trip.getObjectId()) {
BusinessObjectUtils.promote(issueId);
}
return mapping.findForward("reload");
}
@Override
protected Collection<String> reloadIds() {
// Defines the config ids of gadgets to reload
Collection<String> ids = new ArrayList<String>();
ids.add("jqplot-issues-by-state-pie");
ids.add("jqplot-issues-by-state-bar");
return ids;
}
@Override
protected Collection<String> tableReloadIds() {
// Return config ids of gadgets to reload the structure browser table for. No
// database call to fetch new data is done.
return null;
}
@Override
protected Collection<String> fullTableReloadIds() {
// Return config ids of gadgets to reload the structure browser table for. A
// database call is done to fetch the data needed for the table.
Collection<String> ids = new ArrayList<String>();
ids.add("my-open-issues");
return ids;
}
@Override
protected Collection<String> tableRowUpdateIds() {
// Return config ids of gadgets to update structure browser table rows for.
return null;
}
}
JSP (some sections removed to make it more readable)
<%@ taglib uri="/WEB-INF/tvc-core.tld" prefix="core"%>
<%@ taglib uri="/WEB-INF/tvc-struts-bean.tld" prefix="bean"%>
<%@ taglib uri="/WEB-INF/tvc-struts-logic.tld" prefix="logic"%>
<%@ include file="/tvc/core/tvcSetContentType.jspf"%>
<core:noCache />
<html>
<head>
<script src="../tvc/core/scripts/jquery.js" type="text/javascript"></script>
<script src="../tvc/graphicreporting/scripts/tvcDashboardReload.js" type="text/javascript"></script>
<script type="text/javascript">
if (!window.tvx) {
window.tvx = {};
}
if (!window.tvx.dashreload) {
window.tvx.dashreload = {
// Reload table in gadget with config ids (no db call is done)
reloadTable : function(configIds) {
var dashboard = window.tvc.dashreload.getDashboard();
if (dashboard != null) {
var _this = this;
$.each(dashboard.getGadgetsWithConfigId(configIds), function() {
_this.getTableIframe(this).tvcReloadPage();
});
}
},
// Reloads table in gadget with config ids (db call is done)
reloadFullTable : function(configIds) {
},
// Reloads table row
updateRow : function(configIds, dataId) {
},
// Gets content iframe for Structure Browser table
getTableIframe : function(gadget) {
return gadget.content().find('iframe').contents().find('iframe[name=tableContentFrame]')[0].contentWindow;
}
};
}
<logic:present name='reloadConfigIds' scope='request'>
var reloadConfigIds = [];
<logic:iterate id="id" name="reloadConfigIds" scope="request">
reloadConfigIds.push('<core:scriptEscape><bean:write name="id" /></core:scriptEscape>');
</logic:iterate>
window.tvc.dashreload.reload(reloadConfigIds);
</logic:present>
// Omitted code...
</script>
<%@ include file="/tvc/core/tvcAlertErrorPage.jspf"%>
</head>
<body></body>
</html>
Example: Manipulate DOM
Example of how to manipulate DOM elements directly (could be done for example in a JSP file which a struts action forwards to):
JSP
<html>
<head>
<script src="../tvc/core/scripts/jquery.js" type="text/javascript"></script>
<script src="../tvc/graphicreporting/scripts/tvcDashboardReload.js" type="text/javascript"></script>
<script type="text/javascript">
$(document).ready(function() {
// Get dashboard
var dashboard = window.tvc.dashreload.getDashboard();
// Find gadgets with config id 'my-open-issues'
var gadgets = dashboard.getGadgetsWithConfigId('my-open-issues');
// Manipulate DOM
$.each(gadgets, function() {
this.content().find('#result').addClass('ok');
});
});
</script>
</head>
<body></body>
</html>
13. Collaboration
13.1. Collaboration JavaScript API
13.1.1. Javascript methods
| Name | Description |
|---|---|
openCollaborationPanel(objectIds, options) |
Opens collaboration panel for one or more objects. Enovia supports displaying collaboration for only one object at the time. Use the option parameter (optional) to further detail the behaviour of the collaboration panel. Options are defined as a object literal.Available options:launchCreate - Launches the create form when the collaboration panel has been loaded. |
closeCollaborationPanel() |
Closes the collaboration panel. |
openMyspace() |
Opens My Space panel. |
closeMyspace() |
Closes My Space panel. |
Example
Opens discussion for selected objects in structure browser table
...
var objectIds = tvc.findFrame(window, 'tableContentFrame').getSelectedObjectIds();
top.getCollaborator().openCollaborationPanel(objectIds);
...Launches create form once the panel is loaded
...
var options = {
launchCreate : true,
component: 'discussion', // or 'workflow'. optional option.
setId: '0.0.0.0', // discussionId or workflowId. optional option.
itemId: 'x.x.x.x' //WorkflowTaskId to highlight the specific task. optional option.
};
var objectIds = tvc.findFrame(window, 'tableContentFrame').getSelectedObjectIds();
top.getCollaborator().openCollaborationPanel(objectIds, options);
...13.2. Discussion Java API
13.2.1. Overview
Sometimes there is a need to send messages and notifications programmatically. Examples:
-
A part has been promoted to Released and a message shall be sent to the creator.
-
Wizard with custom jsp pages providing an easy way for users to handover an object in a lifecycle. The subject and receivers are generated by custom code and the user only needs to enter a message.
When creating messages and you specify its subject, message, from, to,
importance, context object among other things. The persons the message
is sent to as well as the sender automatically receives a notification.
These are displayed in the notification panel (by clicking the
notification icon on top right corner of the Enovia application) and in
the Inbox located in My Space (reached by clicking View all messages
in the notification panel). If these persons are online its also
possible to broadcast the notification. The notification will be
displayed in the browser without having to reload the page.
Replying to a message is similar to creating a message. The only difference is that you set the id of the thread to reply to.
Read the javadoc for detailed information on how interact with the API.
System tags are also generated for programmatically created messages.
Messages without any receivers are public and can be read by all users.
13.2.2. Examples
Create message
...
// Input
String from = "Val Kilmer";
String to = "Clint Eastwood";
String partId = "1.2.3.4";
String subject = "My Subject";
String messageText = "My Message";
// Factories
DiscussionDAOFactory factory= DAOFactory.getInstance().getDiscussionFactory();
PersonDAO personDAO = factory.getPersonDAO();
MessageDAO messageDAO = factory.getItemDAO();
DiscussionConfigDAO configDAO = factory.getConfigDAO();
// Message object
Message message = new Message();
// From and To
message.setFrom(personDAO.read(from));
message.addRecipient(new Recipient(RecipientType.TO, personDAO.read(to)));
// Context object
message.addContextId(EnoviaIds.parse(partId));
// Subject and message
message.setSubject(subject);
message.setMessage(messageText);
// Create
Environment env = RequestUtils.newEnv(request);
messageDAO.create(message, env);
...Reply to message
...
// Input
String from = "Clint Eastwood";
String to = "Val Kilmer";
String message = "Reply Message";
String replyToThread = "5.6.7.8";
// Code from create message example
...
// Reply to thread
message.setSetId(EnoviaIds.parse(replyToThread));
// Create
messageDAO.create(message, env);
...The subject for replies will be RE: if no subject is set for the
reply message
Broadcast notification
...
// Code creating/replying message
messageDAO.create(message, env);
// Broadcast notifications
ReadContext ctx = new ReadContext.Builder(factory)
.setPerson(person).setEnv(env)
.setIncludeContext(true)
.setIncludeContextFiles(false)
.build();
Collection<Notification> notifications = messageDAO.getNotifications(message.getId(), ctx);
factory.getSetAction().notify(new NotificationContext.Builder(ctx)
.setNotifications(notifications).build());
...The notifications are sent via HTTP to the application servers. If the messages are created on a batchjob/background service server it must have access to send HTTP requests to all application servers.
Searching Collaboration Object
By using discussion thread DAO or wofkflow DAO, we can search workflow and thread object.
...
DiscussionThreadDAO discussionDAO = factory.getSetDAO();
SearchResult<DiscussionThread> threads = discussionDAO
.find(new SearchContext.Builder(factory).setContextIds(objectId)
.setEnv(data.getEnv())
.setPage(0)
.setPageSize(1)
.setPerson(person)
.build());
...If we are not setting the page size then default page size in 100. We can change the page size at system level for these API by setting the following property key:
tvc.collaboration.search.pagesize
13.3. Workflow Java API
13.3.1. Overview
Sometimes there is a need to create workflow or approve or reject task programmatically.
13.3.2. Examples
Create Workflow
...
WorkflowDAOFactory factory = DAOFactory.getInstance().getWorkflowFactory();
Person person = factory.getPersonDAO().read(currentUser);
UpdateContext ctx = new UpdateContext.Builder(factory).addContextIds(ids).setEnv(env).setPerson(person).build();
WorkflowConfig config = new WorkflowConfig.Builder(configJson).build(); // config from json or java builder
WorkflowValue.Builder workflowValueBuilder = new WorkflowValue.Builder(factory, config, contextId)
.setOwner(currentUser)
.setEnv(new Environment())
.addTaskValue(
new TaskValue.Builder(factory, "task-evaluation").addFieldValue("instructions",
"Evaluation Instructions")
.addAssignees(
new Bunch("Evaluators", getPersons(contextId,
"task-evaluation"))) // assignees by code
.build()) // if custom values for field or assignee is required
.addTaskValue(
new TaskValue.Builder(factory, "task-review").addFieldValue("instructions", "Review Instructions")
.addAssignees(
new Bunch("Reviewers", getPersons(contextId, "task-review"))) // assignees by code
.build()); // if custom values for field or assignee is required
Workflow workflow = new Workflow.Builder(factory, workflowValueBuilder.build()).build();
WorkflowAction action = factory.getSetAction();
ActionResult result = action.create(new WorkflowContext.Builder(ctx).setWorkflow(workflow).build());
dao.notify(new NotificationContext.Builder(ctx).setNotifications(result.getNotifications()).build());
String workflowId = workflow.getId().getId();
...Process Task
...
WorkflowDAOFactory factory = DAOFactory.getInstance().getWorkflowFactory();
Person person = factory.getPersonDAO().read(TxManager.getCurrentUser());
ReadContext ctx = new ReadContext.Builder(factory)
.setEnv(env).setPerson(person).setIncludeRelated(true).build();
Workflow workflow = factory.getSetDAO()
.read(factory.getConfigDAO().resolveId(workflowId), ctx);
Task task = workflow.getTask(factory.getConfigDAO().resolveId(taskId));
WorkflowContext wctx = new WorkflowContext.Builder(ctx).setWorkflow(workflow).build();
TaskContext tctx = new TaskContext.Builder(ctx).setTask(task)
.setStatus(status) // task status approve or reject etc..
.setFields(fields) // configured field values. like comments etc..
.setAssignees(assignees) // assignees if status is reassign
.build();
ActionResult result = factory.getItemAction().process(wctx, tctx);
factory.getSetAction().notify(new NotificationContext.Builder(ctx).setNotifications(result.getNotifications()).build());
...Add Task
To add parallel task and serial task. Task object can have "to task" ids and "from task" ids to create the task in between.
...
ActionResult result = factory.getSetAction().addTask(wctx, tctx);
...Task Commands
...
Collection<Command> commands = factory.getItemAction().getCommands(wctx, tctx); // commands from the configured operations
...
boolean hasCommand = factory.getItemAction().hasCommand(wctx, tctx, ApproveCommand.class);
...Workflow Commands
...
Collection<Command> commands = factory.getSetAction().getCommands(wctx); // commands from the configured operations
...
boolean hasCommand = factory.getSetAction().hasCommand(wctx, TerminateCommand.class);
...Task Operation
public class TestOperation extends AbstractTaskOperation {
public static class TestCommand extends AbstractCommand {
public TestCommand(OperationContext ctx) {
super(ctx, "test", "Test Operation");
}
}
@Override
public Command include(OperationContext ctx) throws TVCException {
return new TestCommand(ctx);
}
@Override
protected ActionResult execute(OperationContext ctx, TaskDAO dao, WorkflowContext wctx, TaskContext tctx) {
}
}Task Custom Form Operation
public class TestOperation extends CustomTaskOperation {
public static class TestCommand extends CustomTaskCommand {
public TestCommand(OperationContext ctx) {
super(ctx, "test", "Test Operation");
//setting the form title and submit label
setFormSubmitLabel("Click Test Operation");
setFontIcon("fa fa-asterisk");
}
}
@Override
public Command include(OperationContext ctx) throws TVCException {
return new TestCommand(ctx);
}
@Override
protected ActionResult execute(OperationContext ctx, TaskAction action, WorkflowContext wctx, TaskContext tctx) {
}
}Custom Workflow Email Notification
public class CustomWorkflowEmailNotificationHandler extends WorkflowEmailNotificationHandler{
@Override
public boolean validatePerson(NotificationContext ctx, Notification notification) {
boolean isValidPerson = super.validatePerson(ctx, notification);
boolean isValidDelegator = false;
Task task = (Task) notification.getCurrent();
if (task != null) {
Person delegator = task.getDelegator();
if (delegator != null) {
isValidDelegator = ctx.getPerson().equals(task.getOwner())
&& ctx.getPerson().equals(task.getWorkflow().getOwner());
}
}
return isValidPerson || isValidDelegator;
}
}
}