<Table>
    <Column>
        ....
        <DataHandlerClass>com.company.MyDataHandler</DataHandlerClass>
    </Column>
</Table>
Structure Browser
21 March 2016
1. Structure Browser
1.1. Data Handler
1.1.1. Data Handler Overview
The data in a TableBean, is retrieved by an Evaluator from the database during the evaluation process (also referred to as thevalidation process).
The evaluation process refers to the process when selecting the information on all the objects and relationships within the table, as defined through the select statements defined by all the columns, e.g. the data handlers, within the table.
The purpose with the Data Handler concept, is to provide a powerful but simple mechanism to integrate with the more complex evaluation logic. The evaluation logic has to deal with several issues, which a Data Handler does not to have to consider. Also, not to forget, one additional and very important aspect; the Data Handler concept is performing much better than, for example, a JPO program does. See this section for a deeper discussion regarding performance.
A Data Handler is mainly responsible for three things, namely:
-
Inform the evaluator what select statements it needs
-
Create the Cell, which will hold the selected data
-
Populate the cell with data, which the evaluator has retrieved from the database
Moreover, a Data Handler can also influence how the new value that the user entered in in-cell editing for a particular cell is stored in the database. It is also the Data Handlers responsibility to evaluate whether a user will have edit access to a cell, granted that the column is editable.
A column in a system table can have a custom Data Handler registered. If no custom datahandler is defined, the default Data Handler will be used. E.g. all columns in a table has a datahandler, either explicitly defined or implicit.
1.1.2. When is a Data Handler Needed?
A Data Handler is needed when any of the following criteria is true.
-
You need to select more information from a business object or relationship than you can by using a standard expression as defined in the table-column.
When defining an expression in a table-column, only one expression could be defined.
-
You need to select information from both the relationship and the business object. For example, the relationship contains the quantity value and the business object contains the unit of measure. Then you can use a datahandler to retrieve both these values.
-
You need to perform some calculation/processing of the data retrieved. For example, if you have an attribute containing a temperature value and the value is stored as Celsius; then the datahandler could be used to convert it to Fahrenheit.
-
You need to attach special logic, needed for being able to support in-cell-editing of the value(s) in the cell.
-
If you currently have a JPO in a table column, and want to increase performance.
1.1.3. Data Formatting
Another reason why you should use Data Handlers instead of JPOs is that you gain much more control over the cells in the column. With a JPO you can only produce cells containing pure text or HTML. With a Data Handler you have full control over the data type of each cell.
A datahandler should only retrieve and store the data it gets from the evaluator. It should never store any additional formatting instructions, such as HTML, in the table cells as it has several drawbacks, such as:
-
The data can only be presented correctly in a HTML page. Hence, you will not be able to produce printable pages in PDF or exportable data; as the formatting instructions will break the presentation of the cell value in any other format than HTML.
-
You are not able to distinguish the actual data from the formatting instructions, hence editing the cell value is not possible.
-
You will not be able to use the chart function, and possible other built-in functions, as these functions would then not work as expected as the cells contains formatting data.
-
The formatting instructions will consume unnecessary memory, as the size of the formatting instructions might be high.
If you need to perform formatting of the data, adding mark-up tags etc., you should combine using the DataHandler with a Table Cell Renderer.
By doing so, you can from your Data Handler create a cell that holds all the necessary data you need for the presentation, and let the Table Cell Renderer format the data when the table is rendered.
This allows you to format the data in one way on the HTML page and in another way on the exported page or printer friendly page.
1.1.4. Data Handler Performance
As many of you already know you can use Java Program Objects (JPOs) that resides inside the Matrix database to produce content in table columns. However, there are problems with this approach that can be solved through the use of Data Handlers.
The most important problem that Data Handlers aim to solve is performance. The general rule is that for performance reasons you should always make as few queries as possible into the database to get the information that your program need. This rule is painfully true when it comes to producing content in table columns.
Any JPO will have to make at least one or two queries to get the information that that particular JPO needs. Hence, the more JPOs you add to a table, the more queries will be made into the database. (There are JPOs that make a lot more than one or two queries into the database to get the information that it needs to produce content in just one table column, this behavior must be avoided at all cost since it will scale poorly resulting in disastrous performance). Data Handlers are designed in a way that all information that is required for the entire table will be selected in at most two queries.
There are other performance reasons for not using JPOs, such as the horrible serialization and de-serialization of arguments and return values that happens whenever a JPO is invoked.
Also, keep in mind that if you have a table containing several columns that uses JPOs, there is a big risk that each of these JPOs are selecting the same information as a previous JPO did (for example, type, name, revision, current and possibly other selectables). There is no way to streamline the database calls, as each JPO call is an atomic operation unaware of eachother.
If the data required for a column can’t be fetched using standard select statements, for example you need to perform some calculation based upon information deeper in the structure; such as different roll-up calculations. You should not implement such a logic inside a table; as this would require additional database calls, such as expands or similar.
1.1.5. Table Bean
Data, such as business objects lists, can be stored inside classes that
implements the com.technia.tvc.core.table.FlatTableBean interface.
Structured data, e.g. business objects with connections to each other,
are typically stored inside classes that implements
the com.technia.tvc.core.table.StructureBean interface. Both these
interfaces inherits from the same root interface,
namely com.technia.tvc.core.table.TableBean.
Each row in a TableBean is represented by
a com.technia.tvc.core.table.TableData instance. In the case when a
StructureBean is used, the actual TableData instance is an instance of
a com.technia.tvc.core.structure.StructureBeanNode (which is a subclass
to TableData).
The TableData in turn, contains a reference to
its com.technia.tvc.core.gui.table.Row, which normally has at least
one com.technia.tvc.core.gui.table.Cell attached. The cells are created
when a system table has been evaluated over the set of
objects/relationships, which the TableBean contains.
Each Cell can have several values, where each value is represented as
a com.technia.tvc.core.gui.table.CellValue. In most situations, a Cell
contains only one CellValue, however, when a Cell contains values
selected from related object(s); depending on the number of related
objects, the corresponding amount of CellValues will be created.
For example, selecting from[EBOM].to.name on a business object will
return the names of all objects connected via the EBOM relationship.
Hence, the cell will contain one CellValue for each name returned.
The CellValue itself should, if the cell allows editing and is editable,
be able to update the value to the database. The default CellValue
implementations within TVC dispatches the update call to an
com.technia.tvc.core.db.table.evaluator.Updater, which performs the
update. Actually, the default updater being used is
the com.technia.tvc.core.db.table.evaluator.DefaultUpdater instance.
1.1.6. Data Handler Basics
Registration of a Data Handler
A Data Handler is a registered on a table column, by defining a setting
with name Data Handler Class, whose value must be the fully
qualified name of the Java class to be used for the particular column.
If you have defined your table in XML format, then you can register the Data Handler like this example:
Important Information Regarding Data Handler
TVC will only create one instance of every Data Handler class being used. Thus, if many table columns define that they use the same Data Handler class they will also use the same Data Handler instance. A side effect of this is that you must not under any circumstances save state within the Data Handler instance during an evaluation or between evaluations (e.g., as instance fields), since it is shared by all threads and all users.
By saying this, you should now know that you never should use or rely
upon instance variables inside a datahandler. All fields within a Data
Handler should, be seen as being final, regardless if they have been
marked so or not.
How the Data Handler Works
A Data Handler is a regular Java class that implements
the com.technia.tvc.core.db.table.evaluator.DataHandler interface from
TVC Core. This interface defines three methods that you are required to
implement.
The methods are:
void prepareEvaluation(Column column, EvaluationInput input);

Cell createCell(Column column, EvaluatedData data);

void populateCell(Cell cell, EvaluatedData data);
These methods are invoked on the Data Handlers by TVC whenever a table is being evaluated.
The following picture illustrates the interaction between a Data Handler and the Evaluator within TVC.

|
Even though you are able to perform additional database calls, such as invoking JPO’s or performing other kind of database queries, within any of the methods in a Data Handler, you should never do so. If doing so, you will completely miss the whole idea of using Data Handler as the performance will be bad and the approach will scale very poorly. |
Please note that when you are creating your own data handler, most of
the column settings as described in the Administration Guide for
Structure Browser will not affect the cell’s at all, since those
column settings are mainly affecting the way
the com.technia.tvc.core.db.table.evaluator.DefaultDataHandler works.
However, you are of course able to sub-class the Default Data Handler, or handle those settings you need in your own datahandler. Look at this document for information how to do so.
Preparing the Evaluation
The first method that is invoked on the Data Handler is
theprepareEvaluation method. This method is invoked once per evaluation
before any data is queried from the database. In this method a Data
Handler will define what information it needs from the database. You can
do that, by using methods on
the com.technia.tvc.core.db.table.evaluator.EvaluationInput object.
The following example illustrates how to define selectables on both business objects and relationships.
...
public void prepareEvaluation(Column column EvaluationInput input) {
    input.addSelectBus("attribute[Unit of Measure]");
    input.addSelectRel("attribute[Quantity]");
    //Path selectables as <PathType>~<PathDirection>~<Expression>~<Selectable>
    input.addSelectPath("Proposed Activity.Where~owner~to[Proposed Activities].from.to[Change Action].from~name");
     //add Path selectables by using alternate element Physical Id as <PathType>~<PathDirection>~<Expression>~<Selectable>|<AlternatePhysicalIDExpression>
    input.addSelectPath("Proposed Activity.Where~owner~to[Proposed Activities].from.to[Change Action].from~name|to[Part Specification].from.physicalid");
}
...
When the Evaluator has invoked the prepareEvaluation method on all Data Handlers in the table being evaluated it will collect all select statements defined and query the database to retrieve the desired information.
Even if several columns are using the same select expression(s), you should always add all select expressions that you need in the prepareEvaluation method. E.g. you should not skip that just because a previous datahandler in the table also will add them. This is important as a user might hide a table column, and if that has been done, all columns are not evaluated, hence this might lead into runtime problems, which are hard to troubleshoot.
For simplicity, the example code above does not take advantage of using symbolic names when defining the selectables. This will be described later.
If the same Data Handler class has been associated with more than one column in the same table, then the prepareEvaluation method will be invoked once per column.
Create Cell
The next method that TVC will invoke on a Data Handler is createCell.
The purpose of this method is simply to create an instance of a class
that implements the com.technia.tvc.core.gui.table.Cell interface. You
can return an instance of a Cell class that you have created yourself,
just as long as it implements the Cell interface properly. However, the
different Cell implementations that comes with TVC will probably satisfy
your requirements most of the time.
The following list show the current Cell implementations available in TVC
The following examples illustrates how the createCell method might be implemented.
/**
 * 1: Create a string-cell, without any edit capabilities
 */
public Cell createCell(Column column, EvaluatedData data) {
    return new StringCell(column, null);
}
/**
 * 2: Create a string-cell, with the default updater
 */
public Cell createCell(Column column, EvaluatedData data) {
    return new StringCell(column, DefaultUpdater.INSTANCE);
}
/**
 * 3: Create a date-cell, with the default updater
 */
public Cell createCell(Column column, EvaluatedData data) {
    return new DateCell(column, DefaultUpdater.INSTANCE);
}
/**
 * 4: Creates a int-cell, with the default updater
 */
public Cell createCell(Column column, EvaluatedData data) {
    return new IntCell(column, DefaultUpdater.INSTANCE);
}
As mentioned earlier, a Data Handler can also define the behaviour how a
value within a cell is updated. When using the default Cell
implementations described above, you can supply
a com.technia.tvc.core.db.table.evaluator.Updater as second argument
(you can also supply null here, if not allowing updates at all). You can
either use the com.technia.tvc.core.db.table.evaluator.DefaultUpdater or
create your own variant, which would be able to allow modifications of
fields, which the default updater is unable to handle.
Furthermore, the createCell method will be invoked once per cell being evaluated in the column (or columns) that the Data Handler is associated with. However, if a cell is being re-evaluated (such as when the user clicks the reload button on the table in Structure Browser) TVC might choose to re-use the cell object that was created on a prior evaluation for that particular row and column, hence, this method is not guaranteed to be called upon each table evaluation.
Populate Cell
The last method that is invoked is populateCell. The purpose of this method is to add values to the Cell object that createCellreturned. Also this method is invoked once per cell being evaluated in the column (or columns) that the Data Handler is associated with. On most occasions a cell will only display a single value, but it is possible to display multiple values in a single cell if you are required to do so (e.g., when displaying the name - or some other property - of business objects connected with the business object on a particular row). Cell values are added with the addValue method on the Cell object.
Example code that will populate the cell with values as selected from the database.
public void populateCell(Cell cell, EvaluatedData data) {
    cell.setEditable(false); // disallow edit for all cells...
    SelectedData objectData = data.getObjectData();
    SelectedData relData = data.getRelationshipData();
    //to get path data
    SelectData pathSelect = cell.getColumn().usesBusinessObject() ? data.getPathData() : data.getRelPathData();
    if (relData != null && objectData != null) {
        String qty = relData.getSelectValue("attribute[Quantity]");
        String uom = objectData.getSelectValue("attribute[Unit of Measure]");
        if (qty != null && uom != null) {
            cell.addValue(qty + " " + uom);
        }
    }
}
Summary
As mentioned earlier, a Data Handler uses select statements to retrieve information from the business objects and/or relationships in a table. The prepareEvaluation method is invoked to query the Data Handlers what select statements should be selected. Here are a few examples of such select statements.
-
name
-
current
-
current.actual
-
description
-
attribute[ATTRIBUTE_NAME]
-
from[RELATIONSHIP_NAME].to.name
-
to[RELATIONSHIP_NAME].from[TYPE_NAME].attribute[ATTRIBUTE_NAME]
Example: A table has three columns. The first column has a DataHandler called A, the second column has a DataHandler called B, etc. When the table is being evaluated, TVC will ask all three Data Handlers what select statements should be selected.
After the select statements have been collected, TVC will select all select statements in at most two calls to the database (one call for select statements that should be selected on business objects and one call for select statements that should be selected on relationships).
Lets assume that Data Handler A adds the business object select
statements name and current, B adds the select statement
modified, and C adds the select statements current and
attribute[Quantity]. After TVC has invoked prepareEvaluationon all
three Data Handlers it will have the following list of business object
select statements:
-
name
-
current
-
attribute[Quantity]
-
modified
Notice that although current was added by two Data Handlers (A and
C) it will only be selected once. The next thing TVC does is to select
these four select statements on the business objects in the table, using
only one call to the database (in the ever ongoing struggle to achieve
the best possible performance in your code limiting the number of
database calls is usually the best approach).
When TVC has selected the information it will continue by invokingcreateCell and populateCell on the Data Handlers. This is where the Data Handlers process the information that was selected to create Cell instances and populate them with values. Hence, these methods will be invoked once per row being evaluated. E.g., if 100 rows are being evaluated createCell will be called 100 times on DataHandler A, 100 times on DataHandler B, and 100 times on DataHandler C. The same goes for the populateCellmethod.
When creating Cells there are a few built in Cell implementations to choose among, e.g., StringCell, DateCell, IntCell, RealCell, BooleanCell. While these implementations will handle most use cases there might come times when you have to implement your own Cell implementation, such as when the Cell needs to hold more complex data structures. Data structures that a custom CellRenderer then will display appropriately on the web page or in an export.
Also note that if a cell should have edit capabilities the DataHandler is required to assign an Updater to the cell when creating it. The Updater is responsible for saving the new values into the database. A DataHandler also has the responsibility to check if a certain user should have access to edit a Cell (e.g., checking if the user has modify access on the business object). The user will of course not be able to successfully edit a cell he/she doesn’t have proper access rights for in Matrix. I.e., TVC will not override Matrix access. The reason why a DataHandler should check if a user has access to edit a cell is only so that the cell will be rendered as an editable field when the table is shown in edit mode. If the user should have access to edit a Cell the DataHandler must call the setEditable(boolean) method on the Cell.
1.1.7. The Default Data Handler
The Default Data Handler can be extended, in order to reuse logic that is implementing and considering many of the standard settings that can be applied to a column. For example, support for:
-
Alternate OID Expression
-
Alternate Type Expression
-
Usage of Rules
-
Cell Editable Expression
-
Cell Showable Expression
-
Determining Edit access to objects/relationships
-
Handling the data type and creates corresponding Cell implementation
Override prepareEvaluation
You can override the prepareEvaluation method in order to add more selectables. However, do not forget to call the super class implementation of this method. Example:
public void prepareEvaluation(Column column, EvaluationInput input) {
    super.prepareEvaluation(column, input);

    // add more selectables...
    input.addSelectBus(...);
    input.addSelectRel(...);
    //add Path selectables as <PathType>~<PathDirection>~<Expression>~<Selectable>
    input.addSelectPath("Proposed Activity.Where~owner~to[Proposed Activities].from.to[Change Action].from~name");
}
Override createCell
If you want to create another Cell than what is created by default, you can override the createCellImpl method to return the appropriate Cell instance. The code below illustrates what happens in the DefaultDataHandler implementation:
protected Cell createCellImpl(Column col, EvaluatedData data, int dataType) {
    Updater updater = getUpdater();
    switch (dataType) {
        case AttributeConstants.TYPE_STRING:
            return new LocalizedCell(col, updater);
        case AttributeConstants.TYPE_INT:
            return new IntCell(col, updater);
        case AttributeConstants.TYPE_REAL:
            return new RealCell(col, updater);
        case AttributeConstants.TYPE_DATETIME:
            return new DateCell(col, updater);
        case AttributeConstants.TYPE_BOOL:
            return new BooleanCell(col, updater);
        case AttributeConstants.TYPE_UNKNOWN:
            if (col.getSettings().isColumnTypeProgramHTMLOutput()
                    || col.getSettings().isColumnTypeImage()) {
                return new HtmlCell(col);
            }
            return new UnknownCell(col, updater);
        default:
            throw new IllegalArgumentException("unknown type: " + dataType);
    }
}
Override populateCell
You should not override the populateCell method directly, instead, you should override one of the methods below:
-
protected void populateImpl(Cell cell, EvaluatedData data)
-
protected void internalAddCellValues(Cell cell, Iterator cellValues, Iterator alternateOids, Iterator alternateTypes)
The first method, populateImpl, is collecting some additional selected values such as alternate oid and type values before invoking the internalAddCellValues. In case you need to handle the alternate oid/type values, you should override the latter method; otherwise you can preferably override the first method. Example:
protected void populateImpl(Cell cell, EvaluatedData data) {
    // logic goes here...
}
1.1.8. Updater
The com.technia.tvc.core.db.table.evaluator.Updater is responsible for
updating a value into the database. The value could typically be stored
inside an attribute on the business object or relationship, or it could
be something else; for example the description, owner, another basic
property or possible information stored somewhere else (such as
information stored on a related object).
There is a default implementation of the Updater being used normally in TVC, which is capable of handling the following expressions:
-
Business Object Expressions
-
attribute[Attribute Name]
-
attribute[Attribute Name].value
-
description
-
owner
-
name
-
-
Relationship Expressions
-
attribute[Attribute Name]
-
attribute[Attribute Name].value
-
type
-
Moreover, if the column has been assigned an Update Program and
Update Function, such a JPO will be invoked instead when to perform
the update. In this case, it is up to the JPO to determine what kind of
expressions that are supported. However, due to performance issues,
please consider implementing the update logic inside a
custom Updater instead of implementing it in a JPO.
An Updater is, as mentioned, responsible for updating a value into the database. The updater should return a boolean indicating whether or not the update were successfully made, or in case of serious problems, throwing an exception of type TVCException.
Creating a Custom Updater
If the com.technia.tvc.core.db.table.evaluator.DefaultUpdater does not
support editing of the data you have in the cell, you might need to
implement a custom updater to allow so.
The source code below illustrates a template of how a custom updater could be implemented.
import com.technia.tvc.core.TVCException;
import com.technia.tvc.core.db.aef.env.Environment;
import com.technia.tvc.core.db.table.evaluator.Updater;
import com.technia.tvc.core.gui.table.CellValue;
import com.technia.tvc.core.gui.table.Column;
import com.technia.tvc.core.gui.table.Row;
import com.technia.tvc.core.gui.table.TableClient;

public class MyUpdater implements Updater {

    /**
     * The singleton instance.
     */
    public static final Updater INSTANCE = new MyUpdater();

    private MyUpdater() {}

    public boolean updateCellValue(TableClient.Entry entry,
                                   CellValue cellValue,
                                   String newValue,
                                   Environment env) throws TVCException {
        Row row = cellValue.getCell().getRow();
        Column column = cellValue.getCell().getColumn();
        String oldValue = cellValue.getValue();
        String objectId = cellValue.getObjectId();
        if (objectId == null) {
            objectId = row.getObjectId();
        }
        String relationshipId = cellValue.getRelationshipId();
        if (relationshipId == null) {
            relationshipId = row.getRelationshipId();
        }

        // PERFORM UPDATE LOGIC HERE...

        return true;
    }
}
Code Examples
This document shows a couple of different implementations of Data Handlers.
Example 1 - Combining Selected Values
This example selects the Quantity value from the relationship and the Unit of Measure from the business object. These values are concatenated, and added to the Cell.
import com.technia.tvc.core.TVCException;
import com.technia.tvc.core.db.aef.AEFUtils;
import com.technia.tvc.core.db.aef.macro.ParsedStatement;
import com.technia.tvc.core.db.aef.naming.Naming;
import com.technia.tvc.core.db.table.evaluator.DataHandler;
import com.technia.tvc.core.db.table.evaluator.EvaluatedData;
import com.technia.tvc.core.db.table.evaluator.EvaluationInput;
import com.technia.tvc.core.db.table.evaluator.SelectedData;
import com.technia.tvc.core.gui.table.Cell;
import com.technia.tvc.core.gui.table.Column;
import com.technia.tvc.core.gui.table.impl.StringCell;

import java.util.Locale;

public class QtyAndUnitHandler implements DataHandler {

    private static final ParsedStatement qty = new ParsedStatement(
            "$<attribute[attribute_Quantity].value>");

    private static final ParsedStatement uom = new ParsedStatement(
            "$<attribute[attribute_UnitofMeasure].value>");

    public void prepareEvaluation(Column column, EvaluationInput input) {
        input.addSelectRel(qty.get());
        input.addSelectBus(uom.get());
    }

    public Cell createCell(Column column, EvaluatedData data) {
        return new StringCell(column, null);
    }

    public void populateCell(Cell cell, EvaluatedData data) {
        /*
         * Get the quantity and unit value
         */
        SelectedData selectedData = data.getRelationshipData();
        if (selectedData != null) {
            String quantity = selectedData.getSelectValue(qty.get());
            String unit = getLocalizedUOM(data.getObjectData()
                    .getSelectValue(uom.get()), data.getEnv().getLocale());
            if (quantity != null && unit != null) {
                StringBuffer sb = new StringBuffer();
                sb.append(quantity);
                if (quantity.endsWith(".") || quantity.endsWith(",")) {
                    sb.append("0");
                } else if (quantity.length() == 0) {
                    sb.append("0.0");
                }
                sb.append(" ").append(unit);
                cell.addValue(sb.toString());
            }
        }
    }

    private static String getLocalizedUOM(String unit, Locale locale) {
        try {
            /*
             * Returns the localized value of the Unit of Measure
             * attribute. The localized value is picked up from the
             * emxFrameworkStringResources.properties files.
             */
            String localized = AEFUtils.getLocalizedRangeName(
                    Naming.resolve("attribute_UnitofMeasure"),
                    unit,
                    locale);
            if (localized != null) {
                return localized;
            }
        } catch (TVCException e) {
        }
        return unit;
    }
}
Comments to the classes used in the code example above.
Example 2 - Usage of Custom Settings
This example is showing how to use custom settings on the column to
configure the behavior of a Data Handler. This Data Handler will for
each state defined in the policy either show the actual or
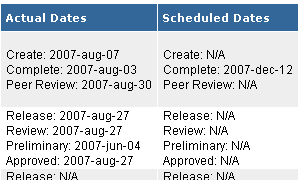
the scheduled date. By using the setting Show Scheduled, you can
change between showing either the actual or scheduled date.
import com.technia.tvc.core.TVCException;
import com.technia.tvc.core.db.DateUtils;
import com.technia.tvc.core.db.aef.AEFUtils;
import com.technia.tvc.core.db.model.PolicyInfo;
import com.technia.tvc.core.db.table.evaluator.DataHandler;
import com.technia.tvc.core.db.table.evaluator.EvaluatedData;
import com.technia.tvc.core.db.table.evaluator.EvaluationInput;
import com.technia.tvc.core.db.table.evaluator.SelectedData;
import com.technia.tvc.core.gui.table.Cell;
import com.technia.tvc.core.gui.table.Column;
import com.technia.tvc.core.gui.table.ColumnSettings;
import com.technia.tvc.core.gui.table.impl.StringCell;
import com.technia.tvc.core.util.StringUtils;

import java.util.Locale;
import java.util.List;

public class StateDateHandler implements DataHandler {
    private static final String SHOW_SCHEDULED = "Show Scheduled";

    public void prepareEvaluation(Column column, EvaluationInput input) {
        /*
         * Depending on if we are showing scheduled or actual,
         * different select expressions are needed.
         */
        if (getShowScheduled(column)) {
            input.addSelectBus("state.scheduled");
        } else {
            input.addSelectBus("state.actual");
        }
    }

    public Cell createCell(Column column, EvaluatedData data) {
        return new StringCell(column);
    }

    public void populateCell(Cell cell, EvaluatedData data) {
        SelectedData objectData = data.getObjectData();
        if (objectData != null) {
            try {
                String selectSuffix = getShowScheduled(cell.getColumn()) ?
                        "scheduled" : "actual";
                PolicyInfo policy = PolicyInfo.getInstance(data.getObjectPolicy());
                List stateNames = policy.getStateNames();
                Locale locale = data.getEnv().getLocale();
                StringBuffer s = new StringBuffer();
                for (int i=0; i<stateNames.size(); i++) {
                    String stateName = (String) stateNames.get(i);
                    String localizedStateName =
                        getLocalizedStateName(policy.getName(),
                                stateName, locale);
                    String actualDate = objectData.getSelectValue("state["
                            + stateName
                            + "]."
                            + selectSuffix);
                    s.setLength(0);
                    s.append(localizedStateName);
                    s.append(": ");
                    if (StringUtils.isOnlyWhitespaceOrEmpty(actualDate)) {
                        /*
                         * Append the N/A string to indicate that the date is
                         * not set.
                         */
                        s.append("N/A");
                    } else {
                        /*
                         * Format the date retrieved according to the user locale
                         */
                        s.append(DateUtils.formatForDisplay(actualDate, locale));
                    }
                    cell.addValue(s.toString());
                }
            } catch(TVCException ignore) {
            }
        }
    }

    private static String getLocalizedStateName(String policy,
                                                String state,
                                                Locale locale) {
        /*
         * Returns the localized state name
         */
        String localized = AEFUtils
            .getLocalizedStateName(policy, state, locale);
        if (localized != null) {
            return localized;
        }
        return state;
    }

    protected boolean getShowScheduled(Column column) {
        ColumnSettings settings = column.getSettings();
        return settings.getSetting(SHOW_SCHEDULED, false);
    }
}
Comments to the classes used in the code example above.
The screenshot below shows a table containing the same Data Handler in two different columns. One that shows the actual date and one showing the scheduled date.
Example 3 - Combination of Data Handler / Cell Renderer and Custom Updater
In Example 2, you saw how to build a Data Handler that were able to display either the actual or the scheduled dates. This data handler only retrieved these values and presented them for the user. A slightly more advanced scenario, would occur if the user wants to, for example, edit the scheduled dates.
In a real world example, one would probably not want to open up the possibility to edit the actual dates. However, in order to support modifying the scheduled dates, we have to extend the example 2 a bit.
First of all, you need a way to support modifying these special dates. As the Default Updater is not able to modify scheduled dates, one need to implement an Updater that can do so. Moreover, in the user interface, you will typically need to add date-pickers for each state to be scheduled.
We will then need three things in place to accomplish this:
-
A Data Handler, similar to as we wrote in example 2
-
An Updater, which is capable of setting scheduled dates
-
A Cell Renderer. The Cell Renderer is responsible for creating the GUI.
Starting with the Data Handler, the source code for it will look like this:
import com.technia.tvc.core.TVCException;
import com.technia.tvc.core.db.DateUtils;
import com.technia.tvc.core.db.MQLUtils;
import com.technia.tvc.core.db.aef.env.Environment;
import com.technia.tvc.core.db.model.PolicyInfo;
import com.technia.tvc.core.db.table.evaluator.DataHandler;
import com.technia.tvc.core.db.table.evaluator.EvaluatedData;
import com.technia.tvc.core.db.table.evaluator.EvaluationInput;
import com.technia.tvc.core.db.table.evaluator.SelectedData;
import com.technia.tvc.core.db.table.evaluator.Updater;
import com.technia.tvc.core.gui.table.Cell;
import com.technia.tvc.core.gui.table.CellValue;
import com.technia.tvc.core.gui.table.Column;
import com.technia.tvc.core.gui.table.TableClient.Entry;
import com.technia.tvc.core.gui.table.impl.DateCell;
import com.technia.tvc.core.util.StringUtils;

import java.util.Date;
import java.util.List;

public class StateDateHandler implements DataHandler {
    public static final String SHOW_SCHEDULED = "Show Scheduled";

    /**
     * The Updater is created inline
     */
    private static final Updater SCHEDULED_DATE_UPDATER = new Updater() {
        public boolean updateCellValue(Entry entry,
                                       CellValue cellValue,
                                       String newValue,
                                       Environment env) throws TVCException {
            /*
             * Cast the CellValue to get the state-name.
             */
            StateInfoCell.StateInfoCellValue v =
                (StateInfoCell.StateInfoCellValue) cellValue;
            setDate(entry.getObjectId(), v.getStateName(), newValue);
            return true;
        }
        private void setDate(String objectId,
                             String state,
                             String date) throws TVCException {
            /*
             * Build the MQL command required for modifying the date.
             */
            StringBuffer mql = new StringBuffer();
            mql.append("escape modify businessobject ");
            mql.append(objectId);
            mql.append(" state \"");
            mql.append(MQLUtils.escapeString(state));
            mql.append("\" schedule \"");
            mql.append(date);
            mql.append("\"");

            /*
             * Perform the MQL command
             */
            MQLUtils.mql(mql.toString());
        }
    };

    /**
     * We need a special Cell implementation, which in addition
     * to holding the date values, also will hold the state names.
     */
    public static class StateInfoCell extends DateCell {
        private boolean scheduled;

        public StateInfoCell(Column column, boolean scheduled) {
            super(column, scheduled?SCHEDULED_DATE_UPDATER:null);
            this.scheduled = scheduled;
        }

        public boolean isScheduledDate() {
            return scheduled;
        }

        public void add(String state, Date date) {
            add(new StateInfoCellValue(state, date));
        }

        protected class StateInfoCellValue extends DateCellValue {
            private String stateName;
            private Date date;

            protected StateInfoCellValue(String stateName, Date date) {
                super(stateName, null, null, null);
                this.stateName = stateName;
                this.date = date;
            }

            public String getDisplayValue() {
                return date != null ? DateUtils.formatForDisplay(date,
                        getCell().getColumn().getLocale()) : null;
            }

            public String getValue() {
                return date!=null?DateUtils.format(date):null;
            }

            public String getStateName() {
                return stateName;
            }

            public Date getDateValue() {
                return date;
            }
        }
    }

    public void prepareEvaluation(Column column, EvaluationInput input) {
        if (getShowScheduled(column)) {
            input.addSelectBus("state.scheduled");
        } else {
            input.addSelectBus("state.actual");
        }
    }

    public Cell createCell(Column column, EvaluatedData data) {
        boolean scheduled = getShowScheduled(column);
        StateInfoCell cell = new StateInfoCell(column, scheduled);
        if (scheduled && cell.getColumn().getSettings().isEditable()) {
            /*
             * Set editable if we are handling scheduled dates, the column
             * is defined to be editable and the user has schedule-access.
             */
            cell.setEditable(data.getObjectAccessMask().hasScheduleAccess());
        } else {
            cell.setEditable(false);
        }
        return cell;
    }

    public void populateCell(Cell cell, EvaluatedData data) {
        StateInfoCell si = (StateInfoCell) cell;
        SelectedData objectData = data.getObjectData();
        if (objectData != null) {
            try {
                PolicyInfo policy = PolicyInfo.getInstance(data.getObjectPolicy());
                List stateNames = policy.getStateNames();
                Date date;
                String dateStr;
                String stateName;
                for (int i=0; i<stateNames.size(); i++) {
                    stateName = (String) stateNames.get(i);
                    if (si.isScheduledDate()) {
                        dateStr = objectData.getSelectValue("state["
                                + stateName
                                + "].scheduled");
                    } else {
                        dateStr = objectData.getSelectValue("state["
                                + stateName
                                + "].actual");
                    }
                    if (!StringUtils.isOnlyWhitespaceOrEmpty(dateStr)) {
                        date = DateUtils.parse(dateStr);
                    } else {
                        date = null;
                    }
                    si.add(stateName, date);
                }
            } catch(TVCException ignore) {
            }
        }
    }

    protected boolean getShowScheduled(Column column) {
        return column.getSettings().getSetting(SHOW_SCHEDULED, false);
    }
}
Explanation of the code above:
Starting with the Updater declared inline; This updater builds up a MQL command based upon the entered value and it will get the name of the state from the actual CellValue instance.
The StateInfoCell is a custom Cell implementation, derived from the
standard DateCell. The purpose of this cell, is to add the ability to
store the name of the state, in addition to the scheduled or actual date
for this state. The name of the state is needed when to modify the
value.
Compare this to how the second example were implemented, where the state
name and the date were concatenated into a string.
The Data Handler implementation itself is almost similar to as in example 2. Some differences though:
So far, we have a Data Handler that is creating StateInfoCellcells, and
allows updating the scheduled dates. If you would use this Data Handler
in a table, you will simply see the dates and in edit mode, the
scheduled dates would be shown as date input fields. However, we would
only see the dates, and not the state names. What we need to do as a
last step, is to create a Cell Renderer, which in addition to simply
showing the dates also would show the names of the states.
Even if this chapter is not about how to write a Cell Renderer, this
example would not be complete if not showing how such a Cell Renderer
could be written. However, the details about Cell Renderer could be
found in this document
The Cell Renderer source code that completes this example is shown below.
import com.technia.tvc.core.db.aef.AEFUtils;
import com.technia.tvc.core.gui.table.Row;
import com.technia.tvc.core.html.io.HtmlWriter;

import com.technia.tvc.structurebrowser.examples.StateDateHandler.StateInfoCell;
import com.technia.tvc.structurebrowser.examples.StateDateHandler.StateInfoCell.StateInfoCellValue;
import com.technia.tvc.structurebrowser.render.cell.TableCellRenderContext;
import com.technia.tvc.structurebrowser.render.cell.TableCellRenderer;

import java.util.Locale;

public class StateDateCellRenderer extends TableCellRenderer {
    public void renderCell(TableCellRenderContext rc) {
        StateInfoCell cell = (StateInfoCell) rc.getCell();
        int valueCount = cell.getValueCount();
        if (valueCount < 1) {
            return;
        }
        boolean editable = rc.isEdit() && cell.isEditable();
        HtmlWriter writer = rc.getHtmlWriter();
        if (valueCount > 1) {
            writer.startElement("table")
                .addAttribute("cellpadding", 1)
                .addAttribute("cellspacing", 0);
        } else if (writer.isElementActive("td")) {
            writer.addAttribute("nowrap");
        }
        boolean currentStateOrLater = false;
        for (int i = 0; i < valueCount; i++) {
            if (valueCount > 1) {
                writer.startElement("tr")
                    .startElement("td")
                    .addAttribute("align","right")
                    .addAttribute("nowrap");
            }
            StateInfoCellValue cv = (StateInfoCellValue) cell.getValueAt(i);
            Row row = rc.getTableData().getRow();
            if (row.getObjectState().equals(cv.getStateName())) {
                currentStateOrLater = true;
                writer.startElement("b");
                writer.addText(getStateName(row.getObjectPolicy(),
                        cv.getStateName(), rc.getLocale()));
                writer.endElement("b");
            } else {
                writer.addText(getStateName(row.getObjectPolicy(),
                        cv.getStateName(), rc.getLocale()));
            }
            if (valueCount > 1) {
                writer.endElement("td");
                writer.startElement("td");
                writer.addAttribute("nowrap");
            }
            if (currentStateOrLater && editable) {
                /*
                 * Use the toolkit to render the date picker.
                 */
                rc.getToolkit().renderDatePicker(rc, cv, null);
            } else {
                /*
                 * In edit mode, simply render the value as it is.
                 */
                writer.addText(cv.getDisplayValue());
            }
            if (valueCount > 1) {
                writer.endElement("td").endElement("tr");
            }
        }
        if (valueCount > 1) {
            writer.endElement("table");
        }
    }

    private String getStateName(String policy, String state, Locale locale) {
        String l = AEFUtils.getLocalizedStateName(policy, state, locale);
        if (l != null) {
            return l;
        }
        return state;
    }
}
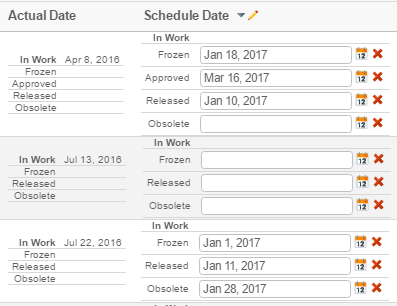
Without going to deep in the details of how to implement a Cell Renderer, as this is out of scope for this document, you can in the code example above get a feeling for how a custom Cell Renderer can be used to work with custom Cells that has been created through a Data Handler
The screenshot below shows the final result of assigning a table column with the Data Handler and Cell Renderer from this example.
1.2. Cell Renderer
A Cell Renderer is responsible for rendering data within a table (i.e., cell values and column headers) into various formats. For example, whenever a table in Structure Browser is viewed on the web page, printed or exported the Cell Renderers assigned to the columns within that table decide how the columns look and feel.
Moreover, a Cell Renderer presents you with the possibility to render each cell differently depending on where (in what context) it is being rendered. For example, a Cell Renderer might choose to render a cell as: an image on the web page in view mode; a dropdown in edit mode; and text in CVS, PDF and HTML exports.
Each column in a table can have its own Cell Renderer assigned to it. If you don’t explicitly define that a Cell Renderer will be used for a particular column, TVC will automatically use the default Cell Renderer for that column.
1.2.1. When should you use a Cell Renderer?
You should use a Cell Renderer whenever you want to customize how a column (cell values or header) look and feel, either on the Structure Browser web page, in an export or both.
Before Cell Renderers became part of the TVC toolbox, the only way that you could customize how a cell looked was by creating cells that contained HTML markup. While the HTML within these cells displayed nicely when viewed on the Structure Browser web page, it did perhaps not display as nicely when exported or printed. To create cells that contained HTML you had to use your own Data Handler (or JPO), and while Data Handlers are perfect for retrieving information from the database they are rather poor at creating a suitable view of that information in all formats supported by Structure Browser (which is the main reason why Cell Renderers was introduced).
Thus, Cell Renderers will not replace Data Handlers. You use a Data Handler to customize how to get data from the database into the table, while you use a Cell Renderer to customize how that data is presented to the users of your application.
We highly recommend that you create Cell Renderers to customize the appearance of a cell rather than creating cells that contain HTML.
1.2.2. Cell Renderer Basics
A Cell Renderer is a Java class that extends a class in TVC called com.technia.tvc.structurebrowser.render.cell.TableCellRenderer.
package mycellrenderers;

import com.technia.tvc.structurebrowser.render.cell.TableCellRenderer;

public class MyCellRenderer extends TableCellRenderer {}
Within your Cell Renderer you may override methods from TableCellRenderer to customize the rendering or exporting process. There are many methods that you can override, each method has it’s own purpose, but you don’t need to override all of them. How many and which methods you decide to override is completely up to you. Here is a list of the methods that you can override.
How to register a Cell Renderer
You register a Cell Renderer on a table column by defining a setting with the name Cell Renderer Class, whose value must be the fully qualified name of the Java class of the Cell Renderer that you want to use.
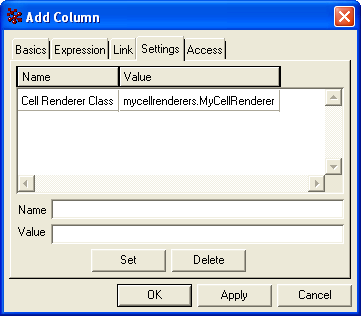
Similarly, if you have defined your table in the TVC XML format you register the Cell Renderer as follows:
<Table>
    <Column>
        ....
        <CellRendererClass>mycellrenderers.MyCellRenderer</CellRendererClass>
    </Column>
</Table>
1.2.3. Cell Rendering
How to customize rendering
There are four different methods within com.technia.tvc.structurebrowser.render.cell.TableCellRenderer that you may override to customize the rendering of a column. In addition to these there are two methods that you may override to include resources (e.g., javascripts, stylesheets) required for a column. The following sections will go through each of these methods in detail.
To each of these methods TVC will send an object that provides
contextual information and services to the Cell Renderer. For example,
the Cell Renderer may use this object to determine whether the table is
rendered: in view or edit mode; as a search result page; as a printer
friendly page; as a build structure target or source table; within a
channel on a portal page; and more. The Cell Renderer may also use this
object to gain access to the data that it is supposed to render (such as
the com.technia.tvc.core.gui.Cell or
the com.technia.tvc.core.gui.Column), or to gain access to the
com.technia.tvc.core.html.io.HtmlWriter to which all the HTML should be
written, or to gain access to other objects (such as the
HttpServletRequest)
and services (such
as com.technia.tvc.structurebrowser.render.TableRenderToolkit).
All non-absolute URLs within the HTML that a Cell Renderer produces will be relative from the common directory in the web application
(if the AEF is present, otherwise the URLs will be relative from the tvc directory).
Render table cell content
The renderCell method is called by TVC to render the cell values (within the column that the Cell Renderer has been assigned to) in view mode as well as edit mode, and to create a printer friendly page.
To this method TVC sends an object that implements the
com.technia.tvc.structurebrowser.render.cell.TableCellRenderContext interface.
Among other things, the Cell Renderer may use this object to gain access
to the Cell that is being rendered. The following code is a simple
example of how you may structure the code in your Cell Renderer to
render the cell differently in edit, view or printer friendly mode.
package mycellrenderers;

import com.technia.tvc.core.gui.table.Cell;
import com.technia.tvc.core.html.io.HtmlWriter;
import com.technia.tvc.structurebrowser.render.TableRenderToolkit;
import com.technia.tvc.structurebrowser.render.cell.TableCellRenderer;
import com.technia.tvc.structurebrowser.render.cell.TableCellRenderContext;

public class MyCellRenderer extends TableCellRenderer {
    public void renderCell(TableCellRenderContext rc) {

        // Get the cell that will be rendered
        Cell cell = rc.getCell();

        // Get the HtmlWriter to which we will write all the HTML
        HtmlWriter writer = rc.getHtmlWriter();

        // Get the toolkit that contains many useful methods
        TableRenderToolkit tk = rc.getToolkit();

        // Check how and where the table is being rendered
        if (rc.isEdit() && cell.isEditable()) {
            // TODO: render cell in edit mode
        } else if (rc.isPrinterFriendly()) {
            // TODO: render cell in printer friendly mode
        } else {
            // TODO: normal rendering
        }
    }
}
Render in-cell editing enabled fields
To render a cell in edit mode (with in-cell editing capabilities) we
encourage you to use one of the methods in
com.technia.tvc.structurebrowser.render.TableRenderToolkit to do the
actual rendering. The following methods are available to render an
editable field.
-
renderComboBox
-
renderDatePicker
-
renderTextArea
-
renderTextField
The following example uses the renderTextField method to render a regular text field in edit mode.
package mycellrenderers;

import java.util.Iterator;
import com.technia.tvc.core.gui.table.Cell;
import com.technia.tvc.core.gui.table.CellValue;
import com.technia.tvc.core.html.io.HtmlWriter;
import com.technia.tvc.structurebrowser.render.TableRenderToolkit;
import com.technia.tvc.structurebrowser.render.cell.TableCellRenderer;
import com.technia.tvc.structurebrowser.render.cell.TableCellRenderContext;
import com.technia.tvc.structurebrowser.render.cell.InputFieldType;

public class MyCellRenderer extends TableCellRenderer {
    public void renderCell(TableCellRenderContext rc) {
        Cell cell = rc.getCell();
        HtmlWriter writer = rc.getHtmlWriter();
        TableRenderToolkit tk = rc.getToolkit();
        if (rc.isEdit() && cell.isEditable()) {

            // Get all cell values
            Iterator i = cell.getValues();

            // Create a style for the input field (optional)
            InputFieldStyle style = new InputFieldStyle();
            style.setInputWidthInPixels(80);

            // For each cell value...
            while (i.hasNext()) {
                CellValue value = (CellValue) i.next();

                // ...render an editable text field
                tk.renderTextField(rc, value, InputFieldType.TEXT, style);
            }
        } else if (rc.isPrinterFriendly()) {
            // TODO: render cell in printer friendly mode
        } else {
            // TODO: normal rendering
        }
    }
}
Render clickable links
If you want to render a link in the cell that opens the href that has been specified on the corresponding column we encourage you to use the getURLForCell method in TableRenderToolkit that returns a URL for this purpose. You may use the value that is returned from this method as the value of the href attribute on an anchor tag.
package mycellrenderers;

import java.util.Iterator;
import com.technia.tvc.core.gui.table.Cell;
import com.technia.tvc.core.gui.table.CellValue;
import com.technia.tvc.core.html.io.HtmlWriter;
import com.technia.tvc.structurebrowser.render.TableRenderToolkit;
import com.technia.tvc.structurebrowser.render.cell.TableCellRenderer;
import com.technia.tvc.structurebrowser.render.cell.TableCellRenderContext;

public class MyCellRenderer extends TableCellRenderer {
    public void renderCell(TableCellRenderContext rc) {
        Cell cell = rc.getCell();
        HtmlWriter writer = rc.getHtmlWriter();
        TableRenderToolkit tk = rc.getToolkit();
        if (rc.isEdit() && cell.isEditable()) {
            // TODO: render cell in edit mode
        } else if (rc.isPrinterFriendly()) {
            // TODO: render cell in printer friendly mode
        } else {

            // Get all cell values
            Iterator i = cell.getValues();

            // For each cell value...
            while (i.hasNext()) {
                CellValue value = (CellValue) i.next();

                // ...get the URL...
                String url = tk.getURLForCell(rc, value);

                // ...and the display value...
                String displayValue = value.getDisplayValue();

                // ...and finally render the value as a clickable link
                writer.startElement("a")
                    .addAttribute("href", url)
                    .addText(displayValue)
                    .endElement("a");
            }
        }
    }
}
Render type icons
If you want to render a type icon in a cell you have two different methods in TableRenderToolkit to choose between, that each will return the URL to a type icon image. You may use the URLs returned from these methods as the value of the src attribute on image tags.
-
getIconURLForCell
-
getTypeIconURL
The method getIconURLForCell returns the type icon URL for the object represented in a particular cell (or cell value). Note that if the you have specified the Alternate Type Expression setting correctly on the column, the URL to the type icon of the type retrieved with this expression will be returned, otherwise the type icon URL for the type of the object represented on the row (in which the cell belongs) will be returned.
If you need more flexibility when rendering a type icon you may use the method getTypeIconURL, which will return the icon URL for the type that you pass to the method as its second argument.
package mycellrenderers;

import java.util.Iterator;
import com.technia.tvc.core.gui.table.Cell;
import com.technia.tvc.core.gui.table.CellValue;
import com.technia.tvc.core.html.io.HtmlWriter;
import com.technia.tvc.structurebrowser.render.TableRenderToolkit;
import com.technia.tvc.structurebrowser.render.cell.TableCellRenderer;
import com.technia.tvc.structurebrowser.render.cell.TableCellRenderContext;

public class MyCellRenderer extends TableCellRenderer {
    public void renderCell(TableCellRenderContext rc) {
        Cell cell = rc.getCell();
        HtmlWriter writer = rc.getHtmlWriter();
        TableRenderToolkit tk = rc.getToolkit();
        if (rc.isEdit() && cell.isEditable()) {
            // TODO: render cell in edit mode
        } else if (rc.isPrinterFriendly()) {
            // TODO: render cell in printer friendly mode
        } else {

            // Get all values on this cell
            Iterator i = cell.getValues();

            // For each cell value...
            while (i.hasNext()) {
                CellValue value = (CellValue) i.next();

                // ...get the type icon URL...
                String url = tk.getIconURLForCell(rc, value);

                // ...and the display value...
                String displayValue = value.getDisplayValue();

                // ...and finally render the image followed by the value
                writer.startElement("img")
                    .addAttribute("src", url)
                    .addText(" ") // add space between icon and value
                    .addText(displayValue);
            }
        }
    }
}
Render table headers
The renderHeader method is called by TVC to render the header of a
column. As headers can be quite sophisticated (e.g., clickable label to
change the sorting of the column, indicator that shows if and in what
direction the column is sorted, mass update link) we encourage you to
use one of the helper methods in
com.technia.tvc.structurebrowser.render.TableRenderToolkit to do the
actual rendering. Here is a list of the available helper methods.
-
renderHeader
-
renderHeaderHTML
-
renderHeaderImage
To the renderHeader method TVC sends an object that implements the
com.technia.tvc.structurebrowser.render.cell.TableCellHeaderRenderContext interface.
From this object the Cell Renderer may gain access to the Column that is
being rendered.
package mycellrenderers;

import com.technia.tvc.core.gui.table.Column;
import com.technia.tvc.structurebrowser.render.TableRenderToolkit;
import com.technia.tvc.structurebrowser.render.cell.HeaderSpec;
import com.technia.tvc.structurebrowser.render.cell.TableCellRenderer;
import com.technia.tvc.structurebrowser.render.cell.TableCellHeaderRenderContext;

public class MyCellRenderer extends TableCellRenderer {
    public void renderHeader(TableCellHeaderRenderContext rc) {

        // Get the column being rendered
        Column column = rc.getColumn();

        // Get the toolkit that contains many useful methods
        TableRenderToolkit tk = rc.getToolkit();

        // TODO: render the header
    }
}
Render headers with a different background color
To render a header with a different background color you can create an
object of the class
com.technia.tvc.structurebrowser.render.cell.HeaderSpec and pass it to
one of the helper methods on TableRenderToolkit. This object allows you
to customize a few things about the header, such as the background
color, the font color, whether the font should be italic or not, etc.
package mycellrenderers;

import com.technia.tvc.core.gui.table.Column;
import com.technia.tvc.structurebrowser.render.TableRenderToolkit;
import com.technia.tvc.structurebrowser.render.cell.HeaderSpec;
import com.technia.tvc.structurebrowser.render.cell.TableCellRenderer;
import com.technia.tvc.structurebrowser.render.cell.TableCellHeaderRenderContext;

public class MyCellRenderer extends TableCellRenderer {
    public void renderHeader(TableCellHeaderRenderContext rc) {
        Column column = rc.getColumn();
        TableRenderToolkit tk = rc.getToolkit();

        // Create a HeaderSpec instance
        HeaderSpec spec = new HeaderSpec();

        // Set the background color
        spec.setBackgroundColor("#00e");

        // Get the label from the column
        String label = column.getLabel();

        // Render the header with the specified background color
        tk.renderHeader(rc, label, spec);
    }
}
Render headers with an image instead of text
If you want to render a column header that contains an image instead of the normal text label you may use the renderHeaderImage method, which allows you to specify the URL to an image on the server. Note that all non-absolute URLs will be relative from the common directory in the web application (if the AEF is present, otherwise the URLs will be relative from the tvc directory).
package mycellrenderers;

import com.technia.tvc.core.gui.table.Column;
import com.technia.tvc.structurebrowser.render.TableRenderToolkit;
import com.technia.tvc.structurebrowser.render.cell.TableCellRenderer;
import com.technia.tvc.structurebrowser.render.cell.TableCellHeaderRenderContext;

public class MyCellRenderer extends TableCellRenderer {
    public void renderHeader(TableCellHeaderRenderContext rc) {
        Column column = rc.getColumn();
        TableRenderToolkit tk = rc.getToolkit();

        // Render the header as an image
        tk.renderHeaderImage(rc, "images/iconColHeadStatus.gif", null);
    }
}
Render mass update field
If you customize the rendering of a cell in edit mode you may sometimes also want to customize how it is rendered as a mass update field. A mass update field is the field that is displayed in the Structure Browser side panel when a user clicks on the mass update link in the header of a column that has enabled mass updates.
To customize the rendering of a mass update field you may override the renderMassUpdateField method. TVC calls this method on the Cell Renderer assigned to the column that the user has selected for mass update.
As when rendering a cell in edit mode with in-cell editing enabled fields, we encourage you to use one of the helper methods in file:///C:/TVC/devdocs/build/TVCDeveloperDocumentation/apidocs/com/technia/tvc/structurebrowser/render/TableRenderToolkit.html[TableRenderToolkit] to do the actual rendering of a mass update field. The following methods are available to render a mass update field.
-
renderComboBox
-
renderDatePicker
-
renderTextArea
-
renderTextField
package mycellrenderers;

import com.technia.tvc.core.gui.table.Column;
import com.technia.tvc.structurebrowser.render.TableRenderToolkit;
import com.technia.tvc.structurebrowser.render.cell.InputFieldType;
import com.technia.tvc.structurebrowser.render.cell.TableCellRenderer;
import com.technia.tvc.structurebrowser.render.cell.MassUpdateRenderContext;

public class MyCellRenderer extends TableCellRenderer {
    public void renderMassUpdateField(MassUpdateRenderContext rc) {

        // Get the column being rendered
        Column column = rc.getColumn();

        // Get the toolkit that contains many useful methods
        TableRenderToolkit tk = rc.getToolkit();

        // Render the mass update field
        tk.renderTextField(rc, InputFieldType.TEXT, null);
    }
}
Render popup cell values
The popup cell value refers to the cell value that is shown in the kind of popup that is displayed when you click on a more-link. To customize how this value is rendered you override a method in your Cell Renderer that is called renderPopupCellValue.
The more-link is rendered by the default Cell Renderer if the text inside a cell value is longer than the maximum allowed number of characters (which is defined as a setting on the column). If you click on this more-link the full (non-truncated) cell value is displayed in a popup
Thus, if you create your own Cell Renderer and want to support this behavior you might want to consider overriding the renderPopupCellValue method to customize how the cell value is rendered in the popup. Moreover, if you override renderCell and don’t invoke the default rendering of the cell (by calling renderCell on the superclass (i.e., TableCellRenderer), or by calling renderCellDefault on TableRenderToolkit), you will also have to render the more-link that opens the popup.
| Although the popup cell value is currently only used in association with the more-link functionality, you may use the popup cell value for other purposes as you wish. |
package mycellrenderers;

import com.technia.tvc.core.gui.table.CellValue;
import com.technia.tvc.structurebrowser.render.TableRenderToolkit;
import com.technia.tvc.structurebrowser.render.cell.TableCellRenderer;
import com.technia.tvc.structurebrowser.render.cell.PopupCellValueRenderContext;

public class MyCellRenderer extends TableCellRenderer {
    public void renderPopupCellValue(PopupCellValueRenderContext rc) {

        // Get the cell value
        CellValue value = rc.getCellValue();

        // Get the HtmlWriter to which we will write all the HTML
        HtmlWriter writer = rc.getHtmlWriter();

        // Render the popup cell value
        writer.addText(value.getDisplayValue());
    }
}
To render a link in renderCell that opens the popup cell value when clicked you are encouraged to use the getPopupURLForCell method in TableRenderToolkit. The URL that this method returns may be used as the value of the href attribute on an anchor tag.
When you render a popup cell value you can't rely on that any resources (e.g., javascripts, stylesheets) that you include on the page (by
overriding getResources) are available.
How to include resources
When you render a cell, column header or a mass update field you may use resources that you include on the web page. For example, the generated HTML might reference a style class inside a Cascading Style Sheet, or you might need to run some custom javascript function.
There are two methods that you may override inside a Cell Renderer that allows you to include this kind of resources on the generated web page.
-
getResources
-
getMassUpdateResources
These methods are quite similar, apart from the important difference that getResources allows you to include resources that you may use when rendering cell content or column headers, while getMassUpdateResources allows you to include resources that you may use when rendering the mass update field only.
package mycellrenderers;

import com.technia.tvc.core.gui.resource.Resource;
import com.technia.tvc.structurebrowser.render.cell.TableCellRenderer;
import com.technia.tvc.structurebrowser.render.cell.TableCellResourceContext;
import com.technia.tvc.structurebrowser.render.cell.MassUpdateResourceContext;

public class MyCellRenderer extends TableCellRenderer {
    public Resource[] getResources(TableCellResourceContext rc) {
        // TODO: return resources for cell content and header
        return null;
    }

    public Resource[] getMassUpdateResources(MassUpdateResourceContext rc) {
        // TODO: return resources for mass update field
        return null;
    }
}
Types of resources
The methods that include resources each return an array of
com.technia.tvc.structurebrowser.render.resource.Resource instances.
Resource itself is an abstract class (i.e., you can’t create any
instances of it), but there are a few available subclasses that you may
instantiate. These are:
-
com.technia.tvc.core.gui.AjaxService
-
com.technia.tvc.core.gui.resource.JavaScript
-
com.technia.tvc.core.gui.resource.JavaScriptRef
-
com.technia.tvc.core.gui.resource.StyleSheet
-
com.technia.tvc.core.gui.resource.StyleSheetRef
JavaScript and StyleSheet allows you to include a javascript or stylesheet that you define directly in the Java code (as java.lang.String instances). JavaScriptRef and StyleSheetRef allows you to include javascript or stylesheet files on the server (the URLs should be relative from the common directory in the web application if AEF is present). Lastly, AjaxService allows you to include client side javascripts required to invoke an Ajax service.
All resource subclasses except AjaxService has constructors that allows you to specify whether that resource should be included if the client browser is Internet Explorer, Mozilla or Google Chrome, or all (AjaxService resources are always supported on Internet Explorer, Mozilla and Google Chrome). This allows you to create javascripts or stylesheets that are browser dependent.
package mycellrenderers;

import com.technia.tvc.core.gui.resource.Resource;
import com.technia.tvc.core.gui.resource.JavaScriptRef;
import com.technia.tvc.core.gui.resource.StyleScriptRef;
import com.technia.tvc.core.gui.cell.TableCellRenderer;
import com.technia.tvc.core.gui.cell.TableCellResourceContext;

public class MyCellRenderer extends TableCellRenderer {

    // Create a static Resource array
    private static final Resource[] resources = new Resource[] { new JavaScriptRef("../acme/tableFunctions.js"), new StyleSheetRef("../acme/tableStyles.css"), new StyleSheetRef("../acme/tableStyles_Moz.css", false, true) };

    public Resource[] getResources(TableCellResourceContext rc) {
        // Return the resources
        return resources;
    }
}
1.2.4. Exporting
A Cell Renderer in Structure Browser supports four different export modes, and for each export mode there are two methods within the Cell Renderer that you can override. This means that there are a total of eight methods that you can override to customize how a cell is exported. The export modes are:
-
PDF
-
HTML
-
Text (CSV)
-
XML
Export to PDF
The PDF export mode is used when you create a printer friendly page in form of a PDF. To customize how the cell is exported into PDF you may override the following methods:
-
exportCell(com.technia.tvc.structurebrowser.render.cell.PDFExportCellContext)
-
exportHeader(com.technia.tvc.structurebrowser.render.cell.PDFExportCellHeaderContext)
package mycellrenderers;

import com.technia.tvc.core.gui.table.Cell;
import com.technia.tvc.core.gui.table.Column;
import com.technia.tvc.structurebrowser.render.PDFTableWriter;
import com.technia.tvc.structurebrowser.render.cell.TableCellRenderer;
import com.technia.tvc.structurebrowser.render.cell.PDFExportCellContext;
import com.technia.tvc.structurebrowser.render.cell.PDFExportCellHeaderContext;

public class MyCellRenderer extends TableCellRenderer {
    public void exportCell(PDFExportCellContext rc) {

        // Get the cell that will be rendered
        Cell cell = rc.getCell();

        // Get the PDFTableWriter that we use to export the cell to PDF
        PDFTableWriter writer = rc.getWriter();

        // TODO: export cell using addCell
    }

    public void exportHeader(PDFExportCellHeaderContext rc) {

        // Get the column that will be rendered
        Column column = rc.getColumn();

        // Get the PDFTableWriter that we use to export the header to PDF
        PDFTableWriter writer = rc.getWriter();

        // TODO: export header using addColumn
    }
}
To each of these methods TVC sends an object that allows you to access
information that your Cell Renderer requires for exporting a cell or a
header into PDF. For example, when you export a cell you will be able to
access the com.technia.tvc.core.gui.table.Cell object from
com.technia.tvc.structurebrowser.render.cell.PDFExportCellContext.
Similarly, when you export a column header you can get access to
the com.technia.tvc.core.gui.table.Column object from
the PDFExportCellHeaderContext.
To write content to the PDF document TVC supplies you with
a com.technia.tvc.structurebrowser.render.PDFTableWriter, which is a
specialized class aimed solely at exporting TVC tables to PDF documents.
For example, when you export the content of a cell you should use one of
the addCell methods that it provides.
-
addCell(String)
-
addCell(String,Color)
-
addCell(String[])
-
addCell(String[],int,boolean,PDFFontSpec[])
-
addCell(String[],int,boolean,PDFFontSpec[],Color)
package mycellrenderers;

import com.technia.tvc.core.gui.table.Cell;
import com.technia.tvc.structurebrowser.render.PDFTableWriter;
import com.technia.tvc.structurebrowser.render.cell.TableCellRenderer;
import com.technia.tvc.structurebrowser.render.cell.PDFExportCellContext;

public class MyCellRenderer extends TableCellRenderer {
    public void exportCell(PDFExportCellContext rc) {
        Cell cell = rc.getCell();
        PDFTableWriter writer = rc.getWriter();

        // Get the number of values in the cell
        int length = cell.getValueCount();

        // Create a string array that will hold the cell values
        String[] content = new String[length];

        // For each cell value...
        for (int i = 0; i < length; i++) {

            // ...set the display value in the array
            content[i] = cell.getValueAt(i).getDisplayValue();
        }

        // Add the cell to the PDF document
        writer.addCell(content);
    }
}
Similarly, when you export a column you should use one of
the addColumn methods that
the com.technia.tvc.structurebrowser.render.PDFTableWriter provides.
-
addColumn(String)
-
addColumn(String,PDFFontSpec,Color,int,boolean)
package mycellrenderers;

import com.technia.tvc.core.gui.table.Column;
import com.technia.tvc.structurebrowser.render.PDFTableWriter;
import com.technia.tvc.structurebrowser.render.cell.TableCellRenderer;
import com.technia.tvc.structurebrowser.render.cell.PDFExportCellHeaderContext;

public class MyCellRenderer extends TableCellRenderer {
    public void exportHeader(PDFExportCellHeaderContext rc) {
        Column column = rc.getColumn();
        PDFTableWriter writer = rc.getWriter();

        // Add the column to the PDF document
        writer.addColumn(column.getLabel());
    }
}
Export to HTML
The HTML export mode is used for the normal table export function (if the export settings define that HTML should be used) and also when you create a printer friendly page for Excel.
The HTML document that is created when you export the table in this mode is intended for Microsoft Excel. Please take into consideration that Microsoft Excel doesn’t always render HTML in the same way that you expect a regular Internet browser to render it. For example, the amount of colors that can be rendered in Microsoft Excel are far less than the amount that Internet Explorer can handle.
To customize how the cell is exported into HTML you may override the following methods:
-
exportCell(HTMLExportCellContext)
-
exportHeader(HTMLExportCellHeaderContext)
package mycellrenderers;

import com.technia.tvc.core.gui.table.Cell;
import com.technia.tvc.core.gui.table.Column;
import com.technia.tvc.core.html.io.HtmlWriter;
import com.technia.tvc.structurebrowser.render.cell.TableCellRenderer;
import com.technia.tvc.structurebrowser.render.cell.HTMLExportCellContext;
import com.technia.tvc.structurebrowser.render.cell.HTMLExportCellHeaderContext;

public class MyCellRenderer extends TableCellRenderer {
    public void exportCell(HTMLExportCellContext rc) {

        // Get the cell that will be rendered
        Cell cell = rc.getCell();

        // Get the HtmlWriter to which the cell will be exported
        HtmlWriter writer = rc.getWriter();

        // TODO: export cell
    }

    public void exportHeader(HTMLExportCellHeaderContext rc) {

        // Get the column that will be rendered
        Column column = rc.getColumn();

        // Get the HtmlWriter to which the column will be exported
        HtmlWriter writer = rc.getWriter();

        // TODO: export header
    }
}
To export the cell or column into HTML your Cell Renderer writes the HTML markup to the HtmlWriter very much in the same was as when you render the cell (in view mode) or column. Though sometimes the way that you normally render a cell isn’t suitable in an HTML export, considering that the exported document is opened in Microsoft Excel, with the result that links might be broken or that the colors might look different.
Export to Text (CSV)
The Text export mode is for creating text or CSV (Comma Separated Values) files. To customize how the cell is exported into text or CSV you may override the following methods:
-
exportCell(TextExportCellContext)
-
exportHeader(TextExportCellHeaderContext)
package mycellrenderers;

import com.technia.tvc.core.gui.table.Cell;
import com.technia.tvc.core.gui.table.Column;
import com.technia.tvc.structurebrowser.render.TextExportWriter;
import com.technia.tvc.structurebrowser.render.cell.TableCellRenderer;
import com.technia.tvc.structurebrowser.render.cell.TextExportCellContext;
import com.technia.tvc.structurebrowser.render.cell.TextExportCellHeaderContext;

public class MyCellRenderer extends TableCellRenderer {
    public void exportCell(TextExportCellContext rc) {

        // Get the cell that will be rendered
        Cell cell = rc.getCell();

        // Get the TextExportWriter to which the cell will be exported
        TextExportWriter writer = rc.getWriter();

        // TODO: export cell
    }

    public void exportHeader(TextExportCellHeaderContext rc) {

        // Get the column that will be rendered
        Column column = rc.getColumn();

        // Get the TextExportWriter to which the column will be exported
        TextExportWriter writer = rc.getWriter();

        // TODO: export header
    }
}
The com.technia.tvc.structurebrowser.render.TextExportWriter object that
TVC supplies when exporting to text or CSV, is a specialized writer to
which Cell Renderers export the content of a cell or the header of a
column. Use the writeText method that the writer provides to write text
to the text or CSV file.
package mycellrenderers;

import java.util.Iterator;
import com.technia.tvc.core.gui.table.Cell;
import com.technia.tvc.core.gui.table.Column;
import com.technia.tvc.structurebrowser.render.TextExportWriter;
import com.technia.tvc.structurebrowser.render.cell.TableCellRenderer;
import com.technia.tvc.structurebrowser.render.cell.TextExportCellContext;
import com.technia.tvc.structurebrowser.render.cell.TextExportCellHeaderContext;

public class MyCellRenderer extends TableCellRenderer {
    public void exportCell(TextExportCellContext rc) {
        Cell cell = rc.getCell();
        TextExportWriter writer = rc.getWriter();

        // Get all cell values
        Iterator i = cell.getValues();

        // For each cell value...
        while (i.hasNext()) {
            CellValue value = (CellValue) i.next();

            // ...write the display value...
            writer.writeText(value.getDisplayValue());

            // ...and a separator if there are more values to come
            if (i.hasNext()) {
                writer.writeText(", ");
            }
        }
    }

    public void exportHeader(TextExportCellHeaderContext rc) {
        Column column = rc.getColumn();
        TextExportWriter writer = rc.getWriter();

        // Write the column label
        writer.writeText(column.getLabel());
    }
}
Export to XML
The XML export mode is not used at all by default. However, there is a setting that you can define so that users will be able to select XML as export format for TVC table pages. If you know that you don’t support the XML export mode there is no need to customize how it’s handled. But if you do want to customize how a cell or column header is exported to XML you can override the following methods:
-
exportCell(XMLExportCellContext)
-
exportHeader(XMLExportCellHeaderContext)
package mycellrenderers;

import com.technia.tvc.core.gui.table.Cell;
import com.technia.tvc.core.gui.table.Column;
import com.technia.tvc.core.html.io.XMLWriter;
import com.technia.tvc.structurebrowser.render.cell.TableCellRenderer;
import com.technia.tvc.structurebrowser.render.cell.XMLExportCellContext;
import com.technia.tvc.structurebrowser.render.cell.XMLExportCellHeaderContext;

public class MyCellRenderer extends TableCellRenderer {
    public void exportCell(XMLExportCellContext rc) {

        // Get the cell that will be rendered
        Cell cell = rc.getCell();

        // Get the XMLWriter to which the cell will be exported
        XMLWriter writer = rc.getWriter();

        // TODO: export cell
    }

    public void exportHeader(XMLExportCellHeaderContext rc) {

        // Get the column that will be rendered
        Column column = rc.getColumn();

        // Get the XMLWriter to which the column will be exported
        XMLWriter writer = rc.getWriter();

        // TODO: export header
    }
}
1.3. SVG Rendering
A SVG Renderer can be used to render table data in a more appealing way when fit. SVG is part of the HTML 5 specification and is a good way to define dynamic images through xml. SVG supports CSS and JavaScript and most browsers do as well.
To leverage SVG rendering you need to create a class that implements the
com.technia.tvc.structurebrowser.render.display.svg.SVGRenderer interface
OR
if you need to dynamically return SVG Renderers create a class that
extends the com.technia.tvc.structurebrowser.render.display.svg.SVGTableRenderer
class
1.3.1. Registration
To use a SVG Renderer, you need to either configure the attribute TVC
Display Mode on the view, or if you prefer XML definitions a SVG
Renderer is registered like the example below:
<DisplayMode>svg:com.mycompany.MySVGRenderer</DisplayMode>
1.3.2. Examples
This section shows SVG Renderer examples such as implementing your own SVG Renderer.
Example 1 - SVG Renderer
Use the init function to register events such as on mouse over
The SVG function must return a point carrying the size of the resulting SVG image
Use the rendering context to render simple entities or to get the xml writer for complex rendering
package com.technia.tvx;

import com.technia.tvc.core.gui.resource.JavaScriptRef;
import com.technia.tvc.core.gui.resource.Resource;
import com.technia.tvc.core.gui.resource.StyleSheetRef;
import com.technia.tvc.core.table.TableBean;
import com.technia.tvc.core.table.TableData;
import com.technia.tvc.core.table.TableUtils;

import com.technia.tvc.structurebrowser.render.TableResourceContext;
import com.technia.tvc.structurebrowser.render.display.svg.SVGRenderContext;
import com.technia.tvc.structurebrowser.render.display.svg.SVGRenderer;

import com.technia.tvc.commons.collections15.IteratorUtils;

import java.awt.Point;
import java.util.Arrays;
import java.util.Collection;
import java.util.List;

public class MySVGRenderer implements SVGRenderer {
    public String getInitFunction(TableResourceContext ctx) {
        // Return the name of the Java Script function to execute on
        // initialization
        return "myInitFunction";
    }

    public Collection<Resource> getSVGViewResources(TableResourceContext ctx) {
        // Include JavaScript or StyleSheet resources
        return Arrays.asList(new Resource[]
            { new JavaScriptRef("../mysvgpath/custom.js"),
             new StyleSheetRef("../mysvgpath/custom.css") });
    }

    public Point svg(SVGRenderContext ctx) {

        // Get table bean
        TableBean t = ctx.getTableBean();

        // Get table data
        List td = IteratorUtils.toList(ctx.getTableBean().getTableData());
        int i = 0;
        for (; i < td.size(); i++) {
            TableData d = (TableData) td.get(i);
            // Get value from select data
            String myValue = TableUtils.getStringValue(t, d, "MyColumn");
            // Render SVG
            ctx.getWriter().renderText(new Point(10, (i + 1) * 10), myValue, "myClass", 0);
        }

        // Return image size
        return new Point(400, (i + 2) * 10);
    }
}
Example 2 - Abstract SVG Renderer
If there is no interest in defining custom resources there is an abstract svg renderer that can be extended
import com.technia.tvc.structurebrowser.render.display.svg.AbstractSVGRenderer;
import com.technia.tvc.structurebrowser.render.display.svg.SVGRenderContext;

import java.awt.Point;

public class MyAbstractSVGRenderer extends AbstractSVGRenderer {

    public Point svg(SVGRenderContext ctx) {
        ctx.getWriter().renderCircle(new Point(200, 200), "myClass", 150);
        return new Point(400, 400);
    }

}
1.3.3. SVG Table Renderer
This section shows a SVG Table Renderer example
Example 3 - SVG Table Renderer
Return svg renderer based upon bean type, select data or other
import com.technia.tvc.core.structure.AbstractStructureBean;
import com.technia.tvc.core.table.FlatTableBean;
import com.technia.tvc.core.table.TableBean;

import com.technia.tvc.structurebrowser.render.display.svg.SVGRenderer;
import com.technia.tvc.structurebrowser.render.display.svg.SVGTableRenderer;

public class MySVGTableRenderer extends SVGTableRenderer {

    @Override
    public SVGRenderer getRenderer(TableBean<?> t) {
        if (t instanceof FlatTableBean) {
            return new MySVGRenderer();
        } else if (t instanceof AbstractStructureBean) {
            return new MyAbstractSVGRenderer();
        }
        return null;
    }
}
1.4. Range Handler
A range handler can be used to provide custom range values to a column. Default, TVC will take the range values as defined on an attribute, however, in some cases these range values are not defined or there is a need to override those range values.
To do so, you need to create a class that implements the
com.technia.tvc.core.gui.table.RangeHandler interface.
1.4.1. Registration
To use a range handler, you need to either configure the setting Range
Handler Class on the column, or if you are using a Data Handler, you
can let the Data Handler itself implement the
interface com.technia.tvc.core.gui.table.RangeHandler.
If you are using XML table definitions, a range handler is registered like the example below:
<Table>
    ...
    <Column>
        <RangeHandlerClass>com.acme.MyRangeHandler</RangeHandlerClass>
        ...
    </Column>
</Table>
1.4.2. Examples
Example 1 - Basic Example
This example creates a range handler with some values that are mapped to an integer number
import com.technia.tvc.core.TVCException;
import com.technia.tvc.core.db.aef.env.Environment;
import com.technia.tvc.core.gui.table.Column;
import com.technia.tvc.core.gui.table.RangeHandler;
import com.technia.tvc.core.gui.table.RangeValue;

import java.util.ArrayList;
import java.util.List;

public class SampleRangeHandler implements RangeHandler {

    public List getRangeValues(Environment env, Column column) throws TVCException {
        int count = IntRangeValue.options.length;
        List l = new ArrayList(count);
        for (int i = 0; i < count; i++) {
            l.add(new IntRangeValue(i));
        }
        return l;
    }

    private static class IntRangeValue implements RangeValue {
        private static final String[] options = {
            "Undefined",
            "Very Low",
            "Low",
            "Medium",
            "High",
            "Very High"
        };

        private final int i;

        public IntRangeValue(int i) {
            this.i = i;
        }

        public String getDisplayValue() {
            return options[i];
        }

        public String getValue() {
            return Integer.toString(i);
        }

        public int compareTo(Object o) {
            return ((IntRangeValue)o).i-i;
        }
    }
}
1.5. Entry Processor
An entry processor is involved during the evaluation of a table, similar to a data handler. The difference between an entry processor and a datahandler, is that a data handler is working with columns while the entry processor is working with the rows.
The entry processor will, before the data is retrieved, inform the evaluator about all the select statements it needs from the objects and/or relationships in the table/structure.
The API contains further details about the
com.technia.tvc.core.db.table.evaluator.EntryProcessor.
1.5.1. Purpose
An entry processor can be used to define the behavior of the rows within the table, examples of such behaviors are:
-
Define if the row can be navigable or not (go there)
-
Define if the row can be selected or not
-
Define if the row is pre-selected
-
Define if the row should be highlighted
-
Define if the row should be in-visible
-
Store additional information on the row level, which might be retreived at a later time - for example when rendering a table/structure
1.5.2. Registration
To use an entry processor, one must provide the parameter entryProcessor with the value set to the class to be used.
This is typically done in the attribute TVC Custom Parameters of the
Page Configuration business object, like below:
entryProcessor=com.acme.entryprocessors.MyEntryProcessor
1.5.3. Examples
Example 1 - Basic Example
This example selects the type.kindof property and makes the row
navigable for Parts only, and selectable for Documents only.
import com.technia.tvc.core.db.select.Statement;
import com.technia.tvc.core.db.table.evaluator.EntryProcessor;
import com.technia.tvc.core.db.table.evaluator.EvaluatedData;
import com.technia.tvc.core.db.table.evaluator.EvaluationInput;
import com.technia.tvc.core.db.table.evaluator.SelectedData;
import com.technia.tvc.core.gui.table.Table;
import com.technia.tvc.core.gui.table.TableClient;

public class SampleEntryProcessor implements EntryProcessor {

    public void prepareEvaluation(EvaluationInput input) {
        /*
         * Select type.kindof
         */
        input.addSelectBus(Statement.TYPE_KINDOF);
    }

    public void process(EvaluatedData data, Table table, TableClient client) {
        TableClient.Entry entry = data.getEntry();
        SelectedData objectData = data.getObjectData();
        String kindOf = objectData.getSelectValue(Statement.TYPE_KINDOF);

        /*
         * only "Parts" are navigable
         */
        entry.setNavigable("Part".equals(kindOf));

        /*
         * only "Documents" are selectable
         */
        entry.setSelectable("DOCUMENTS".equals(kindOf));
    }
}
Example 2 - Making a row invisible
This example checks if the user has some required assignments. If the
user is not assigned to these groups/roles, the row is not visible
unless the current state is Available
import com.technia.tvc.core.TVCException;
import com.technia.tvc.core.db.Assignments;
import com.technia.tvc.core.db.select.Statement;
import com.technia.tvc.core.db.table.evaluator.EntryProcessor;
import com.technia.tvc.core.db.table.evaluator.EvaluatedData;
import com.technia.tvc.core.db.table.evaluator.EvaluationInput;
import com.technia.tvc.core.gui.table.Table;
import com.technia.tvc.core.gui.table.TableClient;

import com.technia.tvc.log4j.Logger;

public class SampleEntryProcessor2 implements EntryProcessor {
    private static final Logger logger = Logger
        .getLogger(SampleEntryProcessor2.class);

    /**
     * Instance variables should be used with care.
     * However, a thread-local, can sometimes be useful
     */
    private ThreadLocal assigned = new ThreadLocal();

    public void prepareEvaluation(EvaluationInput input) {
        assigned.set(Boolean.FALSE);
        try {
            Assignments assignments = Assignments.getInstance();
            if (assignments.isAssigned("group_SomeGroup") &&
                    assignments.isAssigned("role_SomeRole")) {
                assigned.set(Boolean.TRUE);
                input.addSelectBus(Statement.CURRENT);
            }
        } catch(TVCException t) {
            logger.warn("Unable to get user assignments", t);
        }
    }

    public void process(EvaluatedData data, Table table, TableClient client) {
        TableClient.Entry entry = data.getEntry();
        String current = data.getObjectData().getSelectValue(Statement.CURRENT);
        if (!current.equals("Available") && assigned.get() == Boolean.FALSE) {
            entry.setVisible(false);
        }
    }
}
1.6. Cell Editor
The cell editor concept can be used to add interaction with the user while updating cell values. In Technia Value Components you have the possibility to override the way a value actually is modified to the database, through defining a custom Updater. However, the updater itself can only perform the update, and either return true or false whether the update succeeded or not or throw an Exception to indicate severe problems.
A cell editor will be involved before the Updater on the column is
invoked. The cell editor itself will not reduce the need of the
Updater responsibilities, but it will add more possibilities to allow
pre-validation and/or interaction with the user before the actual update
takes place.
The cell editor interface is defined as:
public interface CellEditor {
    /**
     * @param table The table that owns the cell being edited.
     * @param data The table data (row) that should be edited.
     * @param cell The cell being edited.
     * @param valueIndex The value index
     * @param newValue The new value of the cell.
     * @return The edit response.
     */
    Response editCell(EditableTableBean table,
                      TableData data,
                      int cell,
                      int valueIndex,
                      String newValue);
}
Typical and common things that can be solved by using a cell editor are
-
Validate the input
-
Ask the user for confirmation before modifying the value in the database
-
Execute a Java Script after the update is done, such as reload the whole table page.
More information about the cell-editor and related classes are found in the javadoc.
You can instead of implementing the interface
com.technia.tvc.structurebrowser.edit.CellEditor, extend from the
com.technia.tvc.structurebrowser.edit.DefaultCellEditor.
1.6.1. Registering a Cell Editor
A cell-editor is either registered within the Custom Parameters
through the page configuration object, or by defining the setting on a
table column called Cell Editor Class. If you register it on the
page configuration object, the cell editor will be used when editing any
cell within any column.
Registering the cell editor through the custom parameters attribute on the page configuration object, is done as the example below:
cellEditor=com.acme.edit.MyCellEditor
Registering the cell editor through the table column settings, is done as the example below:
add table X system
    column
        setting "Cell Editor Class" "com.acme.edit.MyCellEditor"
If both are defined, the cell editor from the column settings will be used.
1.6.2. Examples
Basic Example
This shows how to do some validation of the input, and if the validation fails - an error message is generated.
import com.technia.tvc.core.table.EditableTableBean;
import com.technia.tvc.core.table.TableData;

import com.technia.tvc.structurebrowser.edit.CellEditor;
import com.technia.tvc.structurebrowser.edit.DefaultCellEditor;
import com.technia.tvc.structurebrowser.edit.Response;

public class Example1 implements CellEditor {

    public Response editCell(EditableTableBean table,
                             TableData data,
                             int cell,
                             int valueIndex,
                             String newValue) {
        if (isValueOk(newValue)) {
            return DefaultCellEditor.getInstance().editCell(table, data, cell,
                    valueIndex, newValue);
        } else {
            return Response.newError("Value is not ok...");
        }
    }

    private boolean isValueOk(String newValue) {
        // TODO Auto-generated method stub
        return false;
    }
}
Reload Example
This shows how to force a reload of the table page, after the edit has taken place.
import com.technia.tvc.core.table.EditableTableBean;
import com.technia.tvc.core.table.TableData;

import com.technia.tvc.structurebrowser.edit.CellEditor;
import com.technia.tvc.structurebrowser.edit.DefaultCellEditor;
import com.technia.tvc.structurebrowser.edit.Response;

public class Example1 implements CellEditor {
    public Response editCell(EditableTableBean table,
                             TableData data,
                             int cell,
                             int valueIndex,
                             String newValue) {
        Response response = DefaultCellEditor.getInstance().editCell(table, data, cell, valueIndex, newValue);
        if (response == null) {
            // The default editor returns null, in case all went fine
            response = Response.newReloadTable(true);
        }
        return response;
    }
}
Example with Confirm Message
This shows how to perform confirmation of cell value updates.
import com.technia.tvc.core.table.EditableTableBean;
import com.technia.tvc.core.table.TableData;

import com.technia.tvc.structurebrowser.edit.CellEditor;
import com.technia.tvc.structurebrowser.edit.ConfirmCallback;
import com.technia.tvc.structurebrowser.edit.DefaultCellEditor;
import com.technia.tvc.structurebrowser.edit.Response;

public class Example implements CellEditor {

    public Response editCell(final EditableTableBean table,
                             final TableData data,
                             final int cell,
                             final int valueIndex,
                             final String newValue) {
        if (isValueOk(newValue)) {
            return DefaultCellEditor.getInstance().editCell(table, data, cell,
                    valueIndex, newValue);
        } else {
            return Response.newConfirm("Confirm update", new ConfirmCallback() {
                public TableData getTableData() {
                    return data;
                }

                public Response accept() {
                    return DefaultCellEditor.getInstance().editCell(table,
                            data, cell, valueIndex, newValue);
                }

                public Response cancel() {
                    // TODO: Localize
                    return Response.newOk("Nothing updated!");
                }
            });
        }
    }

    private boolean isValueOk(String newValue) {
        // TODO Auto-generated method stub
        return false;
    }
}
1.7. Table Post Processing
A table post processor can be used to modify or replace the table bean after it has been initially loaded.
A post processor must implement the
com.technia.tvc.structurebrowser.postprocess.PostProcessor interface
1.7.1. Registration
The post processor to be used for a particular instance of the structure
browser, is defined within the attribute TVC Custom Parameters of
the Page Configuration Business Object being used.
The value is a comma separated list of either fully qualified classnames of a table post processor, or the short name of a pre-defined post processor. See the example below
postProcess=com.acme.MyPostProcessor,AnotherPostProcessor
To register short names of a post-processor, simply add init parameters
starting with the following
prefix: tvc.structurebrowser.tablePostProcessor.
<init-param>
    <param-name>tvc.structurebrowser.tablePostProcessor.AnotherPostProcessor</param-name>
    <param-value>com.acme.postprocessor.AnotherPostProcessor</param-value>
</init-param>
1.8. Expander
As of TVC release 2009.1, you can per view define how to expand a structure. The most common way to expand structures in TVC has been by using so called filters that define how the structure is being expanded.
Other possibilities, like expanding using a JPO or writing a custom StructureBean that implements the expand logic has also been possible. The drawback with that approach has been that you weren’t able to easily mix the expand modes used within the same Structure Browser instance.
Moreover, you will be able to decide per view how the filter chooser should behave e.g. if to allow combining multiple filters, or just select a single filter, or not being able to select any filter at all.
1.8.1. Expander Configuration
An Expander is configured on the View level. In a view, you can either choose to use standard filters, or decide to use an Expander.
Below is an example of how to define this on a view that is defined in XML. If you use business objects as configuration objects, there is a corresponding attribute that allows you to define the ExpandMode.
<View>
    <DisplayName>Latest Rev</DisplayName>
    <ExpandMode>java:com.technia.tvx.enc.expanders.Latest</ExpandMode>
    <Table default="true">tvc:table:tvx:enc/EBOM.xml</Table>
    <Table>tvc:table:tvx:enc/ECOECR.xml</Table>
    <Table>tvc:table:tvx:enc/Condensed.xml</Table>
    <Table>tvc:table:tvx:common/Simple.xml</Table>
</View>
Note that the example above uses a Java implementation of an expander. There are other types of Expanders that allows you to do different expansions, for example via:
-
Inquiries
-
JPOs
-
Shadow Expansions
Please consult the Structure Browser Administration Guide regarding
details for the other expand modes.
1.8.2. Expander API
You can either choose to implement the Expander interface directly, or extend from the base class AbstractExpander. The links to the API are shown below.
-
com.technia.tvc.core.structure.Expander
-
com.technia.tvc.core.structure.expand.AbstractExpander
The Expander interface is defined as:
public interface Expander {
    /**
     * Returns true if this expander allows full expand
     *
     * @param structure The {@link ExpanderBasedStructureBean}.
     * @return True if full expand is allowed.
     */
    boolean isFullExpandSupported(ExpanderBasedStructureBean structure);

    /**
     * Returns true if this expander allows multi-level expands.
     *
     * @param structure The {@link ExpanderBasedStructureBean}.
     * @return True if multi-level expands are supported.
     */
    boolean isMultiLevelExpandSupported(ExpanderBasedStructureBean structure);

    /**
     * Returns the filter mode.
     *
     * @param structure The current {@link ExpanderBasedStructureBean structure}
     */
    FilterMode getFilterMode(ExpanderBasedStructureBean structure);

    /**
     * Expands a node.
     *
     * @param ctx The {@link ExpandCtx context}
     * @param node The node to expand.
     * @param levels The number of levels to expand the node, zero for full
     *        expansion.
     * @throws TVCException If unable to expand the node.
     */
    void expandNode(ExpandCtx ctx, StructureBeanNode node, int levels) throws TVCException;

    /**
     * Collapses a node.
     *
     * @param ctx The {@link ExpandCtx context}.
     * @param node The node to collapse.
     * @since 2009.3
     */
    void collapseNode(ExpandCtx ctx, StructureBeanNode node);
}
1.8.3. Examples
This document shows a couple of different implementations of Expanders
Example 1 - Expanding the Latest Revisions
This example expands the structure and selects the id of the last revision for each object found in the expansion.
E.g. the structure that this expander creates, is in most cases not representing a real structure in matrix, as the object not always are connected. This is the case when the object in a structure has a later revision.
import com.technia.tvc.core.TVCException;
import com.technia.tvc.core.db.BusinessObjectUtils;
import com.technia.tvc.core.structure.Expander;
import com.technia.tvc.core.structure.ExpanderBasedStructureBean;
import com.technia.tvc.core.structure.StructureBeanNode;
import com.technia.tvc.core.structure.expand.AbstractExpander;
import com.technia.tvc.core.util.StringUtils;

import java.util.Iterator;

import matrix.db.RelationshipWithSelect;

public class Latest extends AbstractExpander {
    @SuppressWarnings("unchecked")
    public void expandNode(ExpandCtx ctx, StructureBeanNode node, int levels) throws TVCException {
        Iterator<RelationshipWithSelect> itr = BusinessObjectUtils.expandSelect(
                node.getObjectId(),
                "EBOM",
                "Part",
                StringUtils.toStringList(new String[] {
                        "id",
                        "last.id",
                }),
                StringUtils.toStringList(new String[] {
                        "id",
                }),
                false,
                true,
                1,
                null,
                null,
                false).getRelationships().iterator();
        RelationshipWithSelect rws;
        String relId, id, lastId;
        while (itr.hasNext()) {
            rws = itr.next();
            relId = rws.getSelectData("id");
            id = rws.getTargetSelectData("id");
            lastId = rws.getTargetSelectData("last.id");
            StructureBeanNode newNode = ctx.newStructureNode(relId, lastId, true);
            if (!id.equals(lastId)) {
                /*
                 * Make it possible for some cell-renderer or table-renderer
                 * to pick up this information.
                 */
                newNode.put(LatestInState.REAL_OBJECTID_KEY, id);
            } else {
                newNode.remove(LatestInState.REAL_OBJECTID_KEY);
            }
            node.addChild(newNode);
        }
    }

    public FilterMode getFilterMode(ExpanderBasedStructureBean s) {
        return Expander.FIXED;
    }

    public boolean isFullExpandSupported(ExpanderBasedStructureBean s) {
        return false;
    }

    public boolean isMultiLevelExpandSupported(ExpanderBasedStructureBean s) {
        return false;
    }
}
}
1.9. Javascript API
This document describes commonly used and convenient methods available in a frameset displaying a table or a structure.
1.9.1. Frameset Details
To understand the JS API, one must first understand how a table page is structured, since the JS function are located within different frames. Hence, when invoking a JS function, one must carefully consider where the function is located as well as from where it’s being invoked.
A table page is built up by a number of so called IFRAME elements, as illustrated below:
Details about each frame:
-
This frame contains the header, subheader and toolbar.
-
This frame contains the content of the table.
The frame contains nested IFRAME elements
-
A hidden frame, used for performing processing of certain actions.
-
Same as for item 3. This frame is added in order to support the same
Target Locationvalues as used by the AEF.
1.9.2. Java Script Functions
The following table describes the public available JS methods, which can be used in the Structure Browser.
| Name | Args | Frame Location | Description |
|---|---|---|---|
tvcReloadPage |
tableContentFrame |
Reloads the frame |
|
tvcReloadTableContent |
tableContentFrame |
Refreshes the content of the table from the database and reloads the frame |
|
addRow |
|
tableContentFrame |
Adds one row to the table/structure |
addRows |
|
tableContentFrame |
Adds one or more rows to the table/structure. |
addNode |
|
tableContentFrame |
Adds one node below another object (for structures) |
addNodes |
|
tableContentFrame |
Adds one or more nodes below another object (for structures) |
showProgress |
tableContentFrame |
Shows the progress bar |
|
showProgressMessage |
|
tableContentFrame |
Shows the progress bar together with a progress message. |
hideProgress |
tableContentFrame |
Hides the progress bar |
1.10. Standalone
There is a simple Java class provided in the structurebrowser that allows simple testing of a table. This can be useful during the development of data handlers etc.
The below (Windows) batch script illustrates how to invoke this class. Note about the arguments required to pass on the command line, in order to establish the context and initialization of TVC. See also this chapter for additional information.
@echo off
set USER=Test Everything
set PASSWORD=
set HOST=rmi://localhost:10800

set CP=eMatrixServletRMI.jar
set CP=%CP%;../classes
set CP=%CP%;tvc-core-6.3.0.jar
set CP=%CP%;tvc-structurebrowser-6.3.0.jar
set CP=%CP%;servlet-api.jar
set class="com".technia.tvc.structurebrowser.util.TableTest

java -classpath %CP% %CLASS% "-host=%HOST%" "-user=%USER%" "-pass=%PASSWORD%" -inquiry=Test
This class accepts some parameters, defining how to extract the data and how to present it.
If the argument -objectid= is left out, you need to supply the argument -inquiry=.
Moreover, if you do not supply the parameter -pageconfig, a default view and table is created for you. If you want to expand a structure you must use the argument -structure in addition to either -inquiry or -objectid. See the examples below:
java ... -structure -object=Part,EV-000001,A "-view=Part View"
java ... -structure -object=Part,EV-000001,A "-pageconfig=Navigate EBOM"
java ... -structure -objectid=1234.567.890.1234 "-pageconfig=Navigate EBOM"
The batch script above assumes that you have both the tvc.license file as well as the required JAR files within the current directory.