$<SELECT_EXPRESSION>
Structure Browser - Administration Guide : Other Configuration Possibilities
30 March 2016
Table of Contents
- 1. Other Configuration Possibilities
- 1.1. Using Select Expression Macros
- 1.2. Using Directory Macros
- 1.3. Controlling Access to UI Components
- 1.4. Controlling Edit Access to Table Columns
- 1.5. Controlling Edit and Show Access to Table Cells
- 1.6. Using Data Handlers to Retrieve Column Values
- 1.7. Using Entry Processors
- 1.8. Using Range Handlers
- 1.9. Using JPOs
- 1.10. Using Inquiries to Retrieve Table Rows
- 1.11. Localized View, Table and Filter Names
- 1.12. Service Toolbar Actions
- 1.13. Invoke Service from client side [without calling action]
1. Other Configuration Possibilities
This section describes other, more complicated, ways to configure the Structure Browser that may require programming skills in Java or MQL.
1.1. Using Select Expression Macros
Select expression macros offer the means to define select expressions using symbolic names for administrative objects rather than their actual names.
Symbolic names act as pointers to administrative objects (e.g., attributes, types, policies). This means that select expressions defined using symbolic names are more robust as they don’t have to change if the name of the administrative objects changes.
Select expression macros are defined as:
Where SELECT_EXPRESSION is a valid select expression where administrative object names have been replaced by their corresponding symbolic names. For instance, if an attribute named "Quantity" has a symbolic name like "attribute_Quantity" the expression $<attribute[attribute_Quantity].value> is a valid select expression macro that would return the value of that attribute. Note that you could still use the actual name of an administrative object within a select expression macro; in fact, a select expression macro doesn’t have to contain any symbolic name at all.
Examples:
-
$<name>
-
$<attribute[attribute_Quantity].value>
-
$<attribute[Quantity].value>
-
$<from[relationship_EBOM].to.name>
1.2. Using Directory Macros
Directory macros can be used to specify that a URL should originate from a specific directory on the application server. For instance, the macro ${ROOT_DIR} refers to the root directory of the Value Chain Portfolio applications.
Available Macros:
-
${ROOT_DIR} - Refers to the root directory of the VCP applications (e.g., http://hostname:port/ematrix).
-
${COMMON_DIR} - Refers to the "common" directory (e.g., http://hostname:port/ematrix/common).
-
${SUITE_DIR} - Refers to the application specific directory of the registered suite (e.g., http://hostname:port/ematrix/engineeringcentral).
-
${COMPONENT_DIR} - Refers to the directory that contains common components (e.g., http://hostname:port/ematrix/components).
Examples:
-
${COMMON_DIR}/emxTree.jsp
-
${COMMON_DIR}/emxForm.jsp
-
${ROOT_DIR}/emxLogin.jsp
1.3. Controlling Access to UI Components
Commands and table columns can be assigned access constraints by adding persons, roles, and groups to the Access tab. All users added to this list will be granted access to the UI component. Note that when a role or group is added, all child roles/groups will be granted access as well.
Another way to do this is to define settings on the UI component:
- Access Mask
-
Specifies the accesses a user must have in order for the UI component to be displayed. The mask applies to the business object referenced by the objectId parameter sent with the request, i.e., the root object in the structure when navigating.
Examples:
-
Promote
-
Promote,Demote
-
Modify
-
- Access Expression
-
A Matrix expression that is evaluated against the current business object, which is retrieved from the objectId parameter sent with the request. If no objectId is sent with the request the person objectId is used as default. To disable the default use of person objectId evaluation use the init-param
tvc.core.accessExpression.usePersonObjectDefault=false.Access will be granted if the expression evaluates to true. Note that this setting supports use of select expression macros. See Using Select Expression Macros for more information.
Examples:
-
type==$<type_Company>
-
revision==last
-
- Access Function and Access Program
-
These settings define the name of a method and a JPO respectively. The method on the JPO will be invoked and the return value determines whether the UI component will be displayed or not. The method gets an input parameter of type java.util.HashMap that contains the request parameters. The return value should be of type java.lang.Boolean, where true will grant and false reject access.
import matrix.db.*;
import java.util.*;

public class ${CLASSNAME} {

    public ${CLASSNAME}(Context ctx, String[] args) throws Exception {}

    public Boolean checkAccess(Context ctx, String[] args) throws Exception {
        HashMap paramMap = (HashMap) JPO.unpackArgs(args);
        Boolean hasAccess = new Boolean(true);

        // Perform access checks here and
        // possibly change the return value
        // to reject access

        return hasAccess;
    }
}
1.4. Controlling Edit Access to Table Columns
There are a number of different settings that can be used to control whether a user should be granted access to edit the fields of a certain column. Note that no user will be able to edit a field in a column where edit access has been granted to the column but the policy of the business object in a specific row rejects modify access.
The available settings are:
- Editable
-
The value of this setting should be a Boolean value indicating whether all users should have access to edit the fields of a column or not. Note that no further access check will be performed when this setting is true. The default value for this setting is false.
- Editable Mask
-
Specifies the accesses a user must have in order for the column to be editable. The mask applies to the business object referenced by the objectId parameter sent with the request, i.e., the root object in the structure when navigating.
Examples:
-
Promote
-
Promote,Demote
-
Modify
-
- Editable Expression
-
A Matrix expression that is evaluated against the current business object, which is retrieved from the objectId parameter sent with the request. Access will be granted if the expression evaluates to true. Note that this setting supports use of select expression macros. See Using Select Expression Macros for more information.
Examples:
-
type==$<type_Company>
-
revision==last
-
- Editable Function and Editable Program
-
These settings define the name of a method and a JPO respectively. The method on the JPO will be invoked and the return value determines whether the column will be editable or not. The method gets an input parameter of type java.util.HashMap that contains the request parameters. The return value should be of type java.lang.Boolean, where true will grant and false reject access.
import matrix.db.*;
import java.util.*;

public class ${CLASSNAME} {

    public ${CLASSNAME}(Context ctx, [] args) throws Exception {}

    public Boolean checkAccess(Context ctx, String[] args) throws Exception {
        HashMap paramMap = (HashMap) JPO.unpackArgs(args);
        Boolean hasAccess = new Boolean(true);
        // Perform access checks here and
        // possibly change the return value
        // to reject access
        return hasAccess;
    }
}
1.5. Controlling Edit and Show Access to Table Cells
Two new settings were introduced in TVC 6.0 in order to determine whether or not to grant edit and/or show access to a particular cell of a certain column.
In addition to the setting called "Editable Expression", which is used to determine editable access for all cells of a certain column, one can now use the following settings to determine access on particular cells:
- Cell Editable Expression
-
A Matrix expression that is evaluated against the business object or relationship (depending on the "applies to" value of the column) for the row, which the cell is related to. Note that this setting supports use of select expression macros. See Using Select Expression Macros for more information.
Examples:
-
$<type.kindof[type_Company]>
-
revision==last
-
- Cell Showable Expression
-
Similar to the "Cell Editable Expression", except that it will not control edit access, instead it will control whether or not to show the value of the cell.
1.6. Using Data Handlers to Retrieve Column Values
As it is very expensive to execute a JPO (Java Program Object)[multiblock footnote omitted], another strategy to retrieve column values was implemented in TVC 5.2.0. The new strategy will result in faster evaluation of a table, and reduce unnecessary data base calls.
To enable this feature, you must have to set the Data Handler Class
setting on a table column. The value should be the fully qualified name
of a class which implements an interface called
com.technia.tvc.core.db.table.evaluator.DataHandler. The custom class
must also be available for the application class-loader.
| As of TVC 6.1, you will have the possibility to use so called "Table Cell Renderer’s", which can be used to format the data dependent on where it is being viewed. For example, in the HTML view, the cell is rendered in one way with HTML formatting instructions, but in a table export or printer friendly view, the data can be formatted differently since the HTML tags is for example not affecting the PDF format nor the export format. |
This document does not contain any details related to how to implement data handlers and cell renderer’s. Please consult the developer documentation, which is a part of the TVC documentation set, for more information and code examples of both data handler’s and cell renderer’s.
The built-in data-handlers and cell-renderers with their settings are described in the sub-chapter below:
1.6.1. Built-In Data Handler’s and Cell Renderer’s
There are a couple of built-in data handlers and cell renderers that you can use in your tables. All of them are described in the chapters below.
Type Name Revision (Object)
This data handler and cell renderer will retrieve the type, name, revision and possibly all other revisions and display them within the same cell.
To use this column, apply the following setting to the table column:
<ColumnType>tnr</ColumnType>
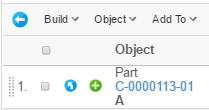
Figure 1. Type Name Revision in the same cell
Following settings are supported:
| Setting | Description | Value |
|---|---|---|
Show All On One Row |
Can be used to define if all information should be drawn on the same row. If this setting is set to true, then the "Show Revisions" setting will be forced to false. |
True / False |
Target Location Revisions |
Defines the target location for the link that appears on the revisions |
popup |
Target Location |
Defines the target location for the link that appears on the name of the object |
popup |
Show Type |
Whether or not to show the type |
True / False |
Show Name |
Whether or not to show the name |
True / False |
Show Revision |
Whether or not to show the revision |
True / False |
Show Revisions |
Defines if to show all revisions, or just the current one. |
True / False |
Highest Revision Count |
The number of "highest" revisions to show. -1 means all. |
-1 |
Previous Revision Count |
The number of "previous" revisions to show. -1 means all. |
-1 |
Show Revisions State |
Whether or not to also show the state for each revision as a tooltip. |
True / False |
Show More |
Whether or not a link should be added, containing information about the revisions. |
False / True |
Jumped Over Indicator |
The indicator used for indicating jumped over revisions |
|…| |
Previous Indicator |
The indicator used for indicate that previous revisions has been dropped. |
…| |
Sort By Type |
Whether or not sorting should sort by the type value of not. |
True / False |
Check Revision |
Whether or not to check if the revision starts with "auto_" or has more than 8 characters |
True / False |
Date Time
This data handler / cell renderer can be applied to any column that is displaying a date values retrieved from Matrix. Hence, you need to specify an expression within the column definition of the table, for example:
$<attribute[attribute_EffectivityDate]> or modified in order to be able
to use this data handler / cell renderer.
To use this column, apply the following setting to the table column:
<ColumnType>date</ColumnType>
Or
<ColumnType>datetime</ColumnType> <!-- Force the setting Display Time to true -->
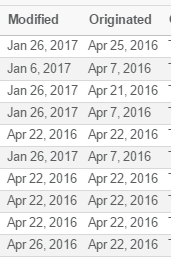
Figure 2. Date Time Column
Following settings can be used to define the behaviour of this column:
| Setting | Description | Value |
|---|---|---|
Timezone Aware |
Whether or not to convert the date time to the users time-zone. |
True / False |
Display Duration |
Whether or not to display the duration |
True / False |
Display Time |
Whether or not to display the time |
True / False |
Pattern |
A custom pattern used to format the date time value. NOTE: Pattern will ignore the “Display Duration” and “Display Time” settings. |
Valid Java SimpleDateFormat |
Date Style |
Defines the amount of information to show for the date. Default is Medium |
Short, Medium, Long or Full |
Time Style |
Defines the amount of information to show for the time. Default is Medium |
Short, Medium, Long or Full |
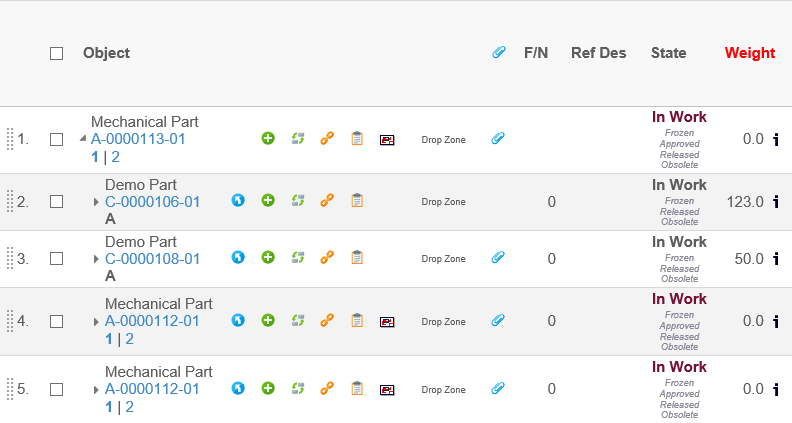
Lifecycle
This data handler / cell renderer will display the current state of the object and allowing to display the previous / next state names. The current state can also be styled dependent on the state value.
To use this column, apply the following setting to the table column:
<ColumnType>state</ColumnType>
Or
<ColumnType>lifecycle</ColumnType>
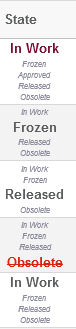
Figure 3. Lifecycle cell
Following settings can be used to define the behaviour of this column:
| Setting | Description | Value |
|---|---|---|
Show Following |
Whether or not to show the following state(s) |
True / False |
Show Previous |
Whether or not to show the previous state(s) |
True / False |
State.<state-name> |
Defines the style for a particular state. |
State.state_Obsolete = color:#d21;text-decoration:line-through; |
Find Number
This data handler /cell renderer is used to ensure that a find number is unique and formatted according to the settings specified.
To use this column, apply the following setting to the table column:
<ColumnType>fn</ColumnType>
Or
<ColumnType>findnumber</ColumnType>
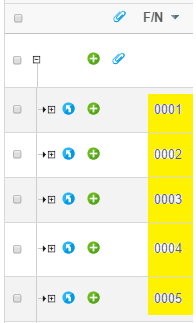
Figure 4. Find Number Cells
Following settings can be used to define the behaviour of this column:
| Setting | Description | Value |
|---|---|---|
Store Formatted Value |
Whether or not to store the value in the database according to the specified "number of digits" |
True / False |
Number of Digits |
The number of digits, which the find number at least will be presented in |
0 |
Reference Designator
This data handler /cell renderer is used to ensure that an entered reference designator is both valid and unique as well as formatted correctly.
To use this column, apply the following setting to the table column:
<ColumnType>refdes</ColumnType>
Or
<ColumnType>referencedesignator</ColumnType>
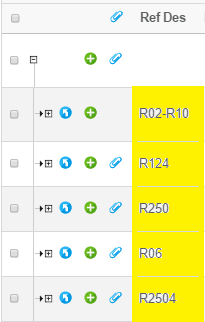
Figure 5. Reference Designator Cells
Following settings can be used to define the behaviour of this column:
| Setting | Description | Value |
|---|---|---|
Split Chars |
The characters used for splitting the RD values. Please note that a setting value is trimmed by Matrix. To enter white-space characters, simply store the value in quoted form. Example: ", " |
", " |
Split Chars in DB |
The stored value can have different split characters than used for display. This setting will only be used if either the setting "Save Optimized" or "Save Exploded" is true. |
"," |
Allow Mixed Labels |
Whether or not mixed labels are allowed for the same RD value |
True / False |
Number of Digits |
The number of digits used to format the numeric part of the RD. Example: If the RD is stored as R1-R3 and this setting is set to "3". It will be formatted as: R001-R003 |
0 |
Warn If Empty |
Whether or not the user should be warned if an empty value is entered |
True / False |
Check Uniqueness |
Whether or not the uniqueness of the entered RD value should be checked |
True / False |
Save Optimized |
Whether or not the entered value should be stored in optimized form. Example: If the RD is entered as below: R1,R2,R3,R8,R9,R10 It will be saved as: R1-R3, R8-R10 |
True / False |
Save Exploded |
True or false if the value should be saved "exploded" in the DB. Example: If the RD is entered as below R1-R3,R8 It will be saved as: R1,R2,R3,R8 |
True / False |
Save As Entered |
True or false if the value should be saved "as entered" in the DB. This is the default saving format. |
True / False |
Export Exploded |
True or false is the value should be "exploded" on table exports |
True / False |
Actual or Scheduled Dates
This data handler /cell renderer is used to show either actual or scheduled dates for an object. Scheduled dates can also be edited, if the column is editable and the user has "schedule" access.
To use this column, apply the following setting to the table column:
<ColumnType>statedate</ColumnType>
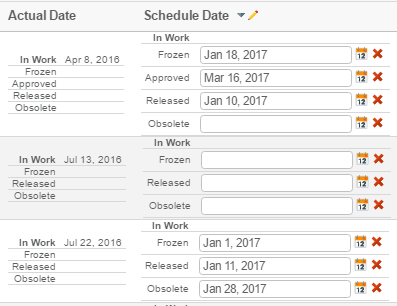
Figure 6. Cells Showing Actual and Scheduled Dates
Following settings can be used to define the behaviour of this column:
| Setting | Description | Value |
|---|---|---|
Show Scheduled |
Whether or not the column should show the scheduled date. |
True / False |
3D Play
Since 2017x 3DPlay is available inside 3DSpace.
3DPlay provide a consistent look and feel across all apps, and allow any user of
the platform to view high quality 3D models in the web browser.
We have added a column type that interacts with 3D PLay. As for now it is loaded from parts and the natural place to enable it is on EBOM views. To use this column, apply the following setting to the table column:
<ColumnType>3dplay</ColumnType>
If the part has a drawing attached to it, you will be able to launch it by pressing the play button.
If there’s no drawing attached to the part, the button won’t be rendered.
To enable cross highlight you need to enable checkboxes in the pageconfiguration.
<RowSelect>multiple</RowSelect>
Note: Cross highlight works for V6 data from 2017x release. You can still launch the player from the 2016x with V5 and V6 data.
Attributes with Dimensions
This data handler /cell renderer can be used for those attributes that has a dimension (Matrix 10.7 feature) associated.
To use this column, apply the following setting to the table column:
<ColumnType>dimension</ColumnType>
Above is an example column showing the attribute Weight, which has a dimension associated. The image right to the value will, upon click, show the conversion table (shown below). This is enabled by the setting "Allow Show More".
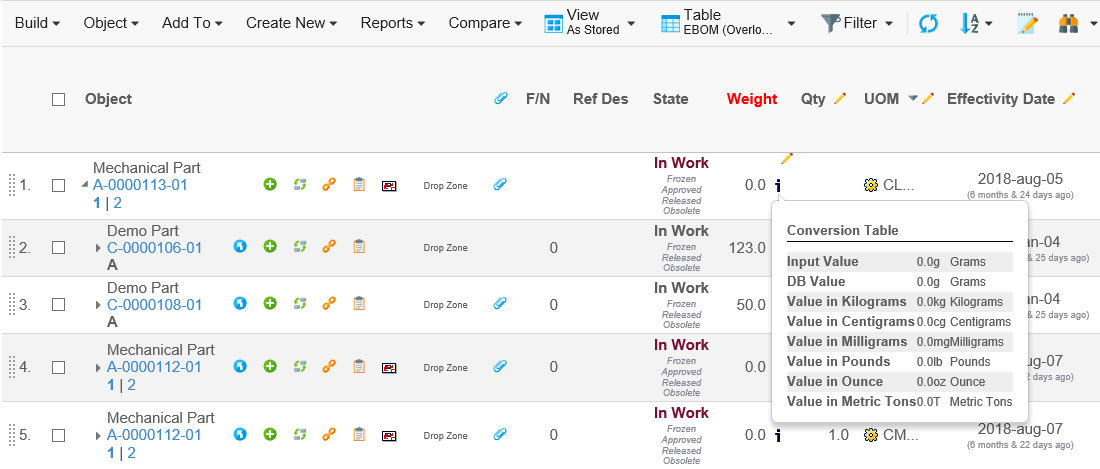
This table shows the value (and unit) as it was entered when it was last modified, as well as the value (and unit) as it is stored in the database. The other rows shows the value converted into all the defined units defined. Following settings can be used to define the behaviour of this column:
| Setting | Description | Value |
|---|---|---|
Show Normalized |
Whether or not to show the normalized value |
True / False |
Show Entered |
Whether or not to show the entered value |
True / False |
Show Unit |
Whether or not the unit should be shown. The unit will only be shown, if either one of the settings "Show Normalized" or "Show Entered" is true. |
True / False |
Min Fraction Digits |
The minimum fraction digits |
1 |
Max Fraction Digits |
The maximum fraction digits |
8 |
Inline Connect
This data handler/cell renderer can be used for enabling "inline connect" to / from an object in the table.
To use this column, apply the following setting to the table column:
<ColumnType>newrow</ColumnType>
The column will show input fields for those rows, where the user can connect the object. The user enters the name of the object to be inserted, and when the field is "leaved"; the update is performed.
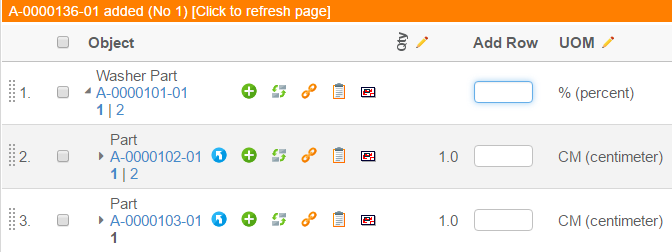
As soon as an object has been connected, the user is notified with a message above the table (as illustrated above). Once the user is completed with the task; e.g. added all the objects, the user can click in the yellow area to reflect the changes in the shown structure.
Following settings can be used to define the behaviour of this column:
| Setting | Description | Value |
|---|---|---|
Relationship |
The name of the relationship to be used for the creation of connections. |
Undefined by default. A value needs to be assigned. |
From |
Whether or not if the connected object should be connected from the object in the table or to. |
True / False |
Type Pattern |
The type pattern that will be used in the query. Note that this value cannot contain symbolic type names, as the type pattern can contain wildcards. |
|
Valid States |
A comma separated list of states, which the item to be connected must conform to. |
|
Allow Wildcard |
Whether or not wildcards such as * or ? are allowed in the name pattern (the entered value from the input field) |
True / False |
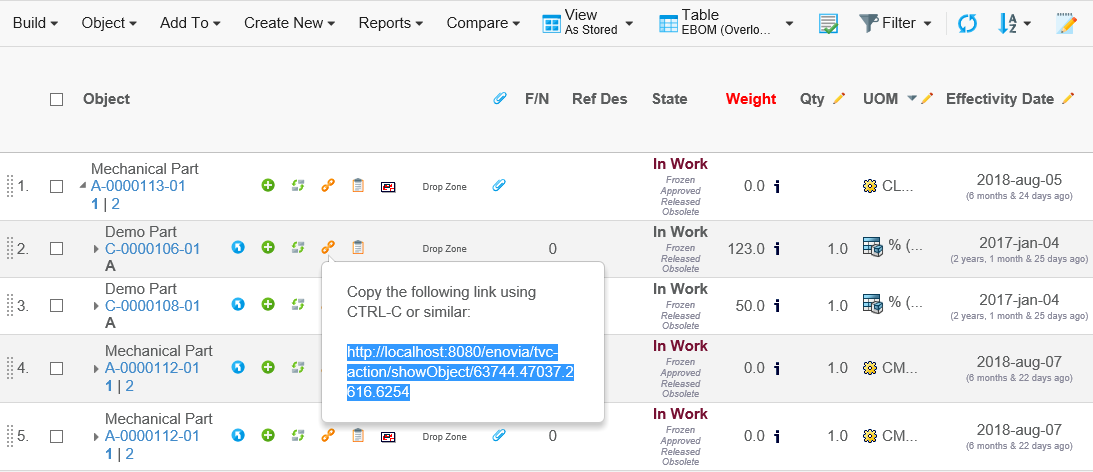
Object Link
A new column type has been added, which will generate a column give an icon that, upon click, will show the link to the object. This link can then be copied and used as a short cut to the object page, or be used in an email message.
To use this column, apply the following setting to the table column:
<ColumnType>objectlink</ColumnType>
The value used as identifier for object links can be controlled using the init param tvc.core.objectlink.identifier. The following values are supported tnr, physicalid, objectid.
Progress
A column type showing the progress of something has been added. An example of how this progress column can look like is shown in the screen capture below:
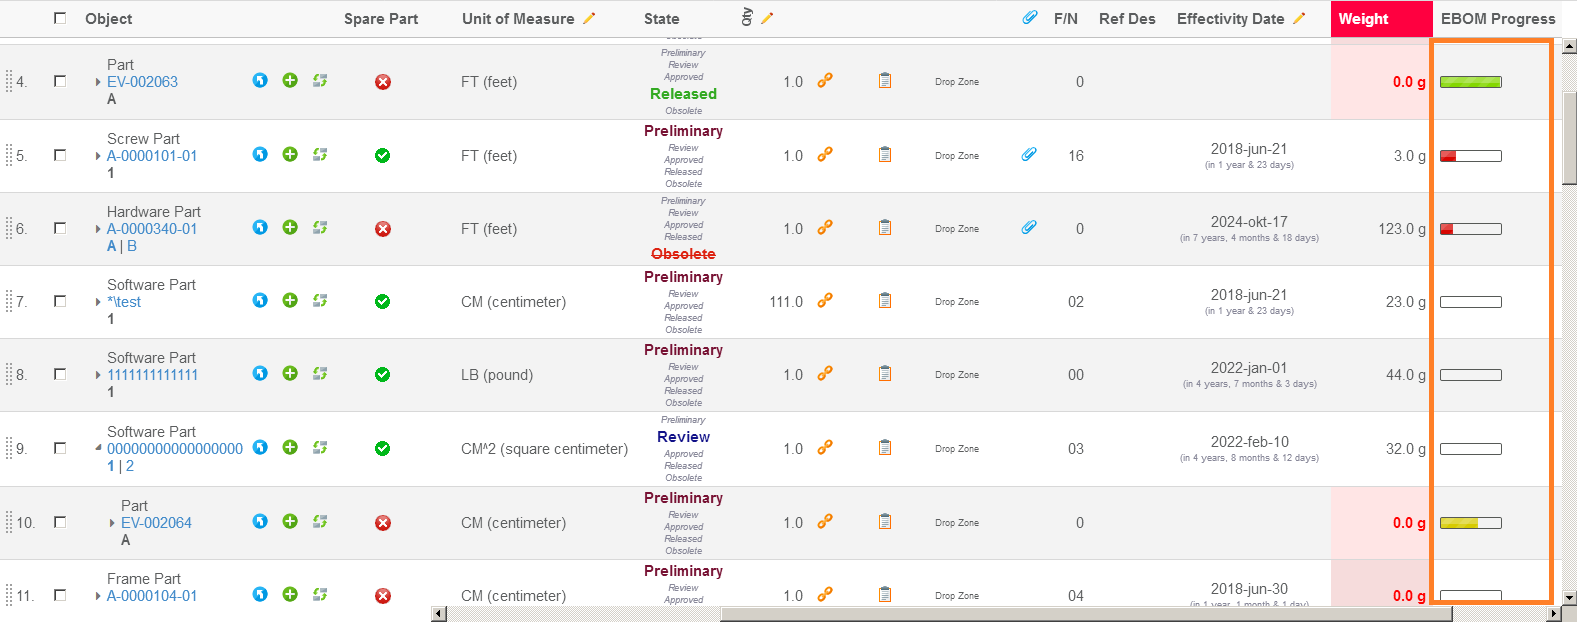
This example shows the progress of the EBOM; e.g. how many percent of the first level is completed.
The column that generated this output was defined like below:
<Column>
    <Name>progress</Name>
    <CellShowableExpression>type.kindOf[Part]</CellShowableExpression>
    <Expression><![CDATA[
        $<from[relationship_EBOM].to.evaluate[current matchlist 'Release,Complete' ',']>
    ]]></Expression>
    <ColumnType>progress</ColumnType>
    <Setting name="Show Text" value="false"/>
    <Setting name="Progress Width" value="60"/>
</Column>
The column type for this column is "progress". And this will force the usage of the following data handler and cell renderer:
- Data Handler
-
com.technia.tvc.structurebrowser.examples.ProgressDataHandler - Cell Renderer
-
com.technia.tvc.structurebrowser.examples.ProgressCellRenderer
The default datahandler that is used here will for the given expression calculate how many values retrieved for the expression equals to true compared to how many that equals to false. E.g. the expression used above will from MQL give output like below:
MQL<9>pri bus Part EV-000007 A select from[EBOM].to.evaluate[current matchlist 'Release,Current' ','];
business object Part EV-000007 A
from[EBOM].to.evaluate[current matchlist 'Release,Current' ','] = TRUE
from[EBOM].to.evaluate[current matchlist 'Release,Current' ','] = FALSE
from[EBOM].to.evaluate[current matchlist 'Release,Current' ','] = FALSE
from[EBOM].to.evaluate[current matchlist 'Release,Current' ','] = TRUE
from[EBOM].to.evaluate[current matchlist 'Release,Current' ','] = FALSE
from[EBOM].to.evaluate[current matchlist 'Release,Current' ','] = FALSE
E.g. in this case 2 of 6 items evaluated to true (33%).
The cell renderer that shows the progress expects that the value in the cell is a numeric value between 0 and 100. So in case you have an attribute holding a percentage value OR you have some other way to calculate the progress, you can re-use the cell-renderer to that column and apply your own logic to provide the percentage value.
The progress column has a number of settings available; these are described in the table below:
| Setting | Description | Value |
|---|---|---|
Progress Width |
The width of the progress bar. This must be a value between 20 and 120. |
60 |
Show Text |
A Boolean defining if the percentage value should be displayed in text next to the progress bar. |
True False |
Text Format |
The formatting instruction to be applied on the value. This is used to create the tooltip and optionally the text shown to the right unless the "Show Text" setting is set to false. The formatting is used by using the String.format in Java. |
%.0f %% |
Green Threshold |
A threshold is a value between 0 and 100 (inclusive) that defines when the value (the progress value) is satisfying a particular colour. Let’s say that you define 50 as threshold; if your value is 50 or above, the progress bar will get that colour. The highest matched Colour will be used. If you assign a negative value to the threshold for a particular colour, that colour will not be used in the progress bar. |
Number 0-100 (negative value disables the colour). |
Yellow Threshold |
See above |
|
Orange Threshold |
See above |
|
Red Threshold |
See above |
If no threshold values are given, the following will be used by default:
-
Green = 80
-
Yellow = 60
-
Orange = 40
-
Red = 0
This can be translated in:
-
If the value is in the range 0⇐40, red colour is used.
-
If the value is in the range 40⇐60, orange colour is used.
-
If the value is in the range 60⇐80, Yellow colour is used.
-
If the value is 80 or above, green colour is used.
Related Object with Condition
Adding a column to a table that shows related object information is quite easy to accomplish in the Structure Browser with a standard expression. However, if you want to select information from a particular object based upon a condition then it could result in some problems.
A common way to solve this is to use an expression like below.
<Column>
    <Expression>from[rel|to.attribute[X] == 'abc'].to.name</Expression>
</Column>
This works OK in some cases, but if you start to add more columns in the same table with similar expressions like shown below, then you will run into some problems.
<Column>
    <Expression>from[rel|to.attribute[X] == 'abc'].to.name</Expression>
</Column>

<Column>
    <Expression>from[rel|to.attribute[X] == 'def'].to.name</Expression>
</Column>
The reason for this is that when you select data with these kind of select statements, ENOVIA will in the result hide the "where clause" making it impossible to map the value back to it’s select statement. The MQL example below illustrates this.
<MQL> pri bus 56328.52446.25457.29684 select from[EBOM|to.name == 'EV-002131'].to.name from[EBOM|to.name == 'EV-002132'].to.name;
    business object Part EV-002130 A
    from[EBOM].to.name = EV-002131
    from[EBOM].to.name = EV-002132
If you compare this to having two columns in a table, where the first column does the first select and the second the second select, you will in the result get both values in both columns.
So in case you have this scenario, you would earlier have to implement a data handler that selects the required data and perform your logic that decides what to include in the cell in there. As of TVC 2011.3.0, we added a datahandler that solves this.
An example of how to use this new datahandler is shown below.
<Column>
<ColumnType>relatedobject</ColumnType>
<Setting name="Relationship" value="relationship_EBOM"/>
<Setting name="Direction" value="from"/>
<!--<Setting name="Type" value="type_Part"/>-->
<Setting name="Select" value="$<attribute[attribute_EffectivityDate]>"/>
<Setting name="Object If" value="name == 'EV-002133'"/>
</Column>This datahandler accepts a number of settings, described in the table below:
| Setting | Value | Description | Required |
|---|---|---|---|
Direction |
From or To |
Defines the direction of the related object. |
No (default is from) |
Relationship |
relationship_EBOM |
The relationship type |
Yes |
Type |
type_Part |
The type of object to include |
No |
Select |
$<attribute[name]> |
The value to select. NOTE: If the prefix of this value is "REL:", then the select will be applied on the relationship instead of the object, which is the default. |
No (default is "name"). |
Object If |
An expression |
The expression to be evaluated on the business object |
No. However, either object-if or relationship-if is typically used for this datahander otherwise you can define an ordinary expression without the need of using this datahandler. |
Relationship If |
An expression |
The expression to be evaluated on the relationship |
See "Object If" |
Set Relationship Attribute Names |
attributeName1,attributeName2 Route Base Purpose,Route Base State |
Can be used to set/update the relationship attribute values during the creation/modification of the connection. Can pass a comma-separated list of attribute names for updating multiple attributes at once. This setting only works in conjunction with the Setting The number of attribute names configured for this setting must be equal to the number of values configured for the Setting |
No |
Set Relationship Attribute Values |
attributeValue1,attributeValue2 Approval,state_InApproval |
Can be used to set/update the relationship attribute values during the creation/modification of the connection. Can pass a comma-separated list of attribute values for updating multiple attributes at once. This setting only works in conjunction with the Setting The number of attribute values configured for this setting must be equal to the number of attribute names configured for the Setting |
No |
Calculate Count |
True or False |
Can be used to calculate the number of related objects that matches the conditions. |
No. Default is false. |
Calculate Percentage |
True or False |
Can be used to calculate how many percent of the related objects that matches the conditions. |
No. Default is false. This setting can be used together with the progress renderer. |
Use PhysicalId |
True or False |
Defines whether a column is set to use physical id or object id. |
No. (Default value is false). |
A note about the "expression" used in the "Object If" and "Relationship If" setting: This expression can be tested in MQL by doing:
print bus 1.2.3.4 select evaluate[THE EXPRESSION] dump;
It should either return TRUE or FALSE. Example:
print bus 1.2.3.4 select evaluate[current matchlist 'Release,Complete' ','] dump;
The relatedobject columntype has built-in support for autocomplete. See the Autocomplete chapter in Core Admin Guide for details on how it’s configured.
Example where users connect an ECO. The dataset specifies the possible values.
<Column xmlns="http://technia.com/TVC/Table"
        xmlns:xsi="http://www.w3.org/2001/XMLSchema-instance"
        xsi:schemaLocation="http://technia.com/TVC/Table http://products.technia.com/tvc/schema/latest/TableColumn.xsd">

    <Name>ECO</Name>
    <Label>ECO</Label>
    <GroupHeader>Engineering Changes</GroupHeader>
    <Editable>true</Editable>
    <Setting name="Relationship" value="relationship_AffectedItem" />
    <Setting name="Direction" value="to" />
    <Setting name="Select" value="name" />
    <Setting name="Type" value="ECO" />
    <MatchRangeOnObjectId>true</MatchRangeOnObjectId>
    <ColumnType>relatedobject</ColumnType>
    <ShowAlternateIcon>true</ShowAlternateIcon>
    <Href>${COMMON_DIR}/emxTree.jsp?mode=insert</Href>
    <AutoCompleteHandler>dataset</AutoCompleteHandler>
    <AutoCompleteSettings><![CDATA[{
        handler : {
            dataset : 'tvc:dataset:tvx:enc/ECOs.xml'
        }
    }]]></AutoCompleteSettings>
</Column>
Note that the column is editable.
Path Type Object/Relationship with Condition
Adding a column to a table that shows Path related object/relationship information is to accomplish in the Structure Browser with Path type setting. In place of using relationship, path is used to define the dependecy between object/relationship in some of the scenarios. Path information uses the physicalid to store the element information.
A common way to retrieve path related information by using following query.
<MQL> query path type "Proposed Activity.What" containsany <physicalid> select owner.to[Proposed Activities].from.to[Change Action].from.name dump;
   CO-0001
An example to configure Path data handler to show path related information is shown below:
- Data Handler
-
com.technia.tvc.structurebrowser.examples.PathTypeHandler - Extended By
-
com.technia.tvc.structurebrowser.examples.RelatedObjectHandler
PathTypeHandler is extended by RelatedObjectHandler to support some of the business scenarios where Objects/Relationships are connected with a path and connection for a single column. With this extension, all the settings of the Related objects will be supported along with the path.
- Cell Renderer
-
com.technia.tvc.structurebrowser.examples.PathTypeRenderer
<Column>
	<Name>Change Order</Name>
	<Label>Change Order</Label>
	<ColumnType>path</ColumnType>
	<PathType>Proposed Activity.Where</PathType>
	<PathDirection>owner</PathDirection>
	<PathExpression>to[Proposed Activities].from.to[Change Action].from</PathExpression>
	<PathSelect>name</PathSelect>
	<AlternateOIDExpression>to[Part Specification].from.physicalid</AlternateOIDExpression>
	<Setting name="Where" value="current != 'Complete'"/>
	<ShowAlternateIcon>true</ShowAlternateIcon>
	<Href>${COMMON_DIR}/emxTree.jsp?mode=insert</Href>
</Column>
This datahandler accepts a number of settings, described in the table below:
| Setting | Value | Description | Required |
|---|---|---|---|
PathDirection |
owner or element |
defines the direction for retrieving the path info for owner/element |
No (default is owner) |
PathType |
Proposed Activity.Where |
The Path type |
Yes |
PathSelect |
$<attribute[name]> |
The value to select for display. |
No (default is "name"). |
PathExpression |
An expression |
The expression to retrieve the information in the context of path owner or to retreive the path owner in case of fetching the element information |
No. |
AlternateOIDExpression |
An expression |
The expression is to get alternate related element physical id to retrieve the information in the context of path owner |
No (default is "physicalid"). |
Where |
An expression |
The expression to be evaluated on the business object/ Connection to show that object/relationship in the table cell |
No. |
IconClass |
String |
CSS class for the icon |
No. |
ColumnIcon |
String |
path for the icon image |
No. |
Alt |
String |
Stic Info as tooltip for column icon or icon class |
No. |
UsePhysicalId |
True or False |
Defines whether a column is set to use physical id or object id. |
No. Default is false. |
Configuring table column of type path when path owner or element is connection id
For a few structures, the path object will be available on connection id, which means connection id will either be the owner of the path or path element.
In such cases, an attribute called usesBusinessObject should be added to the column element to control if the path is available on table row connection id or table row object id.
By default, the system will look for the path object on table row object id unless the attribute usesBusinessObject on the column element is set to false.
Before configuring column definition, one should be aware of where the path object is available, based on that the attribute usesBusinessObject on the column element should be used.
Below example is the way to configure the Path data handler to show path related information if table connection id acts as the path element:
- Data Handler
-
com.technia.tvc.structurebrowser.examples.PathTypeHandler - Cell Renderer
-
com.technia.tvc.structurebrowser.examples.PathTypeRenderer
<?xml version="1.0" encoding="UTF-8"?>
<Column usesBusinessObject="false">
    <Label>Title</Label>
    <GroupHeader>Manufacturing Assembly</GroupHeader>
    <Name>manufacturingAssemblyTitle</Name>
    <ColumnType>path</ColumnType>
    <PathType>SemanticRelation</PathType>
    <PathDirection>owner</PathDirection>
    <PathExpression>to[DELFmiFunctionReference]</PathExpression>
    <PathSelect>attribute[PLMEntity.V_Name]</PathSelect>
</Column>
Below example is the way to configure the Path data handler to show path related information if table connection id acts as the path owner:
<?xml version="1.0" encoding="UTF-8"?>
<Column usesBusinessObject="false">
    <Label>Physical Product</Label>
	<GroupHeader>Physical Product</GroupHeader>
    <Name>physicalProduct</Name>
    <ColumnType>path</ColumnType>
    <PathType>SemanticRelation</PathType>
    <PathDirection>element</PathDirection>
    <PathSelect>to.attribute[PLMEntity.V_Name]</PathSelect>
</Column>
Configuring Path siblings
There might be cases where an intermediate object is used for path connection. Now the path column type supports navigating through the intermediate object.
In the below example, the Cordless_Drill and Cordless Drill Assembly objects are connected via an intermediate object whereas the Cordless_Drill object and intermediate object are connected via path SemanticRelation.
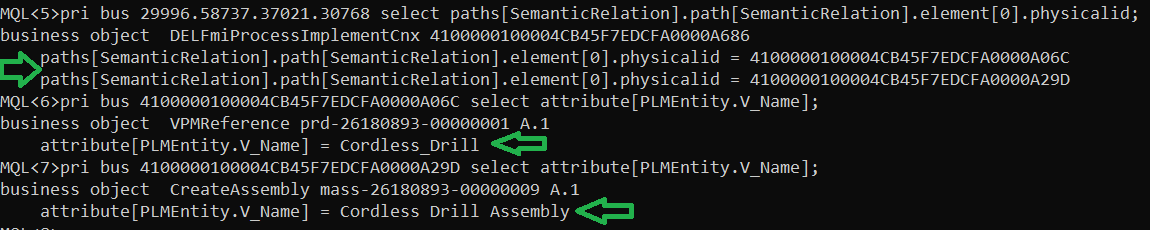
Figure 7. Objects connected via intermediate object.
Now, we can say that the Cordless_Drill and Cordless Drill Assembly objects are siblings to each other. The below configuration can be used to navigate through the intermediate object.
<?xml version="1.0" encoding="UTF-8"?>
<Column>
    <Label>Assembly</Label>
    <ColumnType>path</ColumnType>
    <PathType>SemanticRelation</PathType>
    <PathDirection>siblings</PathDirection>
    <PathSelect>attribute[PLMEntity.V_Name]</PathSelect>
</Column>
Configurable Data Handler / Cell Renderer
In many cases when someone needs to show information in a table cell that requires some logic or special formatting that cannot be solved by just creating a table column in a table and apply some settings, one needs to implement a Data Handler and/or a Cell Renderer in Java to accomplish the task.
To reduce this need, there is a pre-defined column-type in TVC Structure Browser as of release 2012.2.0 called "configurable", which allows specifying XML within the expression of the column to define the rules for what to display and how to display some data. This column-type will not remove the need for implementing Data Handler or Cell Renderers in tables in all cases, but it will definitely reduce the need for it in some cases.
To enable this column feature, you must first of all define some properties on the Column itself, as shown below (example in XML format):
<Column>
    <Name>name</Name>
    <Label>The column label</Label>
    <ColumnType>configurable</ColumnType>
</Column>
If you use tables defined in the database, you have to specify the column type through the settings tab using the setting "Column Type" and set the value to "configurable".
The next thing to do is to define the logic of this column. This is done through the "expression" of the column and the format of this logic is XML. NOTE: If you use XML based tables, the XML logic entered within the expression field must be surrounded with "<![CDATA[ … ]]>" since the XML elements are parsed later than when the table it-self is loaded. See the example below (the logic that goes into the expression field is explained later on):
<Column>
    <Name>name</Name>
    <Label>The column label</Label>
    <ColumnType>configurable</ColumnType>
    <Expression><![CDATA[
            <if test="type.kindOf[Part]">
            <select statement="name"/><text>:</text><select statement="revision"/>
        </if>
        <if test="type.kindOf[DOCUMENTS]">
            <select attribute="attribute_Title"/>
        </if>
    ]]></Expression>
</Column>
Within the expression in the previous example, there are two different "if" elements that does some conditional logic. The expressions are standard ENOVIA expressions that are surrounded with a "evaluate[]" internally.
The select element is used to define the select statement to show. In the example above, we also use the "text" element to add some static text content. There is also a possibility to get text content from TVC string resource files or ENOVIA suite string resource files if wanted.
The XML elements that are supported is described in the next sub chapter.
XML Format
Below is a table showing the "Conditional Elements". If they are evaluated to true, the content of the condition is included.
| Element | Attributes | Description |
|---|---|---|
if |
test="expression" appliesTo="object | relationship" (optional) |
Content of the if element is used if the expression evaluates to true for the current row |
type |
is="comma separated list of type names" |
If you want to match against the type for the object on the row in the table, you can use this condition. |
relationship |
is="comma separated list of relationship type names" |
If you want to match against the relationship type for the relationship on the row in the table, you can use this condition. |
assigned |
name="comma separated list of role/group names" |
A condition that can be used to validate user assignments. |
else |
- |
A condition that is run if the previous condition evaluates to false. |
The next table shows elements that are used for other logic, such as selecting some value or formats the content.
| Element | Attributes | Description |
|---|---|---|
select |
statement="expression" attribute="name of attribute" appliesTo="object | relationship" (optional) separator=", " (optional: Can be used instead of iterate to handle multiple select values) break="none | after | before | both" (optional, can be used to specify if to add a break before/after the value |
Selects something and displays the selected value. Either statement or attribute must be set. |
typeicon |
statement="expression" (optional) attribute="name of attribute" (optional) appliesTo="object | relationship" (optional) |
If no attributes are specified, the type-icon for the object on the row is used. |
style |
bold="true | false" italic="true | false" underline="true | false" strikethrough="true | false" blink="true | false" color="some text-color value" font="name of font" size="size of text" paddingTop="integer value" paddingRight="integer value" paddingBottom="integer value" paddingLeft="integer value" marginTop="integer value" marginRight="integer value" marginBotton= integer value" marginLeft="integer value" |
Adds some styling to the content defined within the style element. All attributes are optional |
table |
padding="integer value" spacing="integer value" border="integer value" width="the width" |
All attributes are optional Container for row elements |
row |
- |
Container for col elements |
col |
colspan="integer value" rowspan="integer value" nowrap="true |
false" |
br |
- |
|
Adds a break |
img |
src="path to image" |
Adds an image reference |
iterate |
- |
Iterates over the children depending on how many select values that has been selected. See next chapter for further example around iteration. |
link |
js="js-code" url="url to launch" target="blank" objectId="expression that resolves the object id" relationshipId="expression that resolves the relationship id" |
Either the js or url attribute must be set. The content of the js or attribute value can contains macros to substitute the selected object id or relationship id. |
text |
key="properties key" suite="name of suite unless a TVC property is used" |
Example Using Iteration
A common case is handling of select statements that return a list of values.
In the example below, we use the "iterate" tag to iterate over multiple values. One important thing to remember here is that all select expressions used within the iterate tag must return the equal amount of items. E.g. you must select along the same relationship and not mix different types since that will most likely result in unexpected result.
As you see in the example, all select expressions will return the same amount of values.
-
from[EBOM].to.type
-
from[EBOM].to.name
-
from[EBOM].to.revision
-
from[EBOM].to.id
<Column>
    <Name>Test</Name>
    <ColumnType>configurable</ColumnType>
    <Expression><![CDATA[
        <if test="type.kindOf[Part]">
            <if test="from[EBOM]">
                <table padding="2" spacing="0" border="0">
                    <row>
                        <col colspan="5">
                            <style bold="true" underline="true">
                                <text>EBOM Connections</text>
                            </style>
                        </col>
                    </row>
                    <iterate> (1)
                        <row>
                            <col nowrap="true">
                                <typeicon statement="from[EBOM].to.type"/> (2)
                            </col>
                            <col nowrap="true">
                                <select statement="from[EBOM].to.type"/> (2)
                            </col>
                            <col nowrap="true">
                                <select statement="from[EBOM].to.name"/> (2)
                            </col>
                            <col nowrap="true">
                                <select statement="from[EBOM].to.revision"/> (2)
                            </col>
                            <col>
                                <link js="tvc.popup('../tvc/core/tvcDebugRequest.jsp?objectId=${OBJECTID}',800,600,false)"
                                      objectId="from[EBOM].to.id"> (2)
                                    <img src="/common/images/iconNewWindow.gif"/>
                                </link>
                            </col>
                        </row>
                    </iterate>
                </table>
            </if>
        </if>
    ]]></Expression>
    <Label>Test</Label>
</Column>
This example would result in output like shown in the image below:
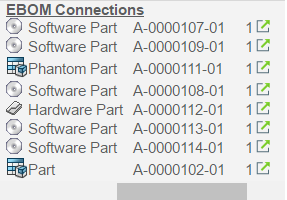
| 1 | Defines that we are iterating over select statement(s) that returns multiple values |
| 2 | Defines the select expressions. Note that these must return the same amount of values. |
Autocomplete
This column type supports autocomplete when modifying values. Configure an AutoCompleteHandler (handler) to specify what kind of value the user can choose from. Settings how the handler should behave can be configured using the AutoCompleteSetting element. See the Autocomplete chapter in the TVC Core Admin Guide for more details.
Autocomplete only supports having one value per cell.
Type
Example:
<Column xmlns="http://technia.com/TVC/Table"
        xmlns:xsi="http://www.w3.org/2001/XMLSchema-instance"
        xsi:schemaLocation="http://technia.com/TVC/Table http://products.technia.com/tvc/schema/latest/TableColumn.xsd">
    <Name>type</Name>
    <Label>Type</Label>
    <Expression>type</Expression>
    <ColumnType>autocomplete</ColumnType>
    <AutoCompleteHandler>type</AutoCompleteHandler>
    <AutoCompleteSettings>{
        'handler' : {
            'rootTypes' : ['type_HardwarePart', 'type_SoftwarePart']
        }
    }</AutoCompleteSettings>
</Column>
User
Example:
<Column xmlns="http://technia.com/TVC/Table"
        xmlns:xsi="http://www.w3.org/2001/XMLSchema-instance"
        xsi:schemaLocation="http://technia.com/TVC/Table http://products.technia.com/tvc/schema/latest/TableColumn.xsd">
    <Name>owner</Name>
    <Label>Owner</Label>
    <Expression>owner</Expression>
    <ColumnType>autocomplete</ColumnType>
    <AutoCompleteHandler>user</AutoCompleteHandler>
    <AutoCompleteSettings>{
        'handler' : {
            'assignments' : ['role_DesignEngineer', 'role_SeniorDesignEngineer']
        }
    }</AutoCompleteSettings>
</Column>
Ranges
Example showing ranges for attribute Unit of Measure:
<Column xmlns="http://technia.com/TVC/Table"
xmlns:xsi="http://www.w3.org/2001/XMLSchema-instance"
xsi:schemaLocation="http://technia.com/TVC/Table http://products.technia.com/tvc/schema/latest/TableColumn.xsd">
<Name>UOM</Name>
<Expression>$<attribute[attribute_UnitofMeasure].value></Expression>
<Label>emxEngineeringCentral.Part.UnitOfMeasure</Label>
<RegisteredSuite>EngineeringCentral</RegisteredSuite>
<ColumnType>autocomplete</ColumnType>
<AutoCompleteHandler>ranges</AutoCompleteHandler>
</Column>1.7. Using Entry Processors
An entry processor can be used to define the behaviour of the rows within the table, examples of such behaviours are:
-
Define if the row can be navigable or not (go there)
-
Define if the row can be selected or not
-
Define if the row is pre-selected
-
Define if the row should be highlighted
-
Define if the row should be in-visible
An entry processor is involved during the evaluation of a table, similar to a data handler, except that an entry processor does not need to create anything. The entry processor will, before the data is retrieved, tell the evaluator what kind of select expressions it might be interested in, and after evaluation - it will process each row (or entry) and set different properties.
An entry processor is a class that implements the
com.technia.tvc.core.db.table.evaluator.EntryProcessor interface.
To define the usage of an entry processor, one must provide the parameter entryProcessor with the value set to the class to be used, to the HREF used to launch the structurebrowser. This is typically done through the Page Configuration object, like below:
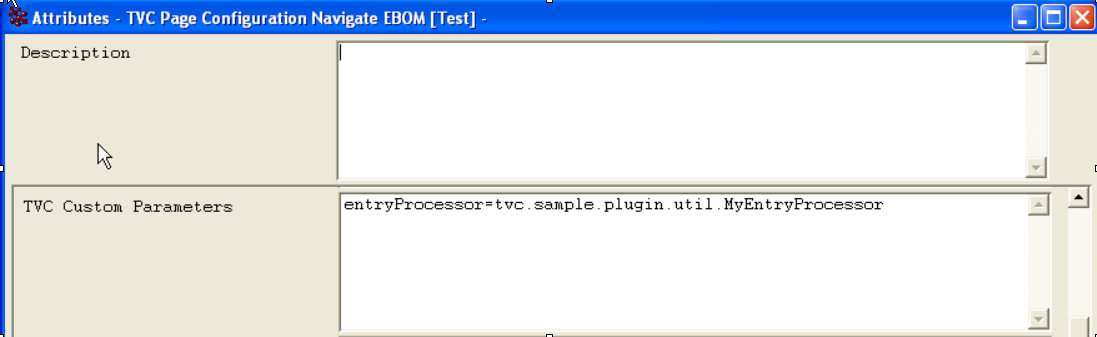
Consult the developer documentation for further details about entry processors.
1.8. Using Range Handlers
A range handler provides range values to a column. A custom range
handler can be registered on a column by defining the setting "Range
Handler Class". The value of this setting must either point to a class,
which is implementing the interface
com.technia.tvc.core.gui.table.RangeHandler or to a named dataset.
1.8.1. Data Set as Range Handler
If you want to use a data-set as range handler, use the prefix "dataset:" in the value. Example:
<RangeHandlerClass>dataset:tvc:dataset/MyDataSet.xml</RangeHandlerClass>
To specify what value you will show for each object returned by the data-set, use the following syntax:
<RangeHandlerClass>dataset:tvc:dataset/MyDataSet.xml|${name}</RangeHandlerClass>
                                                    ^^^^^^^^
Since data-sets returns either id’s of objects or relationships, the range value should either match on an object-id or a relationship-id. There are two additional column settings that can be used to solve this:
-
Match Range On Object ID
-
Match Range On Relationship ID
1.8.2. Letting the Data Handler Provide Range Values
If you are using a data handler for retrieving the data in a column, and
also want to use a range handler; you can simply let the datahandler
implement the interface com.technia.tvc.core.gui.table.RangeHandler and
skip adding the setting Range Handler Class as it will be determined
automatically.
Consult the developer documentation for details about using custom range handlers.
1.9. Using JPOs
| Since invoking a JPO is slow and might result in additional unnecessary database calls to be made, consider using Data Handlers, Range Handlers or other alternatives that exists in the Structure Browser. |
The parameters passed to the JPOs have slightly been changed
as of TVC 2011.3.0 in order to be compatible with ENOVIA OOTB. To
configure this use the global init parameter called
tvc.core.db.jpo.aef.compatibilitymode which can be set to either
legacy or new; or use the column setting "JPO Compatibility Mode" on
the column. As of the 2011.3.0 release, the value of this is default
new.
|
1.9.1. Retrieve Column Values
JPOs (Java Program Objects) can be used to retrieve column values in a table. To enable this feature you have to set the "Column Type" setting to one of these values:
- program
-
The values returned from the program are displayed the same way as if they were retrieved using a select expression.
- programHTMLOutput
-
The values returned are displayed as HTML discarding all other settings that refer to how the column is rendered (e.g., "Show Type Icon", "Show Alternate Icon", "format").
- checkbox
-
The values returned control whether the checkbox should be enabled or disabled. (NOTE: Since 5.2.1, a better approach to control the selections has been implemented. Please have a look into this chapter for details).
The program and function settings define which JPO and method should be invoked to retrieve the column values. The input parameter to the method is a java.util.HashMap, the contents of the map are described below:
| Key Name | Data Type | Description |
|---|---|---|
objectList |
MapList |
This object contains a list of HashMap instances that correspond to rows in the table being evaluated. Each HashMap contains the business object ID and, when available, the relationship ID for a particular row. The business object ID is bound to the key "id" in the HashMap, while the relationship ID is bound to the "id[connection]" key. |
paramList |
HashMap |
This map contains the request parameters available in the request that initiated the table. An additional parameter named "languageStr" is also available for internationalization purposes. The value for this parameter is the language requested by the current user. |
settingsMap |
Map |
A map containing the settings on the column. This enables using custom settings as input parameters to the JPO. |
The expected return value from this method is an instance of
java.util.Vector that must contain java.lang.String instances
representing column values. In the case where the Column Type setting
is checkbox, the String instances contained in the Vector should be
equal to "true" or "false", which will enable and disable the displayed
checkboxes respectively. Note that the size of the Vector must be equal
to the size of the MapList parameter.
import matrix.db.*;
import matrix.util.*;
import java.util.*;
import com.matrixone.apps.domain.util.*;

public class ${CLASSNAME} {

    /* Constructor */
    public ${CLASSNAME}(Context ctx, String[] args) throws Exception {}

    /* Get column values */
    public Vector getDescription(Context ctx, String[] args) throws Exception {

        HashMap paramMap = (HashMap) JPO.unpackArgs(args);
        HashMap paramList = (HashMap) paramMap.get("paramList");
        MapList objectList = (MapList) paramMap.get("objectList");

        /* Construct a Vector in which the column
           values will be returned, process the
           MapList and add values to the Vector.
           The size of the Vector must be exactly
           the same as the size of the MapList. */
        Vector values = new Vector(objectList.size());

        String oid;
        HashMap map;
        for (int i = 0; i < objectList.size(); i++) {
            map = (HashMap) objectList.get(i);
            oid = (String) map.get("id");
            if (oid != null) {
                /* Just add the description to the
                   Vector containing column values.
                   Consider using the static method
                   getSelectBusinessObjectData() in
                   class matrix.db.BusinessObject
                   for better performance in a
                   production system. */
                values.add(
                    new BusinessObject(oid).
                        getDescription(ctx));
            }
        }
        return values;
    }
}
1.9.2. Retrieve Range Values
| Since JPO invocations are slow, consider to use the new approach with so called "Range Handlers" to retrieve column range values instead. See this chapter for more information. |
JPOs (Java Program Objects) can be used to retrieve accepted range values for a table column. The range values are used when the table is displayed in edit mode, use the "Input Type" setting on columns to configure how the column values are displayed in edit mode.
Note that attribute range values will be available by default for columns whose select expression returns the value of an attribute with defined range values. These columns will therefore not need a JPO to return the range values unless the default attribute range values should be overridden.
The Range Program and Range Function settings define which JPO and method should be invoked to retrieve the range values. The input parameter to the method is a java.util.HashMap, the contents of the map are described below:
| Key Name | Data Type | Description |
|---|---|---|
languageStr |
String |
The language requested by the current user, can be used for internationalization purposes. |
objectId |
String |
The business object ID for the current page, i.e., the ID of the root object in the structure when navigating. Note that the value of this parameter is determined by the objectId request parameter sent to the table page. |
relId |
String |
The relationship ID for the current page. Note that the value of this parameter is determined by the relId request parameter sent to the table page. |
requestMap |
HashMap |
This map contains the request parameters available in the request that initiated the table. |
The expected return value from this method is an instance of
java.util.Vector that must contain java.lang.String instances
representing range values.
/* Imports */
import matrix.db.*;
import matrix.util.*;
import java.util.*;

/* Class */
public class ${CLASSNAME} {

    /* Constructor */
    public ${CLASSNAME}(Context ctx, String[] args) throws Exception {}

    /* Get range values */
    public Vector getPersons(Context ctx, String[] args) throws Exception {

        HashMap paramMap = (HashMap) JPO.unpackArgs(args);
        HashMap requestMap = (HashMap) paramMap.get("requestMap");

        /* Construct a Vector in which the range
           values will be returned. */
        Vector values = new Vector();

        /* This code will add all persons in the
           system to the range values. */
        MQLCommand mql = new MQLCommand();
        if (mql.executeCommand(ctx, "list person")) {
            StringTokenizer st = new StringTokenizer(
                mql.getResult(), "\n", false);
            while (st.hasMoreTokens()) {
                values.add(st.nextToken());
            }
        }

        return values;
    }
}
1.9.3. Update Column Values
| Updating column values can be done using so called Updaters. Please consult the developer documentation for information about this (under the data handler chapter). |
JPOs (Java Program Objects) can be used to update column values when the table is being edited.
The Update Program and Update Function settings define which JPO and method that should be invoked to update column values. The input parameter to the method is a java.util.HashMap, the contents of the map is described below:
| Key Name | Data Type | Description |
|---|---|---|
languageStr |
String |
The language requested by the current user, can be used for internationalization purposes. |
objectId |
String |
The business object ID for the updated table cell. |
relId |
String |
The relationship ID for the updated table cell. |
New Value |
String |
The new value changed by the user. |
Old Value |
String |
The old value before the user changed it. |
requestMap |
HashMap |
This map contains the request parameters available in the request that initiated the table. |
The expected return value from this method is an instance of java.lang.Boolean that should indicate whether the update was successful or not (return true for success, otherwise false). If no value is returned, it is treated as success.
Format For Edit column setting can be used to control whether to format the new value before updating.
For details, refer Column Settings.
import matrix.db.*;
import matrix.util.*;
import java.util.*;

public class ${CLASSNAME} {

    public ${CLASSNAME}(Context ctx, String[] args) throws Exception {}

    public Boolean setOwner(Context ctx, String[] args) throws Exception {

        HashMap paramMap = (HashMap) JPO.unpackArgs(args);
        HashMap requestMap = (HashMap) paramMap.get("requestMap");
        String objectId = (String) paramMap.get("objectId");
        String newValue = (String) paramMap.get("New Value");
        String oldValue = (String) paramMap.get("Old Value");

        BusinessObject bo = null;
        try {
            if (newValue != null && !newValue.equals(oldValue)) {
                bo = new BusinessObject(objectId);
                bo.open(ctx);
                bo.setOwner(newValue);
                bo.update(ctx);
            }
            return Boolean.TRUE;
        } catch (Exception e) {
            return Boolean.FALSE;
        } finally {
            if (bo != null && bo.isOpen()) {
                try {
                    bo.close(ctx);
                } catch (Exception ignore) {

                }
            }
        }
    }
}
1.9.4. Retrieve Table Rows
JPOs (Java Program Objects) can be used to retrieve the rows of a table. The input parameter to a method that is used for this purpose is of type java.util.HashMap and contains the request parameters as name-value pairs.
The expected return value from this method is a MapList, which contains a list of HashMap instances where each HashMap corresponds to a row in the table. Each HashMap should contain a business object ID and/or a relationship ID, these are stored using the id and id[connection] keys respectively.
import matrix.db.*;
import matrix.util.*;
import java.util.*;
import com.matrixone.apps.domain.util.*;

public class ${CLASSNAME} {
    /* Constructor */
    public ${CLASSNAME}(Context ctx, String[] args) throws Exception {}

    /* Get the table rows */
    public MapList getEBOM(Context ctx, String[] args) throws Exception {
        HashMap paramMap = (HashMap)JPO.unpackArgs(args);
        /* Construct a MapList that will
           contain HashMap instances. Each
           HashMap corresponds to a row in
           the table. Use the keys "id" and
           "id[connection]" to store the
           business object ID and relationship
           ID respectively. */
        MapList mapList = new MapList();

        /* This example simply returns
           table rows corresponding to a
           single level EBOM structure */
        String objectId =
            (String) paramMap.get("objectId");
        String rel = PropertyUtil.
            getSchemaProperty(ctx, "relationship_EBOM");
        SelectList sl = new SelectList();
        sl.addId();
        BusinessObject bo = new BusinessObject(objectId);
        ExpansionWithSelect ews = bo.expandSelect(
            ctx, rel, "*", sl, sl, false,
            true, (short) 1, "", "", false);
        RelationshipWithSelectList rwsl =
            ews.getRelationships();
        RelationshipWithSelect rws;
        HashMap map;
        for (int i = 0; i < rwsl.size(); i++) {
            rws = (RelationshipWithSelect) rwsl.get(i);
            map = new HashMap();
            map.put("id", rws.getTargetSelectData("id"));
            map.put("id[connection]", rws.getSelectData("id"));
            mapList.add(map);
        }
        return mapList;
    }
}
The JPO that should be used when loading rows into a table is typically
specified using the program request parameter where the value of the
parameter is formatted as: <JPOName>:<MethodName>.
1.10. Using Inquiries to Retrieve Table Rows
Inquiry objects can be used to retrieve table rows in a flat table. The following table describes the parameters that are available on the Inquiry objects.
| Parameter | Description | Accepted Values/Examples |
|---|---|---|
Arguments |
Arguments are used to translate macros within the code. If the value of an argument is a symbolic name, the macro will be replaced by the actual name. For instance if the value of an argument is "type_Part" and "type_Part" is the symbolic name for a business type named "Part" then the macro will be replaced by "Part". Also, there are two macros that are reserved by the system. In order to use these macros within the code it is necessary to define them as arguments with a "dummy" value. The reserved macros are:
|
TYPE=type_Part REL=relationship_EBOM ID=dummy USER=xyz |
Code |
The code parameter specifies the code that will be executed when the Inquiry is evaluated. This is usually an MQL statement like a query or an expansion. |
|
Format |
The format defines how the output from the Inquiry is to be interpreted. The expected output from the Inquiry is a line break separated list of business object IDs and/or relationship IDs. |
|
Name |
The name of the Inquiry object. |
MyParts ECOs |
Pattern |
The pattern defines how the output that the code produces should be interpreted. The interpreted output is then formatted according to the specified format. |
|
1.11. Localized View, Table and Filter Names
The Structure Browser can display localized names of the views, tables
and filters that you create. The localized names are retrieved from the
emxFrameworkStringResource files, that you typically find in
WEB-INF/classes inside your web application. For example, the default
localized names is defined in the
emxFrameworkStringResource.properties file while the localized names
in German is defined in the emxFrameworkStringResource_de.properties
file.
To define a localized name of a view or table, add a property called
emxFramework.View.<VIEW> or emxFramework.Table.<TABLE> respectively.
Please note that spaces within the view or table name should be replaced with underscores. For example:
# Add a localized name for the view: Default View
emxFramework.View.Default_View = Default

# Add a localized name for the table: TVC EBOM
emxFramework.Table.TVC_EBOM = Part
To define a localized name of a filter you need to add a property called
emxFramework.Filter.<ROLE>.<FILTER>. Please note that spaced within
the role and filter name should be replaced with underscores.
# Add a localized name for the filter: EBOM From
# EBOM From is defined on the role: Global User
emxFramework.Filter.Global_User.EBOM_From = Consists Of
Also, please note that you must use the actual names of the roles, etc. AEF-style symbolical names will not be recognized.
1.12. Service Toolbar Actions
It is relatively simpler to transition to a TVC structure browser for table views like EBOM and utilize all built-in features of structure browser which add good business value and provide improved end-user experience. However, with the transition to structure browser, it also becomes necessary to create toolbar commands in the TVC structure browser to perform actions and some action like create and add change objects may involve complex and unique business logic. This will require rewriting complex business logic already available in 3DExperience into TVC, which can then be called from the TVC structure browser toolbar.
With service toolbar actions it is possible to reuse 3DExperience business logic directly in TVC commands. 3DExperience business logic present in JPO, JSP, service and java class can be directly called from TVC command using different URL parameters. This is explained in detail in the below sections.
For example existing 3DExperience service can be called from TVC command to create a physical product in the 3DDashboard’s Structure Editor using TVC view.

Figure 8. Creating physical product in 3DDashboard’s Structure Editor using TVC view
1.12.1. Invoking Service
The Enovia service can be launched from structure browser toolbar command using action invokeService.
Action invokeService takes a service config as a parameter. It requires that the result from the service config is in form of objectId/physicalid when a refreshBehavior is used.
Command Configuration
The URL for service call accepts following parameters and can be invoked like below:
${ROOT_DIR}/tvc-action/invokeService
| Parameter | Description | Required | Example |
|---|---|---|---|
config |
Name of the service configuration. It is used to configure the path to the service config. |
Yes |
|
resultExpression |
An expression that will be applied to the result from the service invoke. |
Yes |
|
from |
Direction to add the new object to table. |
Yes |
|
refreshBehavior |
It defines how a new node would be added from the result to the table. |
No |
|
<?xml version="1.0" encoding="UTF-8"?>
<Command xmlns="http://technia.com/TVC/Menu" xmlns:xsi="http://www.w3.org/2001/XMLSchema-instance"
    xsi:schemaLocation="http://technia.com/TVC/Menu http://products.technia.com/tvc/schema/latest/Command.xsd">
    <Label>tvc.ups.physicalproduct.component.v5</Label>
    <URL action="invokeService" submit="true">
        <Param name="config" value="tvc:service:ups:classic:18x/CreateConnectPartV5.xml" />
        <Param name="resultExpression" value="id" />
        <Param name="from" value="true" />
        <Param name="refreshBehavior" value="insert" />
    </URL>
    <RowSelectType>one</RowSelectType>
    <TargetLocation>tableHiddenFrame</TargetLocation>
    <Image>${ROOT_DIR}/webapps/ENOCollabSharingCmds/assets/icons/32/I_3DPart.png</Image>
</Command>
Service Configuration
Service configuration supports following elements/settings.
| Element | Description | Required | Example |
|---|---|---|---|
URL |
The url of the service, The DefaultInvokeHandler supports macros in url to be able to inject statements from context object. |
Yes |
|
Headers |
Has sub-element Header. |
Yes |
|
Body |
The body of the service call. If body exists, it will automatically be a post otherwise get. The DefaultBodyResolver supports injecting macro statments as example {{attribute[${attribute_Title}]}} |
No |
|
ResultResolver |
It is used to implement a custom result resolver. The default result resolver is the JsonResolver that supports parsing out a property with the Setting jsonPath |
No |
|
InvokeHandler |
It is used to implement a custom invoke handler to handle the actual service call. The DefaultInvokeHandler supports macro statements for the URL like below: |
No |
|
prependServerUrl |
This setting is by default true.This setting can be made false when server url with 3dspace is desired to be not prepended to the url. |
No |
|
jsonPath |
This setting supports parsing out a property for default result resolver which is the JsonResolver |
No |
|
Method |
HTTP method/verb that should be used to invoke the service. Valid values are:
Defaults to |
|
|
<?xml version="1.0" encoding="UTF-8"?>
<Service>
<URL>resources/v1/collabServices/authoring/op/createContent?aggregating_context={{physicalid}}</URL>
<Headers appendRequestHeader="true" appendSecurityContext="true">
    <Header name="content-type" value="application/json"/>
</Headers>
<Body class="com.acme.MyBodyResolver">{"type":"component", "cadOriginType":"V5", "title" : "{{attribute[${attribute_Title}]}}"}
</Body>
<ResultResolver>com.acme.MyJsonResolver</ResultResolver>
<InvokeHandler>com.acme.MyInvokeHandler</InvokeHandler>
<Setting name="jsonPath" value="result[0].physicalid"/>
</Service>1.12.2. Invoking Service from client side [without calling action]
It is possible to call OOTB services that are predefined with an XML configuration file. The services are then accessed from an ordinary service command, which contains the reference to the XML file that defines/configures the service.
XML Definition
The example below illustrates how to define a service inside service command with xml.
<ServiceCommand>
<Label>launchpad.ups.command.unreserve.label</Label>
<Service>
<URL>
     resources/v1/collabServices/reservation/op/unreserve?tenant=OnPremise&isMultiSel=0&select=physicalid
 </URL>
<Headers>
<Header name="content-type" value="application/json"/>
</Headers>
<Method>POST</Method>
<Body>{"urls": ["model//{{physicalid}}"]}</Body>
</Service>
<Macro>true</Macro>
<MacroElements>physicalid</MacroElements>
</ServiceCommand>Child elements of Service Command
| Parameter | Description | Required | Example |
|---|---|---|---|
Service |
Name of the service configuration is used to configure the path to the service config. |
Yes |
|
Macro |
If we have any macros defined in Body, then this setting needs to be true |
No |
|
MacroElements |
If we have any macros defined in Body, then that macro elements should be defined in this tag. It requires Macro tag to be true. |
No |
|
JavaScriptRef |
It is possible to include javascript resource in a service command. It can be used for defining callbacks functions. |
No |
|
PreRequestCallback |
Users can specify a reference to a javascript function that will be executed before service call. The function itself needs to be included in a javascript resource. The function needs to receive two parameter, which will be the payload of the service being modified or updated, second parameter is resolve, which will be called at the end to resolve payload. |
No |
|
ResponseCallback |
Users can specify a reference to a javascript function that will be executed after service call. The function itself needs to be included in a javascript resource. The function needs to receive one parameter, which will be the response of the service being modified or updated. |
No |
|
ResolverPaths |
Service chaining can be configured using |
No |
|
Resolver-Path Configuration
ResolverPath configuration supports following elements/settings.
| Element | Description | Required | Example |
|---|---|---|---|
URL |
URL of service can be resolved from response of intial service or can be configured separately. |
Yes |
OR
|
order |
Order can be defined for multiple service chaining starting from 1. Service calls will be executed as per this order. |
Yes |
|
Headers |
Optinal headers can be configured for service request. |
No |
|
Body |
The body of the service call. It supports injecting macro statments |
No |
|
BodyResolver |
It is used to resolve macro statement mentioned inside the |
No |
|
addCsrfToken |
This setting can be configured as true to put csrf token in service request header. |
No |
|
addSecurityContext |
This setting can be configured as true to put security context in service request header. |
No |
|
Method |
HTTP method/verb that should be used to invoke the service. Valid values are:
|
No |
|
PreRequestCallback |
Users can specify a reference to a javascript function that will be executed before service call. The function itself needs to be included in a javascript resource. The function needs to receive two parameter, which will be the payload of the service being modified or updated, second parameter is resolve, which will be called at the end to resolve payload. |
No |
|
ResponseCallback |
Users can specify a reference to a javascript function that will be executed after service call. The function itself needs to be included in a javascript resource. The function needs to receive one parameter, which will be the response of the service being modified or updated. |
No |
|
XML Definition
The example below illustrates how to define a multi service inside service command with xml.
<ServiceCommand>
<Label>Multi Service</Label>
<Service>
<URL>resources/v1/modeler/documents/files/CheckinTicket?tenant=OnPremise&e6w-lang=en&e6w-timezone=-330</URL>
<Headers>
<Header name="content-type" value="application/json"/>
</Headers>
<Method>PUT</Method>
<Body>{"urls": ["model//{{physicalid}}"]}</Body>
<Settings>
<Setting name = "addCsrfToken" value= "true"/>
</Settings>
</Service>
<JavaScriptRef>../tvx/enc/form/example.js</JavaScriptRef>
<Macro>true</Macro>
<MacroElements>physicalid</MacroElements>
<PreRequestCallback>tvc.example.initialServiceCallback</PreRequestCallback>
<ResponseCallback>tvc.example.initialServiceResponseCallback</ResponseCallback>
<ResolverPaths>
<ResolverPath order="1">
<Setting name = "addCsrfToken" value= "true"></Setting>
<Setting name = "addSecurityContext" value= "true"></Setting>
<PreRequestCallback>tvc.example.preRequestCallback</PreRequestCallback>
<URL>data[0].dataelements.ticketURL</URL>
<ContentType>application/json</ContentType>
<Body>{"__fcs__jobTicket":"{{data[0].dataelements.ticket}}"}</Body>
<BodyResolver>data[0].dataelements.ticket</BodyResolver>
<Method>POST</Method>
<ResponseCallback>tvc.example.payloadCallback</ResponseCallback>
</ResolverPath>
<ResolverPath order="2">
<PreRequestCallback>tvc.example.preRequestCallback</PreRequestCallback>
<URL>data[1].dataelements.ticketURL</URL>
<ContentType>application/json</ContentType>
<Method>PUT</Method>
<ResponseCallback>tvc.example.payloadCallback</ResponseCallback>
</ResolverPath>
</ResolverPaths>
</ServiceCommand>1.12.3. Invoking Form
It is possible to call OOTB service and include the OOTB service response value in the Form for furthur processing. Also, it allows to open a form and prepare OOTB service body with the user input. First, form can be invoked to take user input and on submit it will process the OOTB service.
Form Configuration
Form configuration supports following elements/settings.
| Element | Description | Required | Example | ||
|---|---|---|---|---|---|
URL |
URL of service can be resolved from response of intial service or can be configured separately. |
Yes |
OR
|
||
Widget |
Helium’s widget routing looks for config file inside widget folder, hence widget cofiguration file Form.xml must be placed inside widget folder. For e.g. in this case inside /helium/widget/Form.xml.
|
Yes |
|
||
headers |
This setting can be configured to add addition values in service request header. |
No |
|
||
contenttype |
This setting can be configured to add content type in service request header. By default it is |
No |
|
||
Body |
The body of the service call. It supports injecting macro statments |
No |
|
||
BodyResolver |
It is used to resolve macro statement mentioned inside the |
No |
|
||
addCsrfToken |
This setting can be configured as true to put csrf token in service request header. |
No |
|
||
addSecurityContext |
This setting can be configured as true to put security context in service request header. |
No |
|
||
Method |
HTTP method/verb that should be used to invoke the service. Valid values are:
|
No |
|
||
FormCallback |
Users can specify a reference to a javascript function that will be executed after service call. The function itself needs to be included in a javascript resource. The function needs to receive one parameter, which will be the response of the service being modified or updated. |
No |
|
XML Definition
The example below illustrates how to define a form based service inside service command with xml.
<ServiceCommand>
<Label>Retrieve and Set Part Number</Label>
<Service>
<URL>resources/v1/engineeringItem/retrievePartNumber?tenant=OnPremise&xrequestedwith=xmlhttprequest&_=1611277466036</URL>
<Headers>
<Header name="content-type" value="application/json"/>
</Headers>
<Settings>
<Setting name = "addSecurityContext" value= "true"/>
</Settings>
<Method>POST</Method>
<Body>{"references": [{"physicalid": "{{physicalid}}"}]}</Body>
</Service>
<Form>
<URL>resources/v1/engineeringItem/setPartNumber?tenant=OnPremise&_=1613402130670&xrequestedwith=xmlhttprequest</URL>
<Widget>/helium/Form</Widget>
<Setting name = "addSecurityContext" value= "true"/>
<Setting name = "contenttype" value= "application/json" />
<Body>{"references": [{"physicalid": "{{references[0].physicalid}}", "partNumber": "{{partNumber.values[0].value}}"}]}</Body>
<Method>PUT</Method>
<BodyResolver>references[0].physicalid,partNumber.values[0].value</BodyResolver>
<FormCallback>tvc.example.tvcFunctionCallBack</FormCallback>
</Form>
<JavaScriptRef>../tvx/enc/form/example.js</JavaScriptRef>
<Macro>true</Macro>
<MacroElements>physicalid</MacroElements>
</ServiceCommand>XML Definition
The example below illustrates how to define a form which will call OOTB service with xml.
<ServiceCommand>
<Label>Set Part Number</Label>
<Form>
<URL>resources/v1/engineeringItem/setPartNumber?tenant=OnPremise&_=1613402130670&xrequestedwith=xmlhttprequest</URL>
<Widget>/helium/Form</Widget>
<Setting name = "addSecurityContext" value= "true"/>
<Setting name = "contenttype" value= "application/json" />
<Body>{"references": [{"physicalid": "{{physicalid}}", "partNumber": "{{partNumber.values[0].value}}"}]}</Body>
<Method>PUT</Method>
<BodyResolver>physicalid,partNumber.values[0].value</BodyResolver>
<FormCallback>tvc.example.tvcFunctionCallBack</FormCallback>
</Form>
<JavaScriptRef>../tvx/enc/form/example.js</JavaScriptRef>
<Macro>true</Macro>
<MacroElements>physicalid</MacroElements>
<RowSelectType>multiple</RowSelectType>
</ServiceCommand>| Right now, this feature is limited to dialog page. |
1.12.4. Invoking JPO
A specialized action invokeJPOServiceAction allows reusing existing Enovia business logic to create and connect objects in TVC structure browser. First JPO can be invoked to create the object and then request is forwarded to Enovia process JSP or Enovia java class (called using reflection) to make the connection to the newly created object.
The URL for action accepts following parameters and can be invoked like below:
${ROOT_DIR}/tvc-action/invokeJPOServiceAction
URL Parameter |
Description |
Examples |
program |
JPO/Program which should be invoked to create the object. |
|
function |
Name of function present in JPO/Program which should be invoked to create the object. |
|
functionality |
This parameter is used when postProcessURL is set. In Enovia same process JSP is used to perform multiple types of connection like connecting to change order or change request. This parameter can be set to identify which connection is needed. |
|
targetForward |
When its value set to |
|
preProcessURL |
Process URL which should be called before JPO is invoked or post process URL. |
|
postProcessURL |
Process URL which should be called after JPO is invoked or search is performed. |
|
javaClass |
Java class which should be called to make the connection after JPO is invoked to create an object or search is performed. |
|
javaMethod |
Java method and along with class which should be called to make the connection after JPO is invoked to create the object or search is performed. |
|
refreshBehavior |
It defines how the table rows will be refreshed after the processing is done. Following are valid values:
Default is |
|
| Using Java Class and Method is preferred over process URLs as it provides better error handling than process URL which tends to absorb error at its end, limiting error handling available in this action. |
In addition to these parameters, parameters which are to be used to by Enovia JPO or process URLs can be also be passed. These can be parameters that are needed to create a new object like - Type, Policy, Vault.
Example
With Java Class
<Command>
<Label>Create Change Request Create Process</Label>
<URL action="invokeJPOServiceAction" target="tableHiddenFrame" submit="true">
<Param name="TypeActual" value="Change Request" />
<Param name="Policy" value="Change Request" />
<Param name="Vault" value="eService Production" />
<Param name="program" value="enoECMChangeRequest" />
<Param name="function" value="createChangeRequest" />
<Param name="refreshBehavior" value="refreshRows" />
<Param name="javaClass" value="com.dassault_systemes.enovia.enterprisechangemgt.common.ChangeRequest" />
<Param name="javaMethod" value="connectAffectedItems" />
</URL>
<RowSelectType>multiple</RowSelectType>
</Command>In this example Enovia JPO enoECMChangeRequest:createChangeRequest will be invoked with arguments TypeActual, Policy and Vault to create new Change Request. And after a new object is created, it will be connected to rows selected in the structure browser table by calling java class ChangeRequest and method connectAffectedItems.
With Process JSP
Enovia uses pre process JSP to prepare data for connection like pre processing selected rows from the table. Post process JSP is used to make the connection. This pre and post process URLs can be reused to make the connection to the new object or existing object.
<Command>
<Label>Create Change Request</Label>
<URL action="invokeJPOServiceAction" target="tableHiddenFrame" submit="true">
<Param name="TypeActual" value="Change Request" />
<Param name="Policy" value="Change Request" />
<Param name="Vault" value="eService Production" />
<Param name="program" value="enoECMChangeRequest" />
<Param name="function" value="createChangeRequest" />
<Param name="refreshBehavior" value="refreshRows" />
<Param name="functionality" value="AddToNewChangeRequest" />
<Param name="targetForward" value="processURL" />
<Param name="postProcessURL" value="/enterprisechangemgtapp/ECMFullSearchPostProcess.jsp" />
<Param name="preProcessURL" value="/enterprisechangemgtapp/ECMFullSearchPreProcess.jsp" />
</URL>
<RowSelectType>multiple</RowSelectType>
</Command>
<Command>
<Label>Create Change Request</Label>
<URL href="javascript:invokeCustomService({'targetForward': 'processURL',
'TypeActual': 'Change Request',
'Policy': 'Change Request',
'Vault': 'eService Production',
'program': 'enoECMChangeRequest',
'function': 'createChangeRequest',
'functionality': 'AddToNewChangeRequest',
'postProcessURL': '/enterprisechangemgtapp/ECMFullSearchPostProcess.jsp',
'preProcessURL': '/enterprisechangemgtapp/ECMFullSearchPreProcess.jsp',
'refreshBehavior': 'refreshRows'});" />
<RowSelectType>multiple</RowSelectType>
</Command>In the above example Enovia JPO enoECMChangeRequest:createChangeRequest will be invoked with arguments TypeActual, Policy, and Vault and after a new object is created, it will be connected to rows selected in structure browser table by forwarding to URLs defined in preProcessURL and postProcessURL.
1.12.5. Search and connect service
In addition to create and connect, new search action searchAndConnectServiceAction can also be used to find objects which can be connected by reusing Enovia process JSPs or java classes.
Standard structure browser command can be used to launch action searchAndConnectJPOAction which will load a search page. On select and submit of search result, it forwards to Enovia process JSP or calls java class to connect to the selected object.
The URL for action accepts following parameters and can be invoked like below:
${ROOT_DIR}/tvc-action/searchAndConnectServiceAction
URL Parameter |
Description |
Examples |
searchConfig |
Name of the search configuration. It is used to configure behaviour of the search. |
|
pageConfig |
Name of the page configuration. A page configuration is used to configure behaviour of the Structure Browser. |
|
functionality |
This parameter is used when postProcessURL is set. In Enovia same process JSP is used to perform multiple types of connection like connecting to change order or change request. This parameter can be set to identify which connection is needed. |
|
targetForward |
When set to |
|
preProcessURL |
Process URL which should be called before JPO is invoked or post process URL. |
|
postProcessURL |
Process URL which should be called after JPO is invoked or search is performed. |
|
javaClass |
Java class which should be called to make the connection after JPO is invoked to create an object or search is performed. |
|
javaMethod |
Java method and along with class which should be called to make the connection after JPO is invoked to create the object or search is performed. |
|
refreshBehavior |
It defines how the table rows will be refreshed after the processing is done. Following are valid values:
Default is |
|
Example Configurations
With Java Class
<Command>
<Label>Add Existing Change Order</Label>
<URL action="searchAndConnectJPOAction" submit="true" target="popup" submitOID="true">
<Param name="searchConfig"
value="tvc:searchv2:tvx:common/SearchChangeOrder.xml" />
<Param name="pageConfig"
value="tvc:pageconfig:tvx:enc/EBOMNavigator.xml" />
<Param name="program" value="enoECMChangeOrder" />
<Param name="function" value="createChange" />
<Param name="refreshBehavior" value="refreshRows" />
<Param name="javaClass" value="com.dassault_systemes.enovia.enterprisechangemgt.common.ChangeOrder" />
<Param name="javaMethod" value="connectAffectedItems" />
</URL>
<RowSelectType>multiple</RowSelectType>
</Command>With Process JSP
<Command>
<Label>Add Existing Change Order</Label>
<URL action="searchAndConnectJPOAction" submit="true" target="popup" submitOID="true">
<Param name="searchConfig"
value="tvc:searchv2:tvx:common/SearchChangeOrder.xml" />
<Param name="pageConfig"
value="tvc:pageconfig:tvx:enc/EBOMNavigator.xml" />
<Param name="program" value="enoECMChangeOrder" />
<Param name="function" value="createChange" />
<Param name="refreshBehavior" value="refreshRows" />
<Param name="functionality" value="AddToExistingChange" />
<Param name="targetForward" value="processURL" />
<Param name="postProcessURL" value="/enterprisechangemgtapp/ECMFullSearchPostProcess.jsp" />
<Param name="preProcessURL" value="/enterprisechangemgtapp/ECMFullSearchPreProcess.jsp" />
</URL>
<RowSelectType>multiple</RowSelectType>
</Command>1.13. Invoke Service from client side [without calling action]
In addition using tvc action to invoke OOTB service, we can also call OOTB service directly from client side. It will provide more flexibility and configuration support like allowing user to take input with the associated form and also it gives us possibility to perform multi selection and the chaining of the services. To call OOTB services, we need to predefined it in an XML configuration file. The services are then accessed from an ordinary service command, which contains the reference to the XML file that defines/configures the service.
1.13.1. Service Command
ServiceCommand will be used to configure an OOTB service. XML configure is shown as below.
XML Definition
The example below illustrates how to define a service inside service command with xml.
<ServiceCommand>
<Label>launchpad.ups.command.unreserve.label</Label>
<Service>
<URL>
     resources/v1/collabServices/reservation/op/unreserve?tenant=OnPremise&isMultiSel=0&select=physicalid
 </URL>
<Headers>
<Header name="content-type" value="application/json"/>
</Headers>
<Method>POST</Method>
<Body>{"urls": ["model//{{physicalid}}"]}</Body>
</Service>
<Macro>true</Macro>
<MacroElements>physicalid</MacroElements>
</ServiceCommand>| This commands are also supported in context menu. |
Child elements of Service Command
| Parameter | Description | Required | Example | ||
|---|---|---|---|---|---|
Service |
Name of the service configuration is used to configure the path to the service config. |
Yes |
Example: |
||
Macro |
If we have any macros defined in Body, then this setting needs to be true |
No |
|
||
MacroElements |
If we have any macros defined in Body, then that macro elements should be defined in this tag. It requires Macro tag to be true. |
No |
|
||
refreshBehavior |
It defines how the table rows will be refreshed after the processing is done. Following are valid values: refreshRows - Only rows selected will be refreshed. refreshTable - Complete table will be refreshed. Default is reloading complete table, it will update the entire table. |
No |
|
||
JavaScriptRef |
It is possible to include javascript resource in a service command. It can be used for defining callbacks functions. |
No |
|
||
PreRequestCallback |
Users can specify a reference to a javascript function that will be executed before service call. The function itself needs to be included in a javascript resource. The function needs to receive four parameter, which will be the payload of the service being modified or updated, second parameter is the response of macros, third and fourth parameter are resolve and reject respectively, which will be called at the end to resolve payload. |
No |
|
||
ResponseCallback |
Users can specify a reference to a javascript function that will be executed after service call. The function itself needs to be included in a javascript resource. The function needs to receive one parameter, which will be the response of the service being modified or updated. |
No |
|
||
ResolverPaths |
Service chaining can be configured using |
No |
|
Resolver-Path Configuration
ResolverPath configuration supports following elements/settings.
| Element | Description | Required | Example |
|---|---|---|---|
URL |
This element defines the URL which we want to call after receiving the response of initial service. This can be resolved from response of intial service or can be configured separately. |
Yes |
Here, data[0].dataelements.ticketURL is the part of response object where we get the URL of next service call OR |
order |
A number value used to define in which order service will be executed. The lowest order number will get executed first. |
Yes |
|
Headers |
The header of the next service call can be configured for service request. |
No |
|
Body |
The body of the service call. It supports injecting macro statments |
No |
Here, |
BodyResolver |
It is used to resolve macro statement mentioned inside the |
No |
|
addCsrfToken |
This setting can be configured as true to put 3dspace csrf token in service request header. |
No |
|
addSecurityContext |
This setting can be configured as true to put security context in service request header. |
No |
|
Method |
HTTP method/verb that should be used to invoke the next service. Valid values are:
|
No |
|
PreRequestCallback |
Users can specify a reference to a javascript function that will be executed before service call. The function itself needs to be included in a javascript resource. The function needs to receive four parameter, which will be the payload of the service being modified or updated, second parameter is the resolved value of the macros, third and fourth parameters are resolve and reject respectively, which will be called at the end to resolve payload. |
No |
|
ResponseCallback |
Users can specify a reference to a javascript function that will be executed after service call. The function itself needs to be included in a javascript resource. The function needs to receive one parameter, which will be the response of the service being modified or updated. |
No |
|
XML Definition
Below is the example of uploading a document for a VPMReference object using 3DExperience services.
In the 3DExperience we see multiple requests. Initially it calls CheckinTicket and from its response object it will receive URL for the next service call and fcsjobTicket which it will pass in the body of next service. Then, it calls checkin service to upload the document. Below is the example illustrates how to configure this type of service chaining inside TVC Service command with xml.
<ServiceCommand>
<Label>Multi Service</Label>
<Service>
<URL>resources/v1/modeler/documents/files/CheckinTicket?tenant=OnPremise&e6w-lang=en&e6w-timezone=-330</URL>
<Headers>
<Header name="content-type" value="application/json"/>
</Headers>
<Method>PUT</Method>
<Body>{"urls": ["model//{{physicalid}}"]}</Body>
<Settings>
<Setting name = "addCsrfToken" value= "true"/>
</Settings>
</Service>
<JavaScriptRef>../tvx/enc/form/example.js</JavaScriptRef>
<Macro>true</Macro>
<MacroElements>physicalid</MacroElements>
<PreRequestCallback>tvc.example.initialServiceCallback</PreRequestCallback>
<ResponseCallback>tvc.example.initialServiceResponseCallback</ResponseCallback>
<ResolverPaths>
<ResolverPath order="1">
<Setting name = "addCsrfToken" value= "true"></Setting>
<Setting name = "addSecurityContext" value= "true"></Setting>
<PreRequestCallback>tvc.example.preRequestCallback</PreRequestCallback>
<URL>data[0].dataelements.ticketURL</URL>
<ContentType>application/json</ContentType>
<Body>{"__fcs__jobTicket":"{{data[0].dataelements.ticket}}"}</Body>
<BodyResolver>data[0].dataelements.ticket</BodyResolver>
<Method>POST</Method>
<ResponseCallback>tvc.example.payloadCallback</ResponseCallback>
</ResolverPath>
// It can be used to call another service after the response of checkin ticket
// For this scenario it is not needed
<!-- <ResolverPath order="2">
<PreRequestCallback>tvc.example.preRequestCallback</PreRequestCallback>
<URL>data[1].dataelements.ticketURL</URL>
<ContentType>application/json</ContentType>
<Method>PUT</Method>
<ResponseCallback>tvc.example.payloadCallback</ResponseCallback>
</ResolverPath>-->
</ResolverPaths>
</ServiceCommand>Here, inside Service tag we configure initial service call, the subsequent service call we define inside the tag of ResolverPaths. The subsequents service will be executed in the defined order.
1.13.2. Input Based Service
It is possible to call OOTB service and include the OOTB service response value in the Form for further processing. Also, it allows to open a form and prepare OOTB service body with the user input. First, form can be invoked to take user input and on submit it will process the OOTB service.
Form Configuration
Form configuration supports following elements/settings.
| Element | Description | Required | Example | ||
|---|---|---|---|---|---|
URL |
This is the URL of service which will be called on the submission of the Form. This can be resolved from the response object of initial service or can be configured separately. |
Yes |
|
||
Widget |
This element defines Helium’s FormWidget routing which will looks for config file inside widget folder, hence widget cofiguration file, for example Form.xml must be placed inside widget folder. For e.g. in this case inside /helium/widget/Form.xml.
|
Yes |
|
||
headers |
This setting can be configured to add addition values in the service request header which will be called on the submission of the form. |
No |
|
||
contenttype |
This setting can be configured to add content type in service request header which will be called on the submission of the form. By default it is |
No |
|
||
Body |
The body of the service which will be called on the submission of the form. It supports injecting macro statments |
No |
Here, |
||
BodyResolver |
It is used to resolve macro statement mentioned inside the |
No |
|
||
addCsrfToken |
This setting can be configured as true to put csrf token in service request header. |
No |
|
||
addSecurityContext |
This setting can be configured as true to put security context in service request header. |
No |
|
||
Method |
HTTP method/verb that should be used to invoke the service. Valid values are:
|
No |
|
||
FormCallback |
Users can specify a reference to a javascript function that will be executed after service call. The function itself needs to be included in a javascript resource. The function needs to receive one parameter, which will be the form input of the form being modified or updated. |
No |
|
XML Definition
The example below illustrates how to define a form based service inside service command with xml.
Below is the example of updating a part number for a VPMReference object using 3DExperience service. In the 3DExperience we see multiple requests, initially it will call retrievePartNumber and from its response object it will open a form where it shows Old Part Number and take input from the form to set new part number and call setPartNumber service on submission of the form. This example illustrates how to configure this type of service chaining inside TVC Service command with xml.
Here, inside the Service tag we defined the initial service call configuration. For example, retrievePartNumber and then inside Form tag we will define next service call inside the URL tag, which will call on the submission of the form eg. setPartNumber. Inside Form’s Body tag, macros are defined like physicalid and partNumber (It is the field id defined in the form using which we take user inputs).
<ServiceCommand>
<Label>Retrieve and Set Part Number</Label>
<Service>
<URL>
resources/v1/engineeringItem/retrievePartNumber?tenant=OnPremise&
xrequestedwith=xmlhttprequest&_=1611277466036
</URL>
<Headers>
<Header name="content-type" value="application/json"/>
</Headers>
<Settings>
<Setting name = "addSecurityContext" value= "true"/>
</Settings>
<Method>POST</Method>
<Body>{"references": [{"physicalid": "{{physicalid}}"}]}</Body>
</Service>
<Form>
<URL>
resources/v1/engineeringItem/setPartNumber?tenant=OnPremise&_=1613402130670&xrequestedwith=xmlhttprequest
</URL>
<Widget>/helium/Form</Widget>
<Setting name = "addSecurityContext" value= "true"/>
<Setting name = "contenttype" value= "application/json" />
<Body>{"references": [{"physicalid": "{{references[0].physicalid}}", "partNumber": "{{partNumber.values[0].value}}"}]}</Body>
<Method>PUT</Method>
<BodyResolver>
        references[0].physicalid,partNumber.values[0].value
    </BodyResolver>
<FormCallback>tvc.example.tvcFunctionCallBack</FormCallback>
</Form>
<JavaScriptRef>../tvx/enc/form/example.js</JavaScriptRef>
<Macro>true</Macro>
<MacroElements>physicalid</MacroElements>
</ServiceCommand>XML Definition for Helium Form Widget
Below is an example of Helium form widget config, It will be the standard <FormWidget> except PostRender tag. PostRender tag should have a entry for tvcEditForm callback like <PostRender>tvcEditForm<PostRender>.
If user wants to write their custom postrender callback then tvcEditForm function should be called from custom postrender function.
<FormWidget>
    <Title>Set Part Number</Title>
    <FormConfig namespace="helium">Form1.xml</FormConfig>
    <ResolveContextId>page</ResolveContextId
    <FormMode>edit</FormMode>
    <PostRender>window.top.tvcEditForm</PostRender>
</FormWidget>
XML Definition for Helium Form
Below is the defination of Helium form, It will be as usual. If we want to show the response of first service inside the form field, then we need to define Setting to map the response object to that field.
In the below configuration in the Old Part Number field we want to show the value retrieved from the response of retrievePartNumber service call. For this we mapped it with the response object. Here, references[0].computedPartNumber is the response object of retrievePartNumber service call.
<Form>
    <Title>Set Part</Title>
    <Layout>
        <Columns>1</Columns>
    </Layout>
    <Section>
        <Field>
            <Label>Old Part Number</Label>
            <Setting name="options">{"mapping":"references[0].computedPartNumber"}</Setting>
            <Editable>false</Editable>
            <FieldType>text</FieldType>
        </Field>
        <Field id="partNumber">
            <Label>Part Number</Label>
            <Editable>true</Editable>
            <FieldType>text</FieldType>
        </Field>
	</Section>
</Form>
XML Definition
The example below illustrates how to take user input and pass it to the OOTB service.
<ServiceCommand>
<Label>Set Part Number</Label>
<Form>
<URL>resources/v1/engineeringItem/setPartNumber?tenant=OnPremise&
amp;_=1613402130670&xrequestedwith=xmlhttprequest</URL>
<Widget>/helium/Form</Widget>
<Setting name = "addSecurityContext" value= "true"/>
<Setting name = "contenttype" value= "application/json" />
<Body>{"references": [{"physicalid": "{{physicalid}}", "partNumber": "{{partNumber.values[0].value}}"}]}</Body>
<Method>PUT</Method>
<BodyResolver>physicalid,partNumber.values[0].value</BodyResolver>
<FormCallback>tvc.example.tvcFunctionCallBack</FormCallback>
</Form>
<JavaScriptRef>../tvx/enc/form/example.js</JavaScriptRef>
<Macro>true</Macro>
<MacroElements>physicalid</MacroElements>
<RowSelectType>multiple</RowSelectType>
</ServiceCommand>Example
This is another example of, opening a form to take user input before executing a service call.
In 3DExperience, there is a scenario when we select child element and perform reserve operation.
It will open a form to select choices using which we reserve the child object.
To implement this feature we can use callback to prepare this kind of logic.
<ServiceCommand>
<Label>Reserve Multiple with static form</Label>
<Service>
<URL>
resources/v1/collabServices/reservation/op/reserve?tenant=OnPremise&isMultiSel=0&select=physicalid
</URL>
<Headers>
<Header name="content-type" value="application/json"/>
</Headers>
<Method>POST</Method>
<Body>{"urls": ["model//{{physicalid}}"]}</Body>
</Service>
<PreRequestCallback>tvc.example.multiReserveCallback</PreRequestCallback>
<JavaScriptRef>../tvx/enc/form/example.js</JavaScriptRef>
<Macro>true</Macro>
<MacroElements>physicalid,id</MacroElements>
<RowSelectType>multiple</RowSelectType>
<Form>
<URL>
resources/v1/collabServices/reservation/op/reserve?tenant=OnPremise&isMultiSel=0&select=physicalid
</URL>
<Widget>/helium/Form</Widget>
<Setting name = "addSecurityContext" value= "true"/>
<Setting name = "contenttype" value= "application/json" />
<Method>POST</Method>
<FormCallback>tvc.example.tvcFunctionCallBack</FormCallback>
</Form>
</ServiceCommand>Below, is the definition of callback used for the above configuration.
if (!window.tvc) {
    window.tvc = {};
}
if (!window.tvc.example) {
    window.tvc.example = {};
}

tvc.example = {

    multiReserveCallback: function(payload, response, resolve, reject) {
        alert('In multiple reserve service callback with static form');
        var arr=[];
        // Here we can check if in selected object has child element we can reject the call
        // Then, we invoke form to take input
        if(getSelectedObjectIds().length===3){
            reject(response);
        } else{
            for (var i=0; i<response.length;i++){
                arr.push("model//"+ response[i][0]);
            }
        // Earlier we have open a form, so we need to set form input blank
            tvc.invoke.inputParams.formInput=[];
            payload.data=JSON.stringify({"urls":arr});
            resolve(payload)
        }
    },

    tvcFunctionCallBack: function(formInput){
        if(formInput){
            var arr=[]
            var response = tvc.invoke.response;
            for (var i=0; i<response.length;i++){
                arr.push("model//"+ response[i][0]);
            }
            tvc.invoke.formInput.body =JSON.stringify({"urls":arr});
        }
    }
};| Right now, this feature is limited to popup page. |