...
<body ...>
<%@include file="/tvc/filemanager/emxNavigator.jspf"%>
...File Manager - Administration Guide
04 April 2016
1. Legal Notes
© Copyright 2003-2019 by TECHNIA AB
All rights reserved.
PROPRIETARY RIGHTS NOTICE: This documentation is proprietary property of TECHNIA AB. In accordance with the terms and conditions of the Software License Agreement between the Customer and TECHNIA AB, the Customer is allowed to print as many copies as necessary of documentation copyrighted by TECHNIA relating to the software being used. This documentation shall be treated as confidential information and should be used only by employees or contractors with the Customer in accordance with the Agreement.
This product includes software developed by the Apache Software Foundation. (http://www.apache.org/).
2. TVC File Manager
The TVC File Manager provides users with a streamlined way of working with Microsoft Office documents, or any other document that can be opened for edit with a locally installed application (for example AutoCAD drawings), in a web application. Transfer of meta-data from ENOVIA to the document, for later display in for example header or footer is provided, as well as support for open-for-edit directly from the web page.
The main features of the File Manager are:
-
Full support for the architecture (File Collaboration Server).
-
Supports Internet Explorer, Microsoft Edge, Google Chrome and Mozilla based browsers.
-
Manages multiple files checked out concurrently.
-
Allows checking out and checking in a document across separate sessions.
-
Allows custom triggers to transfer any kind of ENOVIA information (e.g. type, name, revision, current state) to MS Office document files for later usage in the document header, footer or within the document itself
-
Custom triggers can update ENOVIA™ information from properties specified inside a MS Office document upon check-in.
-
Open-for-edit from the web page with automatic checkout, lock, application start-up and check-in upon application exit. This feature is not specific to MS Office document files
-
Full ENOVIA™ Value Chain Portfolio compatibility
-
Common Document Model (CDM) Compatible
-
Easy to install, configure and use
-
Support for downloading multiple files in so called file packages (FPD)
2.1. Usage Scenario
From a user’s perspective, the TVC File Manager is almost invisible. The integration can be used to download a document, view a document, checkout a document (i.e. open for edit) or update and check-in new files into a document.
For example, when a document is checked out for editing, the integration will besides downloading the actual file and lock the document object also transfer the document properties (controlled via triggers).
Once the file has been downloaded, the integration will transfer the document properties to the document (if any) and launch the application associated with the file. The user can now start modifying the document. Once the application is closed, the user is able to check in the document by simply clicking the "done" button within the integration UI (or if desired, do this at a later time). The integration will then up-load the file; unlock the document object and transfer back the document properties in order to make it possible for custom triggers to update meta data in ENOVIA (optional behavior).
The TVC File Manager is able to keep track of multiple files checked out.
2.2. Architecture
Depending on browser and if the File Manager client and have been installed as a native application on the clients computer, the File Manager will run in different modes.
As of 2016.3.0, the File Manager can be installed manually on the clients computer. Especially if the user is using Mozilla Firefox, since this browser has removed support for running Java Applets. The TVC file manager is no longer using Applets, except in one situation mentioned below. Please visit https://products.technia.com for information how to download the installers.
Currently we have support for installing the File Manager natively on Windows and Mac OSX.
-
Is the File Manager native application installed and the user runs on one of the supported browser (Firefox 50+, latest Chrome, latest Microsoft Edge) on Windows / Mac ?
-
Then use the native File Manager application
-
-
Is the user on Internet Explorer 11, or a legacy browser that can run applets?
-
Then run the File Manager as a Java Applet. (This support will be removed in the future)
-
-
If none of the above works, fallback to a HTML5 implementation
-
NOTE: This implementation will not support things like property transfer, file package download etc. Only basic checkout / checkin of files.
-
The File Manager specific triggers that is registered (dont mix with ENOVIA triggers), are executed on the application server – and will only send instructions to the Client. I.e. the actual document property transfer to the file takes place on the client.
2.3. System Requirements
The following is a list of the minimum requirements for the use of the File Manager.
- Server side
-
-
See TVC Installation Guide for details
-
- Client side
-
-
If using Applets (requires a client side JRE (Java Runtime Environment) installed, version 7 or higher)
-
Internet Explorer 11
-
Mozilla Firefox version supporting NPAPI / Java (minimum version = 27)
-
-
If using native installed application
-
Windows and Mac, Mozilla Firefox 50+ or latest Google Chrome or latest Microsoft Edge
-
JRE 7 or higher
-
-
3. Installation
3.1. Mandatory Post Installation Tasks
After running the TVC installer, you must perform some tasks in order to take the TVC File Manager into use.
3.1.1. Task 1 – Modifying emxNavigator.jsp and emxNavigatorDialog.jsp
The first task is needed in order to include some functionality within the "emxNavigator.jsp" and "emxNavigatorDialog.jsp" pages, which are located within the common folder in your ENOVIA™ application directory.
These changes are needed in order to integrate the TVC File Manager with the ENOVIA™ applications.
Just after the "body" element tag in each of the files, add the corresponding include directive.
/common/emxNavigator.jsp
/common/emxNavigatorDialog.jsp
...
<body ...>
<%@include file="/tvc/filemanager/emxNavigatorDialog.jspf"%>
...
3.1.2. Task 2 – Modifying JPO’s
This step is not valid for Info Central based applications.
The second task will replace the functionality in two JPO’s that generates the action links for a document (i.e. the links that are generated to download, view, checkout, check-in, lock, unlock or update a file).
The names of the programs to replace are:
-
emxCommonDocumentUI -
emxCommonFileUI
While the TVC Office component was installed, two programs were added to the database. The two programs mentioned above must be replaced with these new programs. The MQL code below illustrates how to do so. Simply launch the commands from a MQL prompt (ensure that correct user and password is used).
# Set context to a super user, for example creator
set context user creator password xxxxxx;

# Make backups of the original programs
mod program emxCommonDocumentUI name emxCommonDocumentUI-BACKUP;
mod program emxCommonFileUI name emxCommonFileUI-BACKUP;

# Rename the corresponding TVC programs
mod program TVCemxCommonDocumentUI name emxCommonDocumentUI;
mod program TVCemxCommonFileUI name emxCommonFileUI;| These programs might be updated from one version of TVC to another. Hence, you should check if the program has been changed after installing a newer version of TVC. |
3.1.3. Task 3 - Update /WEB-INF/web.xml for 16x and Later
Due to issues of ENOVIA, you need to modify web.xml after installing TVC and add a by-pass filter as shown below:
<filter-mapping>
    <filter-name>ByPassPatternFilter</filter-name>
    <url-pattern>/tvc/office/client/*</url-pattern>
</filter-mapping>
This is needed for Applet based clients, which needs to be able to download the JAR files.
3.2. Using File Manager with Container based LDAP Authentication
If you have configured your Main Collaboration Server to use container based LDAP authentication, you need to update the deployment descriptor (the web.xml file) and add a so called security constraint in there together with the security constraints as described by the ENOVIA documentation regarding LDAP authentication.
In your web.xml file, you add the following section. Add it together with the other security constraint definition.
<security-constraint>
    <web-resource-collection>
        <web-resource-name>FCS</web-resource-name>
        <description>FCS requests</description>
        <url-pattern>/servlet/fcs/*</url-pattern>
    </web-resource-collection>
</security-constraint>
4. User Interface
This chapter will describe how the user interfaces for both the client application and the HTML pages that are used to interact with the TVC File Manager client. Note: If you are using Info Central, the HTML user interface looks slightly different.
4.1. HTML User Interface
The TVC File Manager is integrated to the standard ENOVIA™ pages related to documents, through the manipulation of the JPO’s that generates the links to manage the document files. Note that if you use the TVC Structure Brower, you should take a look into this chapter for more possibilities.
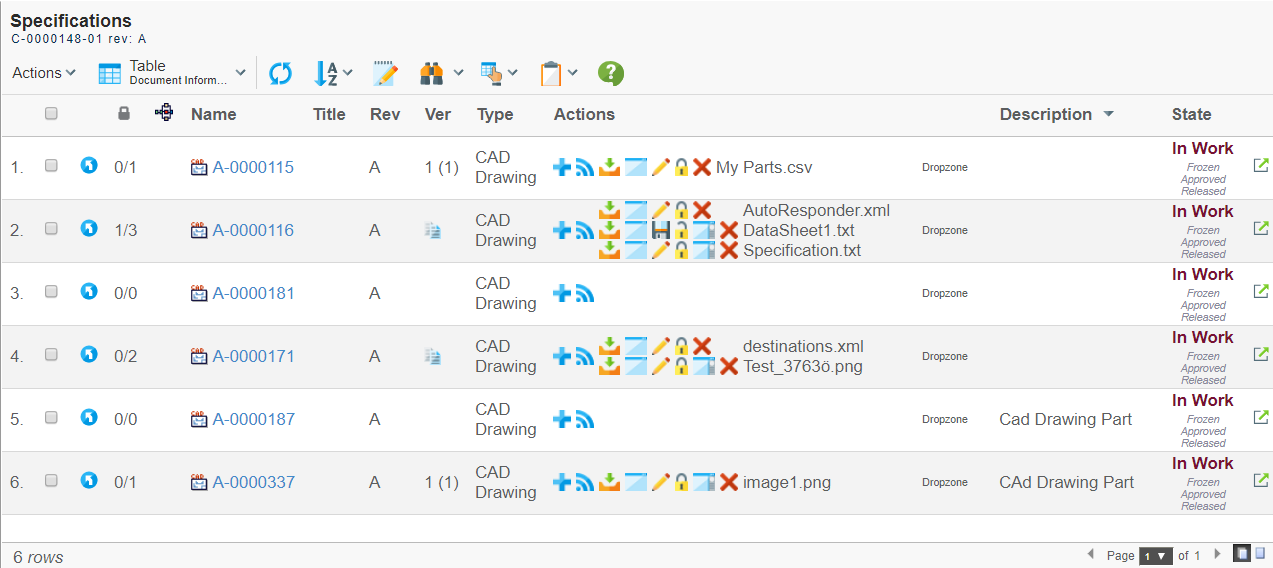
Figure 1. Example of a document table page is shown with the TVC File Manager enabled.
All the links for those objects, which type is a managed type by the TVC File Manager, will have its links replaced to work together with the TVC File Manager client.
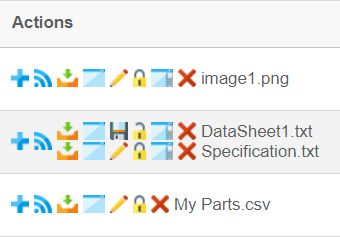
The images for those links have the same meaning as previously, e.g. download, view, check-in, update, check-in new, lock and unlock. See the table below:
| Icon | Description | Tooltip |
|---|---|---|

|
Link for adding new files into the document object. |
Add |

|
Link for adding a subscription on the object. |
Subscribe |

|
Link for downloading a file. |
Download |

|
Link for viewing a file. |
Open |

|
Link for update the file, i.e. check-in a new version. |
Save |

|
Link for checking-out a file. |
Edit |

|
Link for locking the document object holding the file. |
Lock |

|
Link for un-locking the document object holding the file. |
Unlock |

|
Link for preview a file. *Only available when used within a structure browser table. |
Preview |

|
Link for deleting the version object |
Delete |
One behavior change compared to the OOTB behavior is that, if one document object has multiple files checked in – then each file will have separate actions. E.g. the OOTB behavior would just have one set of button for a document object, and if there are multiple files checked-in, you would get a ZIP archive containing all files when downloading (or checking-out) the files. Since the TVC File Manager is supposed to work on one file at a time, this behavior was needed to change. E.g. each file has its own set of action buttons.
Also, It is possible to reverse the lock icon to match the file lock status. Ex. When the file is locked, show the lock icon and similarly, when the file is unlocked, show the unlock icon.
Use the below global property in tvc.properties to reverse the lock icon.
| Property | Description | Default Value |
|---|---|---|
tvc.core.fileActions.reverseLockIcon |
Reverse the lock icon |
false |
4.1.1. Reducing the Amount of Available Actions
The actions shown in the table are all visible depending on the actual access rights the current user has to the document object. However, in some situations, you might want to reduce the amount of available actions; for example just providing a view and/or download link. This might be the case if you want to show the document actions within a search result page for example.
There are a couple of Settings that could be applied to the actions column, in order to reduce the visible actions.
The following table lists those settings:
| Setting Name | Description |
|---|---|
Show Subscription |
Defines if the subscription link should be visible or not |
Show Checkin |
Defines if the check-in new file action should be visible or not |
Show Download |
Defines if the download file action should be visible or not |
Show View |
Defines if the view file action should be visible or not |
Show Checkout |
Defines if the check-out file action should be visible or not |
Show Update |
Defines if the update action should be visible or not |
Show Lock |
Defines if the lock action should be visible or not |
Show Unlock |
Defines if the unlock action should be visible or not |
Show Delete Version |
Defines if the delete version action should be visible or not |
Show Preview |
Defines if the preview action should be visible or not |
All of these settings accept a Boolean value. The default value for all of them is true.
| These settings will not give the user more access than s/he actually has to the document object. I.e. even though the "Show Checkout" setting is set to true, the user must have access to perform this action in order to do a checkout. |
4.1.2. Configuring the File Actions Column
The column showing the file actions can be configured.
For example, you can define if the name of the file should appear only when there are multiple files attached or if they always should be present. The position of the filename could be displayed either on the left or right side of the actions. Moreover, the file name could be truncated to only show a certain amount of characters.
All of these options can be configured via system parameters, which affects all tables showing the actions column. The table below shows these parameters
| Name | Description | Default Value |
|---|---|---|
tvc.office.ui.fileNames.alwaysShowInTable |
Whether or not to always show the file name. If set to false, the filename is only shown in case there are multiple files. |
True |
tvc.office.ui.showFileNamesOnRightSide |
Defines if the filename is on the right hand or the left hand side. |
True |
tvc.office.ui.fileNames.maxLengthInTable |
Defines the maximum length of the filename. |
-1 (no truncation will be made) |
tvc.office.ui.neverShowSubscriptionLink |
Whether or not the subscription link should be disabled |
False |
tvc.office.ui.showAllFilesForNonManagedTypes |
Whether or not to display all files for those document objects that normally aren’t managed by TVC. |
False |
tvc.office.ui.showDeleteVersion |
Whether or not to display the delete version icon by default. |
True |
The system parameters mentioned above, are typically defined in the "web.xml" file, and will affect all tables showing the file actions column.
However, to apply a different behavior to a certain table; you are able to define that by using settings on the column in that table. The following table shows the settings that can be used to apply table specific behavior.
| Table Column Setting Name | Default Value |
|---|---|
Always Show File Name |
According to system setting |
Show Filename On Right Side |
According to system setting |
Filename Length |
According to system setting |
Default Preview Suffixes |
pdf,gif,png,jpg,jpeg,txt,bmp |
To display the actions column in tvc table, you can use this column definition:
<Column>
    <Label>Actions</Label>
    <ColumnType>actions</ColumnType>
    <Setting name="Show Checkin" value="false"/>
    <Setting name="Always Show File Name" value="true" />
</Column>
To display the actions field in tvc TopPanel, you can use this field definition:
<Field>
    <Label>Actions:</Label>
    <DataHandler>com.technia.tvc.office.ui.datahandler.MainObjectActionsHandler</DataHandler>
    <Settings>
        <Setting name="Show Checkin" value="false"/>
        <Setting name="Always Show File Name" value="false"/>
    </Settings>
</Field>
4.2. The version column
The version column ("Ver") comes with some configuration options as well. The column is defined in XML inside a table element, as usual, and the ColumnType is set to "version". The below sample column configuration might be of help:
<Column>
    <ColumnType>version</ColumnType>
    <Label>emxComponents.Common.Version</Label>
    <RegisteredSuite>Components</RegisteredSuite>
    <Setting name="ShowLatestVersion">true</Setting>
</Column>
The setting called "ShowLatestVersion" defines whether or not you want the version column to display both the active version number and the latest revision number of the document. The setting defaults to true, showing both values, in the format <active> (<latest>). However, as these two often are the same, the latter can be hidden by defining this setting as false.
4.3. Integration User Interface
| If you use a browser that only supports the HTML5 UI, the information in this chapter is not valid. |
The user interface of the integration looks like the example below. Each file that has been downloaded has an entry, and depending on if the document were downloaded, viewed or checked out – the entry has different kind of functionality associated. For example, if checking-out a document, the associated application is launched – and while the user is editing the document, the status of the entry is "Editing". Once the user has finished editing the document, he/she can click the "Check-In" button to transfer the new version back to the server. If the user selects "Cancel", the document object is unlocked and no new version is sent back to the server.
You may also right click on an entry to open a context menu. The context menu contains a few more actions besides those that are immediately visible in the entry itself. Such as "Properties" that opens the object from which the file was downloaded in a popup window.
In case the file was downloaded or viewed, the entry has a link for viewing the file. Also, an entry could be removed from the list, by simply clicking the "Remove" link, or using the "broom" to remove all inactive entries (i.e., entries that are in being downloaded or uploaded or in the "Editing" state will not be removed).
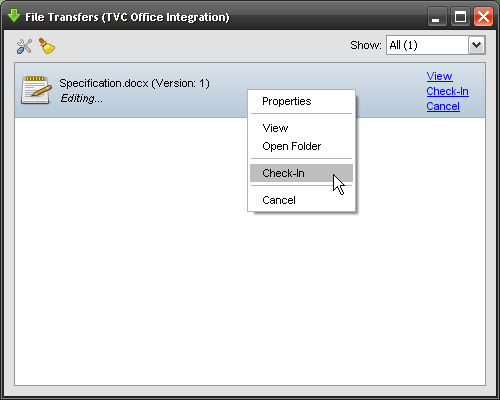
Figure 2. Integration user interface
The integration interface is brought up when the user performs an action against the document – but the window can also be opened up through a command in the "Tools" menu in the top-toolbar (as shown below).
Figure 3. Link for Opening the TVC File Manager
Once the user has finalized the editing of the document, and closed the application. The file manager window popup again, and the user can then click the "Done" link in order to send back the new version. The example below illustrates how this might look like, when uploading a new version of a CDM controlled document. The user is then asked to enter a "Reason for Change" comment (Note. This behavior can be configured via triggers).
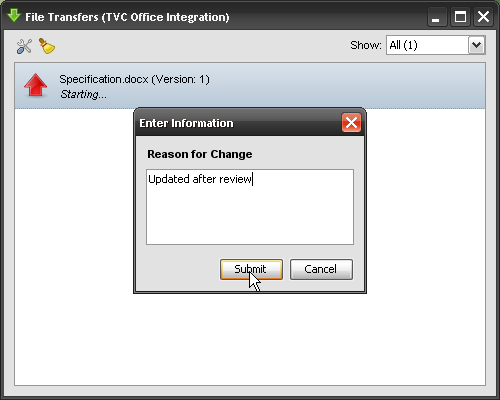
Figure 4. Uploading of a new file version
Once the user has entered a valid "Reason for Change" comment, the file is being uploaded and the progress of the update is shown for the entry. Once that is done, the user can either select to remove the entry, or just keep it (the actual document can be viewed at a later time).
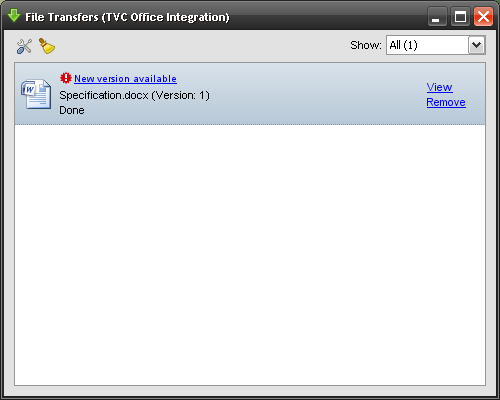
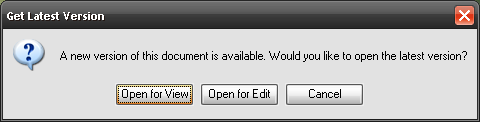
If the file manager has detected that a new version of a file that you have downloaded is available (such as when you just checked in a new version of a file that you edited) it will show a notification. You may click on this notification to download the latest version of the file if you wish. If you do click on it a small popup window will show up asking you if you want to view or edit the latest version (of course, the file manager will not allow you to open the latest version to view or edit it if you don’t have proper access for these operations).
4.3.1. Preferences
The TVC File Manager client allows the user to configure its own preferred behavior. As a user you can select a folder wherein all files should be saved automatically when downloaded. You can also define what should happen if that folder contains a file with the same name as the file being downloaded.
It is also possible to select whether downloaded files should be deleted (moved to the recycle bin) when the entry is removed from the user interface and whether the client should check for new versions of downloaded files. Note that if you want the client to check for new versions it will do so every time you login to the application and every 10 minutes while you’re logged in. Also, the file manager can only check for new versions of downloaded files that follow to the Common Document Model.
Another option that you have as a user is to select whether the integration window should appear when you login to the system. The file manager can be configured to always open the window, only open it if you have active files (e.g. files currently being edited), or to never open it.
The files that are downloaded for view could be placed in a separate temp folder to avoid file name collisions that could occur when comparing document versions.
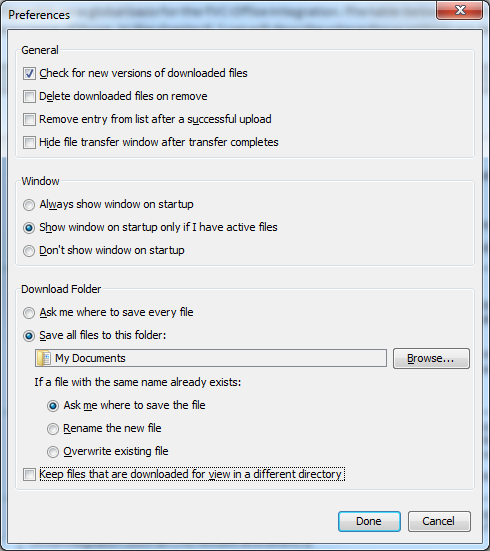
Figure 5. Preferences

Figure 6. Preferences - Bold section headers | increased font size
4.4. Using Applets
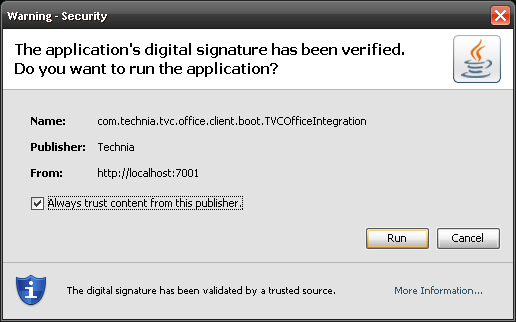
For clients using old legacy browser that only supports running the TVC File Manager as an applet (typically Internet Explorer 11),
When a user uses the application for the first time after the TVC File Manager has been installed, a popup window will be shown (similar as the screenshot below), and the user has to accept the applet in order to use the TVC Office functionality.
5. Integrating with TVC Structure Browser
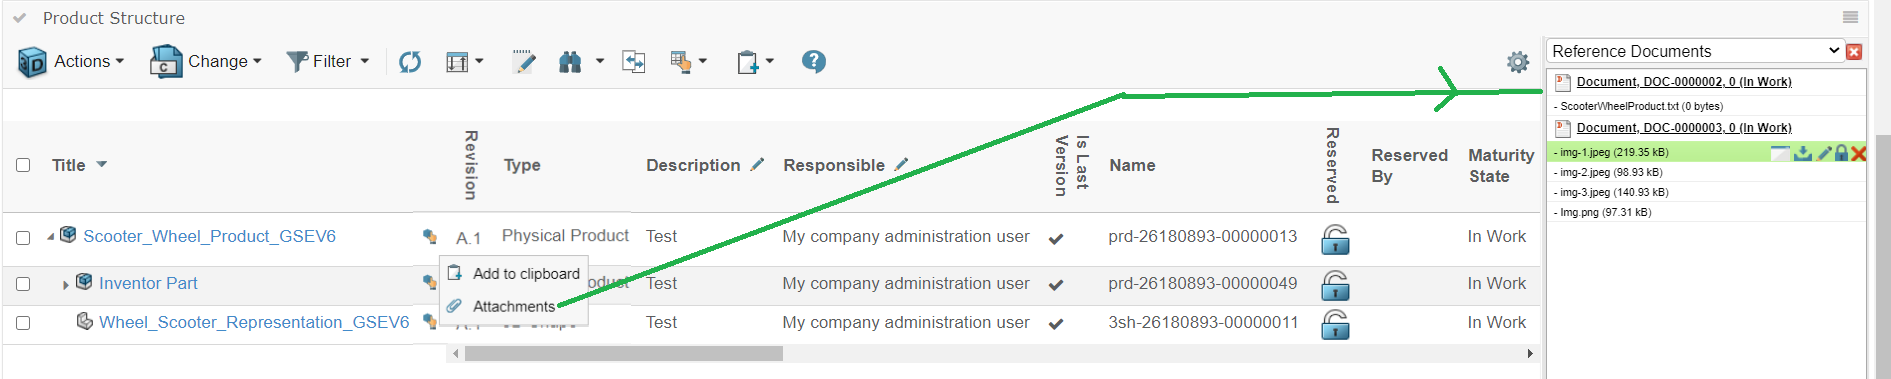
The TVC File Manager is normally invoked through links within the tables related to documents and/or files in the standard (Value Chain Portfolio) applications. However, if you do have the TVC Structure Browser component you can in a structure browser instance show the documents and / or files.
By doing so, you would get an improved user interface – with reduced number of mouse clicks to browse for documents and/or its files. The screen shots below illustrate how this could be used to for example work with Parts specifications, or referenced documents.
One can simply add a command to the category tree to a type, which will bring up related documents in the TVC Structure Browser. From there, you will have the same/similar kind of information as you would have when using the OOTB functionality, but you will have an enhanced user interface to work with. For example, showing the versions of a particular document object just requires you to click the "go-there" (the blue arrow on the left side on each row) and the versions are then shown (Figure 8). You can then simply go back, by clicking the go-back arrow (the blue arrow to the left of the table-selector) (Figure 9).
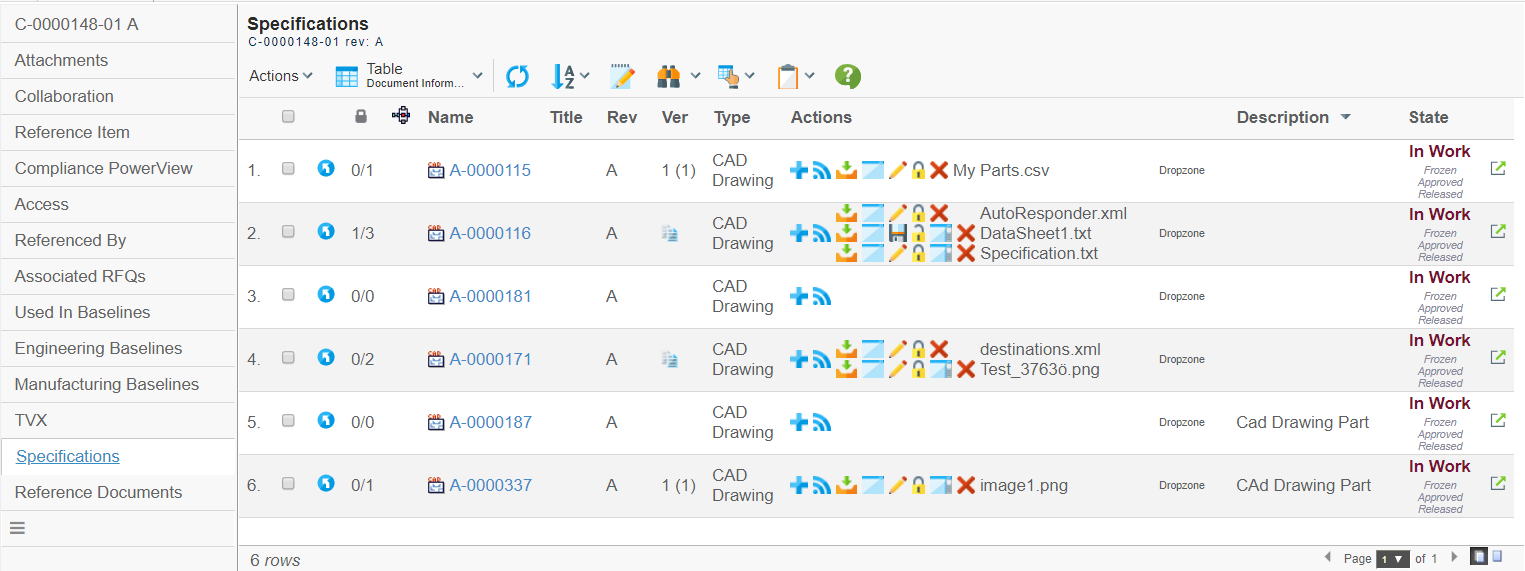
Figure 7. Showing the Specifications in the Structure Browser instance
If a document object would have several files checked in, you will first see the active version objects for each file checked in. By simply clicking the go-there again for a particular file, you will then see all the versions of that file.
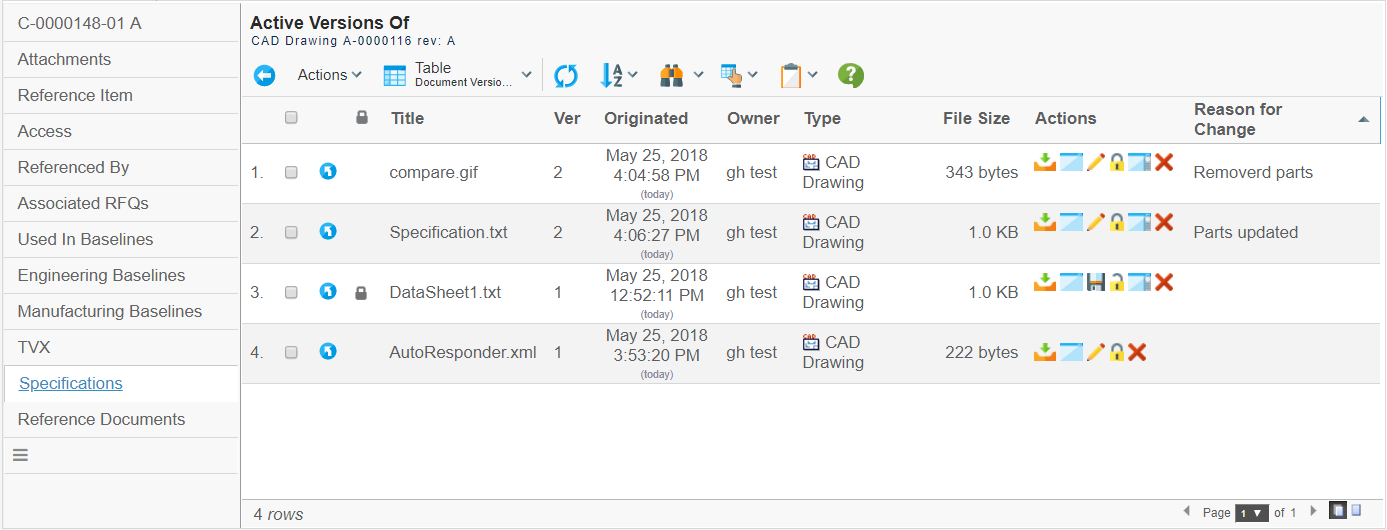
Figure 8. Show the active versions of a selected document object

Figure 9. Show all versions of a file
The list of settings used for reducing the number of visible actions (from this page), are also supported in these views.
| The page configuration objects / view objects / tables and others are all defined in XML files. You will find these XML files under the folder -INF/tvc/office within your application directory. As these files might be overridden when installing new releases of TVC, you should not do modifications within these files. Instead, copy them to a different folder and create new commands that are referring to your updated files. |
Instructions how to work / define configuration objects in XML are described in a separate document, which is distributed among TVC (XMLBasedDefinitions.pdf).
The URL that you can use to load a TVC table with documents is
${ROOT_DIR}/tvc-action/getRelatedDocuments
This URL accepts a number of request parameters, described in the table below:
| Parameter | Required | Description | Example |
|---|---|---|---|
objectId |
Yes |
Either one of these parameters must be present in order to resolve the id of the object, which the related documents should be retrieved for |
|
emxTableRowId |
|||
relationship |
Yes |
The relationship to expand along to get the related documents |
relationship=relationship_PartSpecification |
direction |
No |
The direction to expand. Default is from. |
direction=from |
type |
No |
The type of documents to include. Default is any object. |
type=type_CADDrawing type=type_CADModel |
objectWhere |
No |
The where expression to apply on objects when retrieving the related documents |
objectWhere=current==Release |
relationshipWhere |
No |
The where expression to apply on relationships when retrieving the related documents |
|
5.1. Drop Zone
The drop zone feature allows the user to drag files from his/her local file system into the webpage in order to check-in the file to an existing document object, or in some places create a new document into which the file will be checked in.
This feature was originally implemented using the Java Applet technology, but as of the release 2016.3.0 it is based upon the HTML5 API since Java Applets is an obsolete technology that is no longer supported in the majority of the Web browsers nowadays.
The HTML5 API was originally developed for clients on Mac OSX, but is now the only implementation for all clients.
| This new HTML5 API is an improved version of the previous Mac OSX implementation. |
5.1.1. Cross Origin Requests / FCS Support
Support for downloading/uploading files from/to the FCS servers are by default disabled, since those operations violates the same-origin-policy and hence are denied by modern web-browsers.
It is possible to enable FCS support but that requires implementing so called CORS (Cross Origin Resource Sharing). That can be done by adding a servlet filter enabling CORS support to ALL FCS instances. Information on how to enable this can be found in the TVC Installation Guide under the chapter "FCS Support"
You also need to inform the File Manager that you have enabled CORS support on the FCS servers. This is done via an init-parameter like below:
<init-param>
    <param-name>tvc.office.dropzone.js.cors.enabled</param-name>
    <param-value>TRUE</param-value>
</init-param>
5.1.2. Above Table
A drop zone can be added above a table that typically displays a set of documents related to an object. When dropping files into this area, a new document object will be created and connected to the related object and the file (or files) will be checked in to the newly created object.
Below is a screenshot illustrating the drop zone above a table page.
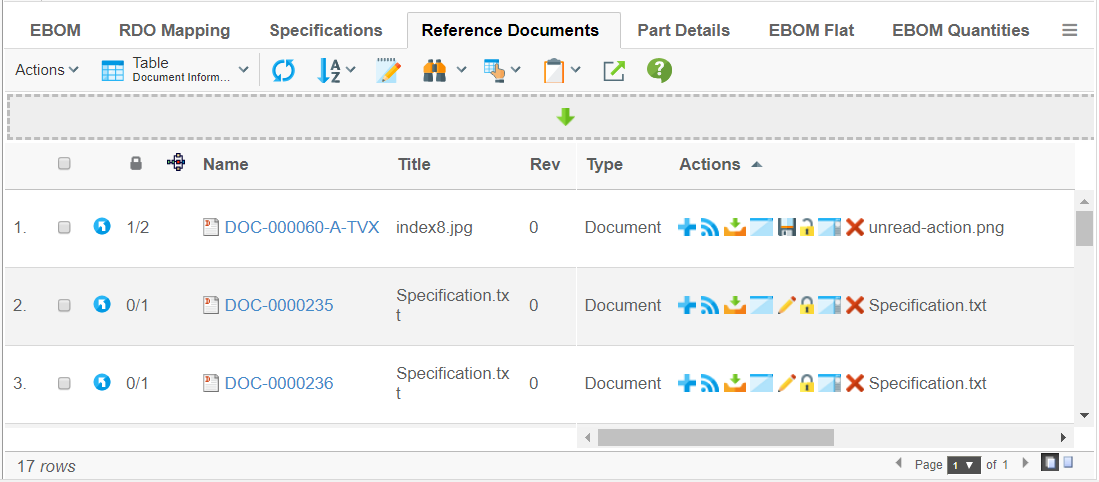
Figure 10. Drop zone above table
By default, the drop zone can also be clicked to show a file browser dialog, allowing the user to select files in a standard way. This can be disabled with a setting. See parameters below for details.
The drop zone above a table is configured via the page configuration that you use on the page.
Note that you must launch the Structure Browser instance using the following URL in order to get the Drop Zone available:
<Command>
    <URL action="getRelatedDocuments">
        <Param name="pageConfig" value="NAME OF PAGE CONFIG"/>
    </URL>
    <Label>Label...</Label>
    <TargetLocation>content</TargetLocation>
</Command>
If your command is defined in the database, the HREF is:
${ROOT_DIR}/tvc-action/getRelatedDocuments?pageConfig=NAME OF PAGE CONFIG
Parameters to Control Drop Zone above Table
The table below shows and explains what parameters that you can use:
| Parameter | Value | Notes / Description |
|---|---|---|
dropzone:enabled |
True or False |
Defines if the drop zone should be available or not |
dropzone:handler |
A Java class name |
Can be used if you want to customize the behaviour of the drop zone. In this case, the provided class must extend from: "com.technia.tvc.office.ui.dropzone.table.DropZoneHandler" |
dropzone:type |
The type of object that will be created. |
Can be a symbolic name or real name |
dropzone:revision |
The revision of the object. |
Optional. Default is to use the first revision in the sequence defined within the policy. |
dropzone:numbergenerator |
The name of the number generator to be used. |
Optional. Can be a TVC Number Generator or an AEF object generator. If undefined, the most suitable number generator will be used. Note that you need a number generator (either a TVC number generator or an AEF object generator) available in the database, otherwise you will get an error. |
dropzone:policy |
The name of the policy to be used for the object that will be created. |
Can be a symbolic name or real name |
dropzone:relationship |
The relationship to be used |
Can be a symbolic name or real name NOTE: If this value is omitted, the "relationship" parameter is used. |
dropzone:direction |
From or To |
Defines the direction. E.g connecting from the context object to the document or or vice versa. NOTE: If this value is ommited, the "direction" parameter is used. |
dropzone:label |
A label |
The label will appear in the drop zone area. |
dropzone:format |
The format to be used |
Can be a symbolic name or real name Note: If this value is omitted, the "generic" format is assumed. |
dropzone:oneobjectperfile |
True or False |
Whether or not to create one document object per file that is dropped. E.g. if the user drops three files, if this setting is set to true, three document objects will be created. Default is false. |
dropzone:selectformat |
True or False |
Allows the user to specify what format the dropped files should be checked-in to. |
dropzone:refresh |
None,insert,refresh |
The refresh behaviour. Default is insert. |
dropzone:filechooser |
True or False |
Enables/Disables left mouse click on drop zone to show a file chooser. Default is true. |
dropzone:usenativefilechooser |
True or False |
If needed, this setting will enable a file chooser that is closer to the native file chooser in the operating system the user is running. For example, this will make it possible to see thumbnails and previews of image files. Default is false. NOTE: When this is enabled, it is only possible to select one file at a time. |
dropzone:skipduplicaterow |
True or False |
Whether or not to add a duplicate row having the same object and relationship id into the table as a result of drop zone activity. With custom dropzone handler, it is possible to upload files into an already available object and in such a case, it might be desired to turn this feature on to avoid duplicate row entry in the table. Default is false. |
The values are set either within the "TVC Custom Parameters" attribute of the Page Configuration business object using key/value pairs or as the example below if you are using XML definitions:
<PageConfig>
    ...
    <Parameters>
        <Parameter name="dropzone:enabled" value="true"/>
        <Parameter name="dropzone:type" value="type_MyDocument"/>
        ...
    </Parameters>
</PageConfig>| If you use a custom drop zone handler through the "dropzone:handler" value, the other parameters will not be used. |
5.1.3. Table Column
There is a new column type available called "dropzone" that can be used to allow the user to drop files into existing documents or onto another object in a Structure Browser table. In the latter case, the dropped file(s) will be checked-in to new document objects that are created and connected to the object, which the file was dropped on.
To enable the drop zone in a table page, add a column into the table and set the setting "Column Type" to "dropzone". There are a number of settings available that you can use to customize the behaviour of the drop zone column, these are mentioned later in this chapter.
When the drop zone column is enabled in the table, it will look like the example screenshot below:
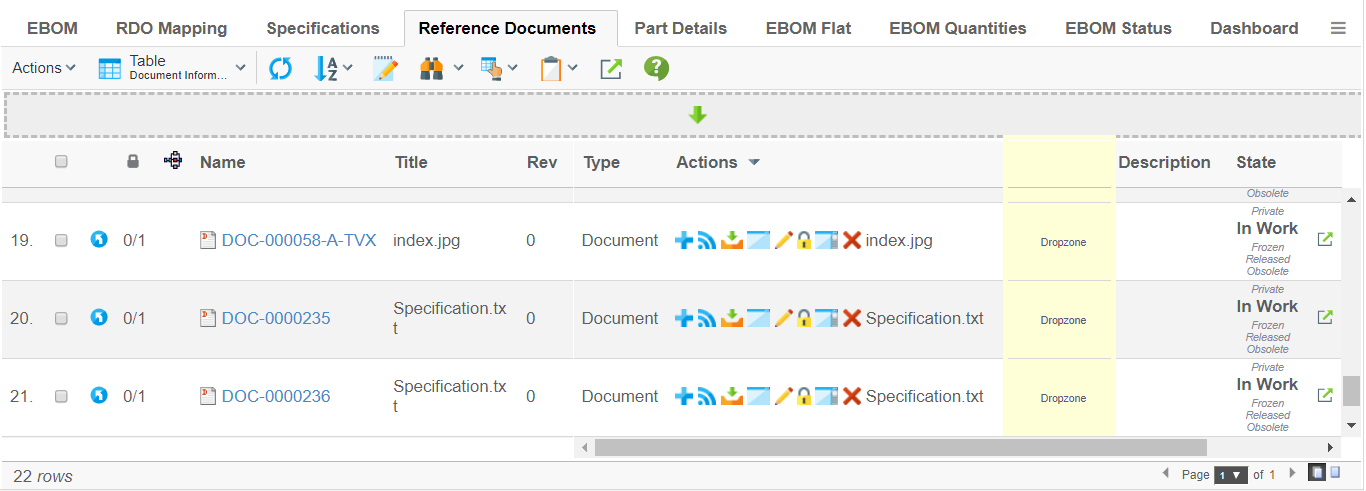
Figure 11. Drop zone in table column
Or in a table page showing folders and documents:

Figure 12. Drop zone in table column for folders
When the user drags files over this column, the appearance of the cell will change to display an icon indicating that the user can drop the files therein. See next screenshot.

Figure 13. Drop zone when files are dragged over the cell
Drop Zone Column Settings
| As of TVC 2011.3.0 we made a number of enhancements to the drop zone, for example allowing the user to drop files on any kind of object. This required us to change how the configuration of the drop zone was done. The old settings are still working and will work together with the new configuration format. |
The drop zone column settings are applied as the example below illustrates:
Setting Name: dropzone:<type-of-object-drop-is-valid-for>
Setting Value: <param>=<value>,(<param>=<value)*
| It is possible to provide a list of object, which the drop-zone is valid for in case you will create and connect the created document in the same way for many different types. In such case, provide the types separated with a comma character. |
It is also possible to define a custom "DropZoneHandler". Please look into this chapter for details.
Example for "Parts" (not complete):
Setting Name: dropzone:type_Part
Setting Value: type=type_Document,relationship=relationship_PartSpecification,...
The parameters supported are shown in the table below:
| Parameter | Type | Required | Notes / Description |
|---|---|---|---|
relationship |
String |
Yes |
The relationship to use when connecting the document |
direction |
enum (from,to) |
No |
The direction to connect the document |
type |
String |
Yes |
The type of document to be created |
policy |
String |
No, but recommended to set. |
The policy to be used. If none is specified, we will try to figure out a proper one to be used |
vault |
String |
No |
The vault to create the object inside. If unspecified, the same vault as the object we connect the document to will be used |
numbergenerator |
String |
No |
The name of the number generator to be used. Use prefix AEF: to force using an AEF generator; use prefix TVC: to force using a TVC number generator. If not specified, we will try to find a suitable number generator depending on type of object being created |
format |
String |
No |
The file format to be used |
maxfilecount |
Integer |
No |
Specifies the max nr of files allowed to be dropped |
oneobjectperfile |
Boolean |
No |
Whether or not to create one object for each file dropped, or put all in one. |
refresh |
enum (insert,refresh,none) |
No |
Specifies the refresh behaviour |
selectformat |
Boolean |
No |
Can be used to force loading the built-in format selector |
There are some other settings that you can add on the column. These are described below:
To control the drop zone on tables that shows Document objects, you have some additional settings to configure the drop-zone on such row.
| Setting Name | Value | Notes / Description |
|---|---|---|
Allow Drop On Document |
True or False |
Whether or not to allow drop files on documents. Default is true. |
Max File Count |
Integer value |
Defines the max number of files that can be dropped on a document. Default is -1 (unlimited) |
Allow Update Existing |
True or False |
Defines if the user is allowed to update existing documents by dropping them in the drop zone. This feature is new as of 2011.3.0. In earlier versions, the user could only create new documents through the drop-zone. |
Show Header |
True or False |
Defines if the header should be shown or not. Default is true and the value will be the text specified in the label of the column. |
To customize the behaviour of the drop zone in case you are displaying a Folder structure (in a Project), you have some additional settings as shown in the table below:
| Setting Name | Value | Notes / Description |
|---|---|---|
Allow Drop On Folder |
True or False |
Whether or not to allow drop files on folders. Default is true. |
Create One Document Per Folder |
True or False |
Defines if each file will be checked into a separate document object. E.g. if the user drops 3 files, either 3 documents are created or one document is created but will contain the 3 files being dropped Default is true. |
Document Type In Folder |
String |
The type to be used. Can be a symbolic name or real name |
Document Policy In Folder |
String |
The policy to be used. Can be a symbolic name or real name |
Document Rev In Folder |
String |
The revision of the object to create (optional). Default is to use the first revision in the sequence defined within the policy. |
Document Number Generator In Folder |
String |
The name of a number generator (optional). Can be a TVC Number Generator or an AEF object generator. If undefined, the most suitable number generator will be used. Note that you need a number generator (either a TVC number generator or an AEF object generator) available in the database, otherwise you will get an error. |
Example of a Column
Below is an example of a column with drop zone defined. The settings define that you can drop documents on Parts. The files will be checked in to new Document object of type "Document". We have also disabled the drop zone for "Document" and "Folder" objects.
<Column>
    <Name>dropzone</Name>
    <ColumnType>dropzone</ColumnType>
    <Setting name="dropzone:type_Part">
        relationship=relationship_PartSpecification,
        direction=from,
        type=type_Document,
        policy=policy_Document,
        vault=vault_eServiceProduction,
        numbergenerator=TVC:A-Size,
        format=generic,
        maxfilecount=4,
        oneobjectperfile=true,
        refresh=insert,
        selectformat=true
    </Setting>
    <Setting name="Allow Drop On Document" value="false"/>
    <Setting name="Allow Drop On Folder" value="false"/>
</Column>
Custom Drop Zone Handler
To override the behaviour of the drop zone; for example you might want to have full control of the creation of the Business Object(s) (maybe creating additional objects etc.), you need to implement a so called Drop Zone Handler.
To define such drop zone handler, you can do this as the example below illustrates:
<Column>
    <Name>dropzone</Name>
    <ColumnType>dropzone</ColumnType>
    <Setting name="dropzone:type_Part" value="java:com.acme.MyDropZoneHandler"/>
</Column>
The class you specify here must derive from the class:
com.technia.tvc.office.ui.dropzone.table.DropZoneHandler
Please refer to the developer documentation for further details around the implementation of a "Drop Zone Handler".
5.1.4. Image Drop Zone
A special variant of the drop zone is available that allows dropping image files and create so called "Image Holder" objects, which the file is checked in to.
To use the image drop zone, you can configure your table as the example below:
<Column>
    <Name>imagesdropzone</Name>
    <ColumnType>imagedropzone</ColumnType>
    <Alt>Image Drop</Alt>
</Column>
To display the primary image in a table, you can use this column definition:
<Column>
    <Name>primaryimage</Name>
    <ColumnType>primaryimage</ColumnType>
    <Format>default</Format>
</Column>
5.2. Command for Viewing Part Specifications
When TVC File Manager was installed, a command called TVCSpecifications was installed. By simply adding this command to the type_Part menu, you will be able to view the specifications for a Part inside the TVC Structure Browser application.
| You have to disable (or rename) the label of the corresponding OOTB command since the AEF does not allow having multiple commands with same label inside the category tree. |
5.3. Command for Viewing Reference Documents
When TVC File Manager was installed, a command called TVCReferenceDocuments was installed. By simply adding this command to the type_Part menu, you will be able to view the reference documents for a Part inside the TVC Structure Browser application.
| You have to disable (or rename) the label of the corresponding OOTB command since the AEF does not allow having multiple commands with same label inside the category tree. |
5.4. Command for Viewing other Documents
If you need to view other Document for other kind of types, please have a look at the commands mentioned earlier how to do so.
5.5. Showing Related Files in the Side Panel
5.5.1. Built-in File column type
As of 6.1, a new data handler and cell renderer are added in the File Manager component to show whether or not a business object has related document(s). The data handler can be configured to define what relationships it should use when looking for related documents. If there are documents related to the object, an icon will display that and the user can click the icon to get the list of files in the side panel. See screen shot below.
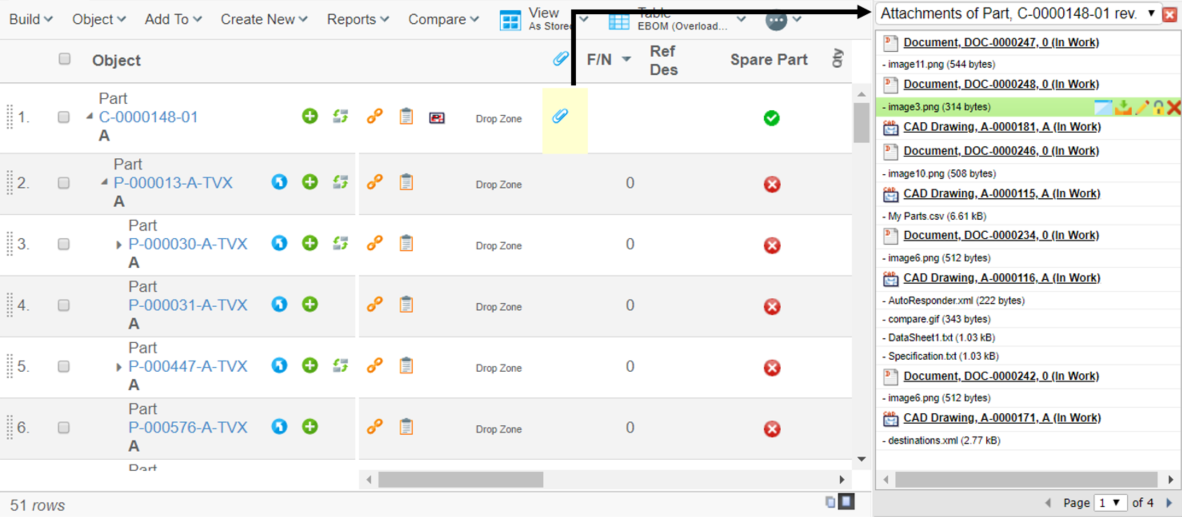
The list will show all related documents and the files related to each document.
For the documents, the user will be able to check-in new files if she/he has access to do so, see basic properties of the document or open the document object in a popup window.
Also, per file, the user will be able to download, view, checkout, unlock, lock or update the file (again, depending on access rights, all actions might not be available).
Unless you provide any settings at all to this data handler, it will default look for "Reference Documents" and "Part Specifications" connected from the object in the table. You can change the behaviour by changing the following settings:
| Setting | Value | Required |
|---|---|---|
Column Type |
File |
Yes |
Direction |
From |
No |
Relationship |
A comma separated list of relationship names (or symbolic names) |
No |
5.5.2. Built-in PathAttachment column type
The File column type is useful to display the related document(s) and their files in the side panel. However, the File column type will only display the related document(s) connected via the given/default relationships.
There might be cases when the table row object can have the document(s) connected via path (A virtual relationship). The File column type is not capable of fetching the document(s) connected via the path.
A new built-in column type PathAttachment has been added which is capable of showing the related document(s) connected via the given/default relationship(s) and also the related document(s) connected via the path.
A new data handler and cell renderer are added in the File Manager component to show whether or not a business object has related document(s). The data handler can be configured to define what relationship(s) and path type it should use when looking for a related document(s). If there are document(s) related to the object, a paper clip icon will be displayed and the user can click the icon to get the list of files in the side panel. See screenshot below.
The list will show all related document(s) and the files related to each document.
For the document(s), the user will be able to check-in new files if user has access to do so, see basic properties of the document or open the document object in a popup window.
Also, per file, the user will be able to download, view, checkout, unlock, lock or update the file (again, depending on access rights, all actions might not be available).
Unless you provide any settings at all to this data handler, it will default look for "Reference Documents" and "Part Specifications" connected from the object in the table. You can change the behaviour by changing the following settings:
| Setting | Value | Description | Required |
|---|---|---|---|
Column Type |
PathAttachment |
This setting defines what type of column a particular column is. |
Yes |
Direction |
From |
The direction of the connection |
No |
Relationship |
relationship_PartSpecification |
A comma separated list of relationship names (or symbolic names) |
No |
PathDirection |
owner or element |
defines the direction for retrieving the path info for owner/element |
No (default is owner) |
PathType |
Proposed Activity.Where |
The Path type |
No |
PathExpression |
An expression |
The expression to retrieve the information in the context of path owner or to retreive the path owner in case of fetching the element information |
No. |
The example below illustrates how user/admin can construct the column of PathAttachment column type:
<?xml version="1.0" encoding="UTF-8"?>
<Column>
	<ColumnType>PathAttachment</ColumnType>
	<Setting name="Relationship" value="SpecificationDocument" />
	<Setting name="Direction" value="from" />
	<PathType>SemanticRelation</PathType>
	<PathDirection>element</PathDirection>
	<PathExpression>from[VPLMrel/PLMConnection/V_Owner].to[PLMDocConnection]</PathExpression>
	<CardTitle>launchpad.ups.table.card.specDocs.Label</CardTitle>
	<CardID>ups_specdocuments</CardID>
	<Description>launchpad.ups.table.column.specDocFile.tooltip</Description>
	<Setting name="Render as Row Action" value="true" />
</Column>
5.5.3. List page configuration
The list page content and sorting can be configured by pointing out a custom list page configuration xml resource file.
To do that you first have to point out the file (reachable by the classloader) using a tvc property or an init-param.
- tvc.properties
-
tvc.office.attachment.listconfig=/com/acme/ListConfig.xml - init-param
<init-param>
    <param-name>tvc.office.attachment.listconfig</param-name>
    <param-value>/com/acme/ListConfig.xml</param-value>
</init-param>
Pagination size of list page can be configured from tvc property or init-param or custom list page configuration xml resource file. If pagination size is not defined in page configuration xml file, its value is set from init-param. If init-param is also not defined for list page pagination size, default value will be 20.
- tvc.properties
-
tvc.structurebrowser.list.pagination.size=40 - init-param
<init-param>
    <param-name>tvc.structurebrowser.list.pagination.size</param-name>
    <param-value>40</param-value>
</init-param>
Example configuration
<ListConfig>
    <SortOrder>
        <Value ascending="false"><![CDATA[$<modifed>]]></Value>
        <Value ascending="true"><![CDATA[$<name>]]></Value>
    </SortOrder>
    <Item>
        <Row style="bold underline"><![CDATA[$<modified>]]></Row>
        <Row style="bold"><![CDATA[$<type>, $<name>, $<revision> ($<current>)]]></Row>
    </Item>
    <PaginationSize>40</PaginationSize>
</ListConfig>
Configure the File Actions
The actions shown on each file, such as view, download, checkout, lock, unlock, tree and details are all actions that is shown depending on if the user has access to perform the actual action or not.
If you want to limit the amount of actions, for example, you only want to allow the user to be able to view or download the document; then you can on the HREF define the maximum set of visible actions.
Example:
${ROOT_DIR}/tvc-action/showAttachments?visible=view|download
The possible values for the visible parameter are:
-
download
-
view
-
checkout
-
checkin
-
lock
-
unlock
-
delete
-
details
-
tree
The values within the visible parameter should be a pipe ("|") separated list. If this parameter is omitted, then all actions are assumed to be possible.
Again, the visible parameter can never give a user more access than s/he actually has. If the user does not have lock access, the user is not able to perform a checkout even though this parameter is among the visible parameter.
5.6. Custom Table Showing Document Actions
If you want to create a complete custom table, with your own set of columns but also include the document actions column. You can create a column with following characteristics:
| Setting | Value |
|---|---|
Column Type |
actions |
The list of settings used for reducing the number of visible actions as seen in this chapter, are also supported in tables that uses this data handler.
6. Configuring the File Manager
This chapter describes what and how the TVC File Manager can be configured.
6.1. What to Configure
Following items are configurable on a global basis for the TVC File Manager. The table below lists all the items, and describes the purpose of those. In this chapter we will describe where these settings are defined.
| Configuration Item | Description |
|---|---|
Enabled |
Defines if the file manager should be enabled or disabled. The file manager could be temporarily disable by easily change this parameter. |
Domain |
This property can be used to distinguish one environment from another. This mechanism allows the client to separate the files checked-out from one environment to another. Meaning that the client will have separate "lists" of files, depending on which application it currently is connected to. This property is typically a string, which uniquely differentiates one environment from another. If this property is left unspecified, the TVC File Manager will generate a value based upon the context-path of the URL. |
Use the Built In Triggers |
This property can be used to disable the built in triggers. The built in triggers are used for transferring basic meta data from the document object to the file (MS Office Documents), and for CDM environments; the built-in triggers will require the user to enter a "Reason For Change" comment upon check-in. In some cases, these triggers are not suitable for you – and you will then write your own triggers (or disable the triggers completely); hence this flag is a convenient way to disable the built-in functionality. |
Managed Types |
This property is used to define what kind of types, which the TVC File Manager will handle. I.e. if the user is looking at an object containing files, depending on the object type, the files are handled (viewed, downloaded, checked-out, updated) via the TVC File Manager or not. The default value of this property is "type_DOCUMENTS", meaning that all objected, which type is derived from "DOCUMENTS" are handled via the TVC File Manager. |
Non Managed Types |
This property is used to define those types, which the TVC File Manager won’t handle. I.e. there are certain objects, which contains files that never should be handled through the TVC File Manager (such as CAD Models and others). The default types that are not managed are:
|
Enabled |
This property can be used to force the TVC File Manager to work in a non mode, meaning that the files will always be checked-out and checked-in through the Main Collaboration Server. NOTE: Even though the enabled flag is set to true, needs to be available and setup (otherwise mode is not used at all). |
CDM Enabled |
This property can be used to force the TVC File Manager to work in a non CDM (Common Document Model) compatible mode. This can be useful when the TVC File Manager is installed in an environment, which lacks CDM support (custom applications, or pre-10.5 environments). NOTE: If CDM has been disabled, documents will NOT be versioned according to the CDM model. Do not turn off the CDM mode, if you are using CDM within your application. |
Required Roles |
This property can be used to define certain roles, which a user must be assigned to in order to have access to the TVC File Manager. By default, all users will have access to the TVC File Manager (there is another mechanism mentioned later, which can be used to disable access for certain users). |
Excluded Formats |
This property can be used to exclude files of a certain format. E.g. if a file has a format, which is configured to be excluded, the file will not show up in the user-interface and the user is not able to download it. |
Client Settings |
See this chapter for further details. |
6.2. Where to Make the Configurations
Configuring the TVC File Manager component can be done through three different approaches. They are listed below.
-
Through an XML file, called
TVCFileManager.xml, stored under WEB-INF/classes (or somewhere else available in the classpath, meaning that the class loader can find the resource). -
Through a Page object within the database, called
TVC File
Manager
. The format of the content in such a page object is same as when using theTVCFileManager.xmlfile. -
Via init-parameters to the TVC Servlet definition in "web.xml"
Not all settings can be configured through using the init-parameters.
The configuration is retrieved the first time a user logs in to the application, after a restart of the application server. The order of how the file manager tries to resolve the configuration parameters are:
-
All parameters set through init-parameters are set first
-
Secondly, if there is a XML file within the classpath (with the name as above), this file is parsed and will/might override the settings defined as init-parameters.
-
Last, if there was no XML file within the classpath, the file manager will check if there is a Page object in the data base. If so, this file is parsed and will/might override the settings defined as init-parameters.
| It is recommended to do the configuration through the XML file, especially when you are running ENOVIA in RMI mode. As in this case, the JPO’s are executed on the RMI server, and the configuration must be made available for that JVM process. Hence, the XML file needs to be in the MX_CLASSPATH as well. |
6.2.1. Configure via Init Parameters
Init parameters are defined within the deployment descriptor ("web.xml" file) for your application. In that file, you should have a section for the TVC Servlet (if not, please advice the Installation Guide for TVC).
Within that section, init-parameters are added as the example below:
<servlet>
    <servlet-name>tvcaction</servlet-name>
    <servlet-class>com.technia.tvc.core.TVCServlet</servlet-class>
    <init-param>(1)
        <param-name>the name of a parameter</param-name>
        <param-value>the value of a parameter</param-value>
    </init-param>
    ...
</servlet>| 1 | Each parameter has a separate section, which is added just after the <servlet-class> definition. |
The following table shows the mapping between the configuration item and the parameter name,
| Configuration Item | TVC Init Parameter Name | Type of Value | Default Value |
|---|---|---|---|
Enabled |
tvc.office.enabled |
Boolean |
TRUE |
Domain |
tvc.office.server.domain |
<unspecified> |
|
Use the Built In Triggers |
tvc.office.server.enableBuiltInTriggers |
Boolean |
TRUE |
Managed Types |
tvc.office.server.managedTypes |
Comma separated list of type names (symbolic or not) |
type_DOCUMENTS |
Non Managed Types |
tvc.office.server.nonManagedTypes |
Comma separated list of type names (symbolic or not) |
type_ECADModel type_MCADModel type_MCADModelTemplate |
Enabled |
tvc.office.server.fcsEnabled |
Boolean |
TRUE |
CDM Enabled |
tvc.office.server.cdmEnabled |
Boolean |
TRUE |
Required Roles |
tvc.office.server.requiredRoles |
Comma separated list of role names (symbolic or not) |
<unspecified> |
Excluded Formats |
tvc.office.server.excludedFormats |
Comma separated list of format names (symbolic or not) |
<unspecified> |
Append "jsessionid" URL parameter |
tvc.office.server.appletArchive.appendSessionId |
Boolean |
TRUE |
Additional parameters related to the client settings are described later
6.2.2. Configured via XML
Either if the File Manager is configured via a file found in the classpath or through a page object, the format of such is the same. The example below illustrates the format of such file.
<FileManager enabled="true" useBuiltInTriggers="true">
    <CDM enabled="true"/>
    <ManagedTypes>
        <Type name="type_DOCUMENTS"/>
    </ManagedTypes>
    <NonManagedTypes>
        <Type name="type_ECADModel"/>
        <Type name="type_MCADModel"/>
        <Type name="type_MCADModelTemplate"/>
    </NonManagedTypes>
    <RequiredRoles>
        <Role name="role_GlobalUser"/>
        <Role name="role_AnotherRole"/>
    </RequiredRoles>
    <ExcludedFormats>
        <Format name="format_ZIP"/>
        <Format name="format_AnotherFormat"/>
    </ExcludedFormats>
</FileManager>
6.3. Disabling the TVC File Manager for Certain Users
The File Manager can be disabled for certain users if wanted.
By simply setting a property on the users Person admin object, this will tell the TVC File Manager to be disabled for such a user.
The code below illustrates how do to so from MQL.
set context user creator;
mod person "Test Everything" add property preference_TVCOfficeIntegrationEnabled value false;
When the File Manager is installed, a couple of commands are added to the database which can be used for allowing the user to disable / enable the usage of the File Manager. These commands are by default not added to any menu.
The names of these commands are:
| Command Name | Description |
|---|---|
TVC OI Enable |
Will enable the file manager |
TVC OI Disable |
Will disable the file manager |
TVC OI Toggle Enabled status |
Will enable or disable the file manager |
As of TVC 6.4.1, if a user is logging in to the system using a non-supported OS, the file manager is disabled for the current session.
6.3.1. TVC File Manager – Behaviour when Disabled
When the TVC File Manager has been disabled for a user, the user will not work with the files through the File Manager client. However, the JPO’s that are generating the "file-actions" in the user interface will still call the TVC logic for creating the images/actions.
It is however possible to instruct the TVC File Manager to skip generating those actions, and let the default JPO’s do it. To configure this behavior, either modify the init-parameter as below (default is FALSE) or configure that through the XML configuration object.
<init-param>
    <param-name>tvc.office.ui.useBaseJPOWhenDisabled</param-name>
    <param-value>TRUE</param-value>
</init-param>
Or
<FileManager useBaseJPOWhenDisabled="true">
    ...
</FileManager>
6.4. Custom Triggers
The TVC File Manager allows using custom triggers to perform actions upon certain events. There are several different events, which a trigger can act upon. Those events are:
| Event | Description |
|---|---|
On Download |
Once a file has been requested for download (download is a general notion and might mean download-, view- or checkout a file. Hence, all of these actions involves downloading a file) The trigger can be used for several purposes, for example: Deny the user to download the file (an additional security level than the access model in ENOVIA), e.g. abort the download action. Set custom properties on a document. Note: The trigger will just generate instructions for the client; the actual property transfer takes place on the client machine via the TVC File Manager client. Perform additional logging, i.e. keep track of who are downloading certain files. |
After Download |
Once a file has been downloaded to the client, the TVC File Manager client will notify the server about this, and that will trigger this event. Implementing logic for such an event could be useful when extended logging is needed. |
On Upload |
Before a file is being uploaded, the server will trigger this event. The trigger can be used for: Deny the user to upload (or check-in) a file. (An additional security level than the access model in ENOVIA). Informing the client about required and optional metadata to be filled in. An example is for CDM document, where the built-in triggers will require the user to fill in a "Reason for Change" comment. Perform additional logging. |
On Validate Upload |
Before the file is uploaded, and a previous event has required the user to fill in certain metadata, this event is fired in order to validate the entered data. If the trigger doesn’t accept the entered metadata, the user will be informed and required to correct the entered values. This trigger will be launched over and over again, until the user has entered proper values. |
After Upload |
After the file has been uploaded to the server (either the server or the server), this event is fired. Typically, this event is used for Updating metadata based upon the user input, or the return properties. For example, the built-in triggers will for CDM controlled documents set the "Reason for Change" comment. Perform additional logging. |
6.4.1. Registration of Triggers
The triggers are registered within the XML file mentioned in this chapter. If the configuration of the TVC File Manager were made through the init-parameters, you will need to create an XML file containing the trigger part only. How the trigger section is defined, is illustrated below.
<FileManager ...>
    ...
    <Triggers>
        <Trigger name="My Trigger" className="my.package.MyTrigger"/>
        <Trigger name="Another Trigger" className="my.package.AnotherTrigger"/>
    </Triggers>
</FileManager>
Each trigger defined, has its own Trigger element inside the Triggers element. On the Trigger element, you must define the className attribute, and the value must contain the fully qualified name of a Java Class that extends from the abstract class "com.technia.tvc.office.server.trigger.Trigger". This chapter describes how such a Trigger class could be implemented.
Moreover, the Trigger element allows nested elements that can be used to mask when this trigger will be used. Se example below:
<FileManager ...>
    ...
    <Triggers>
        <Trigger name="Trigger 1" className="my.package.Trigger1"> (1)
            <Matches fileName="*.xls"/>
            <Matches fileName="*.ppt"/>
            <Matches fileName="*.doc"/>
        </Trigger>

        <Trigger name="Trigger 2" className="my.package.Trigger2"> (2)
            <Matches onlyIfCDM="true" format="format_generic">
                <Matches fileName="*.xls"/>
                <Matches fileName="*.ppt"/>
                <Matches fileName="*.doc"/>
            </Matches>
        </Trigger>

        <Trigger name="Trigger 3" className="my.package.Trigger3"> (3)
            <Matches policy="policy_CADDrawing,policy_MyPolicy"
                     type="type_CADDrawing,type_MyType"
                     role="role_GlobalUser,role_CustomRole">
                <Matches fileName="*.xls"/>
                <Matches fileName="*.ppt"/>
                <Matches fileName="*.doc"/>
            </Matches>
        </Trigger>
    </Triggers>
</FileManager>
The examples shown above, illustrates the capabilities of how the Matches element could be used. These examples might not be realistic, but they show how they could be used.
As seen, the Matches element can be nested in arbitrary levels. Each level is satisfied, if at least one Matches element evaluates to true.
| 1 | The trigger will be executed, if the filename ends with "xls", "ppt" or "doc". |
| 2 | The trigger will be executed only for CDM documents, and if the file format is generic, and if the file ends with either "xls", "ppt" or "doc". |
| 3 | The trigger will be executed if the policy for the current document object is either "CAD Drawing" or "My Policy" and the type of the document object is (or derived from) either "CAD Drawing" or "My Type" and the user is assigned to either the "Global User" or "Custom Role" roles and the name of the file either ends with "xls", "ppt" or "doc". |
6.4.2. Writing a Custom Trigger
As mentioned earlier, a custom trigger must derive from the abstract class "com.technia.tvc.office.server.trigger.Trigger". The code below shows the methods that could be implemented.
| You don’t need to implement all methods, just select those that are needed. |
package mypackage;

import com.technia.tvc.office.server.trigger.Trigger;
import com.technia.tvc.office.server.trigger.TriggerAbort;
import com.technia.tvc.office.server.trigger.OnDownloadInput;
import com.technia.tvc.office.server.trigger.AfterDownloadInput;
import com.technia.tvc.office.server.trigger.OnUploadInput;
import com.technia.tvc.office.server.trigger.ValidateUploadInput;
import com.technia.tvc.office.server.trigger.AfterUploadInput;

public class MyTrigger extends Trigger {
    public void onDownload(OnDownloadInput input) throws TriggerAbort {
    }
    public void afterDownload(AfterDownloadInput input) {
    }
    public void onUpload(OnUploadInput input) throws TriggerAbort {
    }
    public void onValidateUpload(ValidateUploadInput input) {
    }
    public void afterUpload(AfterUploadInput input) {
    }
}
Those methods that can abort a transaction, has in its signature defined that the TriggerAbort exception could be thrown.
Each of the interfaces provided as argument to the trigger methods (ending with *Input), is derived from the interface TriggerInput. The chapters below, shows the available methods on all classes and interfaces used around the trigger execution.
| Never try to start, abort or commit any ongoing transaction on the matrix.db.Context object. This is handled automatically by the TVC File Manager framework. If doing so it will results in unexpected behavior. |
| If you need a reference to the Context (matrix.db.Context) object, there is a method in the Trigger class called getContext() that gives you that. |
All classes and its related methods involved in the execution of a Trigger are listed below. Note: In some cases, each class/interface might have more methods than shown in the table below. Do not use any other method than those mentioned below.
| Class Name | Description |
|---|---|
TriggerInput (com.technia.tvc.office.server.trigger) |
The TriggerInput interface contains methods to retrieve information about the document object and the file currently being handled. This interface has the following methods Methods: |
ObjectInfo (com.technia.tvc.office.common) |
The ObjectInfo class holds information about the document object, which the files belongs to. There are several methods available in order to retrieve metadata on this object. Methods: |
Attributes (com.technia.tvc.office.common) |
The Attributes class holds a number of AttributeInfo instances, each representing an attribute. Methods: |
AttributeInfo (com.technia.tvc.office.common) |
The AttributeInfo class represents an attribute. Methods: |
FileInfo (com.technia.tvc.office.common) |
The FileInfo class represents the actual file. Methods to retrieve information about the file are available, and also in those cases when the file is related to another business object (than the ObjectInfo represents) the object id of such object could be retrieved. Methods: |
OnDownloadInput (com.technia.tvc.office.server.trigger) |
The input provided to the trigger method called onDownload. Methods: |
PropertyInfo (com.technia.tvc.office.common) |
Represents a property that will be transferred from or to a MS Office document. Constructors: Methods: |
AfterDownloadInput (com.technia.tvc.office.server.trigger) |
The input provided to the trigger method called afterDownload <NO METHODS IN THIS VERSION> |
OnUploadInput (com.technia.tvc.office.server.trigger) |
The input provided to the trigger method called onUpload Methods: |
InputFieldInfo (com.technia.tvc.office.common) |
Contains information regarding a user input field that is required / optional for a user to fill in before uploading a file. Methods: |
ValidateUploadInput (com.technia.tvc.office.server.trigger) |
The input provided to the trigger method called onValidateUpload. Methods: |
UserInput (com.technia.tvc.office.common) |
Holds all user input fields. Methods: |
AfterUploadInput (com.technia.tvc.office.server.trigger) |
The input provided to the trigger method called afterUpload. Methods: |
6.4.3. Using JPO for Setting Document Properties
In addition to registering an ordinary Java class as trigger, one can instead configure the TVC File Manager to use a JPO that generates the properties that should be propagated to the document.
This is configured as below:
<FileManager>
    ...
    <Triggers>
        <JPOTrigger program="MyPropertyHandler" get-method="getProperties">
            <Matches fileName="*.doc"/>
        </JPOTrigger>
    </Triggers>
</FileManager>
You have to specify the "program" attribute and "get-method" attribute to match your JPO program / method. The "get-method" property represents the method within your JPO that returns the properties.
The method being executed must return a java.util.Map containing string keys representing the names of the property being transferred. The value can be of any type in the following list:
-
java.lang.String
-
java.lang.Boolean
-
java.lang.Integer
-
java.lang.Double
-
java.lang.Float
-
java.lang.Long
-
java.util.Date
When the JPO argument is unpacked, you will get a java.util.Map, containing information about the document / file being handled. This map contains following:
- objectId
-
The id of the object
- type
-
The type of the object
- name
-
The name of the object
- revision
-
The revision of the object
- current
-
The current state of the object
- policy
-
The policy of the object
- vault
-
The vault for the object
- fileName
-
The name of the file
- format
-
The format
- fileSize
-
The file size
- lockRequested
-
True, if the object is being locked
- cdmObjectId
-
The object id of the CDM main object
- title
-
The title of the CDM main object
- version
-
The version
- activeVersion
-
The version of the active version
- latestVersion
-
The version of the latest version
6.4.4. Transfer of Properties to non OLE-2 Documents
By default, the built-in triggers will only provide properties if the document that is being downloaded is a so called OLE-2 document (actually, only Microsoft Office files are treated as OLE-2 documents).
As of TVC 2011.3.0, a new feature is added that make it possible to write properties for other files than OLE2 documents.
This behavior is enabled by defining a trigger that is run on other files than "doc, docx, xls, xlsx, etc."
The difference in that case is how the properties are managed. In OLE2 documents, the properties are part of the actual file itself, while in other cases the properties are stored in a separate file in the same folder as the file is being checked-out into.
The properties file will have the same name as the file being checked out + an additional suffix consisting of ".tvcprops.xml". For example, if the user is checking out a file called "Test Document.pdf" and his download folder is set to "c:\ENOVIA Files", then an additional file called "Test Document.pdf.tvcprops.xml" is created within the "c:\ENOVIA Files" folder (in case when the server has been configured to propagate properties to .PDF files).
The format of the properties file is XML, and follows this syntax:
<properties>
    <property name="name of property" readOnly="true | false" type="">
        <value>the value</value>
    </property>
    ...
</properties>
The type attribute is an integer, whose values can be:
| Type Value | Data Type |
|---|---|
0 |
Unknown data type |
1 |
Boolean |
2 |
Timestamp |
4 |
Integer |
8 |
Real |
16 |
String |
This can also be disabled by specifying either an "init-parameter" or through the TVCFileManager.xml file:
<init-param>
    <param-name>tvc.office.client.managePropertiesInSeparateFile</param-name>
    <param-value>FALSE</param-value>
</init-param>
Or
<FileManager ...>
    ...
    <Client managePropertiesInSeparateFile="false" ...>
    ...
6.4.5. Built-in Triggers
The built-in triggers are used for the purposes listed below:
-
Transfer properties from the document object including information about the current user, into the OLE-2 document.
-
Only valid for Microsoft Office files
-
-
Require a reason for change upon check-in of a new version (CDM mode).
-
Transforming images being checked in to business objects of type "Image Holder" or "Image", into the various formats (mxThumbnail Image, mxSmall Image, mxMedium Image, mxLarge Image).
-
Letting the user select format when checking-in new files
-
NOTE: This trigger is by default disabled. To enable, see the table below for details.
-
There are some additional "init-parameters" that can be used to configure the behaviour of the built-in triggers.
| TVC Init Parameter Name | Type of Value | Default Value | Description |
|---|---|---|---|
tvc.office.server.enableBuiltInTriggers |
Boolean |
TRUE |
Can be used to completely disable the built-in triggers. |
tvc.office.server.builtInTrigger.transferForActiveVersionOnly |
Boolean |
TRUE |
If properties should be transferred to the active version only. |
tvc.office.server.builtInTrigger.requireCheckinReason |
Boolean |
TRUE |
Whether or not the check-in reason comment is required to have. |
tvc.office.server.builtInTrigger.alwaysRequireCheckinReason |
Boolean |
FALSE |
Whether or not to display the check-in reason dialog when checking in a new document |
tvc.office.server.enableTransformImageTrigger |
Boolean |
TRUE |
Whether or not to convert images being checked in to Image Holder or Image objects. |
tvc.office.property.prefix |
String |
MX |
The prefix used for the properties transferred to the documents. |
tvc.office.server.builtInTrigger.selectFormatEnabled |
Boolean |
FALSE |
If enabled, users will be prompted for a format when adding new files to a document. |
When Disabling the Built-In Triggers
By default in the File Manager, there is one trigger that propagates all attributes to the document and one that requests user input on upload (reason for change).
When disabling the built-in triggers, this means that the trigger that requests for a reason for change message is also disabled. If you wish to enable that trigger again, you need to apply the following to your configuration:
<FileManager useBuiltInTriggers="false">
    ...
    <Triggers>
        <ReasonForChangeTrigger/>
    </Triggers>
</FileManager>
If you want to enable the image transform trigger, then apply the following:
<FileManager useBuiltInTriggers="false">
    ...
    <Triggers>
        <ImageTransformerTrigger/>
    </Triggers>
</FileManager>
If you want to enable the default property transfer trigger, then apply the following:
<FileManager useBuiltInTriggers="false">
    ...
    <Triggers>
        <DefaultPropertyTransferTrigger/>
    </Triggers>
</FileManager>
If you want to reuse parts of the "attribute transfer" logic, you can implement a "Trigger" that extends this class:
com.technia.tvc.office.server.trigger.builtin.CDMTriggerBase
or:
com.technia.tvc.office.server.trigger.builtin.HandleDefaultProperties
6.5. Configuring the Client
The client can be configured from the server. This is done within the same XML configuration file used to configure the server behaviour. Some parameters/settings can be configured via so called init-parameters.
The subchapters describe the possible configurations that can be done and how to apply them.
6.5.1. Property Read/Write
Property write is by default enabled (if there is a trigger that defines so).
Property read is by default disabled (this can be used to transfer properties back to the server when checking in a document).
Configure this through an init parameter:
<init-param>
    <param-name>tvc.office.client.propertyReadEnabled</param-name>
    <param-value>false</param-value>
</init-param>
<init-param>
<param-name>tvc.office.client.propertyWriteEnabled</param-name>
<param-value>true</param-value>
</init-param>Configure this via the "TVCFileManager.xml" configuration file:
<FileManager>
    <Client propertyReadEnabled="true | false" propertyWriteEnabled="true | false"/>
</FileManager>
6.5.2. Keep Alive Interval
The interval (in seconds) with which the client will send keep-alive requests. Default is 600s (10 minutes).
Configure this through an init parameter:
<init-param>
    <param-name>tvc.office.client.keepAliveInterval</param-name>
    <param-value>600</param-value>
</init-param>
Configure this via the "TVCFileManager.xml" configuration file:
<FileManager>
    <Client keepAliveInterval="600"/>
</FileManager>| This value is in seconds. |
6.5.3. Check for New Versions
Defines if the client periodically should check for new versions of files that the user has downloaded. Default is true.
Configure this through an init parameter:
<init-param>
    <param-name>tvc.office.client.checkForNewVersions</param-name>
    <param-value>true</param-value>
</init-param>
Configure this via the "TVCFileManager.xml" configuration file:
<FileManager>
    <Client checkForNewVersions="true"/>
</FileManager>
Enforce configuration
You can also control if the field should be editable or not
Configured through init parameter:
<init-param>
    <param-name>tvc.office.client.checkForNewVersions.editable</param-name>
    <param-value>false</param-value>
</init-param>
Configured through "TVCFileManager.xml":
<FileManager>
    <Client checkForNewVersionsEditable="false"/>
</FileManager>
6.5.4. Use Word to save properties
Defines if the client should save properties using Word automation (for Microsoft Word files). Default is true.
Using Word to save the properties can in some cases take some time, especially if the document is large. Disabling this will result in that the property values needs to be updated manually in Word (Typically using F9), but will result in a faster time to open the document.
Configure this through an init parameter:
<init-param>
    <param-name>tvc.office.client.useWordToSaveProperties</param-name>
    <param-value>true</param-value>
</init-param>
Configure this via the "TVCFileManager.xml" configuration file:
<FileManager>
    <Client useWordToSaveProperties="true"/>
</FileManager>
6.5.5. Disable Running Executables
Disable running executables. E.g. defines if to open an executable file downloaded from ENOVIA automatically. Default is true.
Configure this through an init parameter:
<init-param>
    <param-name>tvc.office.client.disableRunExecutables</param-name>
    <param-value>true</param-value>
</init-param>
Configure this via the "TVCFileManager.xml" configuration file:
<FileManager>
    <Client disableRunExecutables="true"/>
</FileManager>
6.5.6. Default Download Folder
Define the default download folder for the clients.
Configure this via the "TVCFileManager.xml" configuration file:
<FileManager>
    <Client>
        <DefaultWorkFolder>p:\MXDownloads</DefaultWorkFolder>
        <DefaultWorkFolder platform="osx">~/MXDownloads</DefaultWorkFolder>
    </Client>
</FileManager>| This cannot be configured through init-parameters. |
If the path value starts with "~/", this will be expanded to the user’s home directory. The user’s home directory is obtained from the Java system property called "user.home".
If the path doesn’t start with "~/", it can contain macros that are replaced with their corresponding environment variable from the client. For example:
<FileManager>
    <Client>
        <DefaultWorkFolder>$\{TEMP}/MXDownloads</DefaultWorkFolder>
        ...
    </Client>
</FileManager>
The above example will replace the macro ${TEMP} with the environment variable named "TEMP". Note that you should use forward slashes to separate directory names.
Ask or predefined
You can control if the default folder should be default or if the user should be asked where to save the file should be default.
Possible values
-
ask
-
predefined
Configured through init parameter:
<init-param>
    <param-name>tvc.office.client.downloadFolder</param-name>
    <param-value>ask</param-value>
</init-param>
Configured through "TVCFileManager.xml":
<FileManager>
    <Client downloadFolder="predefined"/>
</FileManager>
Enforce configuration
You can also control if the field should be editable or not
Configured through init parameter:
<init-param>
    <param-name>tvc.office.client.downloadFolder.editable</param-name>
    <param-value>false</param-value>
</init-param>
Configured through "TVCFileManager.xml":
<FileManager>
    <Client downloadFolderEditable="false"/>
</FileManager>
6.5.7. Use temp directory when viewing files
Enable temp directory when viewing files as default
Configured through init parameter:
<init-param>
    <param-name>tvc.office.client.useTempForView</param-name>
    <param-value>true</param-value>
</init-param>
Configure through "TVCFileManager.xml":
<FileManager>
    <Client useTempForView="true"/>
</FileManager>
Enforce configuration
You can also control if the field should be editable or not
Configured through init parameter:
<init-param>
    <param-name>tvc.office.client.useTempForView.editable</param-name>
    <param-value>true</param-value>
</init-param>
Configured through "TVCFileManager.xml":
<FileManager>
    <Client useTempForViewEditable="false"/>
</FileManager>
6.5.8. Delete on remove
You can configure File Manager to delete local files when removing the entry from the File Manager entry list.
Configured through init parameter:
<init-param>
    <param-name>tvc.office.client.deleteOnRemove</param-name>
    <param-value>true</param-value>
</init-param>
Configure through "TVCFileManager.xml":
<FileManager>
    <Client deleteOnRemove="true"/>
</FileManager>
Enforce configuration
You can also control if the field should be editable or not
Configured through init parameter:
<init-param>
    <param-name>tvc.office.client.deleteOnRemove.editable</param-name>
    <param-value>true</param-value>
</init-param>
Configured through "TVCFileManager.xml":
<FileManager>
    <Client deleteOnRemoveEditable="false"/>
</FileManager>
6.5.9. Remove after upload
You can configure File Manager to remove entries from the list after successfully completing an upload.
Configured through init parameter:
<init-param>
    <param-name>tvc.office.client.removeAfterUpload</param-name>
    <param-value>true</param-value>
</init-param>
Configure through "TVCFileManager.xml":
<FileManager>
    <Client removeAfterUpload="true"/>
</FileManager>
Enforce configuration
You can also control if the field should be editable or not
Configured through init parameter:
<init-param>
    <param-name>tvc.office.client.removeAfterUpload.editable</param-name>
    <param-value>true</param-value>
</init-param>
Configured through "TVCFileManager.xml":
<FileManager>
    <Client removeAfterUploadEditable="false"/>
</FileManager>
6.5.10. Hide after complete
You can configure the File Manager window to be hidden after completing a file transfer.
Configured through init parameter:
<init-param>
    <param-name>tvc.office.client.hideAfterComplete</param-name>
    <param-value>true</param-value>
</init-param>
Configure through "TVCFileManager.xml":
<FileManager>
    <Client hideAfterComplete="true"/>
</FileManager>
Enforce configuration
You can also control if the field should be editable or not
Configured through init parameter:
<init-param>
    <param-name>tvc.office.client.hideAfterComplete.editable</param-name>
    <param-value>true</param-value>
</init-param>
Configured through "TVCFileManager.xml":
<FileManager>
    <Client hideAfterCompleteEditable="false"/>
</FileManager>
6.5.11. Show on start up
You can control the default behaviour of the File Manager window on start up (login).
Possible values
-
active
-
always
-
never
Configured through init parameter:
<init-param>
    <param-name>tvc.office.client.showOnStartup</param-name>
    <param-value>always</param-value>
</init-param>
Configure through "TVCFileManager.xml":
<FileManager>
    <Client showOnStartup="never"/>
</FileManager>
Enforce configuration
You can also control if the field should be editable or not
Configured through init parameter:
<init-param>
    <param-name>tvc.office.client.showOnStartup.editable</param-name>
    <param-value>true</param-value>
</init-param>
Configured through "TVCFileManager.xml":
<FileManager>
    <Client showOnStartupEditable="false"/>
</FileManager>
6.5.12. Filename conflicts
You can control the default behaviour when there is a filename conflict when downloading a file.
Possible values
-
ask
-
overwrite
-
rename
Configured through init parameter:
<init-param>
    <param-name>tvc.office.client.filenameConflict</param-name>
    <param-value>ask</param-value>
</init-param>
Configure through "TVCFileManager.xml":
<FileManager>
    <Client filenameConflict="rename"/>
</FileManager>
Enforce configuration
You can also control if the field should be editable or not
Configured through init parameter:
<init-param>
    <param-name>tvc.office.client.filenameConflict.editable</param-name>
    <param-value>true</param-value>
</init-param>
Configured through "TVCFileManager.xml":
<FileManager>
    <Client filenameConflictEditable="false"/>
</FileManager>
6.5.13. Validation of Version upon Check-In
When the user has downloaded a document for edit, there are some situations when the user manually uses the "update" function to upload the edited file manually (e.g. not using the "check-in" feature in the file manager client).
This means that even if the file has been uploaded and a new version has been created, the user can still upload the file that originally was opened for edit, once again from the File Manager client.
In order to prevent this to happen, a mechanism has been added that verifies that there isn’t a new version created, which is validated upon check-in. When the user clicks "check-in", and a newer version exists, the following dialog will appear if a newer version exists, which allows the user to decide what to do.
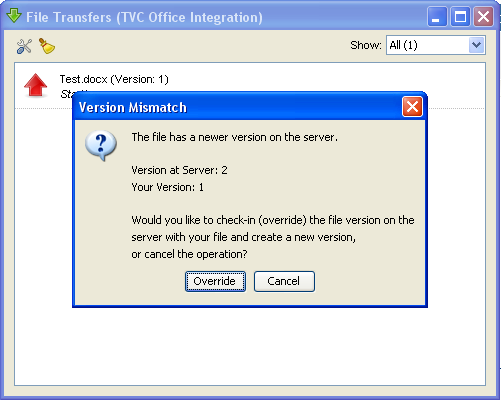
Configure this through an init parameter:
<init-param>
    <param-name>tvc.office.validateVersionOnCheckin</param-name>
    <param-value>false</param-value>
</init-param>
Configure this via the "TVCFileManager.xml" configuration file:
<FileManager>
    <Client validateVersionUponCheckin="true | false"/>
</FileManager>
6.5.14. File Rename
When the user tries to upload a file with a different name, using the upload button in the web-ui, a warning message appears (default behaviour) in order to confirm the file rename, see screenshot below.
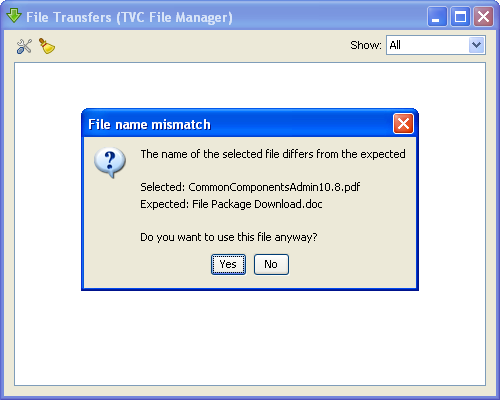
This behaviour can be configured. E.g. it is possible to disable the possibility to rename a file, enable it without the warning message or enable it but show the warning message. The latter is the default. To configure this, use one of the two options below:
Configure this through an init parameter:
<init-param>
    <param-name>tvc.office.fileRenameEnabled</param-name>
    <param-value>warn | yes | no | true | false</param-value>
</init-param>
Configure this via the "TVCFileManager.xml" configuration file:
<FileManager>
    <Client fileRenameEnabled="warn | yes | no | true | false"/>
</FileManager>
6.5.15. Allowing Check-in Multiple Files
By default, the user can select multiple files when checking in new files into a document object. This can however be changed.
Configure this through an init parameter:
<init-param>
    <param-name>tvc.office.client.maxFileCountOnCheckin</param-name>
    <param-value>100</param-value>
</init-param>
Configure via the "TVCFileManager.xml" configuration file:
<FileManager>
    <Client maxFileCountOnCheckin="100"/>
</FileManager>| Setting the value to -1 implies that the user can check-in as many files as wanted. |
6.5.16. Preventing Bad Characters in file names
You can prevent files containing bad characters from being uploaded to the server. It will first check the Enovia OOTB setting in emxSystem.properties:
emxFramework.Javascript.FileNameBadChars
If the above property is not set it will use the TVC init parameter:
<init-param>
    <param-name>tvc.office.client.fileNameBadChars</param-name>
    <param-value>#$@&%</param-value>
</init-param>
Or configured via the "TVCFileManager.xml" configuration file:
<FileManager>
    <Client fileNameBadChars="#$@&%"/>
</FileManager>
6.5.17. Cookie value
The file manager client invokes http requests to the server. By default the JSESSION id automatically added to the request cookie. In some cases, for example when using SSO, it is useful to include the complete cookie value. This is done by using the option "all".
If the above property is not set it will use the TVC init parameter:
<init-param>
    <param-name>tvc.office.client.cookieStrategy</param-name>
    <param-value>jsession | all</param-value>
</init-param>
Or configured via the "TVCFileManager.xml" configuration file:
<FileManager>
    <Client cookieStrategy="jsession | all"/>
</FileManager>| Using the feature requires using version 1.2.0 (or later) of the TVC File Manager Native Client |
6.5.18. Enabling Client Debug
It is possible to enable debugging from the File Manager client. This information can be useful for troubleshooting purposes.
The debugging is enabled by:
Configure this through an init parameter:
<init-param>
    <param-name>tvc.office.client.debug</param-name>
    <param-value>true</param-value>
</init-param>
Configure this via the "TVCFileManager.xml" configuration file:
<FileManager>
    <Client debug="true"/>
</FileManager>| Enabling the debug setting on the server affects all clients connected. An alternative way of enabling the debug from the File Manager Client is to press CTRL+D in the File Transfer window (when the window has focus). |
6.5.19. Bold Section Header
For improving readability in TVC File Manager client extension, section headers can be made bold by using below init parameter.
Configure through an init parameter:
<init-param>
    <param-name>tvc.office.client.makeSectionHeadersBoldOnPreferencesDialog</param-name>
    <param-value>true</param-value>
</init-param>
Configure via the "TVCFileManager.xml" configuration file:
<FileManager>
    <Client makeSectionHeadersBoldOnPreferencesDialog="true"/>
</FileManager>
6.5.20. Change font size of text on preferences dialog
It is possible to change the font size of the text on the preferences dialog of TVC File Manager client.
Configure through an init parameter:
<init-param>
    <param-name>tvc.office.client.fontSizeOnPreferencesDialog</param-name>
    <param-value>15</param-value>
</init-param>
Configure via the "TVCFileManager.xml" configuration file:
<FileManager>
    <Client fontSizeOnPreferencesDialog="15"/>
</FileManager>
6.5.21. Example Configuration
Below is an example configuration showing how to configure client settings.
<FileManager>
    <Client debug="false"
            propertyWriteEnabled="true"
            propertyReadEnabled="false"
            keepAliveInterval="600"
            checkForNewVersions="true"
            checkForNewVersionsEditable="true"
            useTempForView="true"
            useTempForViewEditable="true"
            deleteOnRemove="true"
            deleteOnRemoveEditable="true"
            removeAfterUpload="true"
            removeAfterUploadEditable="true"
            hideAfterComplete="true"
            hideAfterCompleteEditable="true"
            showOnStartup="always"
            showOnStartupEditable="true"
            filenameConflict="overwrite"
            filenameConflictEditable="true"
            downloadFolder="ask"
            downloadFolderEditable="true"
            disableRunExecutables="false"
            useWordToSaveProperties="true"
            validateVersionUponCheckin="true"
            maxFileCountOnCheckin="-1"
            fileRenameEnabled="true"
            makeSectionHeadersBoldOnPreferencesDialog="true"
            fontSizeOnPreferencesDialog="15">
        <DefaultWorkFolder>p:\MXDownloads</DefaultWorkFolder>
        <DefaultWorkFolder platform="osx">~/MXDownloads</DefaultWorkFolder>
    </Client>
    ...
</FileManager>
6.6. FileManager Widget Settings
Configuring the File Manager settings for widget can be done through different approaches. They are listed below.
-
Through PROPERTIES file, called
tvc.properties, stored under WEB-INF/classes (or somewhere else available in the classpath, meaning that the class loader can find the resource). -
Via init-parameters to the TVC Servlet definition in "web.xml"
Not all settings can be configured through using the init-parameters.
6.6.1. Configure via Init Parameters
Init parameters are defined within the deployment descriptor ("web.xml" file) for your application. In that file, you should have a section for the TVC Servlet (if not, please advice the Installation Guide for TVC).
Within that section, init-parameters are added as the example below:
<servlet>
    <servlet-name>tvcaction</servlet-name>
    <servlet-class>com.technia.tvc.core.TVCServlet</servlet-class>
    <init-param>(1)
        <param-name>tvc.3ddashboard.settings.useNativeFileManager</param-name>
        <param-value>true</param-value>
    </init-param>
    ...
</servlet>| 1 | Each parameter has a separate section, which is added just after the <servlet-class> definition. |
6.7. File Manager extension alert for firefox
Firefox does not allow the side loading of the web extensions which fails to auto install the file manager plugin.
To address this issue, We have enabled a feature to show an alert message in firefox so that user can add the plugin manually by clicking the url available on the message. If user does not want to install the filemanager web extension, user can continue with fallback HTML UI and in that case user needs to disable the alert message by clicking on the checkbox which says Do not show this message again.
tvc.office.filemanager.extension.firefoxInstallAlert=true
Default value is set to false.
Figure 14. Filemanager extension alert for firefox.
7. Process Steps
This chapter describes what and how the TVC File Manager can be configured in Process Steps.
7.1. Problem
OOTB Process Steps feature is not using common document model JPO to generate file actions. This restricts the use of TVC File Manager actions.
7.2. Solution
We recommend overriding the service which will use the common document model JPO to generate the TVC file action links.
Example code snippet and instructions for the same.
Step 1: Override the method which is used to generate File Mangaer actions, and use JPO emxCommonDocumentUI
to generate File Manager actions.
Example: Create a Custom CustomECMProcessSteps class extending ECMProcessSteps and override the method getActionLinks
package myPackage;

import java.util.ArrayList;
import java.util.Collections;
import java.util.List;
import java.util.Vector;

import com.dassault_systemes.enovia.ecmprocesssteps.services.impl.ECMProcessSteps;
import com.matrixone.apps.domain.util.FrameworkException;

import matrix.db.Context;
import matrix.db.JPO;

public class CustomECMProcessSteps extends ECMProcessSteps {
    @Override
    public List<String> getActionLinks(Context context, String[] objectArray) throws FrameworkException {
        List<String> stringList = new ArrayList<String>();
        try {
            Vector<String> actions = (Vector)JPO.invoke(context, "emxCommonDocumentUI", objectArray, "getDocumentActions", objectArray, Vector.class);
            stringList = Collections.list(actions.elements());
            return stringList;
        } catch (Exception exception) {
            throw new FrameworkException(exception);
        }
    }
}
Step 2: Register service
package myPackage;

import com.dassault_systemes.platform.restServices.ModelerBase;
import javax.ws.rs.ApplicationPath;

@ApplicationPath("/resources/tvcProcessSteps")
public class TVCServiceModeler extends  ModelerBase {
    @Override
    public Class<?>[] getServices() {
        return new Class[] { CustomProcessStepsService.class};
    }
}
Step 3: Create a custom service to use overidden method which we have created in step one.
Example:
package mypackage;

@Path("/CustomProcessStepsService")
public class CustomProcessStepsService extends RestService {

    @Path("/getProposedChangesData")
    @POST
    @Produces({"application/json"})
    @Consumes({"application/json"})
    public Response getProposedChangesData(@Context HttpServletRequest httpServletRequest, String objectId) {
        matrix.db.Context context = null;
        Response response = null;
        ....
        if (context != null) {
			String data = "";
            try {
                ...
                // Create CustomECMProcessSteps instance
                CustomECMProcessSteps eCMProcessSteps = new CustomECMProcessSteps();
                List<MapList> list = eCMProcessSteps.getProposedChanges(context, data);
                ...
            } catch (Exception exception) {
                response = Response.serverError().build();
            }
        }
        return response;
    }
}
Step 4: Replace OOTB service call with custom service
Example: In OOTB 19x version to replace OOTB File Manager Action with TVC one,
In enoECMProposedChangesView.jsp Instead of calling ECMProcessStepsService service
call custom service CustomProcessStepsService
Modify resources/ecmProcessSteps/ ECMProcessStepsService /getProposedChangesData
to /resources/tvcProcessSteps/CustomProcessStepsService/getProposedChangesData

Figure 15. Show the TVC File Manager Actions in Proposed Changes
8. File Package Download
The file package download, referred to FPD further on in this document, is a feature of the Office Integration component, which allows downloading multiple files in a so called package to a folder in the client’s computer and to automatically open a pre-defined file from the package.
The files within such a package can consist of dynamic data from the ENOVIA™ database, and/or checked in files.
Downloading multiple files from a web-environment is normally not doable, without the need to download a compressed file (like a ZIP file) and then rely on a third party tool to uncompressed the files. Also, such kind of a solution does not solve the need for automatically open a file from the compressed archive. And the user would also need to find the file to be opened via the file-explorer or similar.
The FPD solution, will remove the need to rely on having any third party uncompressing tools as well as reducing the number of mouse clicks the user would need to perform in handling multiple files. The FPD functionality also supports the architecture (File Collaboration Architecture), meaning that it is capable of downloading business object files from local file stores.
The FPD functionality can be used for a broad different use cases. One of many examples is, being able to create reports where you have Excel templates containing macros that populate the spreadsheet based upon data retrieved from Matrix.
8.1. Usage Scenario
The usage scenario depends on how the FPD functionality is configured. Mainly, there are two different usage scenarios: Starting without a pre-defined configuration or starting with a pre-defined configuration.
The user initiates the FPD by clicking on a link somewhere in the application, either from a command in a toolbar, through a standard link in the user interface or through another mechanism.
Depending on how the href is constructed, the user will be asked to select a configuration before the package is generated OR the link can be constructed so that the used configuration is defined directly in the href. In the later case, the user will not be prompted to select a configuration.
A configuration can be defined to require a single, none or multiple selected object(s) as input. The configuration defines what it needs. If the configuration declares that it requires selected objects as input, then the selected objects are validated against the configuration if they are accepted or not.

Figure 16. Selecting configuration
Once the user has selected the configuration, the system will start generating the package and the control of the package creation is handed over to the TVC File Manager client.
The client will periodically determine the status of the package creation, and once it’s done – it will start downloading the files into the target directory on the client’s computer. Once this is finished, the file that has been configured to be opened will be launched. If no file has been defined to be opened upon completion, the directory holding the package data will be opened for the user.
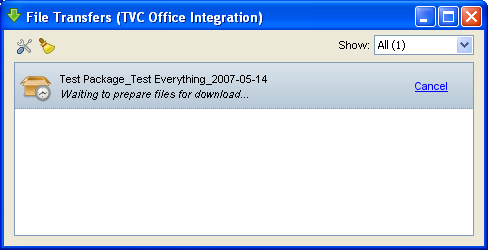
Figure 17. Downloading the Package
There are several other configuration options available; for example, one could have a pre-process page allowing the user to enter certain values before the actual data extraction is done.
8.2. Concepts
The FPD functionality is configured on the server side through a page object (admin object in business), which defines the behavior of a particular file package. This page object contains all different configurations that might exist in your environment.
For a configuration, the most central part is something called "Handler". The handler is responsible for defining the content of the package. For example, extracting meta-data from Matrix into different files, define dependent files needed to be checked out into the package from business object(s), add output from JPO execution(s) and more.
Typically, a Handler is a Java class, which is a part of the web-application. Writing such a handler is very simple, and gives the most flexible options. For less advanced use cases, one can instead of writing a Handler, use a pre-defined handler (see this section for further details), which does not require writing any Java code.
8.2.1. Command
This section describes how to create a Command to launch the File Package Download function from a TVC Structure Browser page or a business object’s details page.
Commands can be created and modified with the Business Administrator and MQL thick clients; however, it is recommended that you use the Business Administrator if you are not familiar with MQL (Matrix Query Language).
The most important parameter when creating a Command to launch the File Package Download is the "Href" parameter, whose value must be the following URL.
${ROOT_DIR}/tvc-action/fpd-init
| When adding the command to a toolbar displayed in the standard Value Chain Portfolio applications it is sometimes necessary to append a bogus JSP page to the URL. E.g. |
${ROOT_DIR}/tvc-action/fpd-init/foo.jsp
                               ^^^^^^^^
The reason for this is that when the toolbar is displayed in the Value Chain Portfolio application it fails to append the objectId parameter to the URL unless it ends with .jsp. This is not necessary if the command is to be added to the toolbar that is displayed on a TVC Structure Browser page.
8.2.2. Settings
The following table describes the settings and values that should be set on a Command that is used to launch the File Package Functionality.
| Setting | Description | Required Value |
|---|---|---|
Target Location |
This setting defines the target frame when executing the command. The value should be set to "popup" to ensure that the File Package Dialog is loaded in a new popup window. |
popup |
Window Width |
The width of the popup window. Recommended width is 500. |
500 |
Window Height |
The height of the popup window. Recommended height is 400. |
400 |
In addition the following settings can be used when adding the command to the toolbar of a TVC Structure Browser page. Adding these settings will force the user to select a row in the table that will be the root business object when creating the File Package.
| Setting | Description | Required Value |
|---|---|---|
Row Select |
Defines the required row selection on the TVC Structure Browser page when launching the Personal Browser. |
single |
Submit |
Defines whether to submit the row selections or not when clicking on the Command. |
true |
8.2.3. Start with a Pre-Defined Configuration
Normally, when launching the command specified above, a dialog will appear with the possible configurations to be used (if any) where the user needs to select one of the configurations to be used in the particular use-case.
However, if desired, the file package functionality can be started directly with a defined configuration. You will need to add a parameter called configuration to the HREF, whose value is the id of a configuration (see the following chapters how to define a configuration and associate id’s to them).
9. Configuration
There are two ways to handle the configurations for the File Package Download functionality. The first way is to keep the configurations within a page object in the database called "TVC File Package Download Configuration". This page object can contain multiple configurations.
The other way is to store a configuration as an XML file within the application server, under the "/WEB-INF/tvc/fpd" folder. In the latter case, each configuration should be placed inside its own file.
It is possible to mix these two configuration storage alternatives.
9.1. Page Object
The page object called "TVC File Package Download Config" contains the configurations available.
The content of this page object is XML data, and follows this format:
<Configurations>
    <Configuration id="firstCfg">
        ...
    </Configuration>
    <Configuration id="secondCfg">
        ...
    </Configuration>
    ...
</Configurations>
The format/content for the "Configuration" element is described later on. Important to remember is that when the configurations are defined in the page-object, each configuration must have a unique id associated.
9.2. XML File
Since the number of configuration can grow to become quite large, the page object might be harder to maintain. An easier approach is to hold each configuration as a separate file (this is possible as of the 2009.1 release).
In this case, you don’t need the "Configurations" element as in the "page-object" case. Also, you don’t need to specify an "id" on the "Configuration" element, as the file-path acts as the id.
This approach makes it easier to deploy new FPD configurations also, since you don’t need to modify the database at all.
9.3. Configuration Format
An example of how such a configuration object is defined is shown below:
<!--
     Each configuration must have a unique id
     NOTE: not needed in case the configuration is stored in separate XML files
 -->
<Configuration id="cfg1"> (1)
    <!-- The name of this configuration. Can be localized -->
    <DisplayName>Test</DisplayName> (2)
    <DisplayName locale="sv">Test sv</DisplayName>

    <!-- The description of this configuration. Can be localized -->
    <Description>This is the descriptive text</Description> (3)

    <!--
         Defines the package name. If the package is made against an
         object, then the package name can consist of dynamic values, resolved
         from such object.
     -->
    <PackageName> (4)
        <Text>Test Package</Text>
        <Text>_</Text>
        <CurrentUser/>
        <Text>_</Text>
        <Date/>

        <!-- Example of dynamic values -->
        <Basic>current</Basic>
        <Text>_</Text>
        <Attribute>attribute_Test</Attribute>
    </PackageName>

    <!-- Define access to this configuration -->
    <Access> (5)
        <UserList>
            <User>A Person</User>
        </UserList>
        <RoleList>
            <Role>role_GlobalUser</Role>
        </RoleList>
        <GroupList>
            <Group>A Group</Group>
        </GroupList>
    </Access>

    <!--
         Defines the types, which this config is valid for
         Note: The valid-for is ignored, if the RowSelectType is
         set to none.
      -->
    <ValidFor> (6)
        <TypeList>
            <Type>type_Type</Type>
            <Type>type_AnotherType</Type>
        </TypeList>
    </ValidFor>

    <!-- Defines the kind of selections needed for this config to run -->
    <RowSelectType>none</RowSelectType> <!-- none | single | multiple --> (7)

    <!-- Defines a pre-processor -->
    <PreProcessor> (8)
        <Page>/path/to/a/JspPage/MyPage.jsp</Page> <!--Context relative path-->
    </PreProcessor>

    <!-- The handler is the key in the file package download functionality -->
    <Handler className="my.package.example.TestHandler"/> (9)
</Configuration>| 1 | Each configuration is defined inside the "Configuration" element. NOTE: The id must be defined, and must be unique across all defined configurations, since the id is used to refer to a unique configuration. |
| 2 | Defines the displayed name of the configuration. The name can be localized in different languages, by simply adding as many <DisplayName> elements you wish, with different locale attributes. |
| 3 | The description contains a more descriptive text for the user, when he/she is selecting the configuration to be used. As well as for the DisplayName, this element can also be localized in different languages. |
| 4 | Defines the name of the package. The package name will be used when the files are saved on the client’s computer, i.e. the package name is the name of the directory under which the files are being saved. |
| 5 | Defines the access to a particular configuration. Only configurations that a user has access to will show up in the drop-down list in the File Package Download configuration dialog. |
| 6 | When setting up a configuration it is possible to define for which object type (or types) a configuration should be available. See this chapter for further details. |
| 7 | Defines what kind of object selections required, for this configuration. |
| 8 | Defines a custom pre-processor, used to display a custom pre-process page where the user has the possibility to affect the package content. |
| 9 | The handler is responsible for defining the content of the package. See this chapter for information how to create a Handler. |
9.4. Access
9.4.1. User Based Access Control
It is possible to grant access for a specific user by adding the user name to a list of user names. All users added to this list will have access to the configuration, no matter if they are or aren’t assigned to any roles or groups defined in the role list and group list respectively (See Role Based Access Control and Group Based Access Control).
Users are granted access by enclosing their user name within a User element. The User element is then added to the UserList element, which is a child of the Access element:
<Configuration id="cfg1">
    <!-- More configuration data here... -->
    <Access>
        <UserList>
            <User>person_TestEverything</User>
            <User>Test ManufacturingEngineer</User>
        </UserList>
    </Access>
    <!-- More configuration data here... -->
</Configuration>
9.4.2. Role Based Access Control
When controlling access based on roles it is important to know that all users that are assigned to that role, and all its child roles, will have access to the configuration.
Grant access for all users assigned to a specific role by enclosing the role name within a Role element. The Role element is then added to the RoleList element, which is a child of the Access element:
<Configuration id="cfg1">
    <!-- More configuration data here... -->
    <Access>
        <RoleList>
            <Role>role_GlobalUser</Role>
        </RoleList>
    </Access>
    <!-- More configuration data here... -->
</Configuration>
9.4.3. Group Based Access Control
When controlling access to a configuration based on groups, it is important to know that all users that are assigned to that group, or its child groups, will have access to the configuration.
Grant access for all users assigned to a specific group by enclosing the group name within a Group element. The Group element is then added to the GroupList element, which is a child of the Access element:
<Configuration id="cfg1">
    <!-- More configuration data here... -->
    <Access>
        <GroupList>
            <Group>Company Name</Group>
        </GroupList>
    </Access>
    <!-- More configuration data here... -->
</Configuration>
9.4.4. Combining Access Control
Note that when combining different types of access control, all users that are either explicitly added to the UserList element, OR are assigned to any of the roles added to the RoleList element, OR are assigned to any of the groups added to the GroupList element, will have access
9.5. Defining Valid Root Object Types
When setting up a configuration it is possible to define for which object type (or types) a configuration should be available.
Define valid root object type by enclosing the name of the type within a Type element. The Type element is added to the TypeList element, which is added to the ValidFor element. It is possible to add more than one valid root object type by adding another Type element to the TypeList element. If no valid root object type(s) has been defined, the configuration is considered to be valid for all object types.
<Configuration id="cfg1">
    <!-- More configuration data here... -->
    <ValidFor>
        <TypeList>
            <Type>type_Part</Type>
        </TypeList>
    </ValidFor>
    <!-- More configuration data here... -->
</Configuration>
9.6. Creating a Handler
A handler is a plain Java class, which implements an interface named
com.technia.tvc.office.server.fpd.Handler.
The only method, which your handler needs to implement, has the following signature:
void perform(HandlerCtx ctx) throws TVCException;
For example, a handler without any logic would look like:
package mypackage;

import com.technia.tvc.office.server.fpd.Handler;
import com.technia.tvc.office.server.fpd.HandlerCtx;

public class MyHandler implements Handler {

    public void perform(HandlerCtx ctx) throws TVCException {
        // logic goes here...
    }
}
Within the perform method, you define what the package will contain. Everything added to the package is defined as being either a PackageEntry or a PackageDependency.
The difference between a PackageEntry and a PackageDependency is that while an Entry is a part of the Package, a Dependency is something that is downloaded after the package has been created but before the package is opened.
Currently the only dependency you can have is to a file checked-in to a business object in Matrix. The file might then be downloaded through the server, if is enabled in your environment. The benefit of not letting checked-in files being a part of the package, but being a dependency, is because of utilizing the benefits with the architecture (i.e. reducing the need of transferring large amount of data over WAN).
Generally, one should reduce the size of the dynamic package if possible – because the package it self is always downloaded from the Main Collaboration Server (), while dependencies can be downloaded from File Collaboration Servers ().
9.6.1. Writing the Perform Method
As mentioned before, the perform method does the work and defines the package content. The argument to the perform method, is an instance of a class named "HandlerCtx". The HandlerCtx class provides a large set of different functions that is used to add content to the package. See the specification below:
public interface HandlerCtx {
    /**
     * Returns the {@link UserData} containing relevant information
     * for the handler
     */
    UserData getUserData();

    /**
     * Adds an arbitrary {@link InputStream} to the package.
     *
     * @param in The input stream, which the data is read from
     * @return A {@link PackageEntry entry} used for defining properties
     * on the entry.
     */
    PackageEntry add(InputStream in);

    /**
     * Adds an arbitrary {@link Reader} to the package.
     *
     * @param in The reader, which the data is read from
     * @return A {@link PackageEntry entry} used for defining properties
     * on the entry.
     */
    PackageEntry add(Reader reader);

    /**
     * Adds a DOM document
     * @param doc
     * @return A {@link PackageEntry entry} used for defining properties
     * on the entry.
     */
    PackageEntry addXML(Document doc);

    /**
     * Adds an arbitrary {@link InputSource} to the package.
     *
     * @param in The input source, which the XML data is read from
     * @return A {@link PackageEntry entry} used for defining properties
     * on the entry.
     */
    PackageEntry addXML(InputSource in);

    /**
     * Adds an arbitrary {@link Source} representing XML data,
     * which is converted via the provided {@link Source xslt source}
     * to the package.
     *
     * @param in The XML source
     * @param xslt The XSLT source.
     * @return A {@link PackageEntry entry} used for defining properties
     * on the entry.
     */
    PackageEntry addTransformXML(Source in, Source xslt);


    /**
     * Adds an arbitrary {@link Source} representing XML data,
     * which is converted via the provided {@link Source xslt source}
     * to the package using the XSLT parameters from the Map.
     *
     * @param in The XML source
     * @param xslt The XSLT source.
     * @param parameters The parameter map
     * @return A {@link PackageEntry entry} used for defining properties
     * on the entry.
     */
    PackageEntry addTransformXML(Source document, Source xslt, Map parameters);

    /**
     * Adds the content of a page object as resource
     *
     * @param pageName The name of the page object to include in the package.
     * @return A {@link PackageEntry entry} used for defining properties
     * on the entry.
     */
    PackageEntry addPageContent(String pageName);

    /**
     * Adds the result of a export businessobject output
     *
     * @param typePattern The type pattern
     * @param namePattern The name pattern
     * @param revPattern The revision pattern
     * @return A {@link PackageEntry entry} used for defining properties
     * on the entry.
     */
    PackageEntry addExportBus(String typePattern,
                              String namePattern,
                              String revPattern);

    /**
     * Adds the result of a export businessobject output transformed via
     * the provided XSLT stylesheet.
     *
     * @param typePattern The type pattern
     * @param namePattern The name pattern
     * @param revPattern The revision pattern
     * @param xslt The stylesheet
     * @param parameters A map containing parameters (optional)
     * @return A {@link PackageEntry entry} used for defining properties
     * on the entry.
     */
    PackageEntry addExportBus(String typePattern,
                              String namePattern,
                              String revPattern,
                              Source xslt,
                              Map parameters);


    /**
     * Adds the result of a export business object output transformed
     * via the provided XSLT stylesheet.
     *
     * @param typePattern
     * @param namePattern
     * @param revPattern
     * @param files
     * @param captured
     * @param icons
     * @param history
     * @param fromRelationships
     * @param toRelationships
     * @param states
     * @param archive
     * @param xslt
     * @param parameters
     * @return A {@link PackageEntry entry} used for defining properties
     * on the entry.
     */
    PackageEntry addExportBus(String typePattern,
                              String namePattern,
                              String revPattern,
                              boolean files,
                              boolean captured,
                              boolean icons,
                              boolean history,
                              boolean fromRelationships,
                              boolean toRelationships,
                              boolean states,
                              boolean archive,
                              Source xslt,
                              Map parameters);

    /**
     * Adds the output from a JPO execution.
     *
     * @param jpo
     * @param function
     * @return A {@link PackageEntry entry} used for defining properties
     * on the entry.
     */
    PackageEntry addJPO(String jpo,
                        String function);

    /**
     * Adds the output from a JPO execution. The provided
     * argument is passed to the JPO.
     *
     * @param jpo The name of the JPO to invoke
     * @param function The name of the method to invoke.
     * @param argument An argument.
     * @return A {@link PackageEntry entry} used for defining properties
     * on the entry.
     */
    PackageEntry addJPO(String jpo,
                        String function,
                        Serializable argument);


    /**
     * Adds the output from a MQL command execution.
     *
     * @param mqlCommand The command to execute
     * @return A {@link PackageEntry entry} used for defining properties
     * on the entry.
     */
    PackageEntry addMQL(String mqlCommand);

    /**
     * Adds a file from a businessobject to the package.
     *
     * @param type The type
     * @param name The name
     * @param revision The revision
     * @param format The format
     * @param fileName The name of the file
     * @return A {@link PackageEntry entry} used for defining properties
     * on the entry.
     */
    PackageEntry addFile(String type,
                         String name,
                         String revision,
                         String format,
                         String fileName);

    /**
     * Adds a file from a businessobject to the package.
     *
     * @param objectId The id of the object
     * @param format The format
     * @param fileName The name of the file
     * @return A {@link PackageEntry entry} used for defining properties
     * on the entry.
     */
    PackageEntry addFile(String objectId,
                         String format,
                         String fileName);


	/**
     * Adds a path till the leaf node of the package if there is no file checked in
     *
     * @param path
     * @return
     */
    void addEmptyPackageName(String path);

    /**
     * Adds the output from a structure expansion
     *
     * @param rootObjectId The id of the object to expand
     * @param roleName The name of the role, which the filters are stored on.
     * @param filterNames The names of the filters to use.
     * @param expandLevels The number of levels to expand
     * @param tableName The name of the table to apply on the result
     * @return A {@link TableExportEntry}
     */
    TableExportEntry addExpandedData(String rootObjectId,
                                     String roleName,
                                     String[] filterNames,
                                     int expandLevels,
                                     String tableName);


    /**
     * Adds the objects returned by the specified inquiry, evaluated with
     * the specified table.
     *
     * @param inquiryName The name of the inquiry to invoke
     * @param args The inquiry arguments
     * @param tableName The name of the table to apply on the result
     * @return A {@link TableExportEntry}
     */
    TableExportEntry addTableData(String inquiryName,
                                  Map args,
                                  String tableName);

    /**
     * Adds the objects returned by the specified JPO, evaluated with
     * the specified table.
     *
     * @param jpoName The name of the JPO to invoke
     * @param function The name of the function to invoke.
     * @param args The JPO arguments
     * @param tableName The name of the table to apply on the result
     * @return A {@link TableExportEntry}
     */
    TableExportEntry addTableData(String jpoName,
                                  String function,
                                  Map args,
                                  String tableName);
    /**
     * Adds the objects returned by the query arguments, evaluated with
     * the specified table.
     *
     * @param typePattern The type pattern
     * @param namePattern The name pattern
     * @param revPattern The revision pattern
     * @param ownerPattern The owner pattern
     * @param vaultPattern The vault pattern
     * @param whereClause The where clause
     * @param limit The query limit
     * @param expandType True if to include sub types to the specified type pattern
     * @param tableName The name of the table to apply on the result
     * @return A {@link TableExportEntry}
     */
    TableExportEntry addTableData(String typePattern,
                                  String namePattern,
                                  String revPattern,
                                  String ownerPattern,
                                  String vaultPattern,
                                  String whereClause,
                                  int limit,
                                  boolean expandType,
                                  String tableName);

    /**
     * Adds a custom table bean to the package.
     *
     * @param table The tablebean to add.
     * @return A {@link TableExportEntry}
     */
    TableExportEntry addTable(TableBean table);


    /**
     * Adds a {@link FileDependency file dependency}
     *
     * @param type
     * @param name
     * @param revision
     * @param format
     * @param fileName
     * @return
     */
    PackageDependency addFileDependency(String type,
                                        String name,
                                        String revision,
                                        String format,
                                        String fileName);
    /**
     * Adds a {@link FileDependency file dependency}
     *
     * @param objectId The id of the object
     * @param format The format
     * @param fileName The name of the file
     * @return A {@link PackageDependency}
     */
    PackageDependency addFileDependency(String objectId,
                                        String format,
                                        String fileName);

    /**
     * Removes a previously added dependency.
     *
     * @param dep
     * @return True if the dependency was removed
     */
    boolean removeDependency(PackageDependency dep);
}
Many of the methods above returns either an instance of "PackageEntry", "TableExportEntry" or "PackageDependency", for each of these return values, you have some common functions that operate on the returned object:
    /**
     * Defines the name of the file, which the content is stored in.
     */
    void setSaveAs(String name);

    /**
     * Defines the directory, where the file is stored.
     */
    void setSaveIn(String dir);

    /**
     * Defines if the file should be opened once the package is created.
     * NOTE: Only one file might be opened after the package has been created
     */
    void setOpen();
Additionally, the "TableExportEntry" instance has the following methods:
/**
 * Defines if the output should be XML
 */
void setXMLOutput();

/**
 * Defines if the output should be
 */
void setCSVOutput();
Additionally, the "PackageDependency" instance has the following methods:
/**
 * Returns true if the dependency is valid. I.e. if the file
 * really can be downloaded. This can be used to perform some
 * logic, when the file for some reason is unreachable.
 */
boolean isValid();

/**
 * Set to true if the dependency is a ZIP archive, and if
 * it is supposed to be automatically un-compressed.
 */
void setExtractIfZIP(boolean b);
9.7. Creating a Configurable Handler
Instead of defining a custom handler, you have the possibility to use a so called configurable handler, which doesn’t require you to do any Java coding. A configurable handler supports a subset of the possibilities, which can be done through implementing a Java based handler.
An example on how to define a configurable handler is provided below:
<Handler>
    <!-- Execute some MQL commands -->
    <MQL saveAs="parts.txt">temp query bus Part * * select id dump |</MQL>
    <MQL saveAs="structure.txt">expand businessobject ${OBJECTID} from recurse to all select bus id select rel id dump |;</MQL>

    <!-- Execute a JPO -->
    <JPO program="MyJPO" method="createXML" saveAs="data.xml"/>

    <!-- Checkout a file -->
    <File open="true">
        <Type>Document Template</Type>
        <Name>-0001</Name>
        <Revision>A</Revision>
        <FileName>Template.xls</FileName>
        <Format>generic</Format>
    </File>

    <!-- Expand a structure, using the filters from the specified role -->
    <!-- then evaluate the structure using the system-table and export -->
    <!-- the data in XML format -->
    <StructureData format="xml"
                   table="My Table"
                   filters="EBOM From,Specifications"
                   role="Global User"
                   expandTo="1"
                   saveAs="structure.xml"/>

    <!-- Load a table from the specified inquiry -->
    <!-- then evaluate the system-table over these objects and export -->
    <!-- the data in CSV format -->
    <TableData format="csv"
               table="My Table"
               inquiry="My Inquiry"
               saveAs="tabledata.xml"/>
</Handler>
The supported instructions, which can be configured through the XML format is:
-
MQL – Adds output from an arbitrary MQL command.
-
JPO – Adds the result from a JPO method invocation
-
File – Adds a file to be checked-out from Matrix
-
StructureData – Expands a structure, and adds the data either CSV or XML formatted.
-
TableData – Similar to StructureData, but for list of objects.
-
URL – Content of a URL
These instructions are described more in detail in the sub-chapters below.
| When using a configurable handler, you should not specify any className attribute on the "Handler" element. |
9.7.1. General
All the instructions support the following attributes:
| Attribute Name | Description | Example | Required |
|---|---|---|---|
saveIn |
Defines the name/path where the file is saved in. Default is in the root of the package. |
/data/files |
Yes |
saveAs |
Defines the name of the file to which the data is written into |
Data.xml |
No |
open |
Defines if the file should be opened after the package has been created. Note that only one file can be defined to be opened. Default is FALSE. |
True |
No |
addEmptyPackageName |
If the folder is empty (no entries) and we want to show the path of folder structure; then we can achieve it by passing name/path as an argument. Default path is the root of the package. |
/root/folder |
No |
9.7.2. MQL
Executes the command and the output from the command is stored in the specified file.
Additional attributes supported by this instruction:
| Attribute Name | Description | Example | Required |
|---|---|---|---|
parseMacros |
Whether or not if the MQL command should be parsed. |
False (default is true) |
No |
execForEach |
Whether or not if the MQL command should be executed for each of the objects provided as input for the file package creation. If set to true, parseMacros is assumed even if this flag has been set to false. When this attribute has been set to true, and there were more than one object as input, the OBJECTID and OBJECTTYPE macros are substituted for each execution of the command. Also, the output from the command is saved into different files. For example, if saveAs is mql.txt, it will be mql_0.txt, mql_1.txt, …, mql_10.txt etc. Or, if no suffix is specified, mql_0, mql_1, …, mql_10 etc. |
True (default is false) |
No |
When the parseMacros attribute is true, the MQL command can contain macros that are parsed. The following macros can be used:
-
${OBJECTID} – Substitutes the macro with the object id (if several object’s were provided as input, the first object id is used)
-
${OBJECTIDS} – Substitutes the macro with a pipe separated list of all object-ids for all objects provided as input.
-
${OBJECTTYPE} – Substitutes the macro with the object type (if several object’s were provided as input, the first object-type is used)
-
${OBJECTTYPES} - Substitutes the macro with a pipe separated list of all object-types for all objects provided as input.
-
${USER} – Substitutes the value to the name of the current user.
Example:
<Handler>
    <MQL execForEach="true" saveAs="mql.txt">
        expand bus $\{OBJECTID} from recurse to 1 select bus id type name dump |
    </MQL>
</Handler>
9.7.3. URL
This instruction can be used to include the content of an URL into the package.
The URL is assumed to be relative to the application context-root if it doesn’t start with http: or https:.
<Handler>
    <URL saveIn="images"
         saveAs="technia-logo.gif">http://www.technia.com/images/logo.gif</URL>
    <URL saveIn="images"
         saveAs="Part.gif">/common/images/type_Part.gif</URL>
</Handler>
9.7.4. JPO
Executes a method in a JPO, and stores the output in the specified file. The JPO must return some value.
Additional attributes supported by this instruction:
| Attribute Name | Description | Example | Required |
|---|---|---|---|
program |
Defines the name of the JPO program |
My Program |
yes |
method |
Defines the method to be invoked |
myMethod |
Yes |
It is also possible to provide additional arguments to the JPO, see the example below:
<Handler>
    <JPO program="MyJPO" method="createXML" saveAs="data.xml">
        <Arg name="first-arg" value="value of arg 1"/>
        <Arg name="second-arg" value="value of arg 2"/>
    </JPO>
</Handler>
When the JPO is invoked, and the string array is unpacked using JPO.unpackArgs, you will get a Map with following key/values:
| Name | Type | Content | Description |
|---|---|---|---|
requestMap |
java.util.Map |
The map contains String keys and String[] values. |
Contains the request parameters used when invoking the FPD |
objectList |
java.util.List |
A list of "java.util.Map" instances. Each map contains string keys and string values. |
If the FPD were invoked around an object, this information contains the id+type information from these object(s). |
arguments |
java.util.Map |
The map contains String keys and String values. |
The optional arguments as configured through the XML configuration. |
9.7.5. File
The File instruction is used to download a file that is checked in to a business object in Matrix.
The example below illustrates how to use this instruction.
<Handler>
    <File open="true">
        <Type>Document Template</Type>
        <Name>-0001</Name>
        <Revision>A</Revision>
        <FileName>Template.xls</FileName>
        <Format>generic</Format>
    </File>
</Handler>
Additional attributes supported by the File element are
| Attribute Name | Description | Example | Required |
|---|---|---|---|
extractIfZIP |
If the downloaded file is a ZIP archive, this flag can be used to automatically unzip the file once it has been downloaded. |
True (default is FALSE) |
No |
9.7.6. TableData
The TableData instruction can be used to evaluate a table over a list of objects, and include the data, either in CSV (comma separated) or in XML format, in the package.
The list of objects can either be retrieved through evaluating an inquiry or by executing a JPO.
Below are some examples that illustrate how to use this instruction:
<Handler>
    <TableData format="csv"
               table="My Table"
               inquiry="My Inquiry"
               saveAs="table1.xml"/>
</Handler>
<Handler>
<TableData format="xml"
table="My Table"
jpo="MyJPO"
method="myMethod"
saveAs="table2.xml"/>
</Handler>Also, it is possible to provide arguments to either the inquiry or to the JPO method:
<Handler>
    <TableData format="csv" table="My Table" ... saveAs="table1.xml">
        <Arg name="arg1" value="value1"/>
        <Arg name="arg2" value="value2"/>
    </TableData>
</Handler>| You can create complex cell data, by creating a DataHandler within the table that produces XML output. |
9.7.7. StructureData
The StructureData instruction is similar to the TableData instruction, but it can be used to extract a structure in either CSV or XML format.
The structure is expanded according to filters that are stored inside the workspace of a role.
Below is an example how to use this element:
<Handler>
    <StructureData format="xml"
        table="My Table"
        filters="EBOM From,Specifications"
        role="Global User"
        expandTo="1"
        saveAs="structure.xml"/>
</Handler>
The filters are created through MQL, and must be created for the role as specified. An example MQL command to create a filter from MQL is shown below:
set context user creator pass xxx;
set workspace user "Global User";
add filter "EBOM From" appliesto relationship from type EBOM;
add filter "Specifications" appliesto relationship from type "Part Specification";
9.8. Integration with Personal Browser
The file package functionality can be used together with the TVC Personal Browser component, if that is available. The benefits by using the file package functionality within the TVC office integration to create a personal browser are:
-
Attached business object files are checked out through the FCS server
-
The generated Personal Browser package is automatically uncompressed, and the personal browser is automatically shown after download is completed. I.e. the user does not need to use a third party tool to do the decompression nor s/he does not have to browse for the personal browser files in the file explorer in order to open it up.
To configure the file package functionality to use a personal browser configuration, you will need to create a configuration like the example below:
<Configuration id="pbEbomWithFilesConfig">
    <DisplayName>EBOM File Package</DisplayName>
    <Description>Creates a package with all the drawings from the EBOM structure</Description>
    <PackageName>
        <Text>PersonalBrowser</Text>
        <Text>_</Text>
        <Basic>type</Basic>
        <Text>_</Text>
        <Basic>name</Basic>
        <Text>_</Text>
        <Basic>revision</Basic>
    </PackageName>
    <ValidFor>
        <TypeList>
            <Type>type_Part</Type>
        </TypeList>
    </ValidFor>
    <RowSelectType>single</RowSelectType>
    <Handler className="com.technia.tvc.personalbrowser.handler.classic.oifpd.FPDHandler"> (1)
        <Property name="personalBrowserConfigName" value="defPartConf"/>
    </Handler>
</Configuration>| 1 | Define the special handler and the configuration to be used , and the property within this element are used to specify what personal browser configuration to be used. |
When the file package download functionality is used to create a personal browser, some features such as FTP transfer of the package can not be used.