jmxclient-<tvc-version>
JMX Client - Administration Guide
30 March 2016
1. Legal Notes
© Copyright 2003-2019 by TECHNIA AB
All rights reserved.
PROPRIETARY RIGHTS NOTICE: This documentation is proprietary property of TECHNIA AB. In accordance with the terms and conditions of the Software License Agreement between the Customer and TECHNIA AB, the Customer is allowed to print as many copies as necessary of documentation copyrighted by TECHNIA relating to the software being used. This documentation shall be treated as confidential information and should be used only by employees or contractors with the Customer in accordance with the Agreement.
This product includes software developed by the Apache Software Foundation. (http://www.apache.org/).
2. Introduction
The TVC JMX Admin Client is a tool that can be used to administrate certain functions within a web application where TVC has been installed into.
A web application is running inside an application server and it’s very common that a system is setup with more than one application server in order to be able to handle a larger amount of users. In such environment, things like clearing the cache or changing log-levels are difficult to do as it has to be done on each application server. An administrator would need to login explicitly to each application server and perform the task.
The TVC JMX Admin client is a tool that can be used to perform certain operations against multiple application servers through a simple user interface. The JMX Admin Client is a separate application that is using the JMX protocol to perform remote operations.
2.1. JMX
JMX is an abbreviation for Java Management Extensions, and is a standard technology in the Java platform as of J2SE 5.0 and higher.
The application that is being subject for remote management typically exposes so called MBeans (or MXBeans), which are standard Java classes that follows certain rules specified by the JMX API. The TVC application exposes a number of MBeans.
An MBean itself exposes either attributes and/or operations. Some attributes supports modifications while others are read-only. Operations are methods that can be executed remotely. The difference between changing an attribute vs. performing an operation is very small.
2.2. TVC JMX Admin Client vs JConsole
The JConsole application is a tool that is part of the Oracle/SUN JDK. JConsole can be used to monitor and manage a remote application through JMX. The main difference between the TVC JMX Admin Client and the JConsole application, is that JConsole is only able to connect to one remote process at a time.
You can perform the same operations through the JConsole as you can via the TVC JMX Admin Client, however, the TVC JMX Admin Client allows you to manage several Application Servers easier and execute operations on many application servers through a single click.
However, the JConsole provides some features that are not part of the TVC JMX Admin Client, such as providing more information about the JVM itself (memory, threads, classes, CPU usage).
3. Installation
The TVC JMX Admin Client is installed through the TVC installer. You select if you want to install it and where you will install it.
You need Java 1.6.0 or higher to run this tool. There is however no restrictions on what Java version you use at the application servers, which is exposing the JMX resources.
When you have installed the application, you will within the folder you selected for installation get a subfolder called:
Below this folder, you will find the following files:
jmxclient.bat
jmxclient.sh
tvc-jmxclient.jar
The BAT and SH files are simple shell scripts for Windows and UNIX that launches the application.
They both simply do the following at the end:
javaw -jar tvc-jmxclient.jar
The JMX Admin Client stores some information locally within a directory called ".tvc/jmxclient" located under the home folder of the user that is running the tool.
| You don’t need to run the JMX Admin Client on the same computer running the application server(s). JMX supports remote administration. If you need to move the files to another computer, you can simply archive the installation folder and move them to the desired computer. |
4. Usage
4.1. Managing Profiles
The application supports storing profiles. A profile defines what remote JVM’s it will connect to. E.g. a profile defines one or more connections.
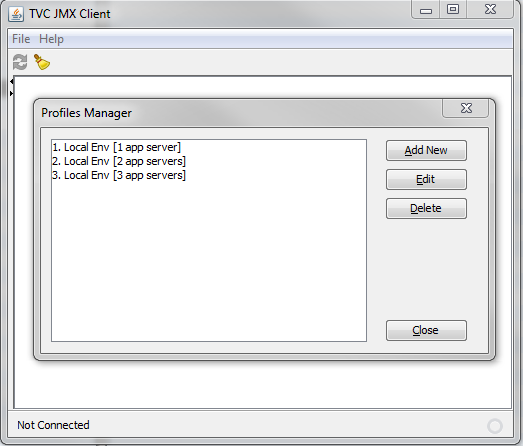
The Profile Manager is used for creating or managing your profiles. You can have as many profiles you wish; typically you would have one profile for the production system, another for the qualifying system and one for your development environment.
The profile manager is opened when you start the application and if you don’t have any profiles created yet. You can always open the Profile Manager through the File menu.
Below is a screenshot showing the profile manager.
| The information about your profiles is stored within the following file: |
${USER_HOME}/.tvc/jmxclient/profiles.xml
If you move the application to another computer, you can also copy this file to avoid having to re-create your profiles again.
Changing this file manually within a text-editor is not recommended.
4.1.1. Creating a Profile
To create a new profile, use the "Add New" button within the Profile Manager dialog.
This will bring up another dialog:
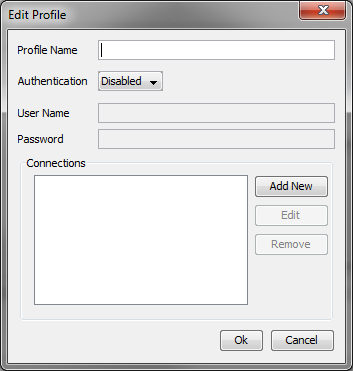
You need to give the profile a name, which typically is a friendly name identifying the environment.
If you use authentication (JMX Specific), you need to provide user-name and password.
| It is assumed that the same user-name and password works for all the connections. |
4.1.2. Adding Connections
The profile needs one or more connections in order to be able to connect to a remote JVM (or remote JMV’s).
To add a connection, use the "Add New" button. This will bring up yet another dialog:
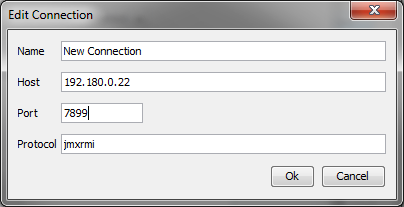
Within this dialog, you have to enter the following:
- Name
-
The name of the connection. Typically some identifier that identifies the remote application
- Host
-
The host (or IP address) to the application being managed
- Port
-
The JMX port that enables the remote management. NOTE: This is NOT the port, which your application server uses.
- Protocol
-
This should be "jmxrmi", which is the only protocol being supported by the JVM unless some extensions has been installed. It is possible to perform JMX operations through other protocols, however, using such requires you to install additional JAR files and this is currently not being supported by the TVC JMX Admin Client.
Once completed, hit OK to add the new connection.
Repeat this procedure as many times as you have application servers to manage.
4.2. Selecting a Profile
When you start the application, the window showing the available profiles is opened (if you have created any profiles earlier). From here, you can select the profile you want to open.
See screenshot below:

This window is can also be opened from the File menu.
To select a profile, either double-click on it or select one and then click the "Select" button.
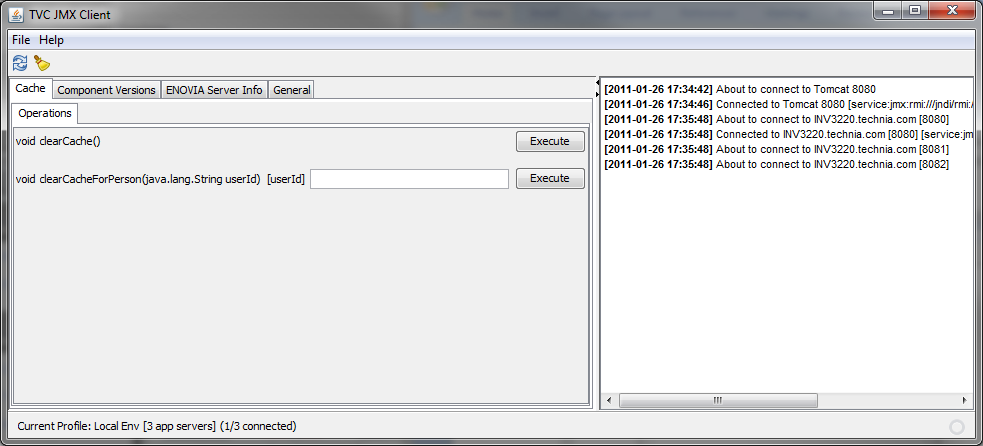
Once the connections are established, you will see a screen like below:
4.3. Running the Application
Once you have connected to your application servers, you should first look into the status bar at the bottom of the application window and verify that you were able to connect with all of them.
The information about successful/non successful connections is also logged into the log pane in the right side of the application window.
The MBeans being exposed from the application servers are shown in separate tabs.
Within each such tab, the attributes and/or operations are shown in a sub-tab.
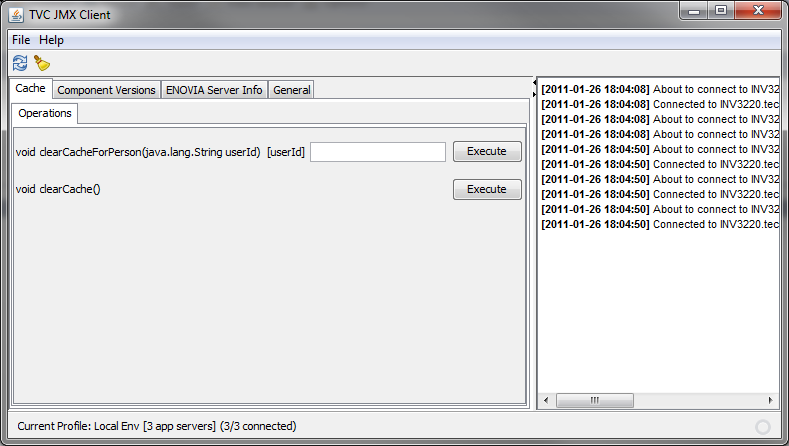
4.4. Performing Operations
In the example screen below, the "Cache" MBean tab is selected. This MBean doesn’t have any attributes, only operations.
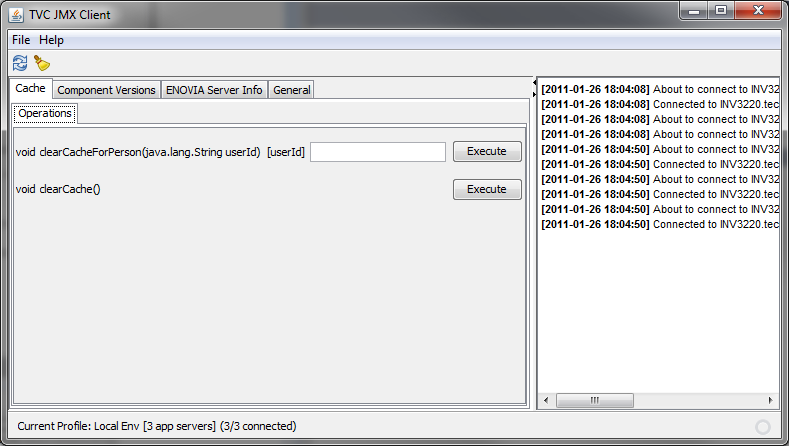
Some operations accepts/requires arguments, while others don’t. Moving the mouse over the argument might give some additional info on what kind of value that is expected.
Fill in the value(s) and then perform the operation by clicking the "Execute" button. The action and possible return values are logged into the log window so that you can follow the progress.
4.5. Set Attributes
The available attributes are shown in a separate tab. In the example below, the "General" MBean tab is selected and it’s attribute tab is shown.
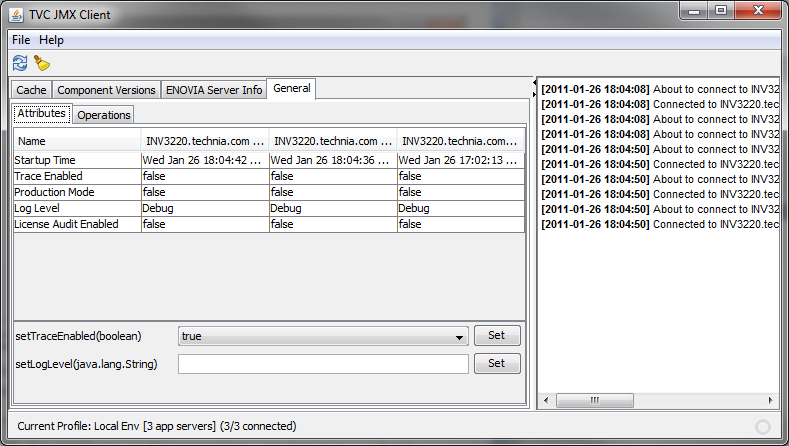
In this screen you will see the values for each attribute as set on each "connection" (or application server).
Those attributes that supports modifications are shown below this table. For example, changing the log-level requires you to fill in the log-level value before clicking the "Set" button.
Possible log-level values:
-
DEBUG
-
INFO
-
WARN
-
ERROR
-
FATAL
The status of the modify attribute operation is shown in the log window on the right side.
4.6. Refresh Information
The values are refreshed automatically when switching between the tabs. You can however force a refresh by clicking the "Refresh" button below the menu in the top of the application window.
4.7. Close Connection
If you want to close the current connection, you can find that command from the File menu.
5. JMX Configuration – Application Server
To enable remote management through JMX, you need to enable this on each application server you want to administrate.
Typically you need to add some arguments to the JVM.
| Even though the JMX technology is a standard feature within Java, we have only tested and verified the functionality against JVM provided by SUN/Oracle. If you use a JVM from IBM or another vendor, you might need to find information on how to enable JMX from the JVM vendor. |
5.1. Enable Remote Administration
To enable JMX remote management on a SUN/Oracle JVM, you need to provide the following arguments to the JVM command line:
-Dcom.sun.management.jmxremote
-Dcom.sun.management.jmxremote.host=computername.company.com
-Dcom.sun.management.jmxremote.port=7768
-Dcom.sun.management.jmxremote.authenticate=false
This will enable remote JMX support on port 7768 with authentication disabled.
5.2. Applying Security
To restrict the JMX access, you can apply some additional properties as below:
-Dcom.sun.management.jmxremote.ssl=false
-Dcom.sun.management.jmxremote.authenticate=true
-Dcom.sun.management.jmxremote.password.file=/path/jmxremote.password
-Dcom.sun.management.jmxremote.access.file=/path/jmxremote.access
This will enable authentication and it will use the specified files for password and access management.
If you don’t specify the "password.file" and/or "access.file" the default files from the following folder will be used:
$JRE/lib/management/jmxremote.access
$JRE/lib/management/jmxremote.password
It’s however easier to not modify those and instead copy these files into another location and point them out through the properties mentioned above.
| When you use authentication, the password and access files MUST be readable by the same user running the JVM process and NOT readable by anyone else. If this condition is not met, the JVM doesn’t start. This is also true for Windows environments. Please see the reference lists for information about how to manage the file permissions etc. |