set context user "creator" password ""; +
set workspace user "Global User"; +
add filter "Baselined Parts" appliesto relationship type "XBOM Baseline Part";XBOM Manager - Administration Guide : Configuration Scenarios
21 March 2016
Table of Contents
- 1. Configuration Scenarios
- 1.1. Define a new filter
- 1.2. Make engineering baselines single-level by default
- 1.3. Change the name of Manufacturing Baselines to Builds
- 1.4. Adding a new baseline purpose
- 1.5. Change the table columns in an existing table
- 1.6. Add a standard command to the menus
- 1.7. Define a new type of comparison
- 1.8. Extend baseline functionality to additional types of documents
- 1.9. Real time data in column
- 1.10. Exclude table column for comparison
1. Configuration Scenarios
This section details step-by-step how to perform certain types of configurations.
| The examples below uses filters/configuration objects stored in the database. It is recommended to use XML files instead. |
1.1. Define a new filter
Scenario: We want a filter where documents are not included.
-
Define the filter (substitute correct creator password) in MQL:
-
Add the new filter to a view in ENOVIA
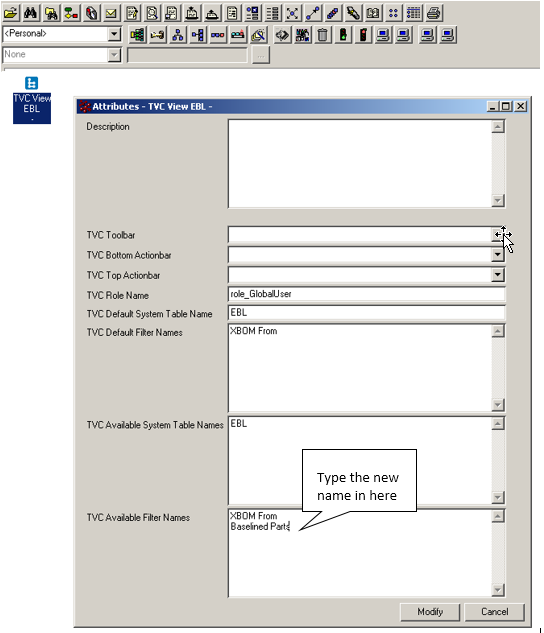 Figure 1. Adding a filter to a view
 -
Ensure the filter chooser is visible in the corresponding Page Configuration:
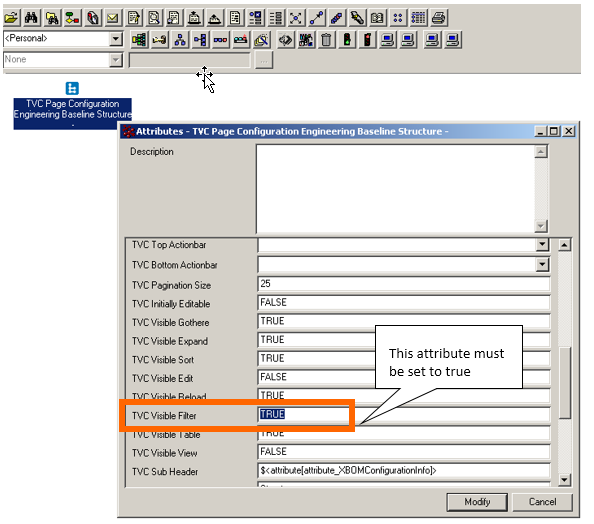 Figure 2. Resetting Visible-Filter setting on a Page Configuration
 -
Update filter definitions for all users
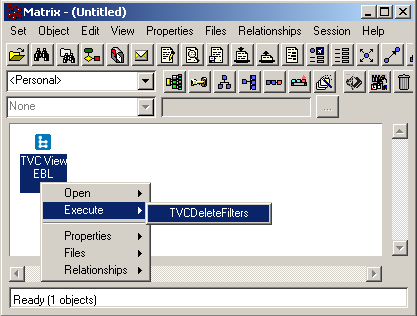 Figure 3. Managing filters on the view objects
Any filters that operate on the XBOM structure should include XBOM Baseline Part and/or XBOM Baseline Doc in order to be able to navigate the structure. You cannot simply navigate objects connected to the EBOM structure when starting out navigating the XBOM. -
Page is updated
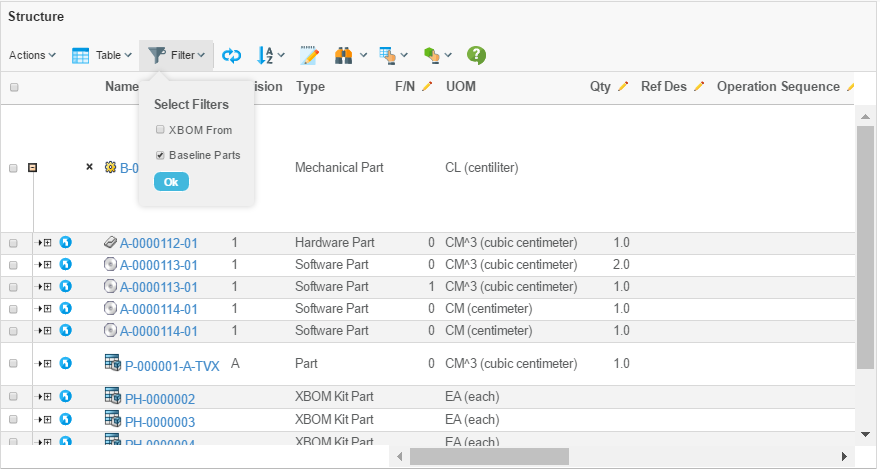 Figure 4. Filter selector with new filter
1.2. Make engineering baselines single-level by default
Scenario: The engineering baselines should only document the level immediately below the active object
-
Update Command in Business
${ROOT_DIR}/tvc-action/createXBOM?type=type_XBOMEngineeringBaseline&policy=policy_XBOMEngineeringBaseline&level=1&freeze=true
-
Reload cache in web application
 Figure 5. Reloading the cache
1.3. Change the name of Manufacturing Baselines to Builds
Changing the name of a type is easily done in Business due to the technique with symbolic names, simply access the type and change the name. In addition, some of the command labels also include the name of the type we are working with.
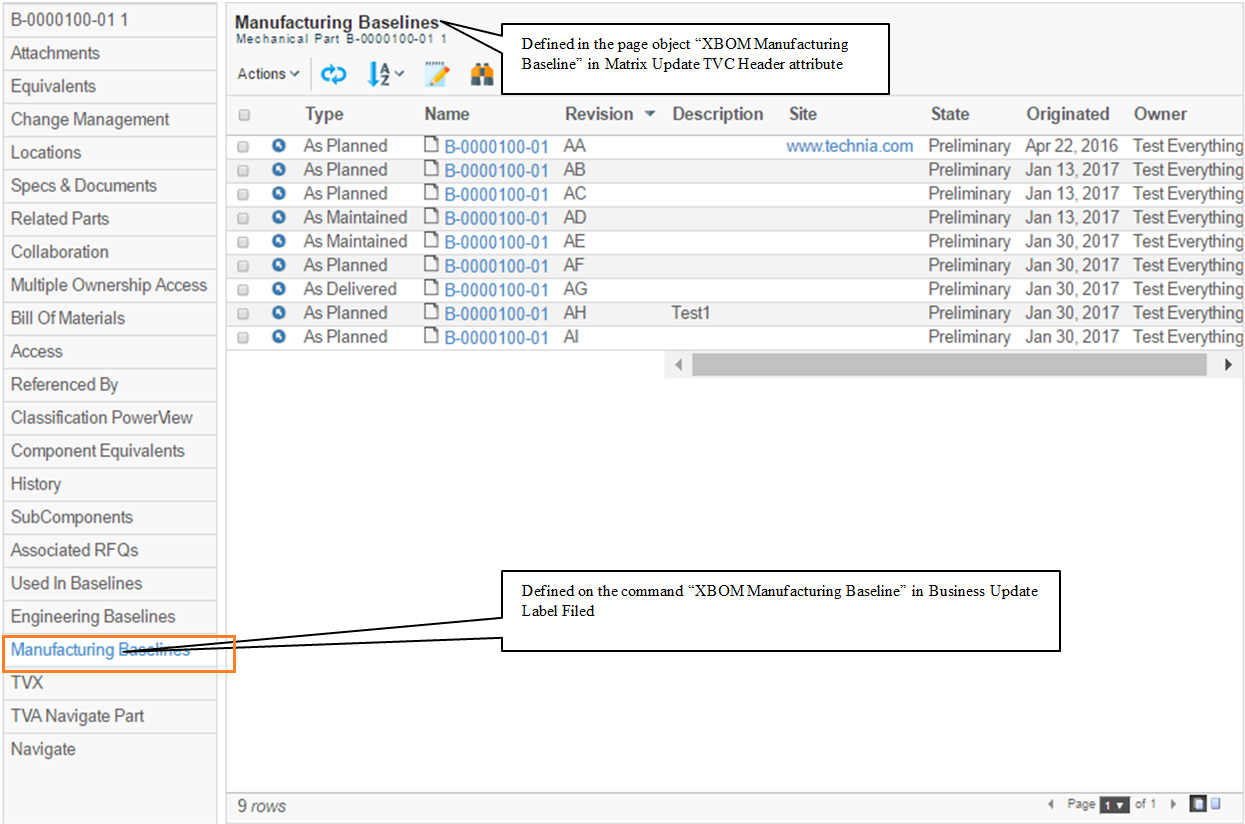
Figure 6. Updating type name on Listing page
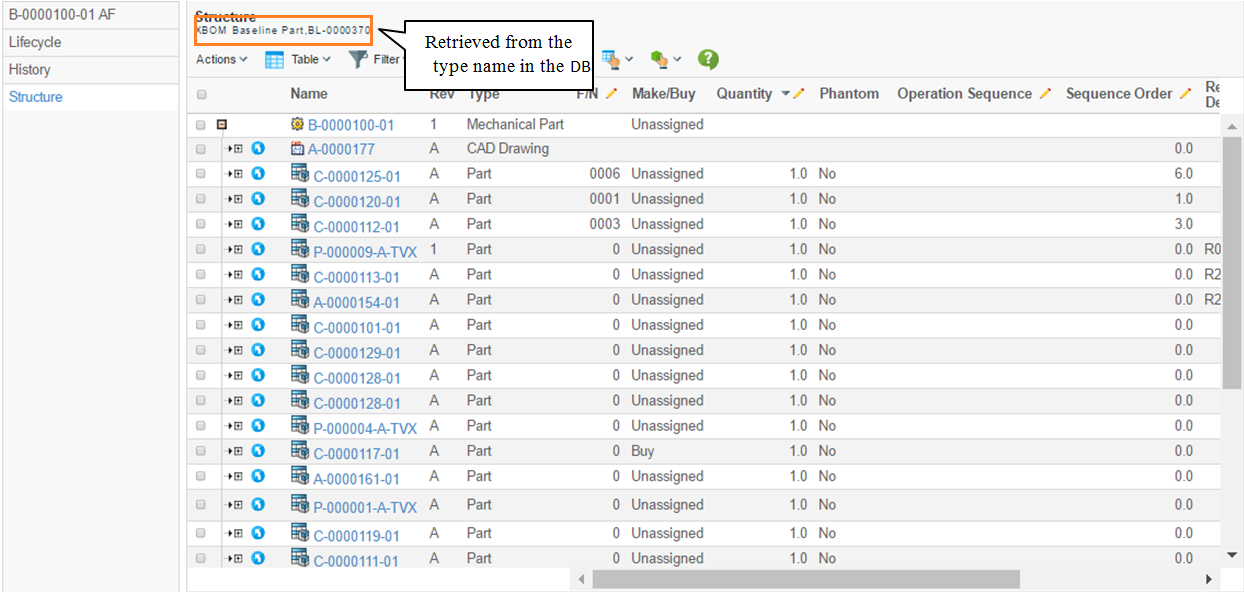
Figure 7. Updating type name on Structure page
1.4. Adding a new baseline purpose
The different purposes of the baseline are defined via an attribute on the Manufacturing Baseline type.
Scenario: We want to add an As Customized option to our baseline types.
-
Access the *XBOM Type* attribute in Business
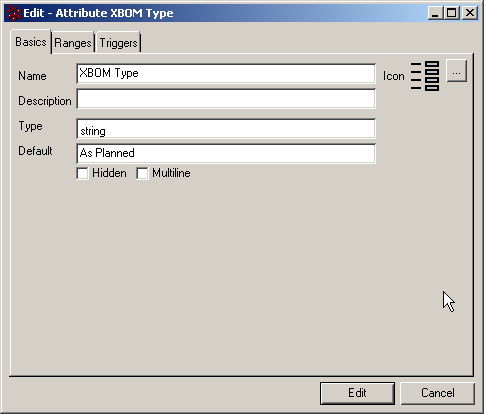 Figure 8. Attribute edit panel
 -
Update the ranges
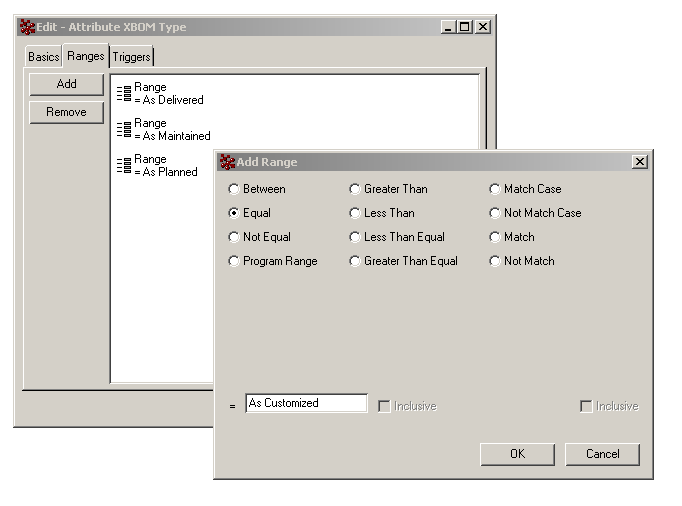 Figure 9. Range value edit panel
 -
Reload the cache and view the result in the interface
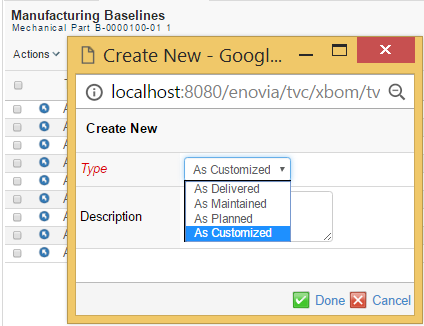 Figure 10. Create panel with new value
1.5. Change the table columns in an existing table
The tables are defined in business. When working with the baselines, it is not the actual objects being navigated, but rather the XBOM structure, and the attributes must be retrieved using expressions as detailed in previous chapter.
Scenario: We want to add the objects’ Product Make Buy Code to the MBL table
-
Retrieve the table in Business and access the columns
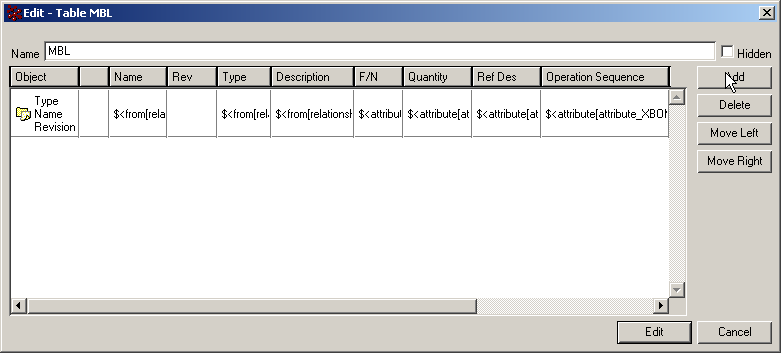 Figure 11. Table edit panel in Business
 -
Add a column called Make/Buy, and Define the expression
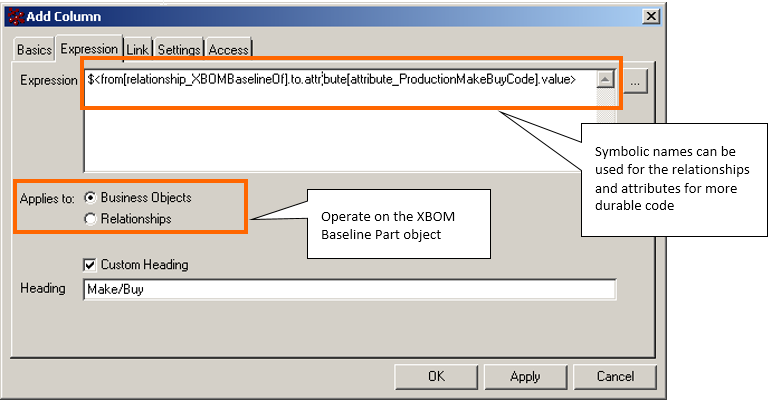 Figure 12. Column edit panel in Business
 -
Update the cache, and view the change
 Figure 13. Updated table display
1.6. Add a standard command to the menus
Commands are both general and object independent, or they will operate on the window’s main object, or they will operate on items selected in a list. When working with an XBOM structure, it is vital to remember that the objects in the table are actually the XBOM objects and not the EBOM objects whose attributes are displayed. Therefore, the most appropriate type of function is to work with the top object.
Scenario: We want to add an "Add to Collection" command in the list view
-
Find the correct menu item
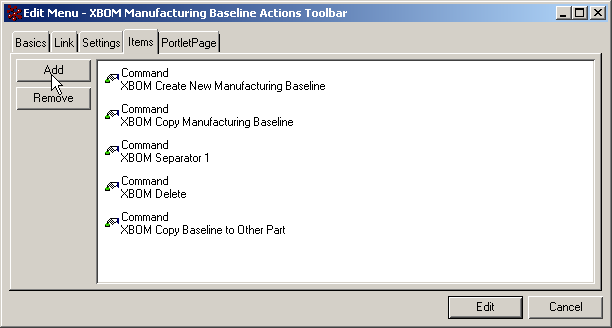 Figure 14. Menu object items list
 -
Find the desired command
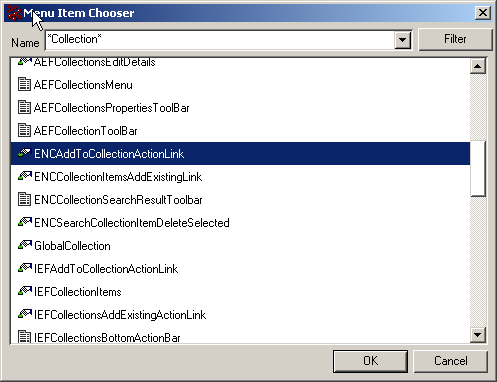 Figure 15. Menu object item chooser
 -
Ensure it operates on a selected item in a table, and that it loads to an existing frame:
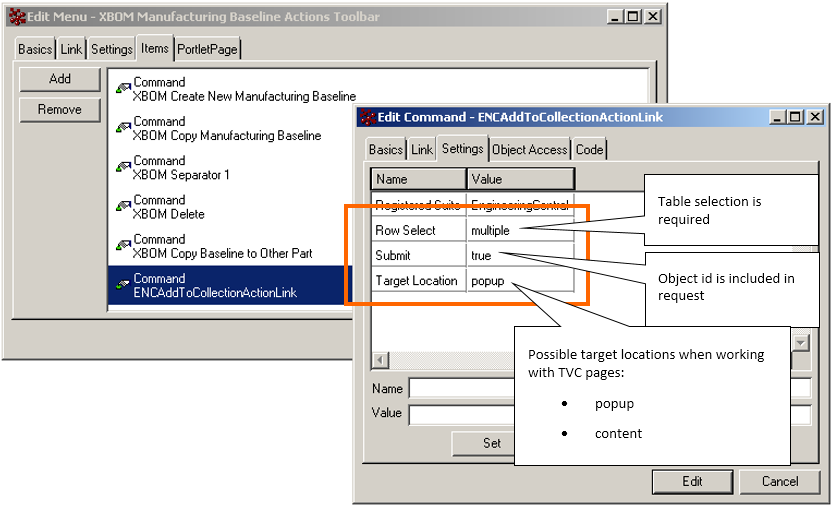 Figure 16. Command object’s settings
 -
Reload cache and view result in toolbar
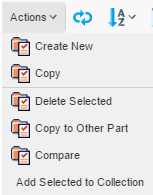 Figure 17. Updated toolbar
1.7. Define a new type of comparison
The comparison that is provided OOTB use the part number and the find number as indexes. If there is a need for a different type of comparison, this can be achieved by modifying the page object named "XBOM Compare Configuration", which holds all settings for the compare function.
1.7.1. Comparison Configuration
The comparison configuration is as mentioned above stored in a page object called "XBOM Compare Configuration". This object contains XML data that defines one or more configuration. Each configuration defines how the comparison should be done.
When the user performs the comparison, the user can select (if multiple configurations exists) the desired configuration. In order to make the decision easier, each configuration should be given a human understandable name.
Below are some descriptions for how a configuration can be defined.
First of all, the basic layout of the XML looks like:
<Configurations>
    <Configuration>
        ...
    </Configuration>
    <Configuration>
        ...
    </Configuration>
    ...
</Configurations>
E.g. the top level element is "Configurations" and each configuration is placed within the "Configuration" element below this top level element.
Looking into a Configuration, the first thing to consider is for what type of objects this configuration applies to. This is configured via the "ForTypes" element as shown below:
<Configuration>
    <ForTypes>
        <Type>type_Part</Type>
    </ForTypes>
The next thing to specify is how the data in the structure should be expanded. Below is an example:
<ExpandSpec>
    <Direction>from</Direction>
    <RelationshipTypes>
        <Type>relationship_EBOM</Type>
        <Type>relationship_PartSpecification</Type>
    </RelationshipTypes>
    <RelationshipWhere></RelationshipWhere>
    <XBOMRelationshipTypes>
        <Type>relationship_XBOMBaselinePart</Type>
        <Type>relationship_XBOMBaselineDoc</Type>
    </XBOMRelationshipTypes>
    <XBOMRelationshipWhere></XBOMRelationshipWhere>
</ExpandSpec>
This section defines how the structure is expanded. Note that you must both specify how the XBOM baseline structure is expanded and how the real structure should be expanded. This is differentiated by using the "XBOM" prefix on the elements.
The next thing to consider is how the comparison tool should be able to identify one row in one structure with the matching row in the other structure. This is accomplished by defining so called "Keys".
The key is defined within the KeySpecs element, and each key is defined under the KeySpec element. An example is shown below:
<KeySpecs>
<KeySpec>
<RelationshipType>relationship_EBOM</RelationshipType>
<RelationshipType>relationship_XBOMBaselinePart</RelationshipType>
<Key relationship="true">$lt;attribute[attribute_FindNumber]></Key>
</KeySpec>
<KeySpec>
<RelationshipType>relationship_PartSpecification</RelationshipType>
<RelationshipType>relationship_XBOMBaselineDoc</RelationshipType>
<Key>type</Key>
<Key>name</Key>
</KeySpec>
</KeySpecs>The above configuration snippet defines that for EBOM connections, the "Find Number" attribute is the only part of the key.
For Part Specifications however, the key consists of "type" and "name" of the object.
The key is used to identify rows that has been added or removed from one structure.
Further on, in order to be able to detect modifications, in addition to finding removed/added rows, one need to define one or more fields that is being used for the comparison.
A field is defined within the Fields element, example is shown below:
<Fields>
<Field>
<Label>Type</Label>
<Expression>type</Expression>
</Field>
<Field>
<Label>Name</Label>
<Expression>name</Expression>
</Field>
<Field>
<Label>Rev</Label>
<Expression>revision</Expression>
<CompareUnless>
<Relationship>relationship_EBOM</Relationship>
<Relationship>relationship_XBOMBaselinePart</Relationship>
</CompareUnless>
</Field>
<Field comparable="false">
<Label>Descr</Label>
<Expression>description</Expression>
</Field>
<Field relationship="true">
<Label>F/N</Label>
<Expression>$lt;attribute[attribute_FindNumber]></Expression>
<CompareIf>
<Relationship>relationship_EBOM</Relationship>
<Relationship>relationship_XBOMBaselinePart</Relationship>
</CompareIf>
</Field>
</Fields>The field should be given a "Label" and an "Expression". The expression is a standard ENOVIA selectable expression.
Moreover, the field could be used for display purpose only, and not being a part of the Comparison. In that case, add the "comparable" attribute on the Field and set it to false.
In addition, a field could be defined to be comparable only for certain relationship-types. This is accomplished by using the "CompareIf" or "CompareUnless" elements.
Finally, the configuration should be given a friendly name. This is done by:
<DisplayName>Standard Comparison</DisplayName>
The display name can be specified for multiple languages, like:
<DisplayName>Standard Comparison</DisplayName>
<DisplayName locale="de">...</DisplayName>
<DisplayName locale="sv">...</DisplayName>
Note that you should always specify a display name without a locale, as this will be used for any user that uses a language that hasn’t a corresponding display name.
1.7.2. Advanced Settings
Some additional settings exist in order to allow doing more advanced configurations.
-
Considering the Phantom attribute. This is configured like below:
<Configuration considerPhantom="true | false">This can be used define if to consider if the phantom attribute has be set on a baseline object. When set to true, the comparison engine will (if a baseline is compared to the real structure) not process levels that has "Phantom = No".
Default is true.
-
Showing multi level changes; e.g. also showing rows below added or removed rows as being added or removed. This is configured like below:
<Configuration showMultiLevelChanges="value">Possible values are
-
always | yes | true
-
when-comparing-xbom-xbom
-
when-comparing-xbom-ebom
-
never | no | false
The first and last value is self explaining. The other values results in that the "showMultilevelChanges" evaluates to true in the case when the user is expanding an XBOM structure against another XBOM structure, or in the second case when comparing an XBOM structure against the "real structure".
-
-
Editing of changes within the comparison result can be enabled. By default, there is a built-in table that can be used for this purpose. However, it is possible to override this and use a custom table by specifying the name of the custom table:
<Configuration editTable="Name of table"> -
In some cases, when the comparison engine tries to match a row from the source structure with a row in the target structure, there might be multiple matches. This could typically happen if the data is not correct or for some other reason. You can specify how these rows should be treated. They can either be treated as being "invalid" or the comparison engine can match one of the rows and mark the others as being added. This is configurable through:
<Configuration treatInvalidRowsAsAdded="true | false">The default value is true.
-
In some cases, each structure of a sub-assembly is needed to be treated independently within BOM like as-built or as serviced XBOM mode. In other words, it is needed that the structure of a sub-assembly shall be modified without impacting any other instance of the same sub-assembly in BOM. This can be enabled by using the As-Built feature in XBOM.
<AsBuilt>true | false</AsBuilt>The default value is false.
1.8. Extend baseline functionality to additional types of documents
The baseline functionality will traverse the Part Specification link to include documents. If the Part Specification link has been amended to include other types of documents than the OOTB CAD Model, CAD Drawing and Drawing Print, these new types can also be included in the baseline.
| using a new type as a reference document will require other UI and policy updates not covered in this document. Doing this incorrectly can lead to follow-on errors in parts of Engineering Central, especially concerning Releasing and ECOs. |
-
Add the new type to the Part Specification relationship.
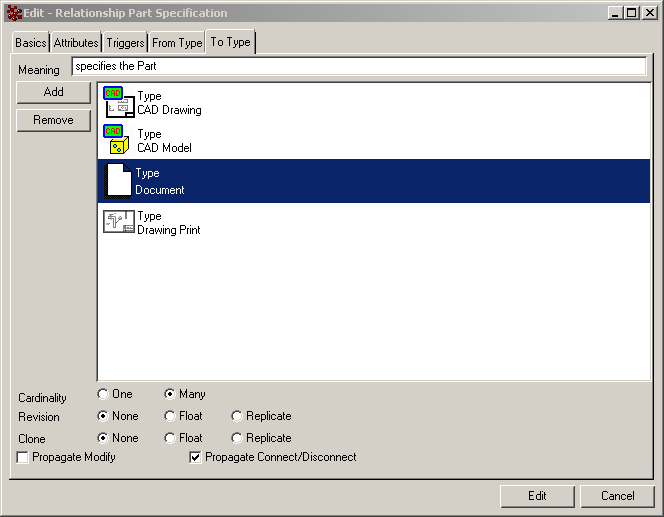 Figure 18. Part Specification relationship edit page
 -
Add the new type to the XBOM Baseline Doc relationship:
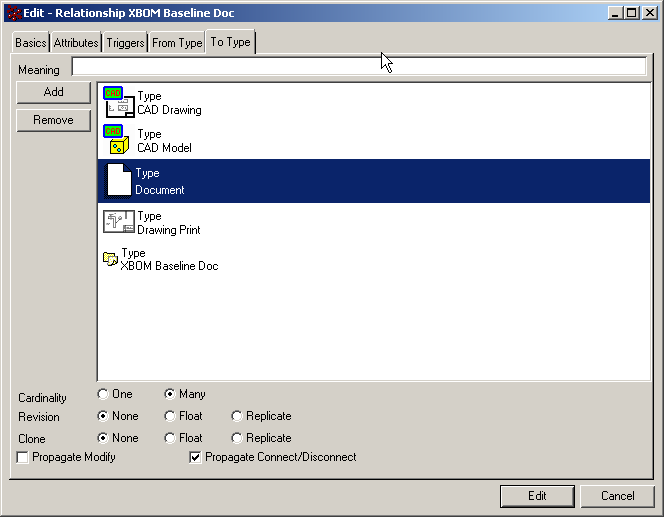 Figure 19. XBOM Baseline Doc Relationship edit page
 -
Verify that the XBOM Baseline Of relationship manages DOCUMENTS, and hence will not require updating.
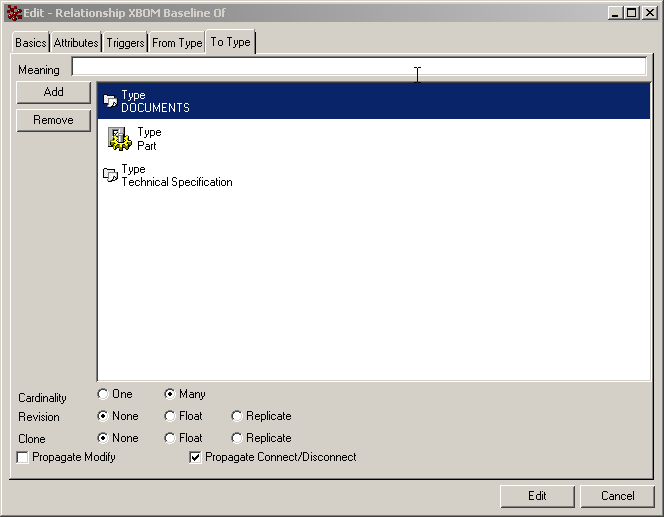 Figure 20. XBOM Baseline Of relationship edit page
 -
An EBOM structure that contains the new type can now be baselined correctly, and includes the new type.
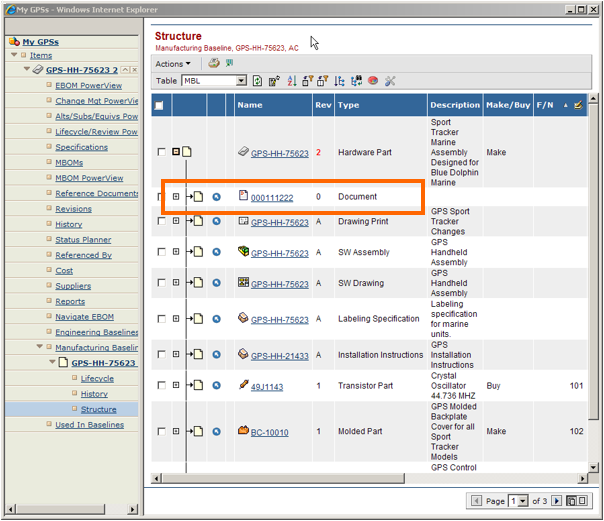 Figure 21. Baseline now includes the new type
| Baselines are supporting PLMReference type objects. |
1.9. Real time data in column
There can be a situation when it is needed to show basline data mixed with some real time data from Enovia database. To support this, a setting XBL Data can be configured on table columns to control whether the data should be pulled from xbom baseline or fetched from Enovia database.
<Setting name="XBL Data" value="false"/>
Default value of XBL Data is true, which means by default column data will be pulled from xbom baseline. Set XBL Data to false, if column data should be fetched from Enovia database.
Example -
<Column>
<Name>Material Category</Name>
<Expression>$<attribute[attribute_MaterialCategory].value></Expression>
<Label>Material Category</Label>
<RegisteredSuite>EngineeringCentral</RegisteredSuite>
<Setting name="XBL Data" value="false"/>
</Column>| Columns showing real time data cannot be edited from XBL table. When using a custom datahandler, make sure cell values are also updated for empty non editable cells. When an object is deleted or connection is removed in Enovia database, no real time data will be shown for that row. |
Figure 22. Column with real time data
1.9.1. Disable lazy loading
When column data is fetched from Enovia database, to avoid performance overheads, table column data is lazy loaded by default. Real time data from Enovia database is fetched as user navigates through pages for visible rows only. If it is desired that data for all rows should be fetched in one go, evaluation of current page only can be disabled by setting evalCurrentPage parameter to false in pageConfig.
<PageConfig>
    ...
    <Parameters>
		<Parameter name="evalCurrentPage" value="false" />
	</Parameters>
When baseline is opened via table link navigation, it can be set with parameter gothere:evalCurrentPage as shown below on baselines table pageConfig -
    <Parameters>
        <Parameter name="tableLinkFactory" value="com.technia.tvc.xbom.xbl2.util.BaselinesLinkFactory"/>
        <Parameter name="gothere:evalCurrentPage" value="false"/>
    </Parameters>
1.10. Exclude table column for comparison
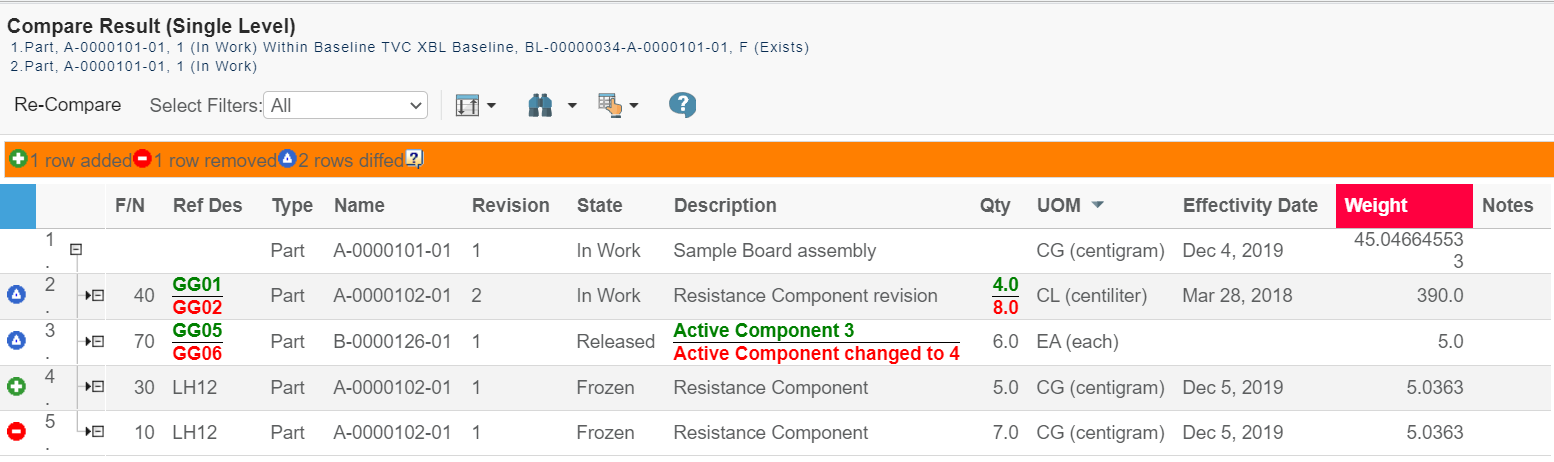
XBL comparison result table can be configured to exclude column(s) for comparison.
Below setting can be added at table column level to exclude the column for comparison. By Default, this setting is true.
<Setting name="Comparable">false</Setting>
As a sample, below tables dispaly the scenario when column "desciption" is comparable and when it is not.
With description comparable:
Without description comparable:
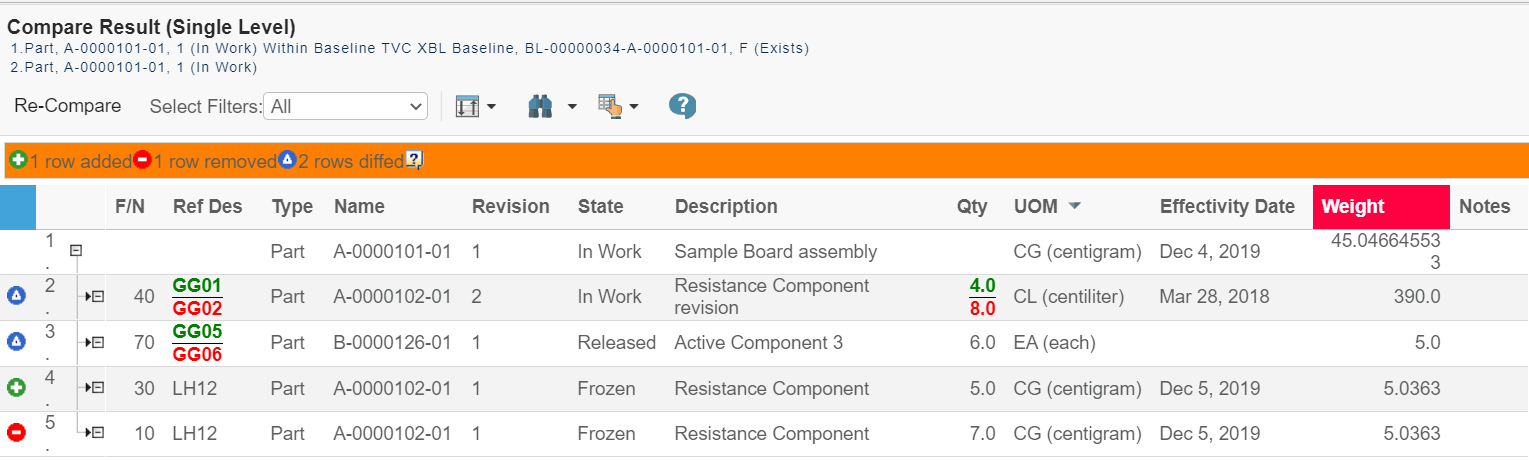
Adding Comparable = false setting in Description column as shown below, has excluded the column from comparison result.
	<Column>
	    <Name>Description</Name>
	    <Expression>description</Expression>
	    <Label>Description</Label>
	    <Setting name="Comparable">false</Setting>
	</Column>