<ColumnType>tnr</ColumnType>
Structure Browser - Administration Guide : Using Data Handlers to Retrieve Column Values
30 March 2016
1. Using Data Handlers to Retrieve Column Values
As it is very expensive to execute a JPO (Java Program Object)[multiblock footnote omitted], another strategy to retrieve column values was implemented in TVC 5.2.0. The new strategy will result in faster evaluation of a table, and reduce unnecessary data base calls.
To enable this feature, you must have to set the Data Handler Class
setting on a table column. The value should be the fully qualified name
of a class which implements an interface called
com.technia.tvc.core.db.table.evaluator.DataHandler. The custom class
must also be available for the application class-loader.
| As of TVC 6.1, you will have the possibility to use so called "Table Cell Renderer’s", which can be used to format the data dependent on where it is being viewed. For example, in the HTML view, the cell is rendered in one way with HTML formatting instructions, but in a table export or printer friendly view, the data can be formatted differently since the HTML tags is for example not affecting the PDF format nor the export format. |
This document does not contain any details related to how to implement data handlers and cell renderer’s. Please consult the developer documentation, which is a part of the TVC documentation set, for more information and code examples of both data handler’s and cell renderer’s.
The built-in data-handlers and cell-renderers with their settings are described in the sub-chapter below:
1.1. Built-In Data Handler’s and Cell Renderer’s
There are a couple of built-in data handlers and cell renderers that you can use in your tables. All of them are described in the chapters below.
1.1.1. Type Name Revision (Object)
This data handler and cell renderer will retrieve the type, name, revision and possibly all other revisions and display them within the same cell.
To use this column, apply the following setting to the table column:
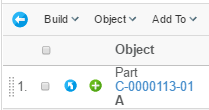
Figure 1. Type Name Revision in the same cell
Following settings are supported:
| Setting | Description | Value |
|---|---|---|
Show All On One Row |
Can be used to define if all information should be drawn on the same row. If this setting is set to true, then the "Show Revisions" setting will be forced to false. |
True / False |
Target Location Revisions |
Defines the target location for the link that appears on the revisions |
popup |
Target Location |
Defines the target location for the link that appears on the name of the object |
popup |
Show Type |
Whether or not to show the type |
True / False |
Show Name |
Whether or not to show the name |
True / False |
Show Revision |
Whether or not to show the revision |
True / False |
Show Revisions |
Defines if to show all revisions, or just the current one. |
True / False |
Highest Revision Count |
The number of "highest" revisions to show. -1 means all. |
-1 |
Previous Revision Count |
The number of "previous" revisions to show. -1 means all. |
-1 |
Show Revisions State |
Whether or not to also show the state for each revision as a tooltip. |
True / False |
Show More |
Whether or not a link should be added, containing information about the revisions. |
False / True |
Jumped Over Indicator |
The indicator used for indicating jumped over revisions |
|…| |
Previous Indicator |
The indicator used for indicate that previous revisions has been dropped. |
…| |
Sort By Type |
Whether or not sorting should sort by the type value of not. |
True / False |
Check Revision |
Whether or not to check if the revision starts with "auto_" or has more than 8 characters |
True / False |
1.1.2. Date Time
This data handler / cell renderer can be applied to any column that is displaying a date values retrieved from Matrix. Hence, you need to specify an expression within the column definition of the table, for example:
$<attribute[attribute_EffectivityDate]> or modified in order to be able
to use this data handler / cell renderer.
To use this column, apply the following setting to the table column:
<ColumnType>date</ColumnType>
Or
<ColumnType>datetime</ColumnType> <!-- Force the setting Display Time to true -->
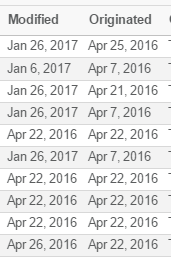
Figure 2. Date Time Column
Following settings can be used to define the behaviour of this column:
| Setting | Description | Value |
|---|---|---|
Timezone Aware |
Whether or not to convert the date time to the users time-zone. |
True / False |
Display Duration |
Whether or not to display the duration |
True / False |
Display Time |
Whether or not to display the time |
True / False |
Pattern |
A custom pattern used to format the date time value. NOTE: Pattern will ignore the “Display Duration” and “Display Time” settings. |
Valid Java SimpleDateFormat |
Date Style |
Defines the amount of information to show for the date. Default is Medium |
Short, Medium, Long or Full |
Time Style |
Defines the amount of information to show for the time. Default is Medium |
Short, Medium, Long or Full |
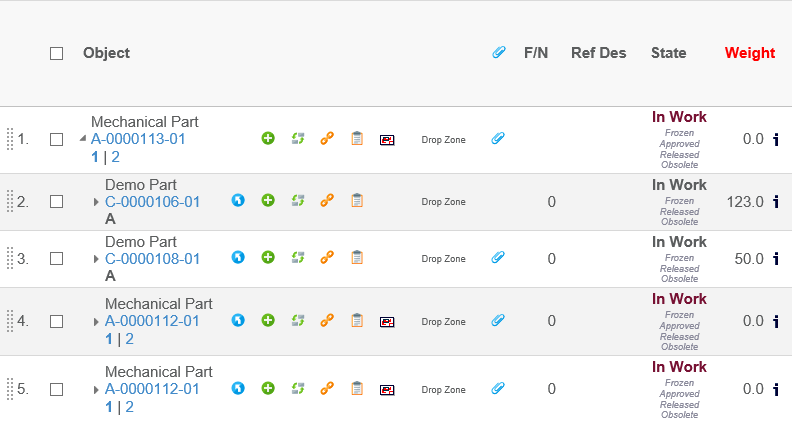
1.1.3. Lifecycle
This data handler / cell renderer will display the current state of the object and allowing to display the previous / next state names. The current state can also be styled dependent on the state value.
To use this column, apply the following setting to the table column:
<ColumnType>state</ColumnType>
Or
<ColumnType>lifecycle</ColumnType>
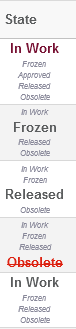
Figure 3. Lifecycle cell
Following settings can be used to define the behaviour of this column:
| Setting | Description | Value |
|---|---|---|
Show Following |
Whether or not to show the following state(s) |
True / False |
Show Previous |
Whether or not to show the previous state(s) |
True / False |
State.<state-name> |
Defines the style for a particular state. |
State.state_Obsolete = color:#d21;text-decoration:line-through; |
1.1.4. Find Number
This data handler /cell renderer is used to ensure that a find number is unique and formatted according to the settings specified.
To use this column, apply the following setting to the table column:
<ColumnType>fn</ColumnType>
Or
<ColumnType>findnumber</ColumnType>
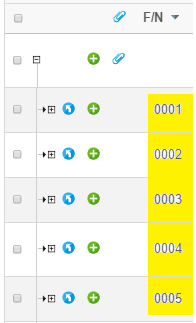
Figure 4. Find Number Cells
Following settings can be used to define the behaviour of this column:
| Setting | Description | Value |
|---|---|---|
Store Formatted Value |
Whether or not to store the value in the database according to the specified "number of digits" |
True / False |
Number of Digits |
The number of digits, which the find number at least will be presented in |
0 |
1.1.5. Reference Designator
This data handler /cell renderer is used to ensure that an entered reference designator is both valid and unique as well as formatted correctly.
To use this column, apply the following setting to the table column:
<ColumnType>refdes</ColumnType>
Or
<ColumnType>referencedesignator</ColumnType>
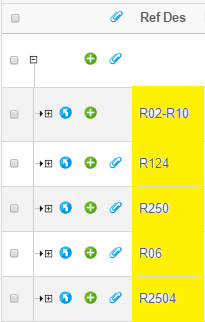
Figure 5. Reference Designator Cells
Following settings can be used to define the behaviour of this column:
| Setting | Description | Value |
|---|---|---|
Split Chars |
The characters used for splitting the RD values. Please note that a setting value is trimmed by Matrix. To enter white-space characters, simply store the value in quoted form. Example: ", " |
", " |
Split Chars in DB |
The stored value can have different split characters than used for display. This setting will only be used if either the setting "Save Optimized" or "Save Exploded" is true. |
"," |
Allow Mixed Labels |
Whether or not mixed labels are allowed for the same RD value |
True / False |
Number of Digits |
The number of digits used to format the numeric part of the RD. Example: If the RD is stored as R1-R3 and this setting is set to "3". It will be formatted as: R001-R003 |
0 |
Warn If Empty |
Whether or not the user should be warned if an empty value is entered |
True / False |
Check Uniqueness |
Whether or not the uniqueness of the entered RD value should be checked |
True / False |
Save Optimized |
Whether or not the entered value should be stored in optimized form. Example: If the RD is entered as below: R1,R2,R3,R8,R9,R10 It will be saved as: R1-R3, R8-R10 |
True / False |
Save Exploded |
True or false if the value should be saved "exploded" in the DB. Example: If the RD is entered as below R1-R3,R8 It will be saved as: R1,R2,R3,R8 |
True / False |
Save As Entered |
True or false if the value should be saved "as entered" in the DB. This is the default saving format. |
True / False |
Export Exploded |
True or false is the value should be "exploded" on table exports |
True / False |
1.1.6. Actual or Scheduled Dates
This data handler /cell renderer is used to show either actual or scheduled dates for an object. Scheduled dates can also be edited, if the column is editable and the user has "schedule" access.
To use this column, apply the following setting to the table column:
<ColumnType>statedate</ColumnType>
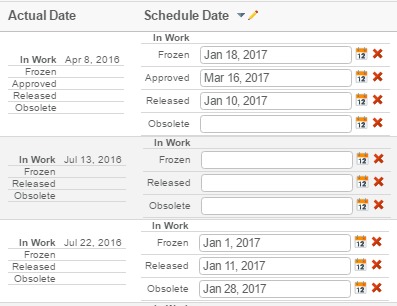
Figure 6. Cells Showing Actual and Scheduled Dates
Following settings can be used to define the behaviour of this column:
| Setting | Description | Value |
|---|---|---|
Show Scheduled |
Whether or not the column should show the scheduled date. |
True / False |
1.1.7. 3D Play
Since 2017x 3DPlay is available inside 3DSpace.
3DPlay provide a consistent look and feel across all apps, and allow any user of
the platform to view high quality 3D models in the web browser.
We have added a column type that interacts with 3D PLay. As for now it is loaded from parts and the natural place to enable it is on EBOM views. To use this column, apply the following setting to the table column:
<ColumnType>3dplay</ColumnType>
If the part has a drawing attached to it, you will be able to launch it by pressing the play button.
If there’s no drawing attached to the part, the button won’t be rendered.
To enable cross highlight you need to enable checkboxes in the pageconfiguration.
<RowSelect>multiple</RowSelect>
Note: Cross highlight works for V6 data from 2017x release. You can still launch the player from the 2016x with V5 and V6 data.
1.1.8. Attributes with Dimensions
This data handler /cell renderer can be used for those attributes that has a dimension (Matrix 10.7 feature) associated.
To use this column, apply the following setting to the table column:
<ColumnType>dimension</ColumnType>
Above is an example column showing the attribute Weight, which has a dimension associated. The image right to the value will, upon click, show the conversion table (shown below). This is enabled by the setting "Allow Show More".
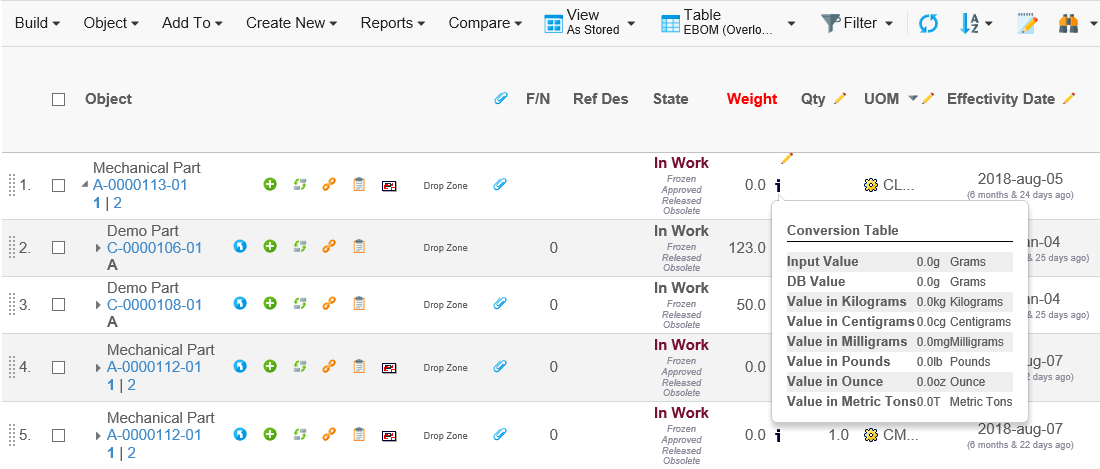
This table shows the value (and unit) as it was entered when it was last modified, as well as the value (and unit) as it is stored in the database. The other rows shows the value converted into all the defined units defined. Following settings can be used to define the behaviour of this column:
| Setting | Description | Value |
|---|---|---|
Show Normalized |
Whether or not to show the normalized value |
True / False |
Show Entered |
Whether or not to show the entered value |
True / False |
Show Unit |
Whether or not the unit should be shown. The unit will only be shown, if either one of the settings "Show Normalized" or "Show Entered" is true. |
True / False |
Min Fraction Digits |
The minimum fraction digits |
1 |
Max Fraction Digits |
The maximum fraction digits |
8 |
1.1.9. Inline Connect
This data handler/cell renderer can be used for enabling "inline connect" to / from an object in the table.
To use this column, apply the following setting to the table column:
<ColumnType>newrow</ColumnType>
The column will show input fields for those rows, where the user can connect the object. The user enters the name of the object to be inserted, and when the field is "leaved"; the update is performed.
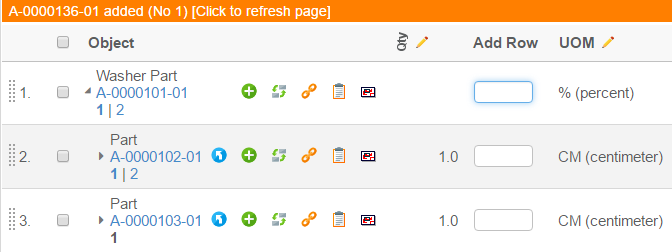
As soon as an object has been connected, the user is notified with a message above the table (as illustrated above). Once the user is completed with the task; e.g. added all the objects, the user can click in the yellow area to reflect the changes in the shown structure.
Following settings can be used to define the behaviour of this column:
| Setting | Description | Value |
|---|---|---|
Relationship |
The name of the relationship to be used for the creation of connections. |
Undefined by default. A value needs to be assigned. |
From |
Whether or not if the connected object should be connected from the object in the table or to. |
True / False |
Type Pattern |
The type pattern that will be used in the query. Note that this value cannot contain symbolic type names, as the type pattern can contain wildcards. |
|
Valid States |
A comma separated list of states, which the item to be connected must conform to. |
|
Allow Wildcard |
Whether or not wildcards such as * or ? are allowed in the name pattern (the entered value from the input field) |
True / False |
1.1.10. Object Link
A new column type has been added, which will generate a column give an icon that, upon click, will show the link to the object. This link can then be copied and used as a short cut to the object page, or be used in an email message.
To use this column, apply the following setting to the table column:
<ColumnType>objectlink</ColumnType>
The value used as identifier for object links can be controlled using the init param tvc.core.objectlink.identifier. The following values are supported tnr, physicalid, objectid.

1.1.11. Progress
A column type showing the progress of something has been added. An example of how this progress column can look like is shown in the screen capture below:

This example shows the progress of the EBOM; e.g. how many percent of the first level is completed.
The column that generated this output was defined like below:
<Column>
    <Name>progress</Name>
    <CellShowableExpression>type.kindOf[Part]</CellShowableExpression>
    <Expression><![CDATA[
        $<from[relationship_EBOM].to.evaluate[current matchlist 'Release,Complete' ',']>
    ]]></Expression>
    <ColumnType>progress</ColumnType>
    <Setting name="Show Text" value="false"/>
    <Setting name="Progress Width" value="60"/>
</Column>
The column type for this column is "progress". And this will force the usage of the following data handler and cell renderer:
- Data Handler
-
com.technia.tvc.structurebrowser.examples.ProgressDataHandler - Cell Renderer
-
com.technia.tvc.structurebrowser.examples.ProgressCellRenderer
The default datahandler that is used here will for the given expression calculate how many values retrieved for the expression equals to true compared to how many that equals to false. E.g. the expression used above will from MQL give output like below:
MQL<9>pri bus Part EV-000007 A select from[EBOM].to.evaluate[current matchlist 'Release,Current' ','];
business object Part EV-000007 A
from[EBOM].to.evaluate[current matchlist 'Release,Current' ','] = TRUE
from[EBOM].to.evaluate[current matchlist 'Release,Current' ','] = FALSE
from[EBOM].to.evaluate[current matchlist 'Release,Current' ','] = FALSE
from[EBOM].to.evaluate[current matchlist 'Release,Current' ','] = TRUE
from[EBOM].to.evaluate[current matchlist 'Release,Current' ','] = FALSE
from[EBOM].to.evaluate[current matchlist 'Release,Current' ','] = FALSE
E.g. in this case 2 of 6 items evaluated to true (33%).
The cell renderer that shows the progress expects that the value in the cell is a numeric value between 0 and 100. So in case you have an attribute holding a percentage value OR you have some other way to calculate the progress, you can re-use the cell-renderer to that column and apply your own logic to provide the percentage value.
The progress column has a number of settings available; these are described in the table below:
| Setting | Description | Value |
|---|---|---|
Progress Width |
The width of the progress bar. This must be a value between 20 and 120. |
60 |
Show Text |
A Boolean defining if the percentage value should be displayed in text next to the progress bar. |
True False |
Text Format |
The formatting instruction to be applied on the value. This is used to create the tooltip and optionally the text shown to the right unless the "Show Text" setting is set to false. The formatting is used by using the String.format in Java. |
%.0f %% |
Green Threshold |
A threshold is a value between 0 and 100 (inclusive) that defines when the value (the progress value) is satisfying a particular colour. Let’s say that you define 50 as threshold; if your value is 50 or above, the progress bar will get that colour. The highest matched Colour will be used. If you assign a negative value to the threshold for a particular colour, that colour will not be used in the progress bar. |
Number 0-100 (negative value disables the colour). |
Yellow Threshold |
See above |
|
Orange Threshold |
See above |
|
Red Threshold |
See above |
If no threshold values are given, the following will be used by default:
-
Green = 80
-
Yellow = 60
-
Orange = 40
-
Red = 0
This can be translated in:
-
If the value is in the range 0⇐40, red colour is used.
-
If the value is in the range 40⇐60, orange colour is used.
-
If the value is in the range 60⇐80, Yellow colour is used.
-
If the value is 80 or above, green colour is used.
1.1.12. Related Object with Condition
Adding a column to a table that shows related object information is quite easy to accomplish in the Structure Browser with a standard expression. However, if you want to select information from a particular object based upon a condition then it could result in some problems.
A common way to solve this is to use an expression like below.
<Column>
    <Expression>from[rel|to.attribute[X] == 'abc'].to.name</Expression>
</Column>
This works OK in some cases, but if you start to add more columns in the same table with similar expressions like shown below, then you will run into some problems.
<Column>
    <Expression>from[rel|to.attribute[X] == 'abc'].to.name</Expression>
</Column>

<Column>
    <Expression>from[rel|to.attribute[X] == 'def'].to.name</Expression>
</Column>
The reason for this is that when you select data with these kind of select statements, ENOVIA will in the result hide the "where clause" making it impossible to map the value back to it’s select statement. The MQL example below illustrates this.
<MQL> pri bus 56328.52446.25457.29684 select from[EBOM|to.name == 'EV-002131'].to.name from[EBOM|to.name == 'EV-002132'].to.name;
    business object Part EV-002130 A
    from[EBOM].to.name = EV-002131
    from[EBOM].to.name = EV-002132
If you compare this to having two columns in a table, where the first column does the first select and the second the second select, you will in the result get both values in both columns.
So in case you have this scenario, you would earlier have to implement a data handler that selects the required data and perform your logic that decides what to include in the cell in there. As of TVC 2011.3.0, we added a datahandler that solves this.
An example of how to use this new datahandler is shown below.
<Column>
<ColumnType>relatedobject</ColumnType>
<Setting name="Relationship" value="relationship_EBOM"/>
<Setting name="Direction" value="from"/>
<!--<Setting name="Type" value="type_Part"/>-->
<Setting name="Select" value="$<attribute[attribute_EffectivityDate]>"/>
<Setting name="Object If" value="name == 'EV-002133'"/>
</Column>This datahandler accepts a number of settings, described in the table below:
| Setting | Value | Description | Required |
|---|---|---|---|
Direction |
From or To |
Defines the direction of the related object. |
No (default is from) |
Relationship |
relationship_EBOM |
The relationship type |
Yes |
Type |
type_Part |
The type of object to include |
No |
Select |
$<attribute[name]> |
The value to select. NOTE: If the prefix of this value is "REL:", then the select will be applied on the relationship instead of the object, which is the default. |
No (default is "name"). |
Object If |
An expression |
The expression to be evaluated on the business object |
No. However, either object-if or relationship-if is typically used for this datahander otherwise you can define an ordinary expression without the need of using this datahandler. |
Relationship If |
An expression |
The expression to be evaluated on the relationship |
See "Object If" |
Set Relationship Attribute Names |
attributeName1,attributeName2 Route Base Purpose,Route Base State |
Can be used to set/update the relationship attribute values during the creation/modification of the connection. Can pass a comma-separated list of attribute names for updating multiple attributes at once. This setting only works in conjunction with the Setting The number of attribute names configured for this setting must be equal to the number of values configured for the Setting |
No |
Set Relationship Attribute Values |
attributeValue1,attributeValue2 Approval,state_InApproval |
Can be used to set/update the relationship attribute values during the creation/modification of the connection. Can pass a comma-separated list of attribute values for updating multiple attributes at once. This setting only works in conjunction with the Setting The number of attribute values configured for this setting must be equal to the number of attribute names configured for the Setting |
No |
Calculate Count |
True or False |
Can be used to calculate the number of related objects that matches the conditions. |
No. Default is false. |
Calculate Percentage |
True or False |
Can be used to calculate how many percent of the related objects that matches the conditions. |
No. Default is false. This setting can be used together with the progress renderer. |
A note about the "expression" used in the "Object If" and "Relationship If" setting: This expression can be tested in MQL by doing:
print bus 1.2.3.4 select evaluate[THE EXPRESSION] dump;
It should either return TRUE or FALSE. Example:
print bus 1.2.3.4 select evaluate[current matchlist 'Release,Complete' ','] dump;
The relatedobject columntype has built-in support for autocomplete. See the Autocomplete chapter in Core Admin Guide for details on how it’s configured.
Example where users connect an ECO. The dataset specifies the possible values.
<Column xmlns="http://technia.com/TVC/Table"
        xmlns:xsi="http://www.w3.org/2001/XMLSchema-instance"
        xsi:schemaLocation="http://technia.com/TVC/Table http://products.technia.com/tvc/schema/latest/TableColumn.xsd">

    <Name>ECO</Name>
    <Label>ECO</Label>
    <GroupHeader>Engineering Changes</GroupHeader>
    <Editable>true</Editable>
    <Setting name="Relationship" value="relationship_AffectedItem" />
    <Setting name="Direction" value="to" />
    <Setting name="Select" value="name" />
    <Setting name="Type" value="ECO" />
    <MatchRangeOnObjectId>true</MatchRangeOnObjectId>
    <ColumnType>relatedobject</ColumnType>
    <ShowAlternateIcon>true</ShowAlternateIcon>
    <Href>${COMMON_DIR}/emxTree.jsp?mode=insert</Href>
    <AutoCompleteHandler>dataset</AutoCompleteHandler>
    <AutoCompleteSettings><![CDATA[{
        handler : {
            dataset : 'tvc:dataset:tvx:enc/ECOs.xml'
        }
    }]]></AutoCompleteSettings>
</Column>
Note that the column is editable.
1.1.13. Path Type Object/Relationship with Condition
Adding a column to a table that shows Path related object/relationship information is to accomplish in the Structure Browser with Path type setting. In place of using relationship, path is used to define the dependecy between object/relationship in some of the scenarios. Path information uses the physicalid to store the element information.
A common way to retrieve path related information by using following query.
<MQL> query path type "Proposed Activity.What" containsany <physicalid> select owner.to[Proposed Activities].from.to[Change Action].from.name dump;
   CO-0001
An example to configure Path data handler to show path related information is shown below:
- Data Handler
-
com.technia.tvc.structurebrowser.examples.PathTypeHandler - Extended By
-
com.technia.tvc.structurebrowser.examples.RelatedObjectHandler
PathTypeHandler is extended by RelatedObjectHandler to support some of the business scenarios where Objects/Relationships are connected with a path and connection for a single column. With this extension, all the settings of the Related objects will be supported along with the path.
- Cell Renderer
-
com.technia.tvc.structurebrowser.examples.PathTypeRenderer
<Column>
	<Name>Change Order</Name>
	<Label>Change Order</Label>
	<ColumnType>path</ColumnType>
	<PathType>Proposed Activity.Where</PathType>
	<PathDirection>owner</PathDirection>
	<PathExpression>to[Proposed Activities].from.to[Change Action].from</PathExpression>
	<PathSelect>name</PathSelect>
	<AlternateOIDExpression>to[Part Specification].from.physicalid</AlternateOIDExpression>
	<Setting name="Where" value="current != 'Complete'"/>
	<ShowAlternateIcon>true</ShowAlternateIcon>
	<Href>${COMMON_DIR}/emxTree.jsp?mode=insert</Href>
</Column>
This datahandler accepts a number of settings, described in the table below:
| Setting | Value | Description | Required |
|---|---|---|---|
PathDirection |
owner or element |
defines the direction for retrieving the path info for owner/element |
No (default is owner) |
PathType |
Proposed Activity.Where |
The Path type |
Yes |
PathSelect |
$<attribute[name]> |
The value to select for display. |
No (default is "name"). |
PathExpression |
An expression |
The expression to retrieve the information in the context of path owner or to retreive the path owner in case of fetching the element information |
No. |
AlternateOIDExpression |
An expression |
The expression is to get alternate related element physical id to retrieve the information in the context of path owner |
No (default is "physicalid"). |
Where |
An expression |
The expression to be evaluated on the business object/ Connection to show that object/relationship in the table cell |
No. |
IconClass |
String |
CSS class for the icon |
No. |
ColumnIcon |
String |
path for the icon image |
No. |
Alt |
String |
Stic Info as tooltip for column icon or icon class |
No. |
1.1.14. Configuring table column of type path when path owner or element is connection id
For a few structures, the path object will be available on connection id, which means connection id will either be the owner of the path or path element.
In such cases, an attribute called usesBusinessObject should be added to the column element to control if the path is available on table row connection id or table row object id.
By default, the system will look for the path object on table row object id unless the attribute usesBusinessObject on the column element is set to false.
Before configuring column definition, one should be aware of where the path object is available, based on that the attribute usesBusinessObject on the column element should be used.
Below example is the way to configure the Path data handler to show path related information if table connection id acts as the path element:
- Data Handler
-
com.technia.tvc.structurebrowser.examples.PathTypeHandler - Cell Renderer
-
com.technia.tvc.structurebrowser.examples.PathTypeRenderer
<?xml version="1.0" encoding="UTF-8"?>
<Column usesBusinessObject="false">
    <Label>Title</Label>
    <GroupHeader>Manufacturing Assembly</GroupHeader>
    <Name>manufacturingAssemblyTitle</Name>
    <ColumnType>path</ColumnType>
    <PathType>SemanticRelation</PathType>
    <PathDirection>owner</PathDirection>
    <PathExpression>to[DELFmiFunctionReference]</PathExpression>
    <PathSelect>attribute[PLMEntity.V_Name]</PathSelect>
</Column>
Below example is the way to configure the Path data handler to show path related information if table connection id acts as the path owner:
<?xml version="1.0" encoding="UTF-8"?>
<Column usesBusinessObject="false">
    <Label>Physical Product</Label>
	<GroupHeader>Physical Product</GroupHeader>
    <Name>physicalProduct</Name>
    <ColumnType>path</ColumnType>
    <PathType>SemanticRelation</PathType>
    <PathDirection>element</PathDirection>
    <PathSelect>to.attribute[PLMEntity.V_Name]</PathSelect>
</Column>
1.1.15. Configuring Path siblings
There might be cases where an intermediate object is used for path connection. Now the path column type supports navigating through the intermediate object.
In the below example, the Cordless_Drill and Cordless Drill Assembly objects are connected via an intermediate object whereas the Cordless_Drill object and intermediate object are connected via path SemanticRelation.
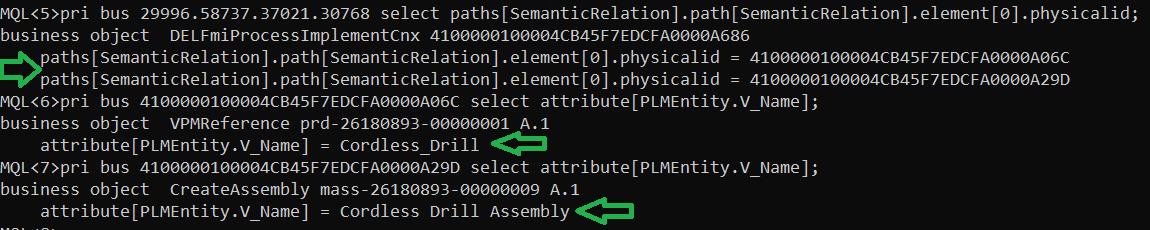
Figure 7. Objects connected via intermediate object.
Now, we can say that the Cordless_Drill and Cordless Drill Assembly objects are siblings to each other. The below configuration can be used to navigate through the intermediate object.
<?xml version="1.0" encoding="UTF-8"?>
<Column>
    <Label>Assembly</Label>
    <ColumnType>path</ColumnType>
    <PathType>SemanticRelation</PathType>
    <PathDirection>siblings</PathDirection>
    <PathSelect>attribute[PLMEntity.V_Name]</PathSelect>
</Column>
1.1.16. Configurable Data Handler / Cell Renderer
In many cases when someone needs to show information in a table cell that requires some logic or special formatting that cannot be solved by just creating a table column in a table and apply some settings, one needs to implement a Data Handler and/or a Cell Renderer in Java to accomplish the task.
To reduce this need, there is a pre-defined column-type in TVC Structure Browser as of release 2012.2.0 called "configurable", which allows specifying XML within the expression of the column to define the rules for what to display and how to display some data. This column-type will not remove the need for implementing Data Handler or Cell Renderers in tables in all cases, but it will definitely reduce the need for it in some cases.
To enable this column feature, you must first of all define some properties on the Column itself, as shown below (example in XML format):
<Column>
    <Name>name</Name>
    <Label>The column label</Label>
    <ColumnType>configurable</ColumnType>
</Column>
If you use tables defined in the database, you have to specify the column type through the settings tab using the setting "Column Type" and set the value to "configurable".
The next thing to do is to define the logic of this column. This is done through the "expression" of the column and the format of this logic is XML. NOTE: If you use XML based tables, the XML logic entered within the expression field must be surrounded with "<![CDATA[ … ]]>" since the XML elements are parsed later than when the table it-self is loaded. See the example below (the logic that goes into the expression field is explained later on):
<Column>
    <Name>name</Name>
    <Label>The column label</Label>
    <ColumnType>configurable</ColumnType>
    <Expression><![CDATA[
            <if test="type.kindOf[Part]">
            <select statement="name"/><text>:</text><select statement="revision"/>
        </if>
        <if test="type.kindOf[DOCUMENTS]">
            <select attribute="attribute_Title"/>
        </if>
    ]]></Expression>
</Column>
Within the expression in the previous example, there are two different "if" elements that does some conditional logic. The expressions are standard ENOVIA expressions that are surrounded with a "evaluate[]" internally.
The select element is used to define the select statement to show. In the example above, we also use the "text" element to add some static text content. There is also a possibility to get text content from TVC string resource files or ENOVIA suite string resource files if wanted.
The XML elements that are supported is described in the next sub chapter.
XML Format
Below is a table showing the "Conditional Elements". If they are evaluated to true, the content of the condition is included.
| Element | Attributes | Description |
|---|---|---|
if |
test="expression" appliesTo="object | relationship" (optional) |
Content of the if element is used if the expression evaluates to true for the current row |
type |
is="comma separated list of type names" |
If you want to match against the type for the object on the row in the table, you can use this condition. |
relationship |
is="comma separated list of relationship type names" |
If you want to match against the relationship type for the relationship on the row in the table, you can use this condition. |
assigned |
name="comma separated list of role/group names" |
A condition that can be used to validate user assignments. |
else |
- |
A condition that is run if the previous condition evaluates to false. |
The next table shows elements that are used for other logic, such as selecting some value or formats the content.
| Element | Attributes | Description |
|---|---|---|
select |
statement="expression" attribute="name of attribute" appliesTo="object | relationship" (optional) separator=", " (optional: Can be used instead of iterate to handle multiple select values) break="none | after | before | both" (optional, can be used to specify if to add a break before/after the value |
Selects something and displays the selected value. Either statement or attribute must be set. |
typeicon |
statement="expression" (optional) attribute="name of attribute" (optional) appliesTo="object | relationship" (optional) |
If no attributes are specified, the type-icon for the object on the row is used. |
style |
bold="true | false" italic="true | false" underline="true | false" strikethrough="true | false" blink="true | false" color="some text-color value" font="name of font" size="size of text" paddingTop="integer value" paddingRight="integer value" paddingBottom="integer value" paddingLeft="integer value" marginTop="integer value" marginRight="integer value" marginBotton= integer value" marginLeft="integer value" |
Adds some styling to the content defined within the style element. All attributes are optional |
table |
padding="integer value" spacing="integer value" border="integer value" width="the width" |
All attributes are optional Container for row elements |
row |
- |
Container for col elements |
col |
colspan="integer value" rowspan="integer value" nowrap="true |
false" |
br |
- |
|
Adds a break |
img |
src="path to image" |
Adds an image reference |
iterate |
- |
Iterates over the children depending on how many select values that has been selected. See next chapter for further example around iteration. |
link |
js="js-code" url="url to launch" target="blank" objectId="expression that resolves the object id" relationshipId="expression that resolves the relationship id" |
Either the js or url attribute must be set. The content of the js or attribute value can contains macros to substitute the selected object id or relationship id. |
text |
key="properties key" suite="name of suite unless a TVC property is used" |
Example Using Iteration
A common case is handling of select statements that return a list of values.
In the example below, we use the "iterate" tag to iterate over multiple values. One important thing to remember here is that all select expressions used within the iterate tag must return the equal amount of items. E.g. you must select along the same relationship and not mix different types since that will most likely result in unexpected result.
As you see in the example, all select expressions will return the same amount of values.
-
from[EBOM].to.type
-
from[EBOM].to.name
-
from[EBOM].to.revision
-
from[EBOM].to.id
<Column>
<Name>Test</Name>
<ColumnType>configurable</ColumnType>
<Expression><![CDATA[
<if test="type.kindOf[Part]">
<if test="from[EBOM]">
<table padding="2" spacing="0" border="0">
<row>
<col colspan="5">
<style bold="true" underline="true">
<text>EBOM Connections</text>
</style>
</col>
</row>
<iterate> (1)
<row>
<col nowrap="true">
<typeicon statement="from[EBOM].to.type"/> (2)
</col>
<col nowrap="true">
<select statement="from[EBOM].to.type"/> (2)
</col>
<col nowrap="true">
<select statement="from[EBOM].to.name"/> (2)
</col>
<col nowrap="true">
<select statement="from[EBOM].to.revision"/> (2)
</col>
<col>
<link js="tvc.popup('../tvc/core/tvcDebugRequest.jsp?objectId=${OBJECTID}',800,600,false)"
objectId="from[EBOM].to.id"> (2)
<img src="/common/images/iconNewWindow.gif"/>
</link>
</col>
</row>
</iterate>
</table>
</if>
</if>
]]></Expression>
<Label>Test</Label>
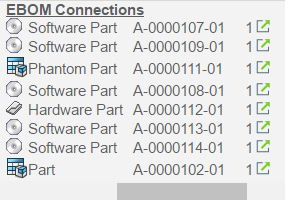
</Column>This example would result in output like shown in the image below:
| 1 | Defines that we are iterating over select statement(s) that returns multiple values |
| 2 | Defines the select expressions. Note that these must return the same amount of values. |
1.1.17. Autocomplete
This column type supports autocomplete when modifying values. Configure an AutoCompleteHandler (handler) to specify what kind of value the user can choose from. Settings how the handler should behave can be configured using the AutoCompleteSetting element. See the Autocomplete chapter in the TVC Core Admin Guide for more details.
Autocomplete only supports having one value per cell.
Type
Example:
<Column xmlns="http://technia.com/TVC/Table"
        xmlns:xsi="http://www.w3.org/2001/XMLSchema-instance"
        xsi:schemaLocation="http://technia.com/TVC/Table http://products.technia.com/tvc/schema/latest/TableColumn.xsd">
    <Name>type</Name>
    <Label>Type</Label>
    <Expression>type</Expression>
    <ColumnType>autocomplete</ColumnType>
    <AutoCompleteHandler>type</AutoCompleteHandler>
    <AutoCompleteSettings>{
        'handler' : {
            'rootTypes' : ['type_HardwarePart', 'type_SoftwarePart']
        }
    }</AutoCompleteSettings>
</Column>
User
Example:
<Column xmlns="http://technia.com/TVC/Table"
        xmlns:xsi="http://www.w3.org/2001/XMLSchema-instance"
        xsi:schemaLocation="http://technia.com/TVC/Table http://products.technia.com/tvc/schema/latest/TableColumn.xsd">
    <Name>owner</Name>
    <Label>Owner</Label>
    <Expression>owner</Expression>
    <ColumnType>autocomplete</ColumnType>
    <AutoCompleteHandler>user</AutoCompleteHandler>
    <AutoCompleteSettings>{
        'handler' : {
            'assignments' : ['role_DesignEngineer', 'role_SeniorDesignEngineer']
        }
    }</AutoCompleteSettings>
</Column>
Ranges
Example showing ranges for attribute Unit of Measure:
<Column xmlns="http://technia.com/TVC/Table"
xmlns:xsi="http://www.w3.org/2001/XMLSchema-instance"
xsi:schemaLocation="http://technia.com/TVC/Table http://products.technia.com/tvc/schema/latest/TableColumn.xsd">
<Name>UOM</Name>
<Expression>$<attribute[attribute_UnitofMeasure].value></Expression>
<Label>emxEngineeringCentral.Part.UnitOfMeasure</Label>
<RegisteredSuite>EngineeringCentral</RegisteredSuite>
<ColumnType>autocomplete</ColumnType>
<AutoCompleteHandler>ranges</AutoCompleteHandler>
</Column>