
Report Generator - Administration Guide
04 April 2016
1. Legal Notes
© Copyright 2003-2019 by TECHNIA AB
All rights reserved.
PROPRIETARY RIGHTS NOTICE: This documentation is proprietary property of TECHNIA AB. In accordance with the terms and conditions of the Software License Agreement between the Customer and TECHNIA AB, the Customer is allowed to print as many copies as necessary of documentation copyrighted by TECHNIA relating to the software being used. This documentation shall be treated as confidential information and should be used only by employees or contractors with the Customer in accordance with the Agreement.
This product includes software developed by the Apache Software Foundation. (http://www.apache.org/).
2. Report Generator
The Report Generator Component produces reports over business-objects and connections from ENOVIA into different formats, where the most commonly used formats are PDF and HTML.
The main features of the Report Generator Component are:
-
Queuing mechanism, i.e. controlling the number of concurrent reports being created.
-
Possibility to distribute the work for creating reports into other processes, by using so called “Report Agents”.
-
A report is defined / configured via XML files OR business objects (report definition objects).
-
Report definition objects can be configured to be available only for certain users, e.g. by using filter expressions.
-
The report can be generated on-demand, sent by mail, uploaded to a FTP site or checked in to a business object in ENOVIA, or a combination of the methods. This is called “output handler”.
-
Possibility to post-process the report after it has been created. For example, stamp the PDF with some text, or ZIP the report before it is delivered.
-
Separation of data extraction and presentation, e.g. same stylesheet used for design but different system-tables depending on what to view.
-
Highly customizable. The plug-in architecture of the report generator allows a high degree of customization, such as custom output handlers or post processors.
2.1. Definitions
| Definition | Description |
|---|---|
Report Definition |
The "configuration" object (XML file OR business object) that defines how a report is generated. Defines for example which output format, stylesheet and system table to use for a particular report (among others). |
Post Processor |
A post processor can be used to modify the generated report, for example perform PDF stamp. |
Output Handler |
An output handler is responsible for delivering the report to a certain destination. For example: by mail, to FTP, check-in to ENOVIA etc. |
XSL |
XSL is a W3C standard concerned with publishing XML documents. It consists of two parts: XSLT and XSLFO. The acronym expands to eXtensible Stylesheet Language. |
XSLT |
XSLT describes the transformation of arbitrary XML input into other XML (like XSL-FO), HTML or plain text. The "T" comes from Transformation. For historical reasons, a transformation is often also called a "style sheet". |
XSL-FO |
XSLFO is an XML vocabulary that is used to specify pagination and other styling for page layout output. The acronym "FO" stands for Formatting Objects. XSLFO can be used in conjunction with XSLT to convert from any XML format into a paginated layout ready for printing or displaying. |
FOP |
Formatting Objects Processor. It can be used to render an XML file containing XSL formatting objects (XSL-FO) into a page layout. The main target is PDF but other rendering targets may be used (DOCX, RTF, Open Office, Post Script). |
Xalan |
Xalan-Java is an XSLT processor for transforming XML documents into HTML, text, or other XML document types. http://xml.apache.org/xalan-j/index.html |
Xerces |
XML Parser from Apache. http://xml.apache.org/xerces2-j/index.html |
2.2. Overview
The report definition object defines the extraction criteria. Depending on the type of definition object being used, this is done differently. It could for example be to define the expansion settings, defining an inquiry or setting up a more advanced report that does a combination of different methods.
A table (system table or XML-table) is used to define which attributes and other properties that are needed from the objects and/or connections. After the table has been evaluated over the extracted data, an XML document is created that represents the raw data.
The raw XML data is converted into a different format by using a stylesheet. Most commonly, the data is converted into an XML format called XSL-FO, which is used for producing for example PDF, DOCX or RTF reports. However, it is also common that the raw XML data is converted into HTML.
After the report has been created, any post processors being configured will be executed. The last step is to process the output handlers.
Figure 1. Report creation process
2.2.1. Pre Processing
Sometimes it is needed to get some input from the user before the report is being created. This is solved by using a custom pre-process page.
Some examples of what a pre process page allows the user to do:
-
Give input criteria to the query, e.g. affect the data included in the report
-
Define which columns in a table that should be included
-
Define which sections that should be included in a report.
2.2.2. XML-FO Processor
Internally, the Report Generator uses a component from the Apache Software Foundation called FOP for converting XML-FO data into for example PDF. The report generator has two versions of the Apache FOP software available, 0.20.5 and 1.1. The default version being used is 1.1 (this has been changed as of TVC 2010.3.0). See this chapter for information how to change the version used.
As of TVC 2013.1.0, the Report Generator contains another XML-FO converter that can produce DOCX, RTF, ODT (Open Office) and Wordprocessing ML output. This XML-FO converter is called XFC.
3. Usage Scenarios
The report generator may be invoked in following ways
-
Manually, by selecting a valid report definition. The report definition may be global or context sensitive. Global means that the report definition is not dependent upon a specific object and context sensitive means that the report definition needs a specific object as input to be able to create the report.
-
Automatically triggered by an event, for example when an object is promoted to a specific lifecycle state or when an object is revised a report could be generated automatically.
-
Manually, by invoking a custom command (URL) that explicitly uses one pre-defined report definition
-
From the Side Panel in the TVC Structure Browser
-
Through a command line invocation
In either one of the scenarios above, exactly how the report will be generated and what will happen to the generated output is defined in the Report Definition object (configuration object), which is used.
There are a number of different Report Definition types that can be used. They are all described in this chapter.
3.1. Global Report
A global report is not dependent upon a specific object as input. An example of such report could be, to query the database for all ECR’s and show the status of those.
The command used to invoke the global reports is called "TVC Show Global Reports". This command should be located where it’s easy reachable for the user, for example in the menu called "Toolbar" (please note that this name might vary between different ENOVIA versions).
The report definition configuration defines whether or not the report is global.
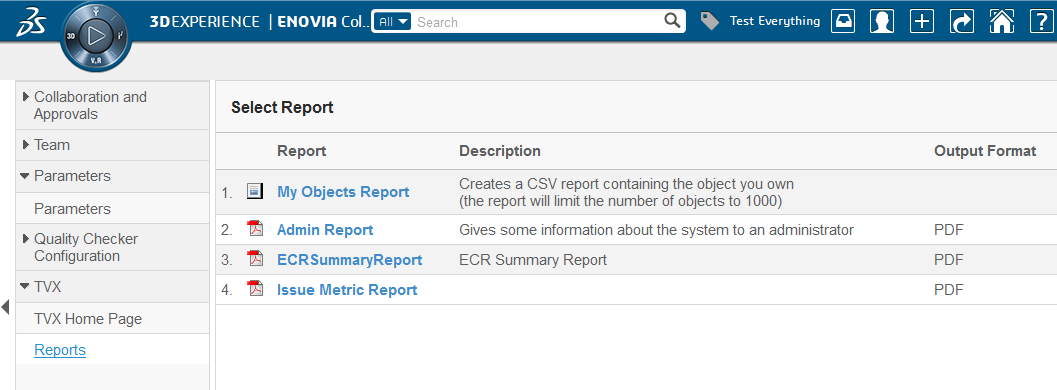
Figure 2. Global Report command in a V6R2016x environment.
3.2. Context Report
Context reports, i.e. reports that requires a business object as start object, is most commonly available from the category tree.
The command used from the category tree to display the available reports is called "TVC Show Reports". This command can be added to an object type category in order to make it available for the user. Figure 3 below shows the category tree for a Part instance with such command attached.
The command is by default not attached to any category tree after installation, but following MQL command can typically be used to add the command to the Part type category tree (the same command could of course be attached to any type_ABC menu):
<MQL> modify menu type_Part add command "TVC Show Reports";
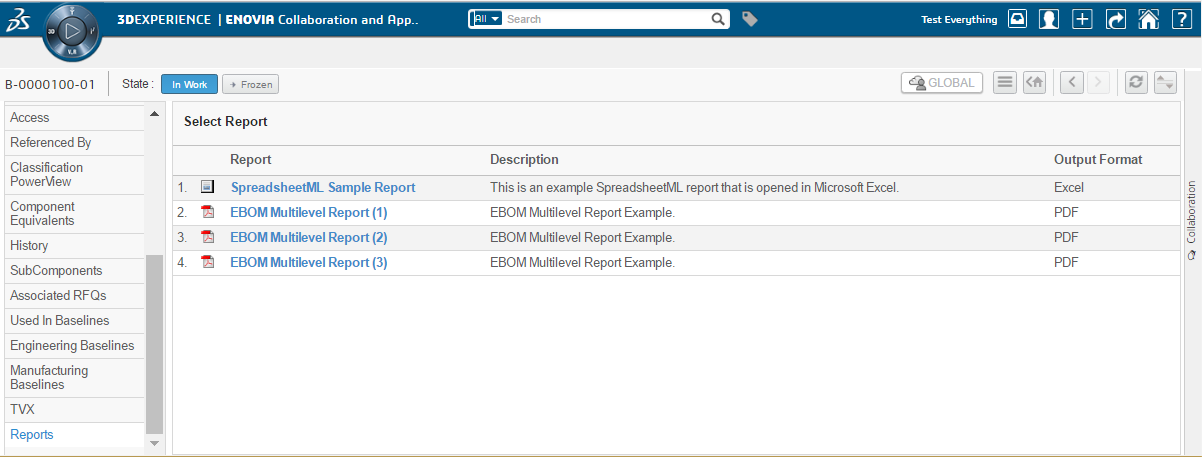
Figure 3. Report command in category tree.
3.3. Triggered by Event
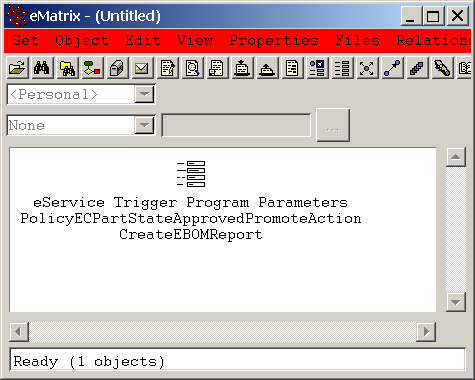
The creation of a report could be done from a triggered event. The report generator contains a JPO called TVCReportGenerator that wraps the logic to create a report.
3.3.1. Integrating With Trigger Manager
First, create a trigger program object similar as shown below.
Next, define the attributes of the trigger program object, as shown in the picture below.
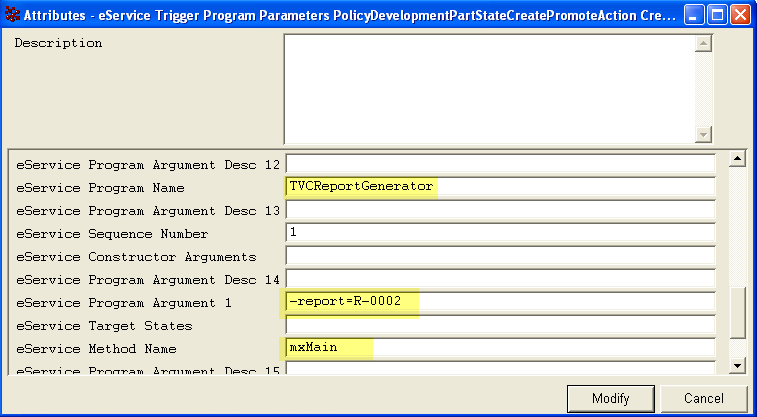
Next, attach the program to the desired event as shown below:
3.3.2. Custom Invocation of the Report Generator (MQL)
You can invoke the report generator from MQL like the example below illustrates.
<MQL> set context user creator password zzz;
<MQL> execute program TVCReportGenerator –method mxMain -report=R-002 -oid=1234.5678.90123.4567;
Remember that you need the tvc JAR files in the MX_CLASSPATH, including the tvc.license file.
Also note if you are using report definitions stored as XML files below the /WEB-INF/tvc folder of your web-application, you need to set an environment variable before starting your MQL session.
Example:
set TVC_WEBAPP_DIR=d:/Tomcat/webapps/enovia
Otherwise the Report Generator cannot resolve the XML files that are used.
3.4. Define a Custom URL to Create a Specific Report
There is a way to initiate the report generation without allowing the user to select a report definition. A custom command with properties as below may be created and added to an appropriate place within the application.
<MQL> add command "My Test Report"
        href "${ROOT_DIR}/tvc-action/beginCreateReport?reportDefinition=Test"
        label "My Test Report"
        alt "My Test Report";
The table below shows the URL parameters that can be passed to the server.
| Parameter | Description |
|---|---|
reportDefinition |
The name or the object ID of the report definition object to use (required). For XML based reports use the XML definition e.g. tvc:report/Report.xml |
objectId |
The object ID of the object the report will be made for (in case of structural reports). (This parameter is added automatically when the command is used from a category tree or from a table context). |
The command can have its "Target Location" setting pointing to a hidden frame; in this case you need to add the parameter "openPopup" with value set to true to the URL in the command. By default, the "beginCreateReport" end-point assumes that it is being opened inside a popup window.
3.5. Create Multiple Reports
A common use case is to create multiple reports (one report for each selected object, where the selection of objects typically is done within a table). In such case, the user will just have to fill in values on the pre process page (if such is used) one time, and those are applied to all reports.
When multiple reports are being created, each report is created individually, meaning that any output handler is executed for each report. However, if the report is configured for on-demand delivery, the report generator will collect all created reports within one ZIP file.
To create multiple reports, one need to create a command or link that has the following characteristics:
${ROOT_DIR}/tvc-action/rgCreateMultipleReports?reportDefinition=tvc:report/MyDefinition.xml
In addition, you need to supply the selected objects. This is done by passing the object ids using the parameter "objectId" or "emxTableRowId". NOTE: You need to supply at least one object.
If the link is opened in a popup window, you should also provide the parameter "openPopup=false". If the link is opened in a hidden frame, the popup window is automatically created.
3.6. Integrating with the TVC Structure Browser
If the TVC Structure Browser is available, you can increase the usability of the report generator.
3.6.1. Reports in the Side Panel
When working inside the TVC Structure Browser, a common use case for the user is to be able to create a report against one of the objects inside the table / structure. The normal steps to do this, would be to open the desired objects category tree (emxTree.jsp) page and select the reports page from there, and then select the report to create. This is not only a time consuming task, it also makes it harder for the user to come back to the structure and continuing the work he/she was doing before creating the report.
A better approach would be to utilize the side panel and display the available reports in there, for the selected object. This is exactly what the command "TVC Show Reports In Sidepanel" does. It is installed with the report generator, and can be added to any toolbar-menu or context menu inside the structure browser.
When this command is invoked, the available reports for the selected object will appear in the side panel and the user can create the report directly from the structure browser without the need for leaving the page.
An example screenshot is shown below:
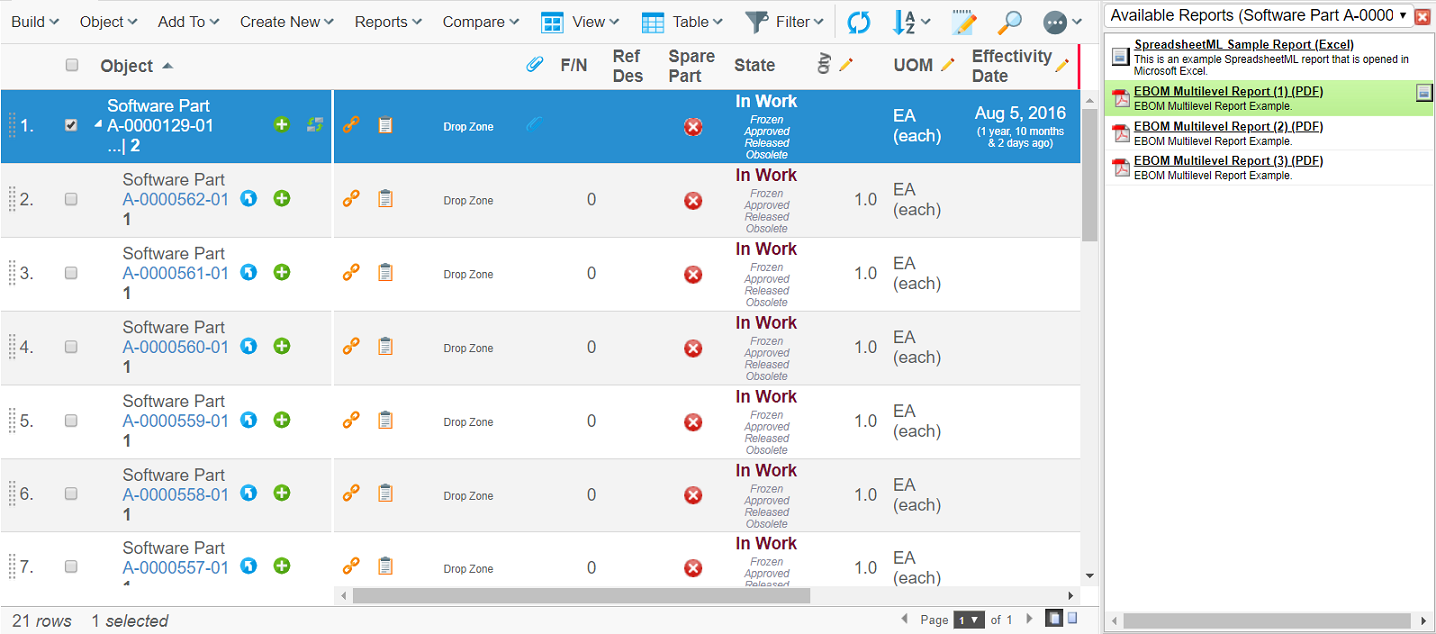
Figure 4. Structure Browser showing the available reports in the side panel
3.7. Command Line Invocation
It is possible to invoke the report generator from the command line. When TVC is installed, you will get a directory under the WEB-INF folder in the web-application called "reportgenerator". Within this directory, there is a script file available called "Client". The script itself contains further information how to launch the report generator.
4. Configuring the Report Generator
4.1. Global Properties
In this section we describe all of the possible settings and
configuration possibilities that globally apply to the Report Generator.
These global properties are stored within a page object in the database
called TVC Report Generator Properties. To view or modify the content
of this page object, you need to use the ENOVIA MQL client or the ENOVIA
Business Modeler application.
These properties are not re-loaded automatically when changed, unless the production-mode setting is set to FALSE. If the system has production-mode set to TRUE, then you must restart the application server to have your changes in use. The production mode setting is discussed within the installation guide for the TVC.
The table below contains those parameters that are changeable.
| Parameter | Description | Example | ||
|---|---|---|---|---|
mail.from.email |
Specifies an email address from which the user will see that the posted reports are from. |
|||
mail.from.name |
The "real" name that will be seen in the mail. |
Report Daemon |
||
mail.subject |
The subject of the mail. See chapter this chapter for further details regarding custom mail content. |
Report ${DEF-NAME} for ${TYPE}, ${NAME}, ${REVISION} |
||
mail.message |
The message of the mail. See chapter this chapter for further details regarding custom mail content. |
This is the requested report. Find the attachment below.\\n\\n |
||
mail.subject.onerror |
Mail subject in case of error. See chapter this chapter for further details regarding custom mail content. |
Report ${DEF-NAME} for ${TYPE}, ${NAME}, ${REVISION} FAILED ! |
||
mail.message.onerror |
Mail message in case of error |
The system was unable to generate the requested report. |
||
mail.sendTo.onerror |
The Email address to an administrator that should receive any error notification. |
|||
mail.smtp.host |
The SMTP host that will be used for outgoing mail |
mail.your.domain.com |
||
defaultUseLatestFOP |
Whether or not to use the latest FOP version by default. Default is TRUE. |
True |
||
openReportOnComplete |
If the report is being delivered on-demand, this setting can be used to force open the created report without the user having to click the link. This value default FALSE.
|
True |
||
max.concurrent.processes |
The number of concurrent running report threads. If you are using report agents for distributing the load, then each report agent has its own setting for controlling how many concurrent reports that are processed. |
5 |
||
max.concurrent.per-user.processes |
The maximum number of reports a single user may create concurrently. |
2 |
||
context.host |
Specifies which collaboration server that the report generator will use when fetching the data. Remove or comment out the property if the default collaboration server should be used. |
//127.0.0.1:1099 |
4.2. Report Definitions
A Report Definition defines how a report is being created. There are a number of different Report Definition types that can be used. The table below lists the available types and describes its use case.
| Report Definition | Use Case |
|---|---|
Advanced Report |
When your report is based upon data that cannot be easily retrieved by using either an expansion or an inquiry, but you need to combine this to retrieve different kind of data, you should use this type. This report type was introduced with TVC 6.4.0 and allows you to extract different set of data by using for example expansions, queries, select statements, inquiries etc and combine these in the way you need. There are also other capabilities that let you filter the data better, and also evaluate different tables over the different of sections of data. |
Expansion Report |
When creating a report of a structure and the data in the structure can be retrieved by using an expand command. Typically an EBOM structure, where the EBOM relationship is followed in one direction from top to bottom. |
Inquiry Report |
Can be used for arbitrary data retrieval. An inquiry can be used to make queries, expands, retrieve data from sets, performing more advanced expands that requires more logic than for a "Expansion Report" etc. |
Custom Report |
Allows you to create the report using custom code. |
JPO Report |
Should only be used when you need to integrate some legacy functionality with the report generator. As JPO invocations are not performing that well, you should consider using the "TVC Custom Report" type instead. |
A report definition can either be defined in the database as a Business Object of a certain type; or defined in an XML file stored within the ENOVIA web-application.
The recommended approach is to store them as XML configuration files within the ENOVIA web application since this allows you to deploy reports faster and decreases the time to develop a report.
4.2.1. Defining Report Definitions as XML files
Reports defined in XML files are stored within a folder called "report" below the "/WEB-INF/tvc" folder of your web application. The file must have the suffix ".xml".
Referencing a report stored as XML on disk is done using a specific
naming syntax. To reference the report stored in
/WEB-INF/tvc/report/MyReport.xml, one would use the following name:
tvc:report/MyReport.xml
You can also group these XML resources within domains. For example,
you might want to store the configuration files related to Engineering
Central in a certain place. As an example the file
/WEB-INF/tvc/enc/report/MyReport.xml would then be referenced as.
tvc:report:enc/MyReport.xml
          ^^^^
The root element of the XML file defines what type of report definition it is. The mapping between report definition type and its root elements are listed in the table below:
| Root Element | Report Definition Type |
|---|---|
<AdvancedReport> |
Advanced Report |
<ExpansionReport> |
Expansion Report |
<InquiryReport> |
Inquiry Report |
<CustomReport> |
Custom Report |
<JPOReport> |
JPO Report |
| This document contains more information about XML files in general. |
4.2.2. Defining Report Definitions as Business Objects
Business Object Types
The different report definition business object types are listed below along with their respective attributes.
| Business Object Type | Attributes | Description |
|---|---|---|
TVC Advanced Report |
TVC Data Extraction Definition |
Defines the data extraction rules. |
TVC Expansion Report |
TVC Expansion Level |
Defines Expand Level |
TVC Get From |
Defines if to expand in the from-direction |
|
TVC Get To |
Defines if to expand in the to-direction. |
|
TVC Object Pattern |
Defines the business object type pattern. A comma separated list of type names. |
|
TVC Object Where |
Defines the where clause to be applied on the business objects. |
|
TVC Relationship Pattern |
Defines the relationship type pattern. A comma separate list of type names. |
|
TVC Relationship Where |
Defines the where clause to be applied on the relationships in the structure. |
|
TVC Inquiry Report |
TVC Inquiry |
Defines the name of the inquiry to be used |
TVC Custom Report |
TVC Class |
Defines the Java class that is implementing the reporting functionality. |
TVC JPO Report |
TVC Class |
Defines the JPO name |
TVC Method |
Defines the method within the JPO |
All of these types are derived from a common business type called "TVC Report Definition".
This type has the following attributes defined:
| Attribute Name | Used For |
|---|---|
TVC Conversion Properties |
Specifying the conversion properties |
TVC Displayed Output Format |
Defining the displayed output format |
TVC Filter Expression |
Defines the expression, which defines what business objects this report is valid for. |
TVC Output Format |
Defines the output format |
TVC Global |
Defines if the report is global or contextual |
TVC Hidden |
Defines if the report is hidden or not. |
TVC Icon |
Defines a custom icon to be used to represent this report in the UI. |
TVC PreProcess Page |
Defines a pre process page. |
TVC Sort Order |
Defines the order, which this report is sorted against compared to other reports definition types. |
TVC Stylesheet |
Defines the stylesheet |
TVC System Table |
Defines the system table. |
Creating the Instances
Creating the Report Definition instances are simply made from either the ENOVIA thick client or the MQL client.
Please remember that these objects must be created with following properties:
Vault: TVC Administration
Policy: TVC Report Definition
The vault and the policy above are created during installation of the Report Generator.
4.2.3. Common Report Definition Configuration Options
Many configuration options on a Report Definition are the same regardless what Report Definition type you have chosen. The sub-chapters describe these in detail.
Even though the configuration options are on the common level, there are some Report Definition types that may not use some of the configuration options mentioned here. These exceptions are described per Report Definition type later on within this document.
4.2.4. Global
Defines if the report is global or context dependent (e.g. requires a business object as input). See chapter 3.1 and 3.2 for more information.
To define the global value within your report definition, use the syntax below:
<AdvancedReport> <!-- or any other type -->
    <Global>true</Global>
</AdvancedReport>
4.2.5. Filter Expression
Defines an expression that is used to evaluate if the definition is available or not for the object that the report is being created for. The expression is used with the MQL command "evaluate expression" and must therefore conform to that syntax.
Note that if your report definition is marked as being "global", then the filter expression has no meaning.
To define a filter expression within your report definition, use the syntax below:
<AdvancedReport> <!-- or any other type -->
<FilterExpression>type == Part &&current == Release</FilterExpression>
</AdvancedReport>Remember to escape XML sensitive characters. This can be made as in the
example above using XML entity references, or surround the value with <![PCDATA[ … ]]>.
Also note that you should test your expression in advance against a business object. Below is an example from MQL how to do so:
<MQL> print bus 1.2.3.4 select evaluate[type == Part && current == Release] dump;
E.g. you surround the filter expression with evaluate[].
In some situations (depends also on used ENOVIA version), you might need
to use the keywords AND instead of && and OR instead of ||.
Remember also that some keywords are reserved by ENOVIA. For example evaluating that current state equals to "Exists" requires the usage of the "const" keyword since "Exists" is a reserved word; see example below:
<MQL> print bus 1.2.3.4 select evaluate[current == const "Exists"] dump;
4.2.6. Access to a Report
To define the access to use a particular report definition, one can do this either based upon role or group assignment or to named users.
The access is defined like shown below:
<AdvancedReport> <!-- or any other type -->
    <Access>
        <RoleList>
            <Role>role_Engineer</Role>
            <Role>role_Manager</Role>
        </RoleList>
        <GroupList>
            <Group>System Administrator</Group>
        </GroupList>
        <UserList>
            <User>Joe</User>
            <User>Sue</User>
        </UserList>
    </Access>
</AdvancedReport>| Access is granted if one condition of the specified evaluates to true. |
+ E.g. a user having either the role "Engineer" or "Manager", or is member of the group "System Administrator", or the user actually is either Joe or Sue will have access to this report.
4.2.7. Output Format
Defines the output format that is being used for the report. Currently, the following formats are available:
-
PDF
-
DOCX
-
ODT
-
WML
-
RTF
-
PS
-
TXT
-
XML
-
HTML
| When selecting any of the formats PDF, DOCX, ODT, WML, RTF or PS, you must use a stylesheet that generates XSL-FO elements. E.g. the output-format and stylesheet attributes are dependent on each other. |
To define the output format within your report definition, use the syntax below:
<AdvancedReport> <!-- or any other type -->
    <OutputFormat>DOCX</OutputFormat>
</AdvancedReport>
4.2.8. Displayed Output Format
If defined, this value is shown in the GUI on the page where the user selects a report. If undefined, the value of the Output Format is shown instead.
To define the displayed output format within your report definition, use the syntax below:
<AdvancedReport> <!-- or any other type -->
    <OutputFormat>DOCX</OutputFormat>
    <DisplayedOutputFormat>Microsoft Word</DisplayedOutputFormat>
</AdvancedReport>
4.2.9. Stylesheet
Defines the stylesheet (XSLT) to be used to convert the extracted data from ENOVIA with.
The value refers to an XML file or to a page object within the database that holds the content. To define the stylesheet within your report definition, use the syntax below:
<AdvancedReport> <!-- or any other type -->
    <Stylesheet>tvc:stylesheet:enc/MyStylesheet.xslt</Stylesheet> (1)

    <!-- OR -->
    <Stylesheet>NameOfPageObject</Stylesheet> (2)
</AdvancedReport>

<1> Refers to the file: /WEB-INF/tvc/enc/stylesheet/MyStylesheet.xslt
<2> Refers to the page object: NameOfPageObject

[[table]]
==== Table

Defines the name of a table that defines which data to be extracted into
the report.

Note that the name might refer to a table stored inside the database,
or, to a table stored in XML within the web-application.

To define the table within your report definition, use the syntax below:

```xml
<AdvancedReport> <!-- or any other type -->
    <Table>tvc:table:enc/MyTable.xml</Table> (1)
    <!-- OR -->
    <Table>My Table</Table> (2)
</AdvancedReport>| 1 | Refers to the file: /WEB-INF/tvc/enc/table/MyTable.xml |
| 2 | Refers to the system table in the data base called "My Table" |
4.2.10. Hidden
Defines if the definition object is visible for the user when s/he is selecting a report to be created from the user interface.
For example, some report definitions are only used by triggers, hence these are not intended for use manually and setting the Hidden value to TRUE will make them unavailable.
To define the hidden value within your report definition, use the syntax below:
<AdvancedReport> <!-- or any other type -->
    <Hidden>true</Hidden>
</AdvancedReport>
4.2.11. Pre-process Page
Defines the name of a custom JSP page that is invoked before the report is being created.
Using a pre-process page enables more control over the created report. Depending on the pre-process page – more or less sophisticated functionality may be added, but typically a form with some options are displayed and the user does some selection that finally applies to the final report. See this chapter for details regarding implementation details of pre-process pages.
To define a pre process page within your report definition, use the syntax below:
<AdvancedReport> <!-- or any other type -->
    <PreProcessPage>/path/to/Page.jsp</PreProcessPage>
</AdvancedReport>
The path to the JSP page, must be context relative. E.g. start from the root of your web-application.
4.2.12. Icon
A report can be associated with a custom icon. This icon will be shown in the user interface where the user selects a report to be created. The purpose of associating a custom icon is to make it easier for the user to find the report to be created.
To define an icon, use the sytax below:
<AdvancedReport> <!-- or any other type -->
    <Icon>/common/images/image.png</Icon>
</AdvancedReport>
The path must be context relative, e.g. start from the root of your web-application.
4.2.13. Sort Order
Within the list of reports presented for the user, the order of appearance for the available reports can be adjusted.
To define the sort order, use the syntax below:
<AdvancedReport> <!-- or any other type -->
    <SortOrder>3</SortOrder>
</AdvancedReport>| By default, TVC Report Generator will sort the reports first by output format then by its display name. To actually use the sort order as defined on the report definitions, one need to apply a system init parameter within web.xml as described within this chapter. |
4.2.14. Report Settings
Defines different parameters that control the behavior of the report creation.
To define the settings/conversion properties within your report definition, use the syntax below:
<AdvancedReport> <!-- or any other type -->
    <Settings>
        <Setting name="name of setting" value="value"/> (1)
        <Setting name="another setting">the value</Setting> (2)
    </Settings>
</AdvancedReport>| 1 | Value is specified in the value attribute |
| 2 | Value is specified between start and end tag, e.g. body text. |
The table below shows the different parameters that are adjustable. Note that each output handler or post processor, or other feature, might have support for additional settings that are not listed in this table.
| Setting Name | Example | Description | ||
|---|---|---|---|---|
outputHandlers |
mail,checkin,ftp,fileStore |
Specifies the output-handlers that will be used, e.g. how the generated report should be handled. This is a comma-separated list of named output handlers. See this chapter for information regarding the output handlers. |
||
postProcessors |
zip,PDFStamp |
Specifies which post processors to be used. This is a comma separated list of named post processors. See this chapter for information regarding post processing. |
||
file.on.demand |
true |
Specifies if the report should be generated on demand. |
||
file.suffix |
The suffix which the file will use. This is normally only needed if you want to override the default value. |
|||
file.prefix |
BOM-Specification |
The prefix which the file will use. Note that you can use macros that resolves dynamic values against the context object, which the report is created for. See this chapter. |
||
file.contentType |
application/pdf |
Overrides the content-type of the report. Affects the download of the report. |
||
useLatestFOP |
true |
Defines if to use the latest FOP version. Can be used to override the global settings described in this chapter. |
||
pageHeader |
BOM Report |
Can be used to configure a custom header in the user interface. |
||
transactionType |
update |
Can be used to change the transaction type during the data extraction. By default, a read transaction is started. However, if you for some reason needs an update transaction, you can change it through this parameter |
||
createAsSuperUser |
True |
If you want to override the access mechanism in ENOVIA and create the report as a user without any restriction, you can set this value to true. |
||
checkoutImagesAsSuperUser |
True |
If set to true, all images are checked out / generated with super-user context. |
||
openReportOnComplete |
True |
If the report is being delivered on-demand, this setting can be used to force open the created report without the user having to click the link. This value default FALSE.
|
4.2.15. Transformer Properties
Parameters that you pass to the XSLT transformation (your stylesheet) can be declared within the report definition. To define these, use the syntax below:
<AdvancedReport> <!-- or any other type -->
    <TransformerProperties>
        <Property name="name of setting" value="value"/>
        <Property name="another setting">the value</Setting>
    </TransformerProperties>
</AdvancedReport>
4.2.16. Expansion Report Definition
An expansion report is used to generate a report over the objects and connections inside one structure. This is equal to browsing the relationships going from or to the selected business object in the defined number of levels. For more information about expanding business objects, see the ENOVIA MQL guide.
The root element within an expansion based report definition must be
<ExpansionReport>.
The expansion report has following configuration options.
| Option | Description | Configuration Example |
|---|---|---|
Expand Depth |
Defines the number of levels to expand. 0 means all levels. |
Or
|
Relationship Pattern |
Defines the relationship types to expand along. Symbolic names or real names might be used. If undefined, the relationship pattern "*" will be used. |
|
Object Pattern |
Defines which object types to expand. Symbolic names or real names might be used. If undefined, the type pattern "*" will be used. |
|
Relationship Where |
Where clause to apply on the relationships This value may contain an expression that contains symbolic names rather than actual names. |
|
Object Where |
Where clause to apply on the objects. This value may contain an expression that contains symbolic names rather than actual names. |
|
Expand Direction |
Defines the expand direction. The value "both" may not be used in conjunction with a full expand. |
`<Direction>from |
to |
both</Direction>` |
Load Root Nodes |
4.2.17. Inquiry Report Definition
The inquiry report uses an inquiry to retrieve the objects and relationships that will be included in the report. The inquiry report definition has the following configuration options.
| Option | Description | Configuration Example |
|---|---|---|
Inquiry |
Defines the name of the inquiry that is used to gather the objects/relationships to be included in the report. |
|
Below are two examples that show how the inquiries should be constructed in order to work properly with the report generator.
NB: The name of the fields in the format part of the inquiry must be same as below.
Inquiry for retrieval of flat data (a list of object without relationship information):
<Inquiry>
    <Pattern>*|*|*|${OID}</Pattern>
    <Format>${OID}</Format>
    <Code>temp query bus ${TYPE} * * where 'owner == "${USER}"' select id dump |</Code>
    <Argument name="TYPE" value="type_Part"/>
    <Argument name="USER" value="dummy"/>
</Inquiry>
An inquiry for structured data might look like this:
<Inquiry>
    <Pattern>${LEVEL}|*|${DIRECTION}|*|*|*|${OID}|${RELID}</Pattern>
    <Format>${LEVEL}|${DIRECTION}|${OID}|${RELID}</Format>
    <Code>expand bus ${ID} from rel ${REL} recurse to all
    select bus id select rel id dump |
    </Code>
    <Argument name="REL" value="relationship_EBOM"/>
    <Argument name="ID" value="dummy"/>
</Inquiry>
4.2.18. Passing Custom Parameters to the Inquiry
The inquiry report definition is very flexible. You may pass additional parameters in the URL that are sent further to the inquiry. This is accomplished by adding URL parameters to the command described in this chapter.
The arguments that can be passed to the inquiry must have the following syntax:
Inquiry arguments :== <Argument Name> & <Argument Value> [& <Inquiry arguments>]
Argument Name :== argName=<name-of-argument>
Argument Value :== argValue=<value-of-argument>
URL example:
${ROOT_DIR}/tvc-action/beginCreateReport?reportDefinition=MyInquiryDef&argName=NameOfFirstArg&argValue=ValueOfFirstArg&argName=NameOfSecondArg&argValue=ValueOfSecondArg
The arguments that are passed must also be defined on the inquiry itself.
4.2.19. Inquiry Report Example
Following example illustrates how these custom parameters can be used to create a report of objects stored in a set. The inquiry will retrieve the id of the objects stored in a set, and the name of the set is passed as input parameter.
-
Create an inquiry with following configuration
pattern: ${OID} format: ${OID} argument: SET dummy code: pri set "${SET}" select id dump -
Create an Inquiry Report Definition instance, called LoadFromSet, that used the created inquiry
-
Create a set from either MQL or ENOVIA Navigator that contains some business objects. Name the set to for example "MySet".
-
Create a command with following parameters:
${ROOT_DIR}/tvc-action/beginCreateReport?reportDefinition=LoadFromSet&argName=SET&argValue=MySet -
The command can now be used to make a report of the objects within the set called "MySet".
4.2.20. Advanced Report Definition
The advanced report definition allows dividing a report into sections, where each section contains data that is generated by evaluating one table over a set of objects / connections, which are provided by a so called dataset’s. The report might contain as many sections as needed to build up the complete report.
The definition of the data extraction logic is defined within the Report Definition configuration. For an example how such report is constructed, see the example below:
<AdvancedReport>
    <OutputFormat>DOCX</OutputFormat>
    ...

    <!-- First section evaluates a table over the revisions -->
    <TableDataSection element="Revisions">
        <Description>Revision information</Description>
        <DataSet>tvc:dataset/Revisions.xml</DataSet>
        <Table>tvc:table/BasicInformation.xml</Table>
    </TableDataSection>

    <!-- The second section evaluates another table over the EBOM -->
    <TableDataSection element="EBOM">
        <Description>Bill of Material</Description>
        <DataSet>tvc:dataset/EBOM.xml</DataSet>
        <Table>tvc:table/EBOM.xml</Table>
        <XMLSpec>
            <OmitRootNode>true</OmitRootNode>
        </XMLSpec>
    </TableDataSection>
</AdvancedReport>
This report contains two sections; Information about all the revisions and information about the BOM structure below the item. These sections are evaluated using different tables.
The data-set defining the revisions looks like this: (/WEB-INF/tvc/dataset/Revisions.xml)
<DataSet>
    <Select>
        <Statement>revisions.id</Statement>
    </Select>
</DataSet>
The data-set defining the EBOM structure looks like this: (/WEB-INF/tvc/dataset/EBOM.xml)
<DataSet>
    <Expand>
        <From>true</From>
        <To>false</To>
        <Depth>0</Depth>
        <TypePattern>
            <Type>type_Part</Type>
        </TypePattern>
        <RelationshipPattern>
            <Relationship>relationship_EBOM</Relationship>
        </RelationshipPattern>
    </Expand>
</DataSet>
4.2.21. Table Data Section
A table data section uses a table (system table or an XML defined table) and evaluates this table over the data returned by the data-set being used. Moreover, a section is in the final report grouped inside its own element, which is defined in the attribute "element" on the "TableDataSection" tag.
The minimum configuration requred for a Table-data-section, is to define a data set and a table. You can omit the table, however, then all basic properties including all attribute values are extracted for the business objects and connections, which the data-set returns.
<TableDataSection element="EBOM">
    <DataSet>tvc:dataset/EBOM.xml</DataSet>
    <Table>tvc:table/EBOM.xml</Table>
</TableDataSection>
The description element is optional, but can be used to provide a user friendly description describing the purpose of the section. This can be utilized from a pre-process page to allow the user to de-select a section from a particular report. There are two additional attributes that can be used to define the selection behavior of a section, namely: selectable and selected. The first one defines whether or not the user can control the inclusion of the section and the latter one defines if the section is selected by default or not. Below is an example where these attributes are used:
<TableDataSection selectable="true" selected="false" element="documents">
    <Description>Documents related to this object</Description>
</TableDataSection>
Moreover, the XMLSpec element allows you to configure how the XML data for this particular section should be formatted. The details are provided in the next chapter.
XML Specification
The XMLSpec element can have a number of different sub-elements, used for configuring the generated XML. The table below shows the current available elements, their purpose and possible values. Due to compatibility reasons, the default XML format is unchanged since earlier versions. However, the XMLSpec element allows you to adjust the format.
| Element Name | Purpose | Value(s) |
|---|---|---|
IncludeTableHeaders |
Whether or not to include information about the table columns in the table. |
True (default) / False |
IncludeTableGroups |
Whether or not to include data grouping information. |
True (default) / False |
IncludeTableContent |
Whether or not to include the actual table content. |
True (default) / False |
IncludeTableCalculations |
Whether or not to include any table calculations defined on the table |
True (default) / False |
IncludeGroupHeaders |
Whether or not to include information about any group headers in the table. |
True (default) / False |
IncludeSettings |
Whether or not to include the settings defined on the columns, within the table header section. |
True (default) / False |
FlattenStructure |
Whether or not to flatten the data. This is only applicable if the data is structural. |
True / False (default) |
ShowLevel |
Whether or not to include level information on the row. |
True (default) / False |
ShowDirection |
Whether or not to include direction information on the row. |
True (default) / False |
AddColumnId |
Whether or not to add an id on the column. |
True (default) / False |
AddCellIndex |
Whether or not to add cell index on the cells. |
True (default) / False |
AddColumnRef |
Whether or not to add a reference to the column from the cell. |
True (default) / False |
OmitCellValueElement |
Whether or not to have the value element within the cells. |
True / False (Default) |
OmitRootNode |
Whether or not to omit the root node from the XML tree. |
True / False (Default) |
OmitRowAttributes |
Whether or not to omit all attributes on the row |
True / False (Default) |
OmitEmptyCells |
Whether or not to omit the Cell element, if there aren’t any values in the cell. |
True / False (Default) |
UseColumnName |
Whether or not to use the name of the column as name on the Cell elements. This might in some cases help you in the transformation phase, to avoid having too complex XPath expressions. |
True / False (Default) |
TableDataGroupElement |
Define the name of the element that holds the table-data-grouping information |
data-groups |
TableDataElement |
Defines the name of the element that holds the table data information |
objects |
TableColumnsElement |
Defines the name of the element that holds the table column information |
headers |
TableColumnElement |
Defines the name of the Column element. |
header |
RowElement |
Defines the name of the row element. It is possible to use a special macro to create dynamic element names. Following macros are supported:
|
row |
CellElement |
Defines the name of the Cell element. Note that if the "UseColumName" has been set to true, the name of the Column will be used as Cell value element name. |
cell |
CellValueElement |
Defines the value element name |
value |
Data Groups
It is also possible to group the data. The data grouping is made by adding "Group" elements within the "DataGroups" element. Each group must have its own name.
<TableDataSection>
    <DataGroups>
        <Group name="OriginatedByYearQuarter">originated{Originated;year<yyyy>-quarter}</Group>
        <Group name="ByOwnerAndType">owner{Owner}#type{TypeName}</Group>
    </DataGroups>
</TableDataSection>
The syntax for a group definition is defined below:
definition   ::= <group> "#" <group>
group        ::= <column-name> | <column-name> "{" <element-name> ";" <group-spec> "}"
column-name  ::= <text>
element-name ::= <text>
group-spec   ::= <text>
A group is operating on the cells in the table hence the column is referenced by its name.
The group-spec is different depending on the data type of the property, which the group is made on. For example, date fields are different than numeric fields.
This is easiest explained with a few examples:
-
Group by originated date (year & quarter). Format the year using 4 digits
originated{Originated;year<yyyy>-quarter} -
Group by weight (numeric attribute):
Weight{==0,0<<10,>=10}This will make one group for all matching 0, one group for items having between 0 and 10 and one for those having weight above or equal to 10.
4.2.22. MQL Output Section
MQL output can be included by defining a MQLSection. This could either be just invoking a MQL command that returns XML output or invoking some other program that produces XML output.
See example below:
<AdvancedReport>
    <MQLSection>
        <Description>This is the description...</Description>
        <XML>true</XML>
        <Code>temp webreport ... xml; </Code>
    </MQLSection>
</AdvancedReport>
The sub elements of <MQLSection> are:
| Element Name | Type of data | Description | Required |
|---|---|---|---|
XML |
Boolean (true/false) |
Defining if the output is XML formatted |
No |
Code |
String |
The MQL code to execute |
Yes |
XSLT |
String |
An optional XSLT stylesheet (name of such) to be used for converting the XML output before its being part of the report |
No |
Description |
String |
A descriptive text of what kind of data this section generates |
No |
ExecuteAsSuperUser |
Boolean |
Defines if the MQL statement should be executed with super-user privileges |
No |
RequiresVersion |
String |
Specifies the lowest ENOVIA version. If this requirement is not met, the section will be omitted from the report. |
No |
If your report was created for a particular object, e.g. not a
global report, you can use the ${OBJECTID} macro within the code of
your MQL section to get access to the object-id value. Also, you can use
the macro ${USER} to substitute with the id of the current user.
|
4.2.23. Custom Report Definition
In case you have a need for creating a report that are not possible to create by using any of the previously mentioned Report Definition types, or you want to leverage some existing code within the Report Generator; you should use the "Custom Report" type.
This report definition type requires you to point out a Java class,
which is derived from the base class
com.technia.tvc.reportgenerator.impl.CustomReport.
<CustomReport>
    ...
    <Class>com.acme.report.EBOMtoExcel</Class>
</CustomReport>
4.3. Post Processing
After the report has been created, it is possible to modify the file containing the report. For example, if you create a PDF report, you can stamp the PDF with some text. In some other case, you might want to ZIP the report.
The built-in post processors are shown in the table below:
| Post Processor | Description |
|---|---|
pdf-stamp |
Used for adding a stamp to the PDF report |
zip |
Used to ZIP the generated report. |
It is also possible to perform multiple post-processing of the report, for example first stamp the PDF file then ZIP the PDF report. However, note that the post processors are executed in the order they are defined, hence you cannot PDF stamp a ZIP file.
The post processors are registered and configured within the Report Settings like shown below:
<InquiryReport>
    <Settings>
        <Setting name="postProcessors" value="pdf-stamp,zip"/>
4.3.1. Disabling a Post Processor
Even though you have defined to use a certain post processor using the "postProcessors" property; it is possible to disable a particular processor by setting a different property. The example below will disable the PDF Stamp processor.
<Setting name="postProcessors" value="pdf-stamp,zip"/>
<Setting name="pdf.stamp.enabled" value="false"/>
<Setting name="zip.enabled" value="true"/>
This can be utilized from a pre-process page to decide at runtime whether or not a post processor is enabled.
4.3.2. PDF Stamp
The following properties can be used to configure where the PDF should be stamped.
pdf.stamp.enabled=true | false
pdf.stamp.text=${CURRENT}
pdf.stamp.fontName=Arial
pdf.stamp.fontSize=18
pdf.stamp.fontColor=rgb(255,0,0)
pdf.stamp.margin=10
pdf.stamp.position=top-left | top-center | top-right | bottom-left | bottom-center | bottom-right | center-left | center-center | center-right
pdf.stamp.rotation=45
The "pdf.stamp.text" property may contain a macro.This chapter describes the possible macros that can be used.
4.4. Output Handlers
An output handler is responsible for delivering the report to some destination. The output handler(s) are invoked after the report has been created.
A report can use as many output handler(s) as wanted. The output handler to be used for a particular report is declared inside the Report Settings.
The built-in output handlers are shown in the table below:
| Output Handler | Description |
|---|---|
For sending the report via mail to the user that creates the report. It is also possible runtime to add more recipients. |
|
checkin |
Used to check-in the report to a new object or to the object, which the report is being created for. |
ftp |
For sending the report to a FTP server. |
fileStore |
For storing the report on a local mounted disk. |
For sending the report to a printer. |
Below is an example how the property is declared:
<InquiryReport>
    ...
    <Settings>
        <Setting name="outputHandlers" value="mail,checkin,ftp,fileStore,print"/>
    </Settings>
</InquiryReport>
Each output handler needs to be configured by adding/configuring other settings.
| If the report is not being delivered on-demand, at least one output handler must be defined. |
4.4.1. Disabling an Output Handler
Even though you have defined to use a certain output handler using the "outputHandlers" property; it is possible to disable a particular handler by setting a different property. The example below will disable the mail and ftp output handler.
<Settings>
    <Setting name="outputHandlers" value="mail,ftp,checkin"/>
    <Setting name="mail.enabled" value="false"/>
    <Setting name="ftp.enabled" value="false"/>
</Settings>
This can be utilized from a pre-process page to decide at runtime whether or not an output handler is enabled.
4.4.2. Check-in Handler
The check-in handler can be used to either attach the report to the object for which the report is being created for (e.g. the context object), or create a new object to where the report will be checked in.
A new object can be created using a number generator. Current release supports using the object generators from the AEF/BPS or by using the number generators from TVC to generate new names. To setup object generators in the AEF/BPS, please consult the Framework/Business Process Services documentation. To setup a TVC number generator, see this chapter.
Once an object generator is configured, following properties are used to control which object generator to use.
checkin.create.object=true
checkin.create.strategy=AEF | TVC

# If strategy = AEF
checkin.aef.objectgenerator.name=type_Report
checkin.aef.objectgenerator.revision=1
checkin.aef.objectgenerator.create-additional=false

# If strategy = TVC
checkin.tvc.objectgenerator.name=<The Name of the Number Generator>

# Common
checkin.object.type=<The type of the object to create>
checkin.object.policy=<Policy governing the Object>
checkin.object.revision=<Revision of the Object>
checkin.object.vault=<The name of the vault to hold the object>

# If you want to connect the newly created object with the object, which the
# report is being created for, apply these settings:
checkin.connect.relationship=relationship_MyRel
checkin.connect.direction=from
Important notes:
-
The
checkin.object.typeis required. -
The
checkin.object.policyis optional; If omitted, the best suited policy for the specified type will be used. -
The
checkin.object.revisionis optional; If omitted, the first revision in the sequence defined on the policy will be used. -
The `checkin.object.vault is optional; If omitted, the same vault as object which the report is created for will be used. If the report is not created around a business object (e.g. it’s a global report), the "eService Production" vault is assumed.
-
The
checkin.tvc.objectgenerator.nameis optional. If omitted, the first number generator for the specified type will be used.
Either if you check in the object to the original object or if you are creating a new one using an object generator, a set of additional settings can be specified in order to being able to check-in the report.
The following properties control the check-in:
checkin.format=<Symbolic name or real name of the format>
checkin.unlock=<true for unlock>
checkin.append=<true to append>
TVC Number Generator
When a number generator is created, one should use the type, vault and policy settings as shown in the picture below. The name of the object defines the "type", which the numbers are to be generated for. The revision is the logical name of the number generator – one type of object might have several number generators.

Figure 5. Creating a TVC Number generator
The attributes that controls how the generated names are formatted, is defined as the picture below shows.
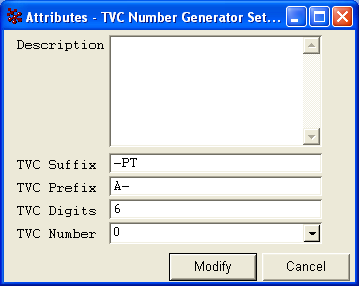
Figure 6. Defining attributes that controls the generated number
4.4.3. Mail Handler
The mail handler will send the mail to the user who initiated the report creation. A mail address must be specified on his/her person admin object.
The settings for mail sending is defined in the global page configuration object, but the following properties may be set/overridden in the report settings.
mail.from.email=<email of from user>
mail.from.name=<name of from user>
mail.subject=<mail subject>
mail.message=<mail message>
mail.sendTo.onerror=<mail address used to send info to upon failure>
mail.subject.onerror=<subject of mail upon failure>
mail.message.onerror=<message of mail upon failure>
mail.max.fileSize=10m
In order to have dynamic content in the mails that are sent, there are possibilities to use macros within the subject and mail message properties. This chapter describes the possible macros to be used.
The report is by default sent to the user that created the report. It is possible to change this behavior, and send the report to someone else.
The properties below can be used to define other recipients.
mail.to
mail.cc
mail.bcc
The property "mail.max.fileSize" can be used to disable the mail delivery in case the generated report is equal to or larger than the specified size. The size can be specified in various formats, example:
-
5000 (5000 bytes)
-
10k (10 kilobytes)
-
1.5m (1.5 megabytes)
4.4.4. FTP Upload Handler
The FTP handler sends the report via FTP. Following properties controls the built in FTP handler:
ftp.host = <name of ftp host>
ftp.port = 0 (for default port)
ftp.user = <name of user, which has an account on the FTP server>
ftp.password = <password for user>
ftp.dir = <name of directory on the ftp server>
ftp.file.name = <name of the uploaded file>
ftp.min.fileSize = 10m
ftp.sendNotification = false (default is true)
The properties ftp.dir and ftp.file may contain macros. This chapter describes the possible macros to be used.
An example of how a macro could be used is shown below:
ftp.file.name = ${DEF-TYPE}_${DEF-NAME}_${YEAR}${MONTH}${DAY}${HOUR}${MINUTE}${SECONDS}.pdf
ftp.dir = /home/ftpuser/${TYPE}/${NAME}/${REV}
The property ftp.min.fileSize can be used to restrict the delivery of
the report via FTP unless the size is greater than the specified value.
See previous chapter regarding the mail delivery handler for details
regarding the format of this value, including how this setting can be
used in conjunction with the mail handler.
The ftp.sendNotification property can be used to inform the user about
the delivery of the report to the FTP destination.
4.4.5. File Store Handler
The "fileStore" output handler is used when the file should be stored on a mounted drive.
Following properties controls this outputhandler.
fileStore.directory = <name of directory>
fileStore.fileName = <name of file>
Both these properties may contain macros. This chapter describes the possible macros to be used.
An example of how a macro could be used is shown below:
fileStore.fileName = ${DEF-TYPE}_${DEF-NAME}_${YEAR}${MONTH}${DAY}${HOUR}${MINUTE}${SECONDS}.pdf
fileStore.directory = /home/ftpuser/${TYPE}/${NAME}/${REV}
4.4.6. Print Handler
The print output handler sends the report directly to the printer.
The printers should be pre-configured with the necessary drivers & available on the application server where the report generator component is running.
Following property controls this outputhandler.
print.printers = <name of the printer>
It is also possible to pass a comma-separated list of printer names to the property above, in which case the report will be sent to each of the printers. The name of the printer, in this case, refers to the actual name of the printer as referred to by the operating system on the application server.
The above property could be statically defined in the report configuration or a more likely scenario is for them to be over-ridden at run time by the end user through a pre-process page.
Printer selection pre-process page
TVC provides functionality for having the printer selector on a pre-process page through which users can select from a list of printers to send the report to.
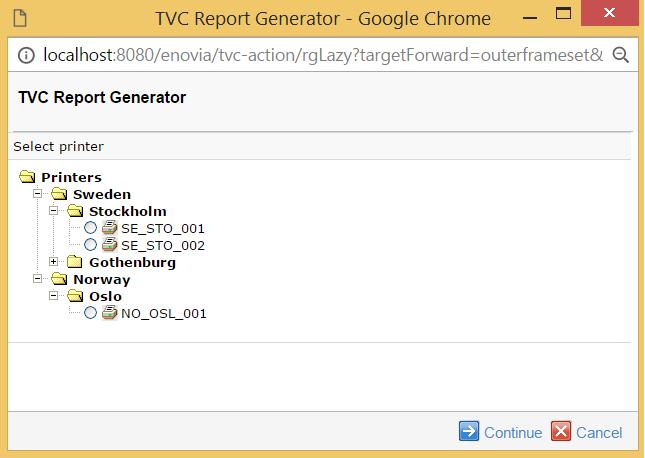
See this chapter for details on how to implement a pre process page with a printer selector.
The list of printers and their groupings are pre-defined in the page object called "TVC Report Generator Print Output Handler Configuration". The pre-process page reads this configuration and generates the necessary user interface to assist in printer selection.
The following is a sample configuration
<?xml version="1.0" encoding="UTF-8"?>
<!--+
    | Print Output Handler Configuration File.
    | This file contains the template for configuration of Print Output Handlers
    +-->
<PrintOutputHandlerConfiguration>
    <!--+
        | A flat list of configured printers.
        | Each printer must have a unique id
        +-->
    <Printers>
        <Printer id="SE_STO_001">
            <!-- The network path to the configured printer.
                 This printer should be configured and connected
                 in advance.-->
            <Path>\\printserver01\HP-4000</Path>
            <!-- A short description of this configuration.-->
            <Description>Printer on Floor 1</Description>
        </Printer>
        <Printer id="SE_STO_002">
            <Path>\\printserver01\Lexmark-Pro901</Path>
            <Description>Printer on Floor 2</Description>
        </Printer>
        <Printer id="SE_GBG_001">
            <Path>\\printserver02\Lexmark-Pro3500</Path>
            <Description>Printer in Gothenburg</Description>
        </Printer>
        <Printer id="NO_OSL_001">
            <Path>\\printserver03\HP-4100</Path>
            <Description>Printer in Oslo</Description>
        </Printer>
    </Printers>
    <!--+
        | Printers can also be structured in groups & sub-groups e.g.
        | classifying the printers by location or certain printer
        | characteristics.
        | This classification can be used in report pre-process pages for
        | allowing the users to select printers used for printing the report.
        | The printers used in the groups are referred to their printer id
        | defined above.
        | Printer titles can also be localized by appending the locale
        | suffix to the title attribute (e.g. title_de)
        +-->
    <Groups title="Printers" title_de="Drucker">
        <Group title="Sweden" title_sv="Sverige">
            <Group title="Stockholm">
                <PrinterId>SE_STO_001</PrinterId>
                <PrinterId>SE_STO_002</PrinterId>
            </Group>
            <Group title="Gothenburg">
                <PrinterId>SE_GBG_001</PrinterId>
            </Group>
        </Group>
        <Group title="Norway">
            <Group title="Oslo">
                <PrinterId>NO_OSL_001</PrinterId>
            </Group>
        </Group>
    </Groups>
</PrintOutputHandlerConfiguration>
4.4.7. Macros, used by different output handlers
Following table contains macros that may be used on some properties used by some of the output handlers.
| Macro | Description |
|---|---|
|
The name of the user that initiated the report creation |
|
The full name of the user |
|
The type of the definition object that was used |
|
The name of the definition object that was used |
|
The revision of the definition object that was used |
|
The type of the object that the report was created for (if any) |
|
The name of the object that the report was created for (if any) |
|
The revision of the object that the report was created for (if any) |
|
The current state of the object that the report was created for (if any) |
|
The full-date when the report was initiated |
|
The year when the report was initiated |
|
The month when the report was initiated |
|
The day when the report was initiated |
|
The hour when the report was initiated |
|
The minute when the report was initiated |
|
The seconds when the report was initiated |
|
The week no of the year |
|
The week no of the month |
|
The date in ISO format |
|
The date and time in ISO format |
| if the report was created around a business object, e.g. not a global report, you can also use macros that are resolved against the context business object. Example: |
${attribute[attribute_Title]}4.5. Configure FOP Version
TVC Report Generator comes with two versions of the Apache FOP processor; 1.1 and 0.20.5. Technia recommends using the 1.1 version as it is much better compared to the 0.20.5 release, which is several years old and contains many issues.
To upgrade old reports that were designed for the 0.20.5 version, please read through the following page:
The used FOP version is configured in two ways.
-
A global setting specifying the default value that will apply to all reports not specifying what FOP version it requires.
-
A setting per report specifying what version of FOP to be used.
4.5.1. Configure the Global Setting
Find the page object called TVC Report Generator Properties. Add or
find the line containing "defaultUseLatestFOP". Set the value to either
TRUE or FALSE:
defaultUseLatestFOP=true
Note that if you omit this line, or comment it out, the value will be treated as TRUE.
| There are two additional properties within the "TVC Report Generator Properties" page object that can be used to override anything set within a single report. These are: |
-
alwaysUseLatestFOP = true | false
-
neverUseLatestFOP = true | false
If any of those values return true, the setting made on a single report will never be used.
*This can, for example, be used to verify if the reports are compatible with the latest FOP or not, without having to modify the reports themselves. *
4.6. Configuring the Report List Page
The page that shows the available reports, either the reports available for a context object or the list of global reports can be configured in a couple of ways such as the order of the reports and the image to display for each report.
4.6.1. Sort Order
The sorting of the reports on the list page can be configured through a TVC init parameter (system parameter) through the web.xml file.
Below are some examples how this init parameter could be applied:
<init-param>
    <param-name>tvc.reportgenerator.sortReportsBy</param-name>
    <param-value>format,displayname</param-value>
</init-param>
<init-param>
<param-name>tvc.reportgenerator.sortReportsBy</param-name>
<param-value>name</param-value>
</init-param><init-param>
<param-name>tvc.reportgenerator.sortReportsBy</param-name>
<param-value>sortorder</param-value>
</init-param>The first example is the default sort order in TVC if no other configuration has been made. It will sort the reports first by its format secondly by the display-name.
The second example will sort the reports by their internal name (the name of the business object or the name of the XML report).
The third example will utilize the sort-order value set on the report definition itself. This is either specified on the business object report through the "TVC Sort Order" attribute, or on the XML report as shown below:
<ExpansionReport>
<SortOrder>10</SortOrder>| In order to utilize the sort order in an efficient way, you need to ensure that this value has been set correctly in the report definitions. |
All acceptable values for the init parameter are listed below: (they can be combined by separating them using the "," character (comma)).
-
sortorder
-
displayname
-
format
-
name
By default, the ascending sort order is used, however, a "!" character before the property will force descending sort order.
4.6.2. Image
You can associate an image to each report. By default, the system will try to figure out what icon to be shown depending on the output format. To customize what icon to be displayed, you should either use the attribute "TVC Icon" for business object defined report and for XML reports do as shown below:
<ExpansionReport>
<Icon>/common/images/some-image.png</Icon>| The path to the image should be relative to the context root of your application. |
5. Creating Stylesheets
This chapter describes how to develop the stylesheets that are used to convert the XML data produced by the report generator into for example XSL-FO, which is used to create PDF reports, or into HTML format or another XML format.
The stylesheets should be stored as page objects within ENOVIA.
5.1. Extract Raw XML
In order to make the process of creating stylesheets easier, you could extract the raw XML that the report generator is producing by setting the "Output Format" to an empty value. E.g.
<AdvancedReport>
    <OutputFormat></OutputFormat>
</AdvancedReport>
By doing so, you could use the produced XML in an external editor to develop the stylesheet.
5.2. Table Settings
The same tables used in the application may also be used for the report creation. However, there are some things to remember.
-
Only columns containing business object select data, relationship select data and program output is included in the report. Columns that has the setting "Column Type" set to either "programHTMLOutput, "checkbox" or "icon" are not included.
-
You can have data-handlers within the table that generates XML formatted data. However, to preserve the output from the data-handler the setting "Preserve Output" must be set to true; otherwise the XML tags are escaped.
-
It is possible to exclude a column; simply set the column setting
Exclude From Reportto TRUE.
5.3. XML Format
The default XML format is structured like the example below:
<report>
    <group-headers>...
    <headers>...
    <objects>...
    <table-calculations>...
    <meta-data>...
</report>
If you are using the "Advanced Report" definition type, the XML data will be formatted like:
<report>
    <section-1>
        <group-headers>...
        <headers>...
        <objects>...
        <table-calculations>...
    </section-1>

    <section-2>
        <group-headers>...
        <headers>...
        <objects>...
        <table-calculations>...
    </section-2>
    ...
    <meta-data>...
</report>
E.g. each section will be grouped inside its own element, but the content within each section is similar as in the other cases.
The group headers are formatted like:
<group-headers>
    <group-header columns="2">first group header</group-header>
    <group-header columns="3">second group header</group-header>
    <group-header columns="8"/>
</group-headers>
The headers are formatted like:
<headers>
    <header id="c1" type="the-data-type">
        <name>the name of the column</name>
        <expression>the expression</expression>
        <label>the label for the column</label>
        <setting name="name of setting">value of setting</setting>
        ...
    </header>
    ...
</headers>
The objects are formatted like:
<objects>
    <row level="0" isFrom="true" oid="45044.10990.53681.16271" type="Part"
            name="EV-000001" rev="A" current="Create" policy="Development Part"
            symbolicType="type_Part">
        <cell index="0" colRef="c0">
            <value>Part</value>
        </cell>
        <cell index="1" colRef="c1">
            <value>EV-000001</value>
        </cell>
        <cell index="2" colRef="c2">
            <value>A</value>
        </cell>
        <cell index="3" colRef="c3">
            <value>Create</value>
        </cell>
        ...
        <row ...>

        </row>
    </row>
    ...
</objects>
The table calculations are formatted like:
<table-calculations row-count="1540">
    <calculation column="name of column">
        <title>The title text</title>
        <value>The calculated value</value>
    </calculation>
    ...
</table-calculations>
The meta-data section is formatted like:
<meta-data>
    <rt-property key="user">Test Everything</rt-property>
    <rt-property key="fullname">Everything, Test</rt-property>
    ...
    <basic key="type" localizedKey="Type">Part</basic>
    <basic key="policy" localizedKey="Policy">Development Part</basic>
    ...
    <files>
        <file format="..." name="..." size="..."/>
        ...
    </files>
    <attr ...
    ...
</meta-data>
The meta-data section contains information regarding the object, which the report was created for. All basic information and attributes can be found here. Additional select statements could be entered into the TVC Conversion Properties attribute, which will force the selected value to appear in this meta-data section.
5.3.1. Date Values
A value containing date values, will be generated like following:
<value displayDate="..." isoDate="..." isoDateTime="...">mx-value</value>
The mx-value is the date as formatted by ENOVIA. This will vary depending on the "ENOVIA ini-parameters".
The displayDate value is the value as formatted according to the locale, and the iso-date and iso-datetime contains ISO formatted dates with and without the timestamp.
5.4. Stylesheet Template
The following example shows how an XSL-XML document is generated from a structural report (the example lacks details about formatting and should only be used as a template).
<?xml version="1.0" encoding="UTF-8"?>
<xsl:stylesheet
xmlns:xsl="http://www.w3.org/1999/XSL/Transform"
xmlns:fo="http://www.w3.org/1999/XSL/Format" version="1.0">

    <!-- Define layout, paper-size, margins etc -->
    <xsl:template match="/">
        <fo:root xmlns:fo="http://www.w3.org/1999/XSL/Format">
            <fo:layout-master-set>
                <fo:simple-page-master master-name="only"
                                        margin-right="1.5cm"
                                        margin-left="1.5cm"
                                        margin-bottom="0.5cm"
                                        margin-top="1cm"
                                        page-width="29.7cm"
                                        page-height="21cm">
                    <fo:region-body margin-top="3cm" margin-bottom="1.8cm"/>
                    <fo:region-before extent="3cm"/>
                    <fo:region-after extent="1.5cm"/>
                </fo:simple-page-master>
            </fo:layout-master-set>
            <fo:page-sequence master-reference="only">
                <xsl:call-template name="header"/>
                <xsl:call-template name="footer"/>
                <xsl:call-template name="body"/>
            </fo:page-sequence>
        </fo:root>
    </xsl:template>

    <!—- Generates the header that will appear on each page -->
    <!-- The header contains some basic information regarding -->
    <!-- creator and creation date. -->
    <xsl:template name="header">
        <fo:static-content flow-name="xsl-region-before">
            <fo:table width="100%">
                <fo:table-column/>
                <fo:table-column/>
                <fo:table-body>
                    <fo:table-row>
                        <fo:table-cell>
                            <fo:block text-align="right">
                                Created by: <xsl:value-of select="/report/meta-data/rt-property[@key =
                                'fullname']"/>
                            </fo:block>
                            <fo:block text-align="right">
                                Created date: <xsl:value-of select="/report/meta-data/rt-property[@key =
                                'date']"/>
                            </fo:block>
                        </fo:table-cell>
                    </fo:table-row>
                    <fo:table-row>
                        <fo:table-cell>
                            <fo:block>
                                Report
                            </fo:block>
                        </fo:table-cell>
                    </fo:table-row>
                </fo:table-body>
            </fo:table>
        </fo:static-content>
    </xsl:template>

    <!—- Generates the footer that will appear on each page -->
    <!-- The footer contains some basic information regarding -->
    <!-- type,name and revision and page numbering -->
    <xsl:template name="footer">
        <fo:static-content flow-name="xsl-region-after">
            <fo:table width="100%">
                <fo:table-column/>
                <fo:table-column/>
                <fo:table-body>
                    <fo:table-row>
                        <fo:table-cell>
                            <fo:block>
                                Report for <xsl:value-of select="/report/meta-data/basic[@key = 'type']"/>,
                                <xsl:value-of select="/report/meta-data/basic[@key = 'name']"/>,
                                <xsl:value-of select="/report/meta-data/basic[@key = 'revision']"/>
                            </fo:block>
                        </fo:table-cell>
                        <fo:table-cell>
                            <fo:block line-height="14pt" font-size="10pt" text-align="end">
                                Page <fo:page-number/> of <fo:page-number-citation ref-id="endofdoc"/>
                            </fo:block>
                        </fo:table-cell>
                    </fo:table-row>
                </fo:table-body>
            </fo:table>
        </fo:static-content>
    </xsl:template>

    <!-- Generates the body, i.e. the table with the data -->
    <!-- The table contains header information for each column -->
    <xsl:template name="body">
        <fo:flow flow-name="xsl-region-body">
            <fo:table width="100%">
                <fo:table-column/>
                <xsl:for-each select="/report/headers/header">
                    <fo:table-column>
                        <xsl:if test="setting[@name='Column Width']">
                            <xsl:attribute name="column-width">
                                <xsl:value-of select="setting[@name='Column Width']"/>
                            </xsl:attribute>
                        </xsl:if>
                    </fo:table-column>
                </xsl:for-each>
                <fo:table-header>
                    <fo:table-row background-color="#999999">
                        <fo:table-cell>
                            <fo:block>Level</fo:block>
                        </fo:table-cell>
                        <xsl:for-each select="/report/headers/header">
                            <fo:table-cell xsl:use-attribute-sets="tableHeader">
                                <fo:block><xsl:value-of select="label"/></fo:block>
                            </fo:table-cell>
                        </xsl:for-each>
                    </fo:table-row>
                </fo:table-header>
                <fo:table-body>
                    <xsl:for-each select="//row[@level != 0]">
                        <fo:table-row>
                            <xsl:if test="position() mod 2 = 0">
                                <xsl:attribute name="background-color">#CCCCCC</xsl:attribute>
                            </xsl:if>
                            <fo:table-cell xsl:use-attribute-sets="tableCell">
                                <fo:block><xsl:value-of select="@level"/></fo:block>
                            </fo:table-cell>
                            <xsl:for-each select="cell/value">
                                <fo:table-cell xsl:use-attribute-sets="tableCell">
                                    <fo:block><xsl:value-of select="."/></fo:block>
                                </fo:table-cell>
                            </xsl:for-each>
                        </fo:table-row>
                    </xsl:for-each>
                </fo:table-body>
            </fo:table>
            <!-- Empty final block to use when counting pages -->
            <fo:block id="endofdoc"
                      font-size="11pt"
                      font-family="sans-serif"
                      line-height="15pt"
                      space-after.optimum="7pt"
                      text-align="start">
                <xsl:text/>
            </fo:block>
        </fo:flow>
    </xsl:template>

</xsl:stylesheet>
5.5. Stylesheet Import/Include
It is possible to import or include another stylesheet that is stored either on disk or within a page object.
By using the prefix of page: and the name of the page object in the
<xsl:import…> or <xsl:include…> tags, the URI resolver knows that it
should include the referenced page object.
<xsl:include href="tvc:stylesheet/MyIncludedStylesheet.xslt"/>

<xsl:import href="page:My Imported Stylesheet"/>
5.6. Passing Custom Properties to the Stylesheet
In order to make the stylesheets more flexible, it is possible to pass custom parameters to the stylesheet that is evaluated during the XSL transformation step.
There are two ways how to send these parameters:
-
Defining the transformer properties within the Report Definition configuration.
If you are using business object based report definitions, these transformer properties are entered within the conversion properties section; the difference is that the transformer properties must start with a prefix as shown below: transformProperty.paperSize=A3Note that the prefix "transformProperty." is stripped when the property is passed to the XSLT process.
-
Via the pre-process page set transform properties. All request parameters submitted from the pre-process page that starts with "transformer." is treated as a transformer parameter.
The prefix "transformer." is stripped when the property is passed to the XSLT process. The transformer parameters are retrieved in the XSL as shown below:
<?xml version="1.0" encoding="UTF-8"?>
<xsl:stylesheet xmlns:xsl=http://www.w3.org/1999/XSL/Transform
                xmlns:fo="http://www.w3.org/1999/XSL/Format" version="1.0">
    <xsl:param name="paperSize" select="'A4'"/>
    ...
</xsl:stylesheet>
5.7. Creating Excel Reports
To create a report that’s possible to open with Microsoft Excel™, this can be done in two different ways:
-
Using SpreadSheetML.
-
Using a Custom report and produce native Excel through the POI API.
5.7.1. SpreadsheetML
SpreadsheetML is an XML format accepted by Microsoft Excel 2003 and later.
When producing reports following this standard, you need to specify the following on the report definition:
| Configuration Option | Value / Description | Additional Notes |
|---|---|---|
Stylesheet |
Name of a stylesheet that converts the XML into SpreadsheetML XML.
|
|
Output Format |
XML
|
This will instruct the RPT framework that your output will be XML and the conversion is done through an XSLT transformation. |
Displayed Output Format |
Excel |
This value is displayed for the end user. |
Report Settings |
file.suffix=xml file.contentType=application/vnd.ms-excel |
These properties are used when downloading the report. |
Below are some useful references that describe the SpreadsheetML format deeper:
5.7.2. Custom Report using POI
POI is an open source library provided by the Apache organization for working with Microsoft Office files. Through POI, you can for example create native Excel files (XLS).
POI is part of the TVC-Core library, which RPT depends upon. The POI classes are available within the "com.technia.tvc.poi" package.
To create custom reports, see the developer documentation.
To summarize, you need do the following:
-
Create a report definition of type "Custom Report". Example:
import com.technia.tvc.reportgenerator.DataExtractor; import com.technia.tvc.reportgenerator.DataExtractorCtx; import com.technia.tvc.reportgenerator.impl.CustomReport; import com.technia.tvc.poi.hssf.usermodel.HSSFCell; import com.technia.tvc.poi.hssf.usermodel.HSSFRow; import com.technia.tvc.poi.hssf.usermodel.HSSFSheet; import com.technia.tvc.poi.hssf.usermodel.HSSFWorkbook; import java.io.IOException; public class ExampleWithPOI extends CustomReport implements DataExtractor { private static final long serialVersionUID = 1L; public void extract(DataExtractorCtx ctx) throws IOException { HSSFWorkbook workbook = new HSSFWorkbook(); HSSFSheet sheet = workbook.createSheet(); for (int rowNo = 0; rowNo < 10; rowNo++) { HSSFRow row = sheet.createRow(rowNo); for (int colNo = 0; colNo < 10; colNo++) { HSSFCell cell = row.createCell(colNo); cell.setCellType(HSSFCell.CELL_TYPE_STRING); cell.setCellValue(String.format("%d : %d", rowNo, colNo)); } } workbook.write(ctx.getOutputStream()); } @Override public DataExtractor getDataExtractor() { return this; } } -
Define some properties within the Conversion Properties attribute:
file.suffix=xls
file.contentType=application/vnd.ms-excel
Example report in XML:
<CustomReport>
    <Name>Excel Report Example</Name>
    <Description></Description>
    <Global>true</Global>
    <Class>com.acme.rpt.ExampleWithPOI</Class>
    <DisplayedOutputFormat>Excel</DisplayedOutputFormat>
    <Settings>
        <Setting name="file.on.demand" value="true"/>
        <Setting name="file.suffix" value="xls"/>
        <Setting name="file.contentType" value="application/vnd.ms-excel"/>
    </Settings>
</CustomReport>
6. Distributing the Report Creation
Creating a report is typically a resource demanding task in terms of memory use and CPU usage, this because a report typically extracts large amount of data and uses XSLT transformation to convert XML. Even though the internals of the report generator has been implemented in a very efficient way, there will always be a cost in terms of performance to create reports. The report generator has a solution to this, by providing support for distributed creation of reports through use of so called Agents. The agents can be distributed across several computers in the network.
Within the ENOVIA database, you can create business objects of type "TVC Queue".
A report can be associated with a particular queue, by setting the "queue.name" property within the "TVC Conversion Properties" attribute to the name of the "TVC Queue" object. Example:
queue.name = Queue 1
This would correspond to the business object of type "TVC Queue" with name "Queue 1" and having the revision set to empty. The object must be created inside the "TVC Administration" vault.
Whenever a report is created, and the "queue.name" property is defined, a job object will be created and connected to the queue object.
Each queue that is in use needs a so called Agent, which is a separate process that is polling the queue for new jobs. It is possible to have several Agents attached to the same queue; however, one queue agent can only be attached to one queue. This is also illustrated in the picture below.
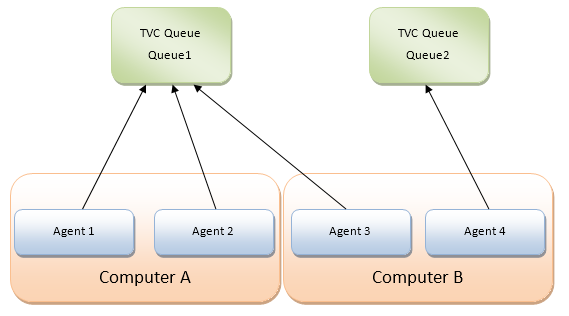
Figure 7. Queue and Agent
6.1. Data Model
Within the database, objects of type TVC Queue represent the queues. The information required to create a report is stored inside an object of type "TVC Job". Job objects are connected to a queue with the relationship "TVC Job".
As of TVC 2011.2, the Agents can also be represented in the database as objects (this is not required though). Within the start script of an agent, you can define an identifier for the agent and if present an agent object will also be created inside the database. The job object will in such case also be connected to the Agent that is processing the job.
To summarize, the data model around this looks like:
The relationship between the Queue and Job and between the Agent and Job is called "TVC Job". The connection between the Agent and Queue is called "TVC Agent". Neither of these relationship types has any attributes.
6.1.1. Attributes
The table below illustrates the attributes being used.
| Business Type | Attribute Name | Purpose | ||
|---|---|---|---|---|
TVC Agent |
TVC Agent Last Alive |
A time stamp indicating the time when the agent last was processing a job. |
||
TVC Agent Startup |
The time stamp when the agent were started up |
|||
TVC Agent Stop Request |
A Boolean attribute that can be set to instruct the Agent to terminate when all ongoing jobs has been completed. |
|||
TVC Queue |
TVC Keep Jobs |
A Boolean value indicating if the jobs should be deleted or not. Setting this attribute to true allows accessing the generated reports after completion. The user can from the user interface see his/her created reports and download them for example. |
||
TVC Keep Time |
A string indicating how long time a job is/should be kept after completion. The value of this attribute is a string, and the format is:
Examples:
Scripts are available for cleaning up jobs that are older than the configured keep time. Such script can be setup to be ran periodically.
|
|||
TVC Job |
TVC Job Status |
Contains a string used to track the status of a completed job. This attribute is used internally by the report generator and should not be manipulated. |
||
TVC Job Info |
Contains a string that is used to identify the job. The value is populated based upon the conversion property "jobInfoMacro". |
|||
TVC Cancel Requested |
A boolean value that indicates that the job should be cancelled. E.g. when the agent takes this job, the job is immediately cancelled. |
6.1.2. Lifecycles
The types Queue, Agent and Job have its own policies. These are described in the table below:
| Business Type | Policy | States | Description |
|---|---|---|---|
TVC Queue |
TVC Queue |
Exists |
N/A |
TVC Agent |
TVC Agent |
Exists |
N/A |
TVC Job |
TVC Job |
Created |
Initial state. |
Waiting |
When the job is connected to a queue, the job is promoted to this state. The job is cancellable in this state. |
||
In Work |
When an agent starts processing a job, the job is promoted to this state. |
||
Done |
When the job has been completed, this state is reached. If the report failed or was cancelled, this is indicated within the TVC Job Status attribute on the job object. In case of success, the job object will also hold the generated report. |
6.2. The Queue Agent
The queue agent is a Java application connected to the ENOVIA/Matrix database. To start an agent one will use the provided start scripts (Windows and UNIX shell scripts available) with some modifications. The modifications required are defined in the sub chapters below.
6.2.1. Queue Agent Start Script
When the report generator is installed, you will have a folder under the WEB-INF directory in the web-application called "reportgenerator". This folder contains a Windows start script and a UNIX start script. These scripts are called:
QueueAgent.sh
QueueAgent.bat
The script has been made as generic as possible and to use it, you will typically invoke the script with the following arguments:
| Argument | Description |
|---|---|
1 |
The name of the queue to bind to. This will set the variable QUEUE_NAME. |
2 |
The name of the agent. This will set the AGENT_ID variable. |
3 |
The action to perform. Any of:
These actions are described later |
| You need to modify the script slightly in order to get it working in your environment correctly. This is described in the next chapter. |
6.2.2. Required Script Changes
The first things you need to modify within these scripts are the following variables:
| Variable Name | Description | ||
|---|---|---|---|
WEBAPP_ROOT_DIR |
Points out where your web application is installed. This is needed as we load the JAR files and other resources dynamically from this directory. The value can be a relative or absolute path. Since the scripts are
located under If you place the script somewhere else, you must change this variable. |
||
CONTEXT_HOST |
Specifies how to connect to ENOVIA/Matrix. If you use RIP mode, this variable is empty, while if RMI mode is used this variable will point out a RMI server. Example:
or
|
Example:
SET WEBAPP_ROOT_DIR=d:\apps\apache-tomcat-6.0.29\webapps\enovia
SET CONTEXT_HOST=rmi://127.0.0.1:1099
If you are running in RIP mode, you will need some additional Matrix related settings also in the script. However, it is out-of-scope in this document to describe the Matrix details.
On UNIX you can modify the MX_ENV_SCRIPT variable to point to a valid mxEnv.sh script.
Java Home
In the Windows start script, it is assumed that the JAVA_HOME variable is set. If not, this has to be set before invoking the script. For UNIX, you need to modify the script and define the JAVA home.
Defining the Number of concurrent Threads
Each queue agent can run X number of concurrent threads. Default this is set to 5. If needed, this value can be changed. Keep in mind that increasing the value requires more resources, like heap size etc. If the number of threads is too high, consider adding a new queue agent process.
The number of threads is specified by the parameter: THREADS.
6.2.3. Agent Actions
The available values for the action argument provided to the script are defined in the table below:
| Action | Description |
|---|---|
run |
|
start |
|
status |
Prints out some statistics for the queue such as how many jobs are waiting. |
stopall |
Requests all agents connected to the queue to stop. |
validate |
Validates how many and what jobs that can be deleted through the cleanup |
cleanup |
Cleans up old jobs that are older than configured keep-time |
6.3. Queue/Job Administration
If you have configured your queues to keep the jobs, you can use enable a command in the user interface allowing administrators to manage and inspect the jobs in the queues.
The URL to the admin console should be:
${ROOT_DIR}/tvc-action/rgAdminConsole
This URL can only be accessed by a person having either system or business privileges or having the role Administration Manager. Once this interface is shown, you will see something like:
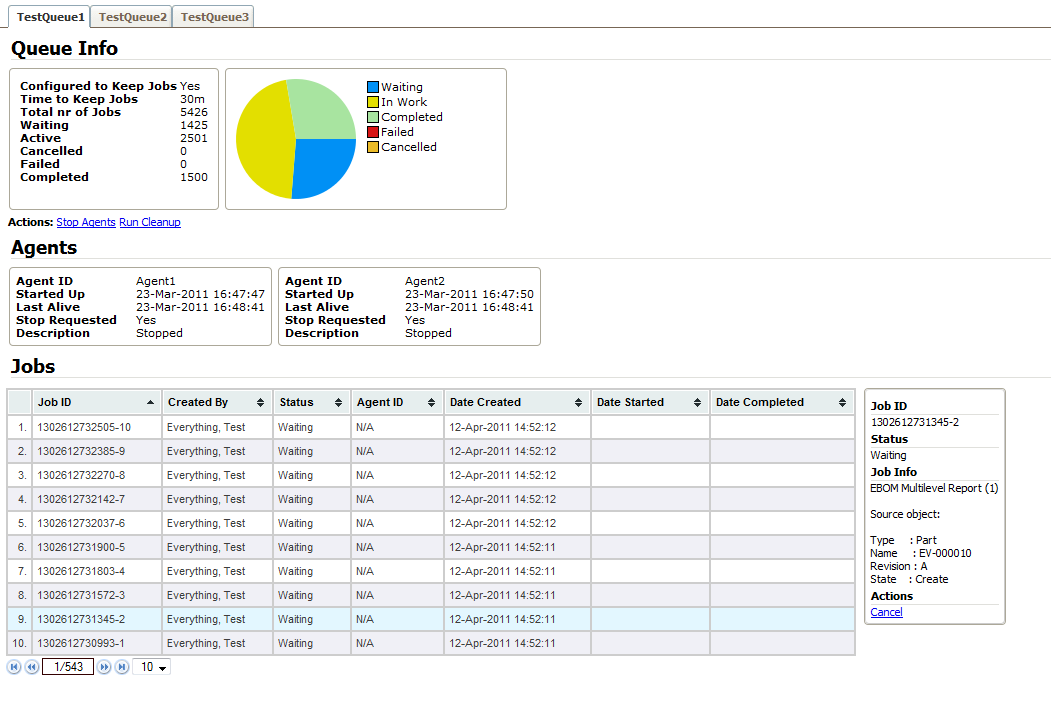
Figure 8. Administration of Jobs
This page gives a tab for each queue, and each tab shows information about a queue such as some statistics and information about attached agents as well as all jobs related to a queue.
Through the list of jobs, you can inspect the jobs and depending on the status of a job, you can for example download the generated report, cancel a report that has not been started and delete a completed job.
Also, the administrator can request all agents to terminate (they will then terminate when all ongoing jobs are completed). Additionally, the administrator can run the clean up, e.g. delete all completed jobs that are older than the configured keep time.
6.4. Allowing a User to Access Jobs
If you have configured your queues to keep the jobs, you can use enable a command in the user interface allowing the users to access jobs that he/she has created. This in order to be able to download reports that has been created in the past time.
The URL to the user job console should be:
${ROOT_DIR}/tvc-action/rgUserConsole
When this page is opened, the user will see a table containing the jobs like shown below:
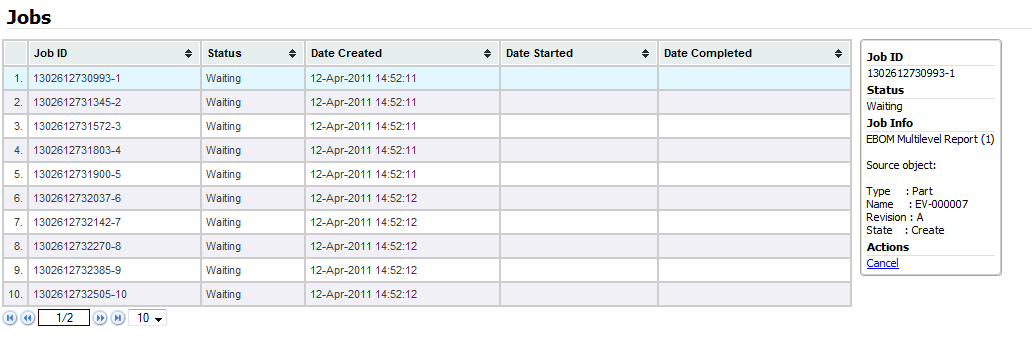
Figure 9. User jobs
From this page, the user can download reports that have been created or request jobs not yet being processed for cancellation.
7. Images
Some of the reports allow you to embed images, for example PDF reports. An image can be taken from the web application, or it could be an image checked into a businessobject. It is also possible to embed a business type image, or a business object image.
7.1. Images Loaded From the Database
Following example illustrates how to include an image, taken from a businessobject image.
<fo:external-graphic border-width="0">
    <xsl:attribute name="src">
        url('matrix://busimage/<xsl:value-of select="@oid"/>')
    </xsl:attribute>
</fo:external-graphic>
Following example illustrates how to include an image, taken from the business type.
<fo:external-graphic border-width="0">
    <xsl:attribute name="src">
        url('matrix://typeimage/<xsl:value-of select="@type"/>')
    </xsl:attribute>
</fo:external-graphic>
Following example illustrates how to include an image, taken from a checked in file.
<fo:external-graphic border-width="0">
    <xsl:attribute name="src">
        url('matrix://busfile/<xsl:value-of select="@oid"/>/format/filename')
    </xsl:attribute>
</fo:external-graphic>| The images retrieved are cached within the Apache FOP layer. If the images on a business object changes over time, you need to force FOP to not use the cached image and always load the image from the DB. This can be done by adding a dummy parameter to the URL. Below is one example how to do so: |
<fo:block xmlns:java="http://xml.apache.org/xslt/java">
    <fo:external-graphic border-width="0">
        <xsl:attribute name="src">
            url('matrix://busfile/oid/format/filename?foo=<xsl:value-of select="java:java.lang.System.currentTimeMillis()"/>');
        </xsl:attribute>
    </fo:external-graphic>
</fo:block>
Another option, which is better, would be to add the modified timestamp from the business object as a parameter on the URL instead of the current time.
7.2. Images from the Web Application
It is also possible to refer to an image from the web-application. The
Following example illustrates how to accomplish this:
<fo:external-graphic border-width="0">
    <xsl:attribute name="src">
        url('tvc/reportgenerator/images/tvc_logo_small.gif')
    </xsl:attribute>
</fo:external-graphic>
7.3. Charts
An alternative to creating charts within the reports by using SVG is to use the chart feature from TVC Core (see this chapter).
To include a chart in a PDF report, you can use the following construct within the stylesheets to accomplish this:
<fo:block>
    <fo:external-graphic border-width="0" content-width="15cm">
        <xsl:attribute name="src">matrix://chart/tvx:enc/EBOMStatus.xml?objectId=<xsl:value-of select="/report/meta-data/basic[@key='id']"/></xsl:attribute>
    </fo:external-graphic>
</fo:block>
The URL that is constructed should start with matrix://chart/${NAME_OF_CONFIG}?{PARAMS}"
The ${NAME_OF_CONFIG} is the name of the chart configuration to be used.
The ${PARAMS} are arbitrary parameters that you need to pass to the
chart in order to be able to produce an image. Typically, you need to
pass the object-id.
| The images are cached; see comment about this in coming chapter. |
Below is an example of an included chart within a PDF document.
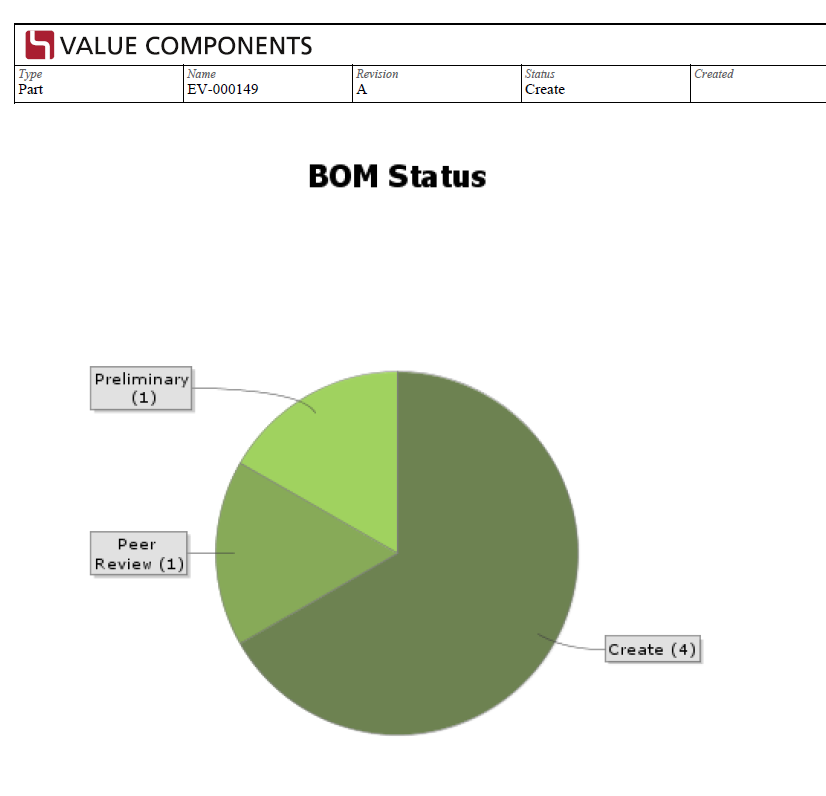
8. i18n
This chapter and sub-chapters discusses the i18n capabilities of the Report Generator and how to solve requirements related to creating reports in multiple languages.
8.1. Stylesheets
The stylesheets are responsible for the layout and placement of data including adding labels in different places such as
-
header
-
footer
-
form labels
-
table-headers
-
…
In order to avoid hard-coding labels within the stylesheet, one can define variables in the XSLT like this:
<?xml version="1.0" encoding="UTF-8"?>
<xsl:stylesheet version="1.0"
  xmlns:xsl="http://www.w3.org/1999/XSL/Transform"
  xmlns:fo="http://www.w3.org/1999/XSL/Format">

  <xsl:variable name="label_Files" select="'Files'" /> (1)
  <xsl:variable name="label_Issues">Issues</xsl:variable> (2)
  ...
  <xsl:template>
    <fo:block>
      <xsl:value-of select="$label_Files" /> (3)
    </fo:block>
  </xsl:template>
</xsl:stylesheet>| 1 | Declares variables containing the static text |
| 2 | Alternative syntax |
| 3 | Using the variable with <xsl:value-of> |
The next step is to separate the logic from the declaration of the variables in order to support multiple languages.
8.1.1. Dynamic Choose of Stylesheet
Within the Report definition you define the stylesheet to be used using the <Stylesheet>
element. E.g.
<AdvancedReport>
  <Stylesheet>Name-of-Stylesheet.xsl</Stylesheet>
  ...
</AdvancedReport>
At runtime when the report is being created and the stylesheets are being resolved, they are resolved based upon the locale used when the report is being invoked. Many times this is the locale as the user has, however, the user may choose another locale (see chapter below).
Example: A french speaking user located in Canada has the locale fr_CA is about to create a report. When the stylesheet is resolved, the search order for the stylesheet to be used will in this case be:
-
Name-of-Stylesheet_fr_CA.xsl
-
Name-of-Stylesheet_fr.xsl
-
Name-of-Stylesheet.xsl
The first found will be used.
Hence, within the language specific stylesheets, you can declare all your language specific variables and then finally include the language neutral templates that produces the output.
Example:
Name-of-Stylesheet_fr_CA.xsl
<?xml version="1.0" encoding="UTF-8"?>
<xsl:stylesheet version="1.0"
  xmlns:xsl="http://www.w3.org/1999/XSL/Transform"
  xmlns:fo="http://www.w3.org/1999/XSL/Format">

  <xsl:variable name="label_Files">Fichiers</xsl:variable>
  <xsl:variable name="label_Issues">Problèmes</xsl:variable>
  <!-- add more variables ... -->

  <!-- Include layout / templates -->
  <xsl:include href="tvc:stylesheet/Layout.xsl"/>
</xsl:stylesheet>
8.2. Extracted Data
If you are using the default XML format as produced from the Report Generator, you will in many places be able to automatically get the correct translation of for example attribute names, state names, type names etc.
NOTE For this to work, the translation must exist in the language specific properties files below /WEB-INF/classes in your application.
Example output:
Header part of a section
<header id="c4" type="string">
    <name>State</name>
    <label>État</label> (1)
    <expression>current</expression>
    <setting name="Registered Suite">Framework</setting>
</header>| 1 | The label is here translated into French |
Object part of a section
<objects>
  <row ...>
      <cell index="0" colRef="c0">
          <value>Pièce Attache</value> (1)
      </cell>
      ...
      <cell index="4" colRef="c4">
          <value>Créée</value> (2)
      </cell>
</row>| 1 | The type translated into French |
| 2 | The current state name in French |
Meta Section
  <attr key="Part Classification"
      symbolicName="attribute_Classification"
      localizedKey="Classification de pièces"
      value="Unassigned">Non affecté</attr> (1)

<basic key="current" localizedKey="État" value="Create">Créée</basic>| 1 | Both the translated value and the DB-value is available in the output |
8.3. Designing Your Tables
You typically use tables that are evaluated over a set of objects and/or relationships. A table defines columns, where each column typically contains a select expression.
To ensure that translations are working, you must set the Setting "Registered Suite" on the column and also use the correct keys for the Labels (also Alt if used). Example:
<?xml version="1.0" encoding="UTF-8"?>
<Table xmlns="http://technia.com/TVC/Table" xmlns:xsi="http://www.w3.org/2001/XMLSchema-instance"
	xsi:schemaLocation="http://technia.com/TVC/Table http://products.technia.com/tvc/schema/latest/Table.xsd">
	<Column>
		<Name>Type</Name>
		<Expression>type</Expression>
		<Label>emxFramework.Basic.Type</Label>
		<RegisteredSuite>Framework</RegisteredSuite>
	</Column>
	<Column>
		<Name>Name</Name>
		<Expression>name</Expression>
		<Label>emxFramework.Basic.Name</Label>
		<RegisteredSuite>Framework</RegisteredSuite>
	</Column>
	<Column>
		<Name>Revision</Name>
		<Expression>revision</Expression>
		<Label>emxFramework.Basic.Revision</Label>
		<RegisteredSuite>Framework</RegisteredSuite>
	</Column>
	<Column>
		<Name>Description</Name>
		<Expression>description</Expression>
		<Label>emxFramework.Basic.Description</Label>
		<RegisteredSuite>Framework</RegisteredSuite>
	</Column>
	<Column>
		<Name>Current</Name>
		<Expression>current</Expression>
		<Label>emxFramework.Basic.Current</Label>
		<RegisteredSuite>Framework</RegisteredSuite>
	</Column>
</Table>
8.4. Change Language
By default, the report is created with the same locale information as the user who is requesting the report. Note however that in some cases, the user may want to create a report in a different language.
To support that use case you need to decide where to do the language selection. Typically you have two options; either associate the report with a pre-process-page and include a language chooser in there. OR, provide different commands / links that will launch the Report Generator with different values for the locale/language.
8.4.1. Request Parameter
If you are launching the report generator through a direct link or via a command in a toolbar, you are most likely using the following URL:
${ROOT_DIR}/tvc-action/beginCreateReport?reportDefinition=tvc:report/MyReport.xml
By adding the parameter "locale" with a valid value, you can create multiple versions of such link/command. Example:
${ROOT_DIR}/tvc-action/beginCreateReport?reportDefinition=tvc:report/MyReport.xml&locale=fr_CA
8.4.2. Pre Process Page
To support selecting the locale/language from a pre-process page, you need to in the pre-process page include a language chooser.
Example of such here:
Pre process page with language chooser
...
<html>
    ...
    <body onload="pageInit()">
        <form action="<rg:writePreProcessPageSubmitAction/>"
              method="post" style="margin:0px;padding:0px;">
            <table>
                <tr>
                    <td class="label" nowrap>Choose Language</td>
                    <td class="inputField">
                        <select name="locale"> (1)
                            <option value="en_US">English (US)</option>
                            <option value="de_DE">German (Germany)</option>
                            <option value="fr_FR">French (France)</option>
                            <option value="fr_CA">French (Canada)</option>
                        </select>
                    </td>
                </tr>
            </table>
        </form>
    </body>
</html>| 1 | The selected value is submitted with the name "locale" |
9. Fonts
When creating PDF reports that contains for example Asian characters you might need to configure the Apache FOP system to find proper fonts that contains glyphs for those characters.
As mentioned in earlier chapter, the report generator contains two different version of Apache FOP: 0.20.5 and 1.0. The font handling in the latter version has been improved a lot compared to earlier versions. This version should preferably be used.
The sub chapters below contain information how to define custom fonts for the different FOP versions.
| In your stylesheet, you need to refer to the fonts that contain the proper glyphs. |
Example:
<xsl:attribute-set name="tableCell">
    <xsl:attribute name="font-family">MSMincho</xsl:attribute> (1)
    ...
</xsl:attribute-set>

...

<fo:table-cell xsl:use-attribute-sets="tableCell"> (2)
    <fo:block>
        ...
    </fo:block>
</fo:table-cell>| 1 | Defines the font |
| 2 | Use attribute set |
9.1. FOP 0.20.5
Create a file called FOPConfig-0.20.5.xml within the folder:
/WEB-INF/classes/com/technia/tvc/reportgenerator/fop
To register custom fonts, add them into the file created according to the example below:
<configuration>
    <fonts>
     <!-- example -->
     <!--
     <font metrics-file="arial.xml" kerning="yes" embed-file="arial.ttf">
        <font-triplet name="Arial" style="normal" weight="normal"/>
        <font-triplet name="ArialMT" style="normal" weight="normal"/>
     </font>
     <font metrics-file="arialb.xml" kerning="yes" embed-file="arialb.ttf">
        <font-triplet name="Arial" style="normal" weight="bold"/>
        <font-triplet name="ArialMT" style="normal" weight="bold"/>
     </font>
     <font metrics-file="ariali.xml" kerning="yes" embed-file="ariali.ttf">
        <font-triplet name="Arial" style="italic" weight="normal"/>
        <font-triplet name="ArialMT" style="italic" weight="normal"/>
     </font>
     <font metrics-file="arialbi.xml" kerning="yes" embed-file="arialbi.ttf">
        <font-triplet name="Arial" style="italic" weight="bold"/>
        <font-triplet name="ArialMT" style="italic" weight="bold"/>
     </font>
     -->
     <!-- Example Japanese fonts
     <font metrics-file="msgothic.xml" embed-file="D:\winnt\font\msgothic.ttc" kerning="yes">
        <font-triplet name="Gothic" style="normal" weight="normal"/>
        <font-triplet name="Gothic" style="normal" weight="bold"/>
        <font-triplet name="Gothic" style="italic" weight="normal"/>
        <font-triplet name="Gothic" style="italic" weight="bold"/>
     </font>
     <font metrics-file="msmincho.xml" embed-file="Cyberbit.ttf" kerning="yes">
        <font-triplet name="Mincho" style="normal" weight="normal"/>
        <font-triplet name="Mincho" style="normal" weight="bold"/>
        <font-triplet name="Mincho" style="italic" weight="normal"/>
        <font-triplet name="Mincho" style="italic" weight="bold"/>
       </font>
      -->
    </fonts>
</configuration>-
The metrics-file must be created from the TTF file using the below command: (example below)
java -cp tvc-reportgenerator-x.y.z.jar com.technia.tvc.fop0205.fonts.apps.TTFReader [options] C:\myfonts\cmr10.ttf ttfcm.xmlWhere the
[options]are described in the table below:Option Description -fn <fontname>
By default, FOP uses the fontname from the .pfm file when embedding the font. Use the "-fn" option to override this name with one you have chosen. This may be useful in some cases to ensure that applications using the output document (Acrobat Reader for example) use the embedded font instead of a local font with the same name.
-ttcname <fontname>
If you’re reading data from a TrueType Collection (.ttc file) you must specify which font from the collection you will read metrics from. If you read from a .ttc file without this option, the fontnames will be listed for you.
-enc ansi
Creates a WinAnsi-encoded font metrics file. Without this option, a CID-keyed font metrics file is created. The table below summarizes the differences between these two encoding options as currently used within FOP. Please note that this information only applies to TrueType fonts and TrueType collections:
-
The metrics files are located relative to the root of the application.
-
Some additional info on this topic can be read from this resource:
9.2. FOP 1.0+
As of FOP 1.0, the fonts available in the operating system on the server where the report generator is running will be registered automatically.
If you need to register a new font, do as described below:
-
Create a file called FOPConfig.xml within the folder:
/WEB-INF/classes/com/technia/tvc/reportgenerator/fop -
The default file that is part of the envoiareportgenerator.jar looks like below:
<fop version="1.0">
    <strict-configuration>false</strict-configuration>
    <strict-validation>false</strict-validation>
    <source-resolution>72</source-resolution>
    <target-resolution>72</target-resolution>
    <use-cache>true</use-cache>
    <renderers>
        <renderer mime="application/pdf">
            <fonts>
                <auto-detect/>
            </fonts>
        </renderer>
    </renderers>
</fop>
Modify this file according to the descriptions found at this URL:
10. Extended Configuration Possibilities
10.1. Webform as Pre Process Page
As of 2011.1, support for using a webform as pre-process page is possible. To use a webform as pre process page, you simple define the value of the pre-process-page setting as below:
webform:name of webform
When this syntax is used, the pre process page will be generated by the
/common/emxFormEditDisplay.jsp page (not part of TVC / TVC Report
generator).
| Using a webform as pre process page can only be used for non-global reports. E.g. an object-id must be available (this is a limitation of the web-form framework). |
10.2. Custom Pre Processing Pages
There is a possibility to have a pre-process page that is executed before the report is being created. Such page could be used to have more interaction with the user, for example defining runtime parameters that impact the report layout and/or content.
Within the report definition, you define the context-relative URL for the pre process page to be used. Context-relative means that you should skip the web-application name, for example if the web-application is called ematrix and your custom pre-process page is under /ematrix/custom/preprocess1.jsp – then the attribute should contain following: /custom/preprocess1.jsp.
Since the pre-processing page is a JSP page, almost any logic may be done on this page. But, typically the general idea with this page is to allow:
-
Overriding settings in the Report Definition instance
-
Defining custom transformer properties
An example of a pre-process page is provided among the web-application
files that are installed with the report generator:
tvx/enc/EBOMSummaryPreProcessPage.jsp.
10.2.1. Submitting Parameters
The request parameters that are submitted from the pre-process page must have one of three different prefixes, in order for the report generator to know how to handle them. These prefixes are:
| Parameter Prefix | Description |
|---|---|
convProps. |
May be used to submit a parameter that typically is defined within the "TVC Conversion Properties" attribute. Example: |
runtime. |
May be used to submit a parameter that overrides an attribute that is defined on the Report Definition instance. The attribute that is being overridden should be referred to with its symbolic name. Example: |
transformer. |
Defines a parameter that is passed to the stylesheet during conversion. Example: |
10.2.2. Submit Action
The URL used to start the report creation from a pre-process page is generated by using following JSP custom tag:
<%@ taglib uri="/WEB-INF/tvc-reportgenerator.tld" prefix="rg" %>
<form action="<rg:writePreProcessPageSubmitAction/>"
10.2.3. Selecting Columns
The definition types "Expansion Report" and "Inquiry Report" are both using a "Table". Sometimes it is useful to allow the user to select columns to be included in the table. Following JSP code does this:
<%@ include file="/tvc/core/tvcSetContentType.jspf" %>
<%@ taglib uri="/WEB-INF/tvc-core.tld" prefix="core" %>
<%@ taglib uri="/WEB-INF/tvc-reportgenerator.tld" prefix="rg" %>
<core:checkLogon/>
<core:noCache/>
<rg:report id="report"/>
<html>
    <head></head>
    <body>
        <form action="<rg:writePreProcessPageSubmitAction/>" method="post">
            <rg:hasTableColumns name="report">
                <table border="0" cellspacing="2" cellpadding="3">
                    <tr>
                        <td class="label" nowrap width=100>Select Columns</td>
                        <td class="inputField" nowrap>
                            <rg:tableColumnChooser name="report"/>
                        </td>
                    </tr>
                </table>
            </rg:hasTableColumns>
        </form>
    </body>
</html>
10.2.4. Selecting Sections
The definition type "Advanced Report" is built up by sections. The user can select sections that should be included / excluded from the report. Following JSP code does this:
<%@ include file="/tvc/core/tvcSetContentType.jspf" %>
<%@ taglib uri="/WEB-INF/tvc-core.tld" prefix="core" %>
<%@ taglib uri="/WEB-INF/tvc-reportgenerator.tld" prefix="rg" %>
<core:checkLogon/>
<core:noCache/>
<rg:report id="report"/>
<html>
    <head></head>
    <body>
        <form action="<rg:writePreProcessPageSubmitAction/>" method="post">
            <rg:hasSection name="report">
                <table border="0" cellspacing="2" cellpadding="3">
                    <tr>
                        <td class="label" nowrap width=100>Select Columns</td>
                        <td class="inputField" nowrap>
                            <rg:sectionChooser name="report"/>
                        </td>
                    </tr>
                </table>
            </rg:hasSection>
        </form>
    </body>
</html>
10.2.5. Selecting Printer
A pre process page example showing how to add a printer selector is shown below. The bold marked sections show the related code for the printer selector. Everything else is just there for illustration purposes on how to create a complete working example.
<%@ include file="/tvc/core/tvcSetContentType.jspf" %>
<%@ taglib uri="/WEB-INF/tvc-core.tld" prefix="core" %>
<%@ taglib uri="/WEB-INF/tvc-struts-bean.tld" prefix="bean" %>
<%@ taglib uri="/WEB-INF/tvc-reportgenerator.tld" prefix="rg" %>
<%@ taglib uri="/WEB-INF/tvc-reportgenerator-outputhandler.tld" prefix="oh" %>
<core:checkLogon />
<core:noCache />
<html>
    <head>
        <core:tvcBase/>
        <core:themeArtifact id="tvc-form"/>
        <script type="text/javascript"
                src="reportgenerator/js/tvcPreProcessPageScripts.js">
        </script>
        <oh:printerSelector disposition="head"/>
        <script type="text/javascript">
            tvcSetSubmitFunction(doSubmitForm);
            function doSubmitForm() {
                var printers = getSelectedPrinters();
                if (printers == null) {
                    parent.frames["createBottom"].private_tvcSetContinueEnabled(true);
                    alert("Please select a printer");
                } else {
                    document.forms[0].elements["convProps.print.printers"].value = printers.join(",");
                    document.forms[0].submit();
                }
            }
        </script>
    </head>
    <body>
        <form action="<rg:writePreProcessPageSubmitAction/>" method="post" style="margin:0px;padding:0px;">
            <input type="hidden" name="convProps.print.printers" />
            <table border="0" width="99%">
                <tr>
                    <td class="label" nowrap width=100>Select Printer</td>
                </tr>
                <tr>
                    <td class="inputField" nowrap>
                        <oh:printerSelector disposition="content"/>
                    </td>
                </tr>
            </table>
        </form>
    </body>
</html>
11. Client Script
A client script is included in the distribution. Use one of the provided start scripts (Windows and UNIX shell scripts available) with some modifications. The modifications required are defined in the sub chapters below.
When the report generator is installed, you will have a folder under the WEB-INF directory in the web-application called reportgenerator. This folder contains a Windows start script and a UNIX start script. These scripts are called:
Client.sh
Client.bat
The script has been made as generic as possible and to use it, you will typically invoke the script with the following arguments:
The first things you need to modify within these scripts are the following variables:
| Variable Name | Description | ||
|---|---|---|---|
USER |
The name of the user, who is running the report |
||
PASS |
The password for this user |
||
OBJECT_ID |
The id of the object, for which the report is being created |
||
REPORT |
The name of the report to create |
||
TARGET_FILE |
The name of the file, which will contain the generated report. If this is set to empty:
|
||
WEBAPP_ROOT_DIR |
Points out where your web application is installed. This is needed as we load the JAR files and other resources dynamically from this directory. The value can be a relative or absolute path. Since the scripts are
located under If you place the script somewhere else, you must change this variable. Example:
|
||
QUEUE_NAME |
The name of the queue to use (leave empty for no queue) |
||
DEBUG |
TRUE or FALSE. Defines the amount of output from the report generator. |
||
JAVA |
In the Windows start script, it is assumed that the JAVA_HOME variable is set. If not, this has to be set before invoking the script. For UNIX, you need to modify the script and define the JAVA home. |
||
HEAP_SIZE |
The size of the heap |
||
CONTEXT_HOST |
Specifies how to connect to ENOVIA/Matrix. If you use RIP mode, this variable is empty, while if RMI mode is used this variable will point out a RMI server. Example: CONTEXT_HOST= CONTEXT_HOST=rmi://server:1099
|
12. Deprecated / Obsolete Configuration
12.1. Advanced Report with Inline Data Sets
As of release 2013.1.0, the recommended approach is to define datasets in external files according to what’s documented within the "TVC Core Administration Guide". It is still possible to define the data-sets inline within the report definition, however, the implementation that is used for the inline definitions does not offer the same capabilities as if you declare them in external file; also, this data-set implementation within the Report Generator will not be enhanced in future releases – all focus will be made to enhance the data-set implementation that is available in TVC Core. The documentation for the inline-definitions of data-sets is still available in the documentation for users that already has reports that has been developed using the inline definitions.
A data set provides a section with a set of objects or objects connections. One data set can be used by different sections, e.g. different tables evaluated over the same data-set.
A data-set must have an identifier, which is set through the "id" attribute on the "DataSet" element, for example:
<DataSet id="spare-parts">
The id must be unique within the report.
A data set uses so called data-producer definitions, which is any of:
-
Expand
-
Inquiry
-
Query
-
Select
-
JPO
The next chapter describes these data producers more in detail.
12.1.1. Data Producers
Expansion
The definition how to expand a structure is shown below.
<Expand>
    <From>true</From>
    <To>false</To>
    <Depth>1</Depth>
    <TypePattern>
        <Type>type_Part</Type>
    </TypePattern>
    <RelationshipPattern>
        <Relationship>relationship_SparePart</Relationship>
    </RelationshipPattern>
</Expand>
Setting the depth to 0, you will expand as deep as possible. This can only be done in one direction.
In the example above, it is the object for which the report is being created for that is being expanded. It is possible to expand some other object(s), this is accomplished by nesting different data producer elements with each other (see this chapter for more details).
Inquiry
To load the data from an inquiry, it is defined like below:
<Inquiry>
    <Name>My Inquiry</Name>
</Inquiry>
Query
It is also possible to define a query. See the example below how to do so.
<Query>
<ExpandType>true</ExpandType>
<FindLimit>0</FindLimit>
<TypePattern>
<Type>type_Part</Type>
<Type>type_AnotherType</Type>
</TypePattern>
<NamePattern>
<Name>A*</Name>
<Name>B*</Name>
</NamePattern>
<RevisionPattern>
<Revision>A</Revision>
<Revision>B</Revision>
<Revision>C</Revision>
</RevisionPattern>
<OwnerPattern>
<Owner>A user</Owner>
</OwnerPattern>
<VaultPattern>
<Vault>A vault</Vault>
<Vault>Another vault</Vault>
</VaultPattern>
<Where>$<attribute[attribute_Weight]< > 100</Where>
</Query>Select
Getting object through a select statement is also possible. See the example below how to do so.
<Select>
    <Statement>from[Documents].to.revisions.id</Statement>
    <Statement>from[Specs].to.revisions.id</Statement>
</Select>
As seen, you can have several statements. Each statement must of course return object-ids.
12.1.2. Combining Data Producers
It is possible to combine different data producers within a data-set. For example, you might want to use an inquiry for loading the root-nodes of a structure before you perform the expansion.
Or you need to expand in one direction to find some objects before you can expand those in a different direction along a different relationship pattern. All of this is described within the following chapter(s).
The data producer used for expanding a structure, Expand, can be driven by a nested Data Producer. E.g. the root nodes in the new structure can be originated from the result of a Query, Inquiry or another expansion. Or after have used any of the Flatten, EndItems or Filter elements that are described in the next chapters.
All in all, the data producers building up a data-set can be very powerful and you will be able to accomplish a lot without the need of writing any code at all.
Flatten Data
Data retrieved by an expansion, contains structural information. If you want to remove the structure information and treat the data as a list, you can use the Flatten element as shown below:
<DataSet id="abc">
    <Flatten>
        <Expand>
            <From>true</From>
            <Depth>0</Depth>
This can be useful when you need to use the filtering possibility (which is described later on).
A flattened data list might contain the same object several times. To ensure unique rows only, you can add the attribute "removeDuplicates" and set the value to true.
<DataSet id="abc">
    <Flatten removeDuplicates="true">
        <Expand>
            <From>true</From>
            <Depth>0</Depth>
Keeping Only the End Items
In some cases, you might want to work with the end items within a structure. To remove anything except the end items, you can use the EndItems element as shown below:
<DataSet id="abc">
    <EndItems>
        <Expand>
            <From>true</From>
            <Depth>0</Depth>
Same as for the Flatten element, you can apply the "removeDuplicates" attribute to ensure that you have unique rows only.
Filter Data
If you need to filter the data for some reason, this can be done through the Filter element.
The example below expands a structure, makes it flat, then applies the filter and removes all the rows not matching this filter.
<DataSet id="abc">
<Filter>
<Expression>$<attribute[attribute_Classification]> == ABC</Expression>
<Flatten>
<Expand>
...
</Expand>
</Flatten>
</Filter>
</DataSet>A Complex Example
The example below illustrates how a more complex data set could be defined:
<DataSet id="regulated-products">
<Filter>
<Expression>$<type.kindof[type_RegulatedProduct]></Expression>
<Flatten>
<Expand>
<Inquiry>
<Name>GetECAffectedItems</Name>
</Inquiry>
<Depth>0</Depth>
<From>false</From>
<To>true</To>
<TypePattern>
<Type>type_ProductConfiguration</Type>
<Type>type_Products</Type>
<Type>type_Part</Type>
</TypePattern>
<RelationshipPattern>
<Relationship>relationship_ProductConfiguration</Relationship>
<Relationship>relationship_EBOM</Relationship>
</RelationshipPattern>
</Expand>
</Flatten>
</Filter>
</DataSet>First, an inquiry is used to retrieve the root-nodes in the structure. These objects are expanded in the to-direction. The result is "flattened" before it is being filtered. E.g. at the end, only objects of type "Regulated Product" is included.
12.2. JPO Report Definition
The JPO Report Definition is similar to the "Custom Report Definition" type. However, instead of pointing out a Java class from the classpath, you have to point out a JPO/method that generates the data.
TECHNIA does not recommend using the JPO report definition due to both performance reasons, but also that a JPO cannot produce reports in binary format; only text reports such as XML/HTML/CSV etc. A better alternative is to use the "Custom Report Definition".
A JPO Report Definition is defines as shown below:
<JPOReport>
    ...
    <JPO name="MyJPO" method="myMethod"/>
</JPOReport>| Your custom JPO must be derived from the JPO called "TVCJPOReportBase". The base class contains an OutputStream, called "out", that you should use to send your data to. Also remember to flush any data written to this output stream, before leaving the JPO. |
| The JPO TVCJPOReportBase has dependencies to some classes from the tvc-reportgenerator-zzz.jar file. Ensure that your MX_CLASSPATH setting contains this file, otherwise your JPO will not work properly._ |
12.2.1. Custom JPO Example
import matrix.db.Context;
import java.io.PrintWriter;

public class ${CLASSNAME} extends ${CLASS:TVCJPOReportBase} {

    public ${CLASSNAME}(Context ctx, String[] args) {
        super(ctx, args);
    }

    public void myMethod() throws Exception {
        PrintWriter writer = new PrintWriter(out, true);
        try {
            /*
             * Add code here that creates the data.
             */
        } finally {
            writer.flush();
            writer.close();
        }
    }
}