MCAD Optimizer - Administration Guide
05 April 2016
1. Legal Notes
© Copyright 2003-2019 by TECHNIA AB
All rights reserved.
PROPRIETARY RIGHTS NOTICE: This documentation is proprietary property of TECHNIA AB. In accordance with the terms and conditions of the Software License Agreement between the Customer and TECHNIA AB, the Customer is allowed to print as many copies as necessary of documentation copyrighted by TECHNIA relating to the software being used. This documentation shall be treated as confidential information and should be used only by employees or contractors with the Customer in accordance with the Agreement.
This product includes software developed by the Apache Software Foundation. (http://www.apache.org/).
2. MCAD Optimizer
The MCAD Optimizer is an add-on to the Structure Browser Component leveraging the same navigational capabilities and dynamic GUI. The administrator can easily configure new views to display MCAD information according to company requirements. The MCAD Optimizer Component enhances the usability of MCAD integrations based on the MatrixOne Integration Exchange Framework (IEF), and is MCAD neutral (works with all MCAD tools supported by the IEF). The main features of the MCAD Optimizer Component are:
-
My CAD Objects - CAD Designers Homepage, displays CAD objects owned, originated and locked by that user. Access to all CAD functions. My MCAD Objects is automatically added by the installer.
-
MCAD Navigator - Displays the CAD structure in a familiar way, and provides access to all common CAD functions, like Check-out, Rename, Lock/Unlock etc. Shortcuts to related information like lifecycle, preview image and related Drawings. MCAD Navigator is automatically added by the installer.
-
MCAD Search – Find CAD object using tvc search functionality. MCAD Search is automatically added by the installer.
2.1. Usage Scenarios
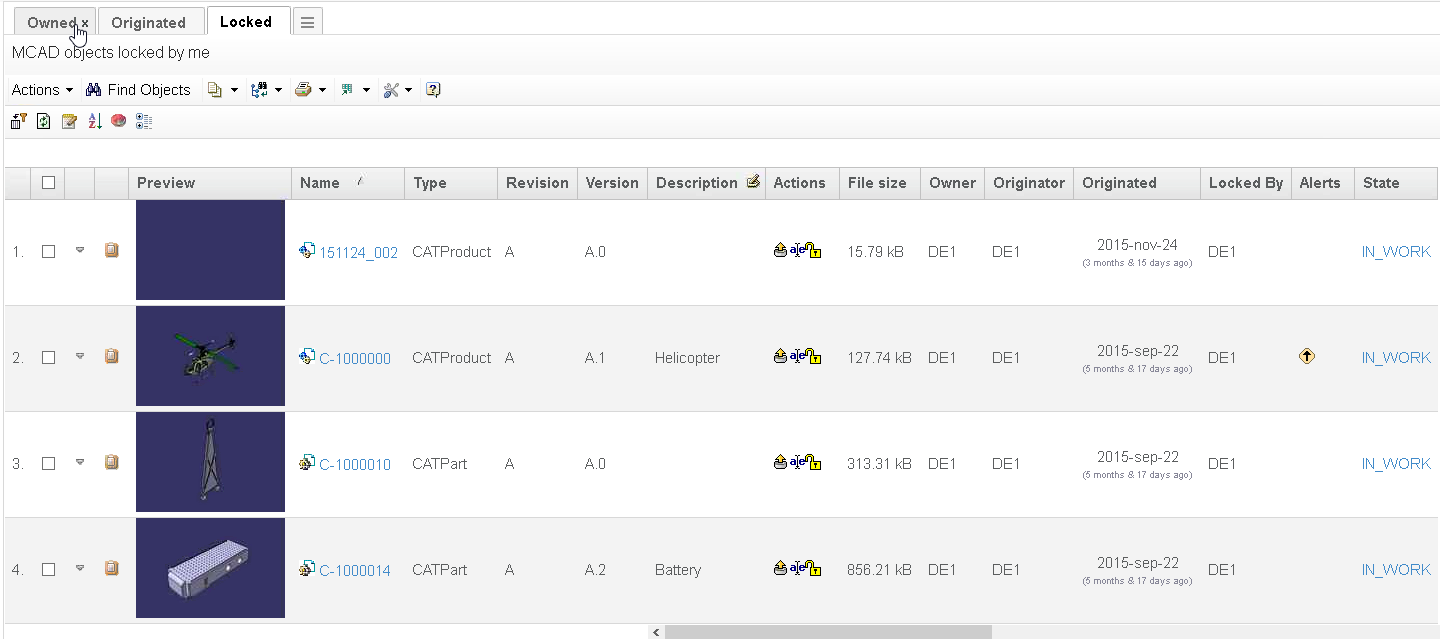
2.1.1. My MCAD Objects
"My MCAD Objects" is automatically added to menu "My Desk" → "Designer" → "My MCAD Objects" by the installer.
This page lists MCAD objects by three different requirements selected by tabs at the top of the page, reducing the number of times the user has to search for designs in the database. Designs Owned, Originated or Locked by the current user are available default.
The view includes a table with the familiar action icons, similarly to the Design Center search result table, as well as the State, Preview and Related Objects columns from MCAD Navigator (See next chapter for details) and the MCAD Actions toolbar enabling multi object actions such as multi unlock.
These requirements can easily be altered or new tabs could be added to suit different business requirements, please refer to Chapter 3 "Configuring MCAD Optimizer" for details.
Figure 1. My CAD Objects
2.1.2. MCAD Navigator
"MCAD Navigator" is automatically added to all MCAD Model and MCAD Drawing context menus by the installer.
The "MCAD Navigator" view can be accessed from the "MCAD Navigator" tree category available on all MCAD Model or MCAD Drawing objects. This view shows an expanded structure of the related CAD-items. If a MCAD Drawing is selected, the Models represented on the Drawing are listed. If a MCAD Assembly is selected, the sub assemblies and components are listed. If the structure consists of multiple levels it can be expanded one level at a time or all levels at once.
The expanded structure is displayed as an indented table and could be navigated by three different views Compact, Exploded and Where Used. Compact is the default view allowing the user to view related drawings in a column. Exploded navigates to the drawings as well allowing the user to perform multi actions on related drawings. Where Used is similar to Compact but with the difference that you navigate in the opposite direction.
The user could navigate an object by three different requirements Navigate, Revisions and Versions. Navigate navigates the relevant object, that is the active version or the revision itself dependent on state. Revisions allow the user to navigate all relevant objects of all revisions in the same navigator. Versions allow the user to navigate all versions of the current revision in the same navigator.
All different tabs navigate structure "As Stored ". The subcomponents are the ones (revision/version) that existed in the assembly at check-in. Later revisions or versions could exist and are alerted in the alerts column.
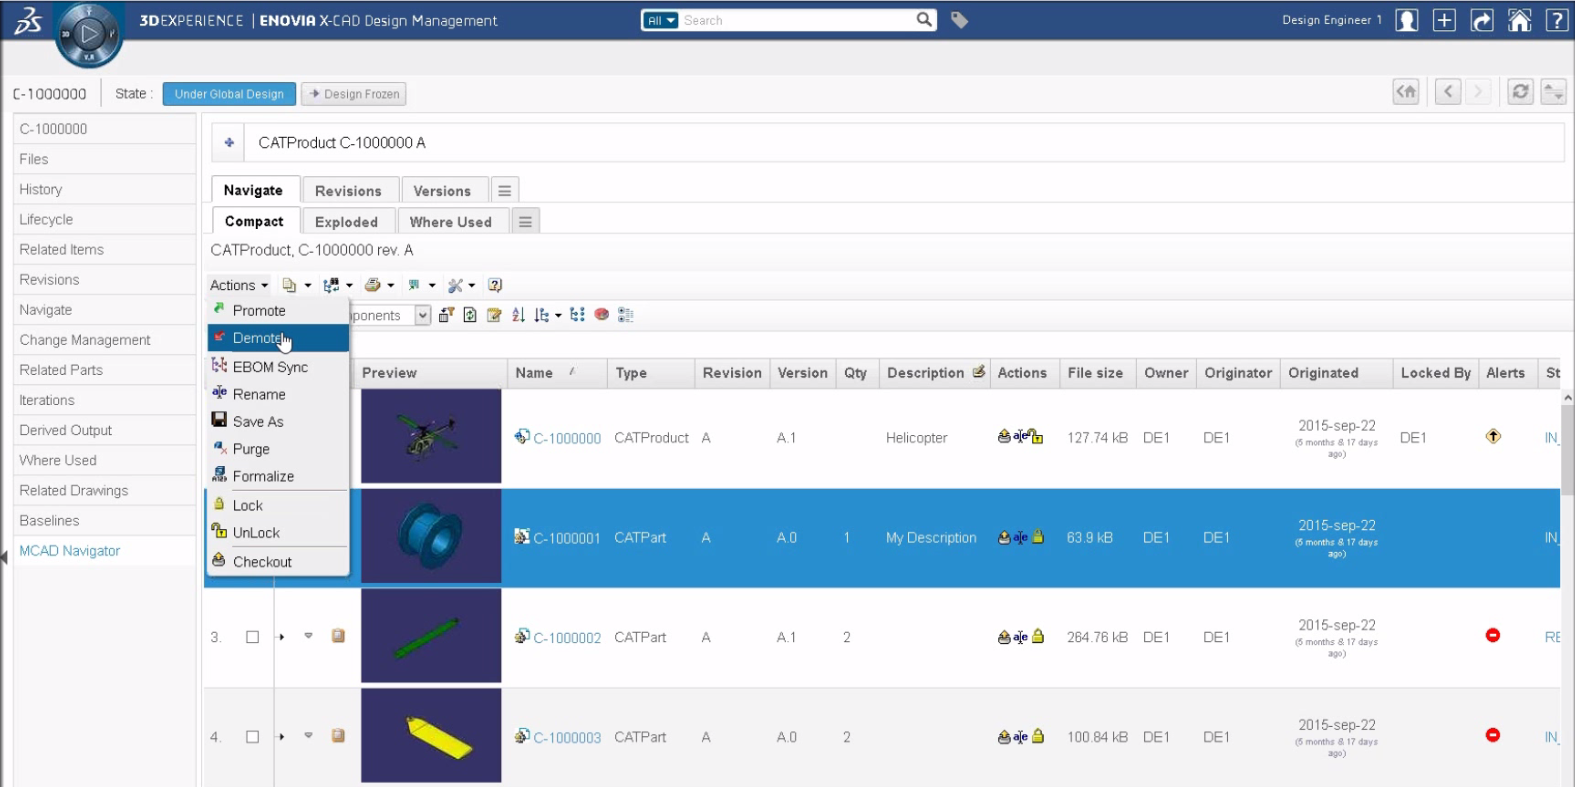
Figure 2. MCAD Navigator
Key information and common CAD functions are displayed for each of the listed objects. The CAD functions available are Promote, Demote, EBOM Sync, Rename, Save As, Purge, Baseline, Lock, Unlock and Checkout. In addition, there are some special columns available that provides additional information and functions to the user.
Table columns
- Navigate
-
image::image3.png[image]
Navigate a subset of the structure currently displayed, also known as "go there"
- Clipboard
-
Add the major object to the clipboard

- Popup
-
Object popup link

- Examine
-
Open the 3DLive Examine viewer in the side panel (if enabled)

- Examine (Light)
-
Open the 3DLiev Examine viewer in light mode in the side panel (if enabled)

- Side-panel Details
-
Open a web-form in the side-panel with a property details view

- Preview
-
If a preview image is present, a clickable thumbnail is displayed. Clicking it will open the preview image in a new window. The preview image must be stored in the same business object as the Cad-file for this function to work
For information on how to configure generation of preview images, please refer to the Designer Central admin guide - Name
-
The major object name clickable inserting the object to the context menu
- Type
-
The type of the major object
- Revision
-
Major object revision
Current revision is not necessarily the latest revision; it is the revision that is currently used by the assembly that is expanded in the structure (As Stored) - Version
-
Minor object revision
Current version is not necessarily the latest version; it is the version that is currently used by the assembly that is expanded in the structure (As Stored) - Description
-
Object description
- Actions
-
Quick-action list for each row

- Checkout
-
Opens the checkout dialog
- Rename
-
Opens the rename dialog
- Lock
-
Locks the object
- Un-lock
-
Un-locks the object
- Baseline
-
Opens the baseline dialog
Available before V6-2010 - File Size
-
Size of the file in the formats drw, prt and asm
Unit is displayed in Bytes, kB and MB
- Owner
-
Owner of the major object
- Originator
-
Originator of the major object
- Originated
-
Originated date of the major object
- Locked By
-
The user name of the object locker
- Alerts
-
This column displays warning icons if changes have been made to one or more items in the structure
Image Description 
A yellow square is displayed if any of the subcomponents has been renamed/revised/versioned since last check in. This would normally require a checkout and update of the affected parent.

A red circle is displayed for each of the modified sub components/assemblies. Modified in this context means that a newer revision or version exists, or that the object has been renamed.

A yellow warning sign is displayed if any subcomponents has been renamed or saved as. This would normally require a checkout and update of the affected parent.

A rename symbol is displayed if the object has been renamed or saved as.

A red node is displayed if the object has a derived component. Appears when there is a derived component structure under a component.
A tool tip is displayed when holding the mouse pointer over one of the icons, indicating what type of modification has taken place. - State
-
Shows current lifecycle state of the object and a link to the lifecycle page
- Family
-
Shows Family of the Instance (of family/instance data model is enabled)
- Popup
-
Opens the Family object in a popup
- Name
-
The name of the Family and a link to the object inserted in the context menu
- Locked By
-
Who has locked the family object
- Related Parts
-
Shows Parts using the model / drawing as a specification
Popup Opens the Part in a popup
- Name
-
The name of the Part and a link to the object inserted in the context menu
- Description
-
Description of the part
- Related Drawings
-
Shows Drawings of the model
- Popup
-
Opens the Drawing in a popup
- Name
-
The name of the drawing
- Description
-
Description of the drawing
- Related Changes
-
Displays ECOs, ECRs, CO’s, CA’s and CR’s that specifies a change order, action or request to the model
- Popup
-
Opens the change object in a popup
- Name
-
The name of the change object
- Description
-
Description of the change object
- Derived Outputs
-
Easy access to all files generated as Derived Output at check in from CAD integration
The rules for expansion and table display can easily be altered to suit different business requirements, please refer to Chapter 3 "Configuring MCAD Optimizer" for details.
2.1.3. Structure Related Drawings
The "Structure Related Drawings" view is removed since 6.4 as all structure related drawings are reached from "MCAD Navigator"
2.1.4. Formalize
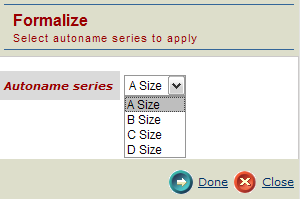
Formalize facilitating auto naming of multiple objects has been reintroduced. Select one or more objects and press formalize, select auto number series in dialog and press done to auto name the selected rows.
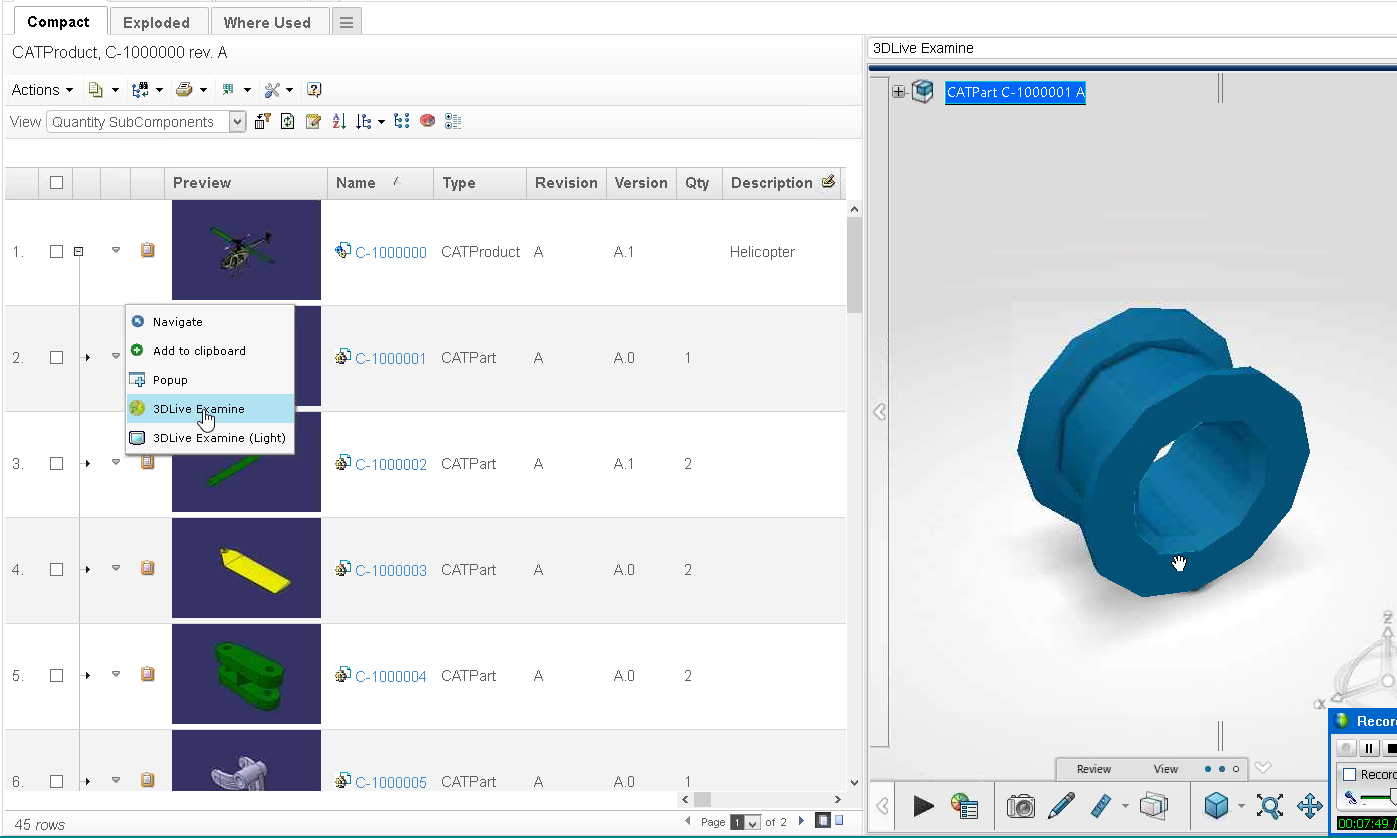
2.1.5. 3DLive Examine
3DLive Examine viewer can be accessed directly from the MCAD Optimizer. The viewer has to be enabled via an init parameter (see chapter about init parameters) and can be used with any CAD integration generating CGR-files as derived output. 3DLive Examine is available in two versions within MCAD Optimizer, the standard and one "light" mode which is faster to load but with very limited functionality.
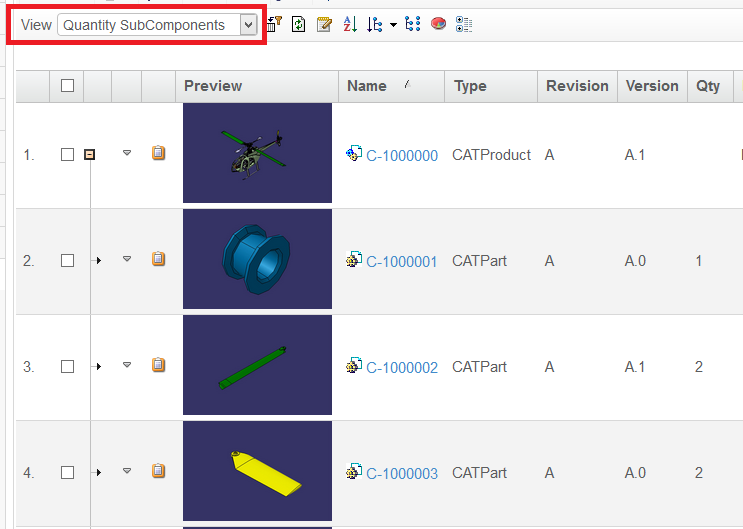
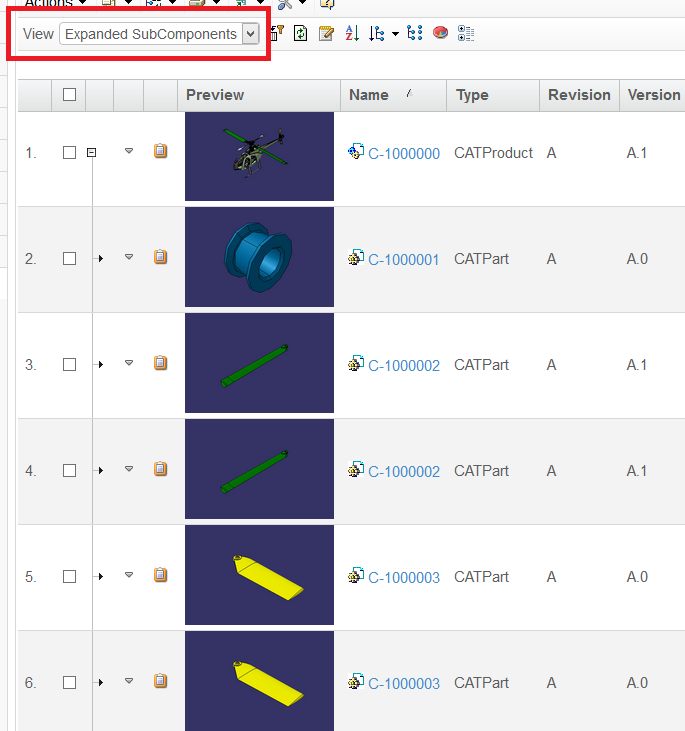
2.1.6. Expanded SubComponets vs. Quantity SubComponents
In the MCAD Navigator page the user can switch View between "Expanded SubComponents" and "Quantity SubComponents". In Expanded mode every "CAD SubComponent" relationship is show in the structure. In Quantity mode only one CAD SubComponent relationship for each connected component will be used. Instead a quantity column shows number of CAD SubComponent links.
This is only useful if MCADInteg-ExpandedSubComponent is set to TRUE in the GCO. Otherwise the integration itself will only create one relationship with a quantity attribute.
2.2. System Requirements
The following is a list of the minimum requirements for the installation of the MCAD Optimizer. If your system is different, consult TECHNIA before installing.
-
Matrix version in the range 10.7.1 to V6R2015X
-
Application Exchange Framework (AEF) in the range 10.7.1 to V6R2015X
-
Designer Central (DSC) / Integration Exchange Framework (IEF) in the range 10.7.1 to V6R2015X
-
TVC Structure Browser
-
Browsers according to the Matrix core product requirements
-
Application Server according to the Matrix core product requirements
3. Configuring MCAD Optimizer
Most of the MCAD Optimizer configuration can be done through the XML
Based Definitions found in the folders
WEB-INF/tvc/mcadoptimizer/*.
The MCAD Optimizer Administrator should be familiar with these techniques, and refer to the Structure Browser Administrator Guide and the XML Based Definitions for details on how configuration should be performed.
To introduce changes to the xml definitions simply modify the existing ones. Before an upgrade make a backup of the current definitions and merge changes made into the new upgraded definitions.
3.1. Configuring My MCAD Objects
The content and appearance of "My MCAD Objects" is controlled by the following admin objects that can be manipulated through the Matrix Business Modeler or MQL:
| Admin Object | Name | Description |
|---|---|---|
command |
TVCMCADMyCADObjects |
Command that is added to "My Desk→Designer" to make "My MCAD Objects" available to users. The command controls the menu based tabbed page to use through the parameter: "menu" |
In addition, page configurations, views etc are stored as xml based
definitions files and could be found in the folders
WEB-INF/tvc/mcadoptimizer/*:
| Resource Type | File Name | Description |
|---|---|---|
Inquiry |
MyObjects.xml |
Determines which objects to list in the "Owned" tab |
Inquiry |
OriginatedObjects.xml |
Determines which objects to list in the "Originated" tab |
Inquiry |
LockedObjects.xml |
Determines which objects to list in the "Locked" tab |
Menu |
tab/ MyObjectsTabs.xml |
Defines the tabs in "My MCAD Objects" |
Menu |
toolbar/ MyObjects.xml |
Defines the toolbar for "Owned" tab in "My MCAD Objects" |
Menu |
toolbar/ OriginatedObjects.xml |
Defines the toolbar for "Originated" tab in "My MCAD Objects" |
Menu |
toolbar/ LockedObjects.xml |
Defines the toolbar for "Locked" tab in "My MCAD Objects" |
Page configuration |
MyObjects.xml |
Defines the page conf for "Owned" tab in "My MCAD Objects" |
Page configuration |
OriginatedObjects.xml |
Defines the page conf for "Originated" tab in "My MCAD Objects" |
Page configuration |
LockedObjects.xml |
Defines the page conf for "Locked" tab in "My MCAD Objects" |
Table |
MyObjects.xml |
Defines the table for "Owned" tab in "My MCAD Objects" |
Table |
OriginatedObjects.xml |
Defines the table for "Originated" tab in "My MCAD Objects" |
Table |
LockedObjects.xml |
Defines the table for "Locked" tab in "My MCAD Objects" |
View |
MyObjects.xml |
Defines the view for "Owned" tab in "My MCAD Objects" |
View |
OriginatedObjects.xml |
Defines the view for "Originated" tab in "My MCAD Objects" |
View |
LockedObjects.xml |
Defines the view for "Locked" tab in "My MCAD Objects" |
3.2. Configuring MCAD Navigator
The content and appearance of "MCAD Navigate" is controlled by the following admin objects, that can be manipulated through the ENOVIA Business Modeler or MQL:
| Admin Object | Name | Description |
|---|---|---|
command |
TVCMCADNavigateModel |
Command that is added to context menus for cad models to make "MCAD Navigator" available to users. The command controls the menu based tabbed page to use through the parameter: "menu" |
command |
TVCMCADNavigateDrawing |
Command that is added to context menus for cad drawings to make "MCAD Navigator" available to users. The command controls the page configuration to use through the parameter: "pageConfig" |
In addition, page configurations, views etc are stored as xml based
definitions files and could be found in the folders
WEB-INF/tvc/mcadoptimizer/*:
| Resource Type | File Name | Description |
|---|---|---|
Menu |
tab/ NavigateModelTabs.xml |
Defines the tabs in "MCAD Navigator" for models |
Menu |
toolbar/ NavigateModel.xml |
Defines the toolbar for "Navigate" and "Revisions" tab in "MCAD Navigate" for models |
Menu |
toolbar/ NavigateDrawing.xml |
Defines the toolbar in "MCAD Navigator" for drawings |
Menu |
toolbar/ NavigateModelVersions.xml |
Defines the toolbar for "Versions" tab in "MCAD Navigator" for models |
Page configuration |
NavigateModel.xml |
Defines the page configuration for "Navigate" tab in "MCAD Navigator" for models |
Page configuration |
NavigateDrawing.xml |
Defines the page configuration in "MCAD Navigator" for models |
Page configuration |
NavigateModelRevisions.xml |
Defines the page configuration for "Revisions" tab in "MCAD Navigator" for models |
Page configuration |
NavigateModelVersions.xml |
Defines the page configuration for "Versions" tab in "MCAD Navigator" for models |
Table |
ModelCompact.xml |
Defines the table for "Compact" and "Where Used" view in "Navigate" and "Revisions" tab in "MCAD Navigator" for models |
Table |
ModelExploded.xml |
Defines the table for "Exploded" view in "Navigate" and "Revisions" tab in "MCAD Navigator" for models |
Table |
ModelVersionsCompact.xml |
Defines the table for "Compact" and "Where Used" view in "Versions" tab in "MCAD Navigator" for models |
Table |
ModelVersionsExploded.xml |
Defines the table for "Exploded" view in "Versions" tab in "MCAD Navigator" for models |
Table |
DrawingCompact.xml |
Defines the table for "Compact" view in "MCAD Navigator" for drawings |
Table |
DrawingExploded.xml |
Defines the table for "Exploded" view in "MCAD Navigator" for drawings |
View |
NavigateDrawingCompact.xml |
Defines the "Compact" view in "MCAD Navigator" for drawings |
View |
NavigateDrawingExploded.xml |
Defines the "Exploded" view in "MCAD Navigator" for drawings |
View |
NavigateModelCompact.xml |
Defines the "Compact" view in "Navigate" and "Revisions" tab in "MCAD Navigator" for models |
View |
NavigateModelExploded.xml |
Defines the "Exploded" view in"Navigate" and "Revisions" tab in "MCAD Navigator" for models |
View |
NavigateModelVersionsCompact.xml |
Defines the "Compact" view in "Versions" tab in "MCAD Navigator" for models |
View |
NavigateModelVersionsExploded.xml |
Defines the "Exploded" view in "Versions" tab in "MCAD Navigator" for models |
View |
NavigateModelVersionsWhereUsed.xml |
Defines the "Where Used" view in "Versions" tab in "MCAD Navigator" for models |
View |
NavigateModelWhereUsed.xml |
Defines the "Where Used" view in "Navigate" and "Revisions" tab in "MCAD Navigator" for models |
Filter |
AssociatedDrawingFrom.xml |
Filter applied to relationship "CAD SubComponent" in to direction |
Filter |
AssociatedDrawingTo.xml |
Filter applied to relationship "CAD SubComponent" in from direction |
Filter |
CADSubComponentFrom.xml |
Filter applied to relationship "Associated Drawing" in to direction |
Filter |
CADSubComponentTo.xml |
Filter applied to relationship "Associated Drawing" in from direction |
Filter |
DerivedComponentFrom.xml |
Filter applied to relationship "Derived Component" in to direction |
Filter |
DerivedComponentTo.xml |
Filter applied to relationship "Derived Component" in from direction |
| Normally, the CAD-specific menus are added on a high level (types and menus starting with MCAD…), making them common for all MCAD-types. Some CSEs (Client Specific Extension – the client part of the integration, specific to CAD tool), however add specific menus for certain types. This is not taken care of by the MCAD Optimizer installer. In those cases, the administrator must manually add the "TVC Navigate MCAD Assembly" to the CAD-specific menus, e.g menu IEF_typeProEPart. |
3.3. Configuring table columns
3.3.1. Major Object Data

To be display the correct data for objects navigating through the complex
datamodel the datahandler
com.technia.tvc.mcadoptimizer.datahandlers.MajorObjectData is used.
MajorObjectData makes sure that the expression is applied to the major
(revision) object. If you use MajorObjectData together with the
expression "current" the current state of the major (revision) object is
shown (used in the State column) even if the minor (version) object is
the one currently displayed and current state Exists is displayed
without MajorObjectData handler.
Example:
<Column>
<Label>State</Label>
<Expression>current</Expression>
<Href>
${SUITE_DIR}/emxInfoObjectLifecycleFS.jsp?header=emxIEFDesignCenter.Header.Lifecycle&HelpMarker=emxHelpInfoObjectLifeCycleDialog&topActionbar=IEFLifeCycleTopActionBarActions
</Href>
<RegisteredSuite>DesignerCentral</RegisteredSuite>
<TargetLocation>popup</TargetLocation>
<HeaderNoWrap>true</HeaderNoWrap>
<DataHandlerClass>com.technia.tvc.mcadoptimizer.datahandlers.MajorObjectData</DataHandlerClass>
</Column>3.3.2. Minor Object Data

To be display the correct data for objects navigating through the
complex datamodel the datahandler
com.technia.tvc.mcadoptimizer.datahandlers.MinorObjectData is used.
MinorObjectData makes sure that the expression is applied to the minor
(version) object. If you use MinorObjectData together with the
expression "revision" the revision of the minor (version) object is
shown (used in the version column) even if the major (revision) object
is the one currently displayed.
Example:
<Column>
    <Label>Version</Label>
    <Expression>revision</Expression>
    <RegisteredSuite>DesignerCentral</RegisteredSuite>
    <NoWrap>true</NoWrap>
    <Fixed>true</Fixed>
    <HeaderNoWrap>true</HeaderNoWrap>
    <DataHandlerClass>
        com.technia.tvc.mcadoptimizer.datahandlers.MinorObjectData
    </DataHandlerClass>
</Column>
3.3.3. Preview
To display the preview image in tables the datahandler
com.technia.tvc.mcadoptimizer.datahandlers.Preview is used. It is
used in combination with the cellrenderer
com.technia.tvc.mcadoptimizer.cellrenderers.Preview to display a
clickable thumbnail. You cold configure from what format the preview
image should be loaded using the setting "Preview Format".
Example:
<Column>
    <Label>Preview</Label>
    <HeaderNoWrap>true</HeaderNoWrap>
    <Setting name="Preview Format">format_Image<!--,format_jpg--></Setting> (1)
    <CellRendererClass>
        com.technia.tvc.mcadoptimizer.cellrenderers.Preview
    </CellRendererClass>
    <DataHandlerClass>
        com.technia.tvc.mcadoptimizer.datahandlers.Preview
    </DataHandlerClass>
    <Fixed>true</Fixed>
</Column>| 1 | Default value is format_Image |
3.3.4. Actions

To display the quick actions column in tables the datahandler
com.technia.tvc.mcadoptimizer.datahandlers.Actions is used. It is
used in combination with the cellrenderer
com.technia.tvc.mcadoptimizer.cellrenderers.Actions to display
clickable icons. You could configure which action icons to display.
Example:
<Column>
    <Label>Actions</Label>
    <HeaderNoWrap>true</HeaderNoWrap>
    <CellRendererClass>
        com.technia.tvc.mcadoptimizer.cellrenderers.Actions
    </CellRendererClass>
    <DataHandlerClass>
        com.technia.tvc.mcadoptimizer.datahandlers.Actions
    </DataHandlerClass>
    <!--<Setting name="Hide Checkout" value="true"/>-->
    <!--<Setting name="Hide Rename" value="true"/>-->
    <!--<Setting name="Hide Lock" value="true"/>-->
    <!--<Setting name="Hide Unlock" value="true"/>-->
    <!--<Setting name="Hide Baseline" value="true"/>-->
</Column>| Setting | Default |
|---|---|
Hide Checkout |
false |
Hide Rename |
false |
Hide Lock |
false |
Hide Unlock |
false |
Hide Baseline |
false (not supported for V6-2010 or later) |
3.3.5. Related Object
To display related object links, popup’s or data there is a related object DataHandler that will find the related objects no matter if it is related to the major or the minor object or if the row corresponds to either major or minor object. All you have to do is to define the relationship(s) and the direction(s) to the related object you like to display (comma separated).
Name link (Related Part Example)
Example:
<Column>
    <GroupHeader>Related Part(s)</GroupHeader>
    <Label>Name</Label>
    <Href>../common/emxTree.jsp?mode=insert</Href>
    <ShowAlternateIcon>true</ShowAlternateIcon>
    <TargetLocation>content</TargetLocation>
    <NoWrap>true</NoWrap>
    <HeaderNoWrap>true</HeaderNoWrap>
    <DataHandlerClass>
        com.technia.tvc.mcadoptimizer.datahandlers.RelatedObject
    </DataHandlerClass>
    <Setting name="relationships" value="relationship_PartSpecification"/>
    <Setting name="directions" value="to"/>
</Column>
Popup (Related Part Example)
Example:
<Column>
    <GroupHeader>Related Part(s)</GroupHeader>
    <Label></Label>
    <Href>../common/emxTree.jsp?mode=insert</Href>
    <Alt>popup</Alt>
    <ColumnIcon>images/iconActionNewWindow.gif</ColumnIcon>
    <ColumnType>icon</ColumnType>
    <TargetLocation>popup</TargetLocation>
    <DataHandlerClass>
        com.technia.tvc.mcadoptimizer.datahandlers.RelatedObject
    </DataHandlerClass>
    <CellRendererClass>
        com.technia.tvc.mcadoptimizer.cellrenderers.Popup
    </CellRendererClass>
    <WindowHeight>680</WindowHeight>
    <WindowWidth>960</WindowWidth>
    <Fixed>true</Fixed>
    <Setting name="relationships" value="relationship_PartSpecification"/>
    <Setting name="directions" value="to"/>
</Column>
Related object data (Related Part Description Example)
Example:
<Column>
    <GroupHeader>Related Part(s)</GroupHeader>
    <Label>Name</Label>
    <Href>../common/emxTree.jsp?mode=insert</Href>
    <ShowAlternateIcon>true</ShowAlternateIcon>
    <TargetLocation>content</TargetLocation>
    <NoWrap>true</NoWrap>
    <HeaderNoWrap>true</HeaderNoWrap>
    <DataHandlerClass>
        com.technia.tvc.mcadoptimizer.datahandlers.RelatedObject</DataHandlerClass>
    <Setting name="relationships" value="relationship_PartSpecification"/>
    <Setting name="directions" value="to"/>
</Column>
3.3.6. Alerts

To display the alerts column in tables the datahandler
com.technia.tvc.mcadoptimizer.datahandlers.Alerts is used. It is
used in combination with the cellrenderer
com.technia.tvc.mcadoptimizer.cellrenderers.Alerts to display icons.
You could configure which icons to display.
Example:
<Column>
    <Label>Alerts</Label>
    <HeaderNoWrap>true</HeaderNoWrap>
    <RegisteredSuite>DesignerCentral</RegisteredSuite>
    <DataHandlerClass>
        com.technia.tvc.mcadoptimizer.datahandlers.Alerts
    </DataHandlerClass>
    <CellRendererClass>
        com.technia.tvc.mcadoptimizer.cellrenderers.Alerts
    </CellRendererClass>
    <!--<Setting name="Hide Derived Component" value="true"/>-->
    <!--<Setting name="Hide Is Updated" value="true"/>-->
    <!--<Setting name="Hide Updated Cad SubComponent" value="true"/>-->
    <!--<Setting name="Hide Updated Associated Drawing" value="true"/>-->
    <!--<Setting name="Hide Is Renamed" value="true"/>-->
    <!--<Setting name="Hide Renamed Cad SubComponent" value="true"/>-->
    <!--<Setting name="Hide Renamed Associated Drawing" value="true"/>-->
</Column>| Setting | Default |
|---|---|
Hide Derived Component |
false |
Hide Is Updated |
false |
Hide Updated Cad SubComponent |
false |
Hide Updated Associated Drawing |
false |
Hide Is Renamed |
false |
Hide Renamed Cad SubComponent |
false |
Hide Renamed Associated Drawing |
false |
3.3.7. Form side-panel link
To fire a web-form in the side-panel use the column type formcardlink
together with an expression (defines the label). Use settings with the
name form:<symbolic name> to define web-form mappings to certain
types.
Example:
<Column>
    <ColumnType>formcardlink</ColumnType>
    <Expression>name</Expression>
    <Setting name="form:type_MCADComponent" value="MCADOptMajorForm"/>
    <Setting name="form:type_MCADDrawing" value="MCADOptMajorForm"/>
    <Setting name="form:type_MCADAssembly" value="MCADOptMajorForm"/>
    <Setting name="form:type_MCADVersionedAssembly" value="MCADOptMinorForm"/>
    <Setting name="form:type_MCADVersionedComponent" value="MCADOptMinorForm"/>
    <Setting name="form:type_MCADVersionedDrawing" value="MCADOptMinorForm"/>
    <CardWidth>350</CardWidth>
    <Fixed>true</Fixed>
</Column>
3.4. Init Parameters
Init parameters are defined within the deployment descriptor ("web.xml" file) for your application. In that file, you should have a section for the TVC Servlet (if not, please advice the Installation Guide for TVC).
Within that section, init-parameters are added as the example below:
<servlet>
    <servlet-name>tvcaction</servlet-name>
    <servlet-class>com.technia.tvc.core.TVCServlet</servlet-class>
    <init-param> (1)
        <param-name>__the name of a parameter__</param-name>
        <param-value>__the value of a parameter__</param-value>
    </init-param>
    ...
</servlet>| 1 | Each parameter has a separate section, which is added just after the
<servlet-class> definition. |
The following table shows the mapping between the configuration item and the parameter name,
| Configuration Item | TVC Init Parameter Name | Type | Default | Description |
|---|---|---|---|---|
Enabled |
tvc.mcadoptimizer.familyinstance.enabled |
Boolean |
FALSE |
Use family/instance data model or not |
Enabled |
tvc.mcadoptimizer.3dliveexamine.enabled |
Boolean |
FALSE |
Enable 3DLive Examine columns in MCAD Optimizer |
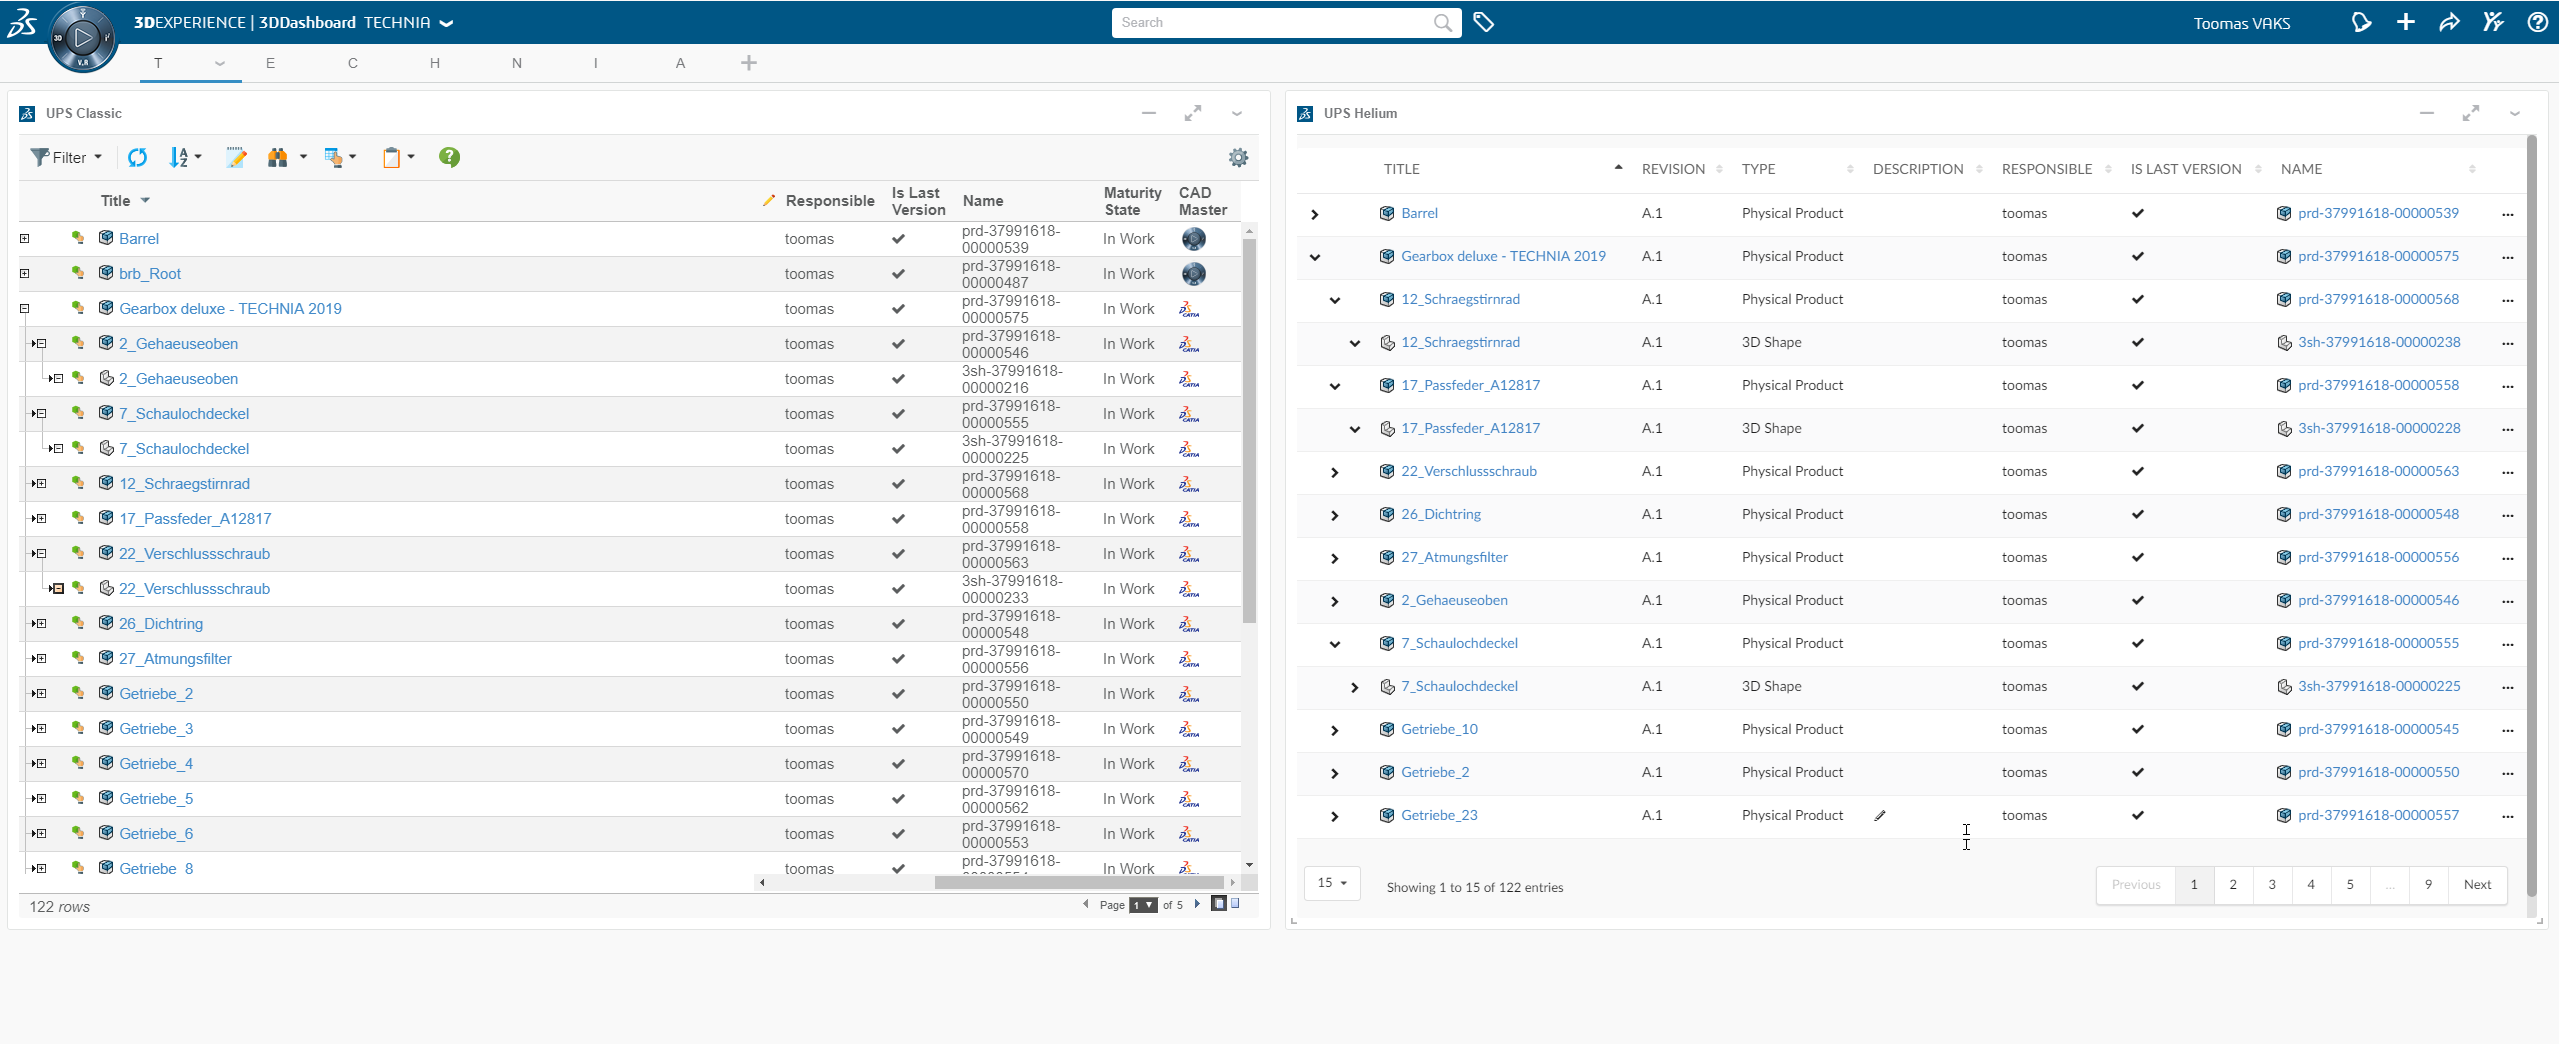
3.5. UPS
In MCAD optimizer three widget configurations is provided to view the unified product structure in 3DDashboards, one configuration for classic components and one for helium and one for 3Dview of the product.
| Widget Location | Configuration |
|---|---|
/webapps/tvc/widget/ups/18x/classic.json |
tvc:pageconfig:ups:classic:18x/UPS.xml |
/webapps/tvc/widget/ups/18x/helium.json |
tvc:page:ups:helium:18x/UPS.xml |
/webapps/tvc/widget/ups/18x/3dplay.json |
tvc:tablecolumn:ups:classic:common/3DPlay.xml |
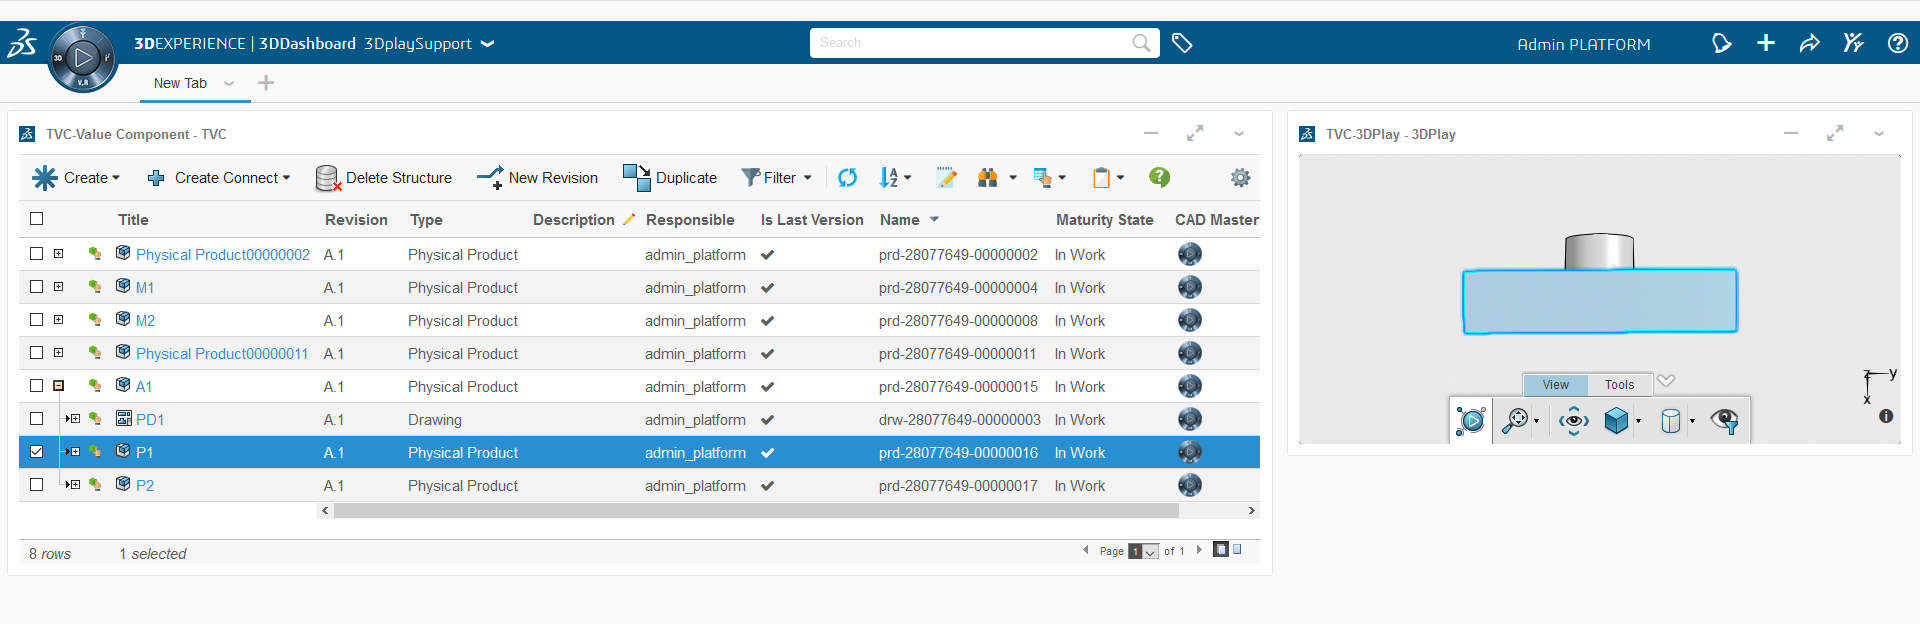
Read more about 3DDashboard configurations in Core Administrator Guide
4. MCAD Optimizer for CATIA
The MCAD Optimizer for CATIA is an add-on to the Structure Browser Component leveraging the same navigational capabilities and dynamic GUI. The administrator can easily configure new views to display CATIA information according to company requirements. The MCAD Optimizer Component enhances the usability of CATIA data inside ENOVIA. The main features of the MCAD Optimizer Component are:
-
My CATIA Objects - CAD Designers Homepage, displays CATIA objects owned, and locked by that user. Access to all CAD functions. My CATIA Objects is automatically added by the installer.
-
CATIA Navigator - Displays the CATIA structure in a familiar way, and provides access to all common functions like examine etc. Shortcuts to related information like lifecycle, preview image and related Representations/Parts/ECOs/ECRs. CATIA Navigator is automatically added by the installer.
-
CATIA Search – Find CAD object using tvc search functionality. TVC Search forms for CATIA objects are automatically added by the installer.
4.1. Usage Scenarios
4.1.1. My CATIA Objects
"My CATIA Objects" is automatically added to menu "My Desk" → "Designer" → "My CATIA Objects" by the installer.
This page lists CATIA objects by two different requirements selected by tabs at the top of the page, reducing the number of times the user has to search for designs in the database. Designs Owned and Locked by the current user are available default.
The views include a table that shows some actions and relevant data for all the objects.
These requirements can easily be altered or new tabs could be added to suit different business requirements.
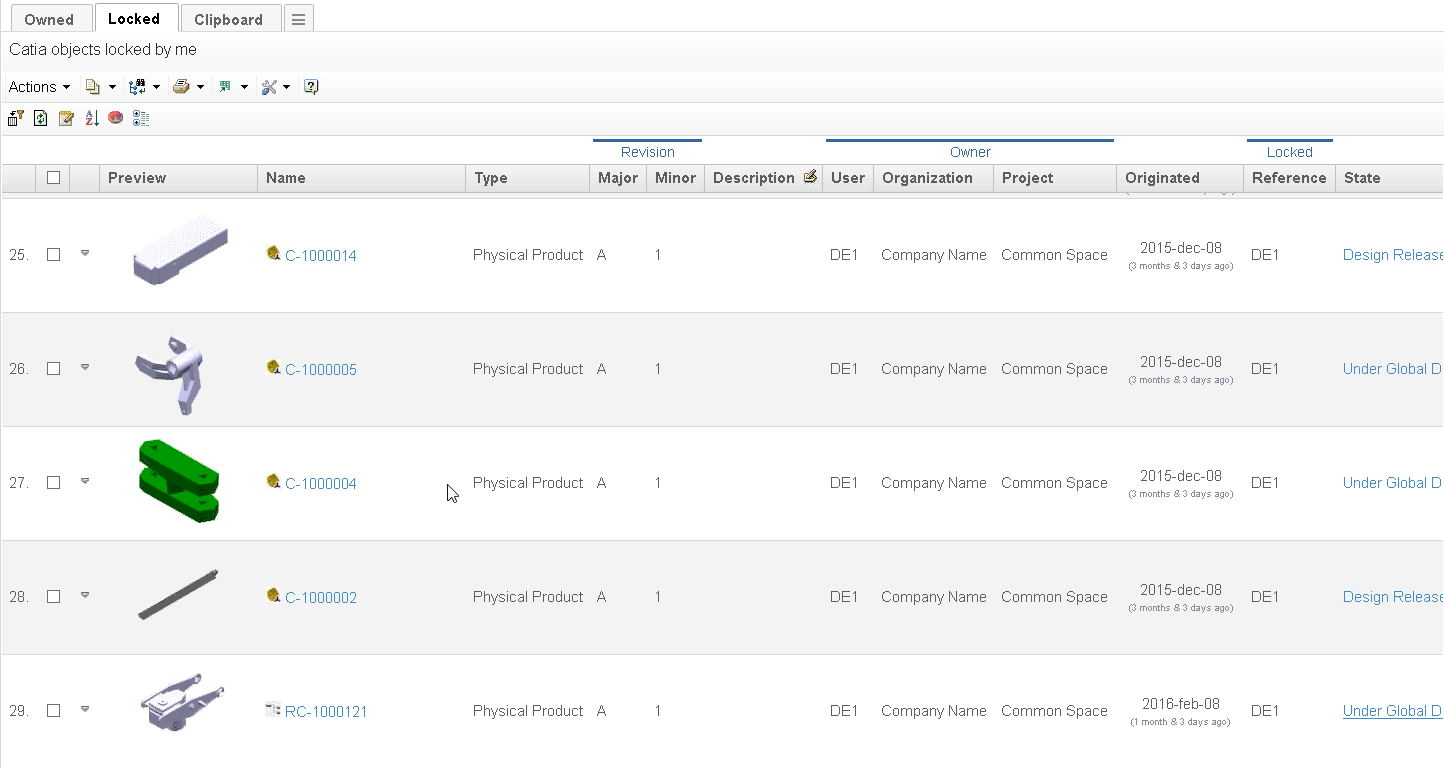
Figure 3. My CATIA Objects
4.1.2. CATIA Navigator
"CATIA Navigator" is automatically added to all CATIA type context menus by the installer.
The "CATIA Navigator" view can be accessed from the "CATIA Navigator" tree category available on all CATIA objects. This view shows an expanded structure of the related CATIA-items. If a Representation is selected, the Products for the Representation are listed. If a Product is selected, the sub Products are listed. If the structure consists of multiple levels it can be expanded one level at a time or all levels at once.
The expanded structure is displayed as an indented table and could be navigated by three different views Compact, Exploded and Where Used. Compact is the default view showing only one row per sub component even if more than one is connected, instead quantity is displayed. Exploded shows every single instance as a row. Exploded is required to see Instance information. Where Used is similar to Exploded but with the difference that you navigate in the opposite direction.
The user could navigate an object by two different requirements Navigate and Revisions. Navigate navigates the relevant object. Revisions allow the user to navigate all relevant objects of all revisions in the same navigator.
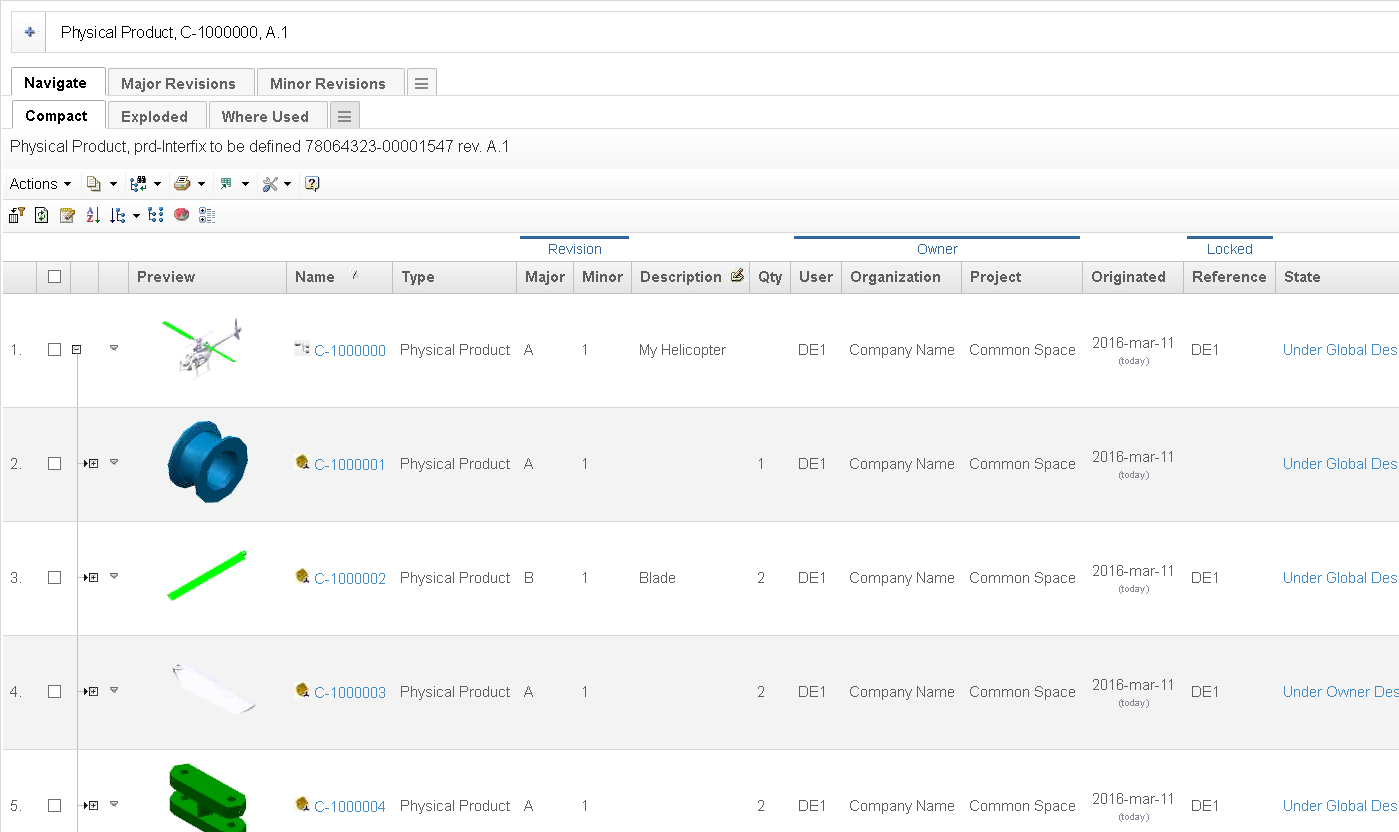
Figure 4. CATIA Navigator
Key information and common CATIA functions like "Examine" are displayed for each of the listed objects
Table Actions (Toolbar/Actions or Context Menu)
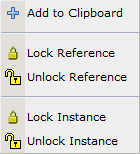
- Add To Clipboard
-
Add selected object(s) to TVC CATIA Clipboard
- Lock Reference
-
Lock reference lock of selected object(s)
- Unlock Reference
-
Unlock reference lock of selected object(s)
- Lock Instance
-
Lock instance lock of selected object(s). (Lock the relationship)
- Unlock Instance
-
Unlock instance lock of selected object(s). (Unlock the relationship)
Table Columns
- Row Actions
-
All row actions in one column
-
Clipboard Add the object to the TVC clipboard

-
Side-panel Details Open a form in the side-panel with a property details view. Also has an edit mode.

-
Examine Opens the 3D Live Examine viewer for this object in a side panel

-
Examine Light Opens the 3DLive Examine viewer in Light mode. Faster to open but with limited functionality

-
Open In CATIA Display the selected model as a search result inside CATIA V6. Unsigned ActiveX execution must be enabled by the web browser for this command to work.

-
Popup Object popup link

-
- Preview
-
If a preview image is present a thumbnail is displayed
- Name
-
The object name displayed as a link. Default cellrenderer also displays an icon for corresponding OOTB type: Physical Product, 3DPart, Drawing, etc. In order to display icons for custom types cellrenderer needs to be removed or customized
- Instance
-
Name of the instance. Not visible in Compact mode
- Type
-
The type of the object
- Revision
-
Object revision
- Description
-
Object description
- Qty
-
Displays number of instances of the specific reference. Only in Compact mode
- Owner
-
Displays the object owner information
- Originated
-
Date when object was originated
- Instance
-
Who has locked the instance of the object Not visible in Compact mode
- Reference
-
Who has locked the reference
- Related Representations
-
Displays links to and information on Representations related to this object
- Related Parts
-
Displays links to and information on Parts related to this object
- Related Change
-
Displays links to and information on ECOs, ECRs, CO’s, CA’s and CR’s related to this object
4.2. System Requirements
The following is a list of the minimum requirements for the installation of the MCAD Optimizer for CATIA V6. If your system is different, consult Technia before installing.
-
ENOVIA version in the range 10.7.1 to V6R2015X
-
TVC Structure Browser
-
Browsers according to the ENOVIA core product requirements
-
Application Server according to the ENOVIA core product requirements
5. Configuring MCAD Optimizer for CATIA
Most of the MCAD Optimizer configuration can be done through the XML
Based Definitions found in the folders
WEB-INF/tvc/mcadoptimizer/CATIA/*. The MCAD Optimizer
Administrator should be familiar with these techniques, and refer to the
Structure Browser Administrator Guide
and the XML Based
Definitions for details on how configuration should be performed.
To introduce changes to the xml definitions simply modify the existing ones. Before an upgrade make a backup of the current definitions and merge changes made into the new upgraded definitions.
5.1. Configuring My CATIA Objects
The content and appearance of "My CATIA Objects" is controlled by the following admin objects that can be manipulated through the Matrix Business Modeler or MQL:
| Admin Object | Name | Description |
|---|---|---|
command |
TVCMCADMyCATIAObjects |
Command that is added to "My Desk→Designer" to make "My CATIA Objects" available to users. |
In addition, page configurations, views etc are stored as xml based
definitions files and could be found in the folders
WEB-INF/tvc/mcadoptimizer/CATIA/*.
5.2. Configuring CATIA Navigator
The content and appearance of "CATIA Navigator" is controlled by the following admin objects, that can be manipulated through the Matrix Business Modeler or MQL:
| Admin Object | Name | Description |
|---|---|---|
command |
TVCMCADNavigateCATIAProduct |
Command that is added to context menus for CATIA Products to make "CATIA Navigator" available to users. |
command |
TVCMCADNavigateCATIARepresentation |
Command that is added to context menus for CATIA Representations to make "CATIA Navigator" available to users. |
In addition, page configurations, views etc are stored as xml based
definitions files and could be found in the folders
WEB-INF/tvc/mcadoptimizer/CATIA/*