TIF Installation Guide
14 May 2015
1. TIF Installation
The TIF application is packaged into two separate parts, namely.
- The TIF Server
-
Contains the server side code of TIF, where all integration jobs are executed among others. This package also contains the ENOVIA/3DExperience connector (might change in a future release), which allows processing jobs requested from the ENOVIA/3DExperience application OR to process jobs that updates the ENOVIA/3DExperience database.
- The client side part of the ENOVIA/3DExperience connector inside TIF
-
Contains a small schema to be installed in the ENOVIA/3DExperience database along with a couple of JAR files containing the necessary code used by the client. Also contains some web related files
The TIF server is packaged into a ZIP archive, tif-server.zip, and is simply extracted to a location where you want to host the TIF Server related files.
The ENOVIA/3DExperience client is packaged into a ZIP archive.
It comes in two different variants, one called tif-client-jakarta.zip and one called tif-client-javax.zip.
These names originates from what JavaEE namespace they are compiled for.
If you are using ENOVIA/3DExperience version 24xFD01 or later → then you need to use the "jakarta" version. For earlier versions, the javax variant is used.
All of these files are downloadable from https://products.technia.com.
2. Installation Overview
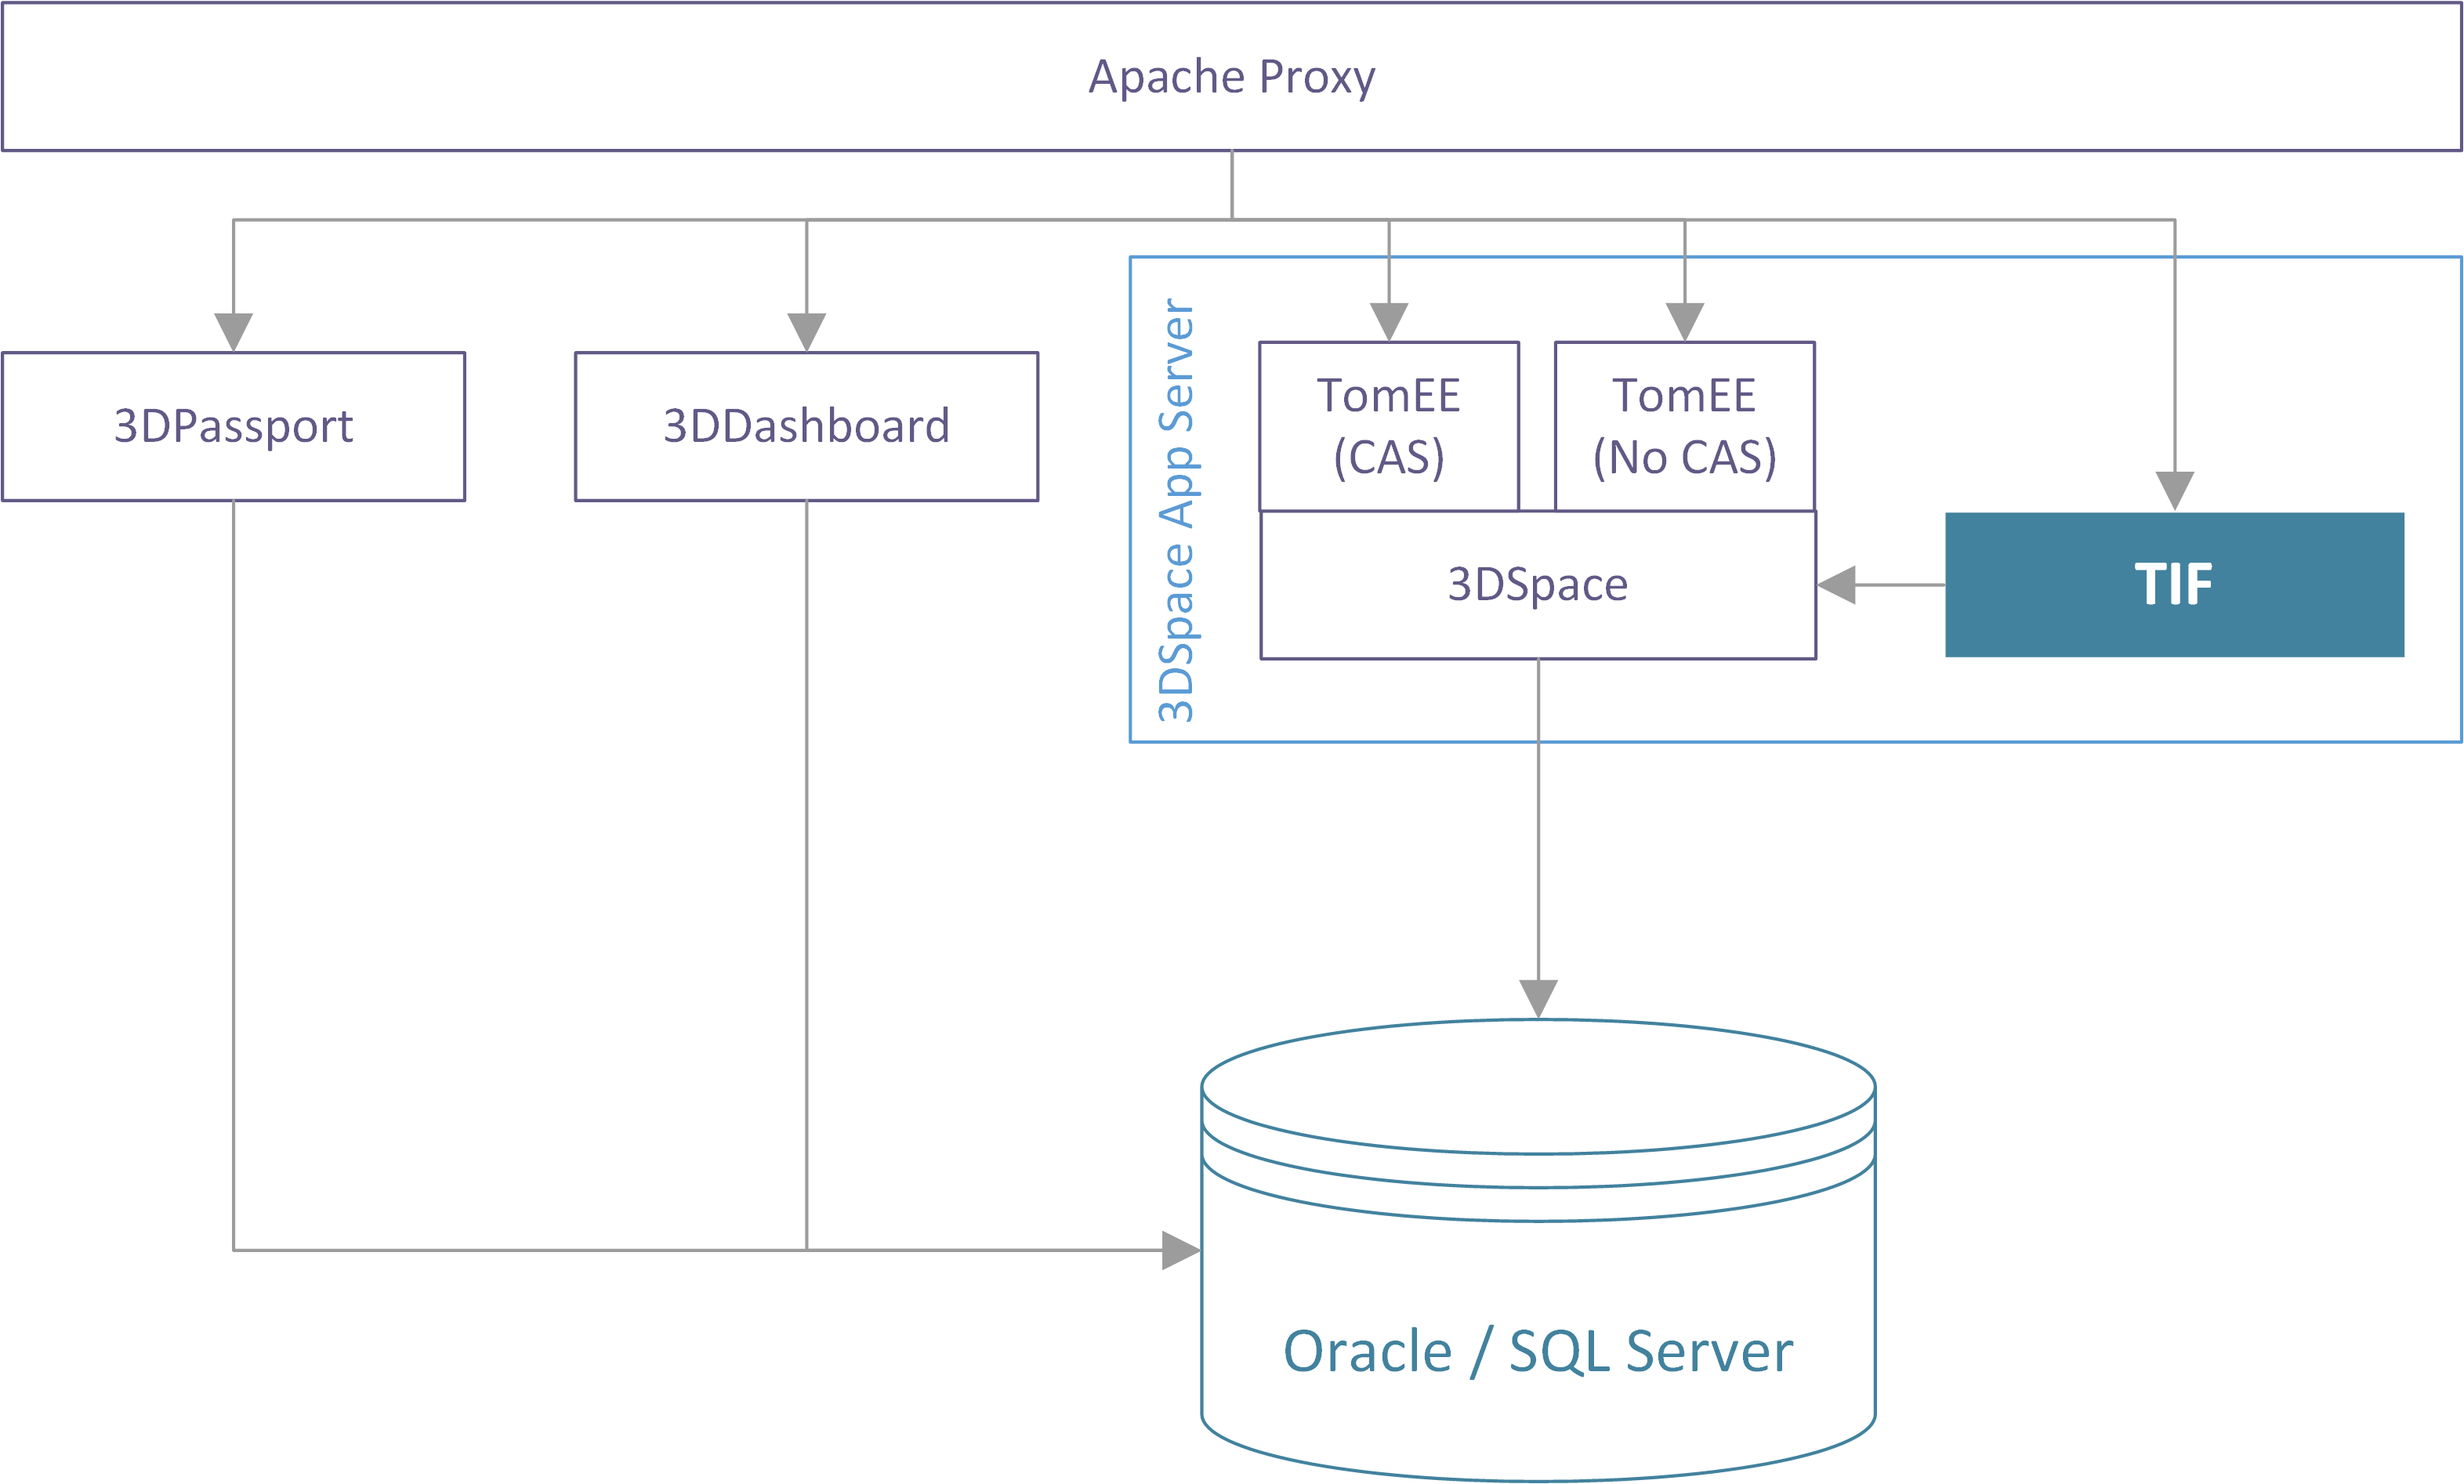
TIF can be installed in a few different ways. Starting with the easiest setup, TIF can be installed on the same server as the ENOVIA/3DExperience application is running at. This is visualized in the image below. This setup is often selected in development or test environments.
Figure 1. Installation Alternative 1
The preferred setup in a production system, is to have the TIF instance on its own server. This requires also that ENOVIA/3DExperience server binaries to be installed at the same machine in order for TIF to be able to connect with ENOVIA/3DExperience database.
This setup is illustrated in the image below.

Figure 2. Installation Alternative 2
The last setup alternative is to have TIF running on a separate server like described above, but instead of connecting to the ENOVIA/3DExperience database directly, instead connect via HTTP/XML to a running Tomee instance.
This setup does not require a ENOVIA/3DExperience Server installation, however, it still requires you to ensure that the necessary JAR files required to connect with ENOVIA/3DExperience is present for the TIF server.
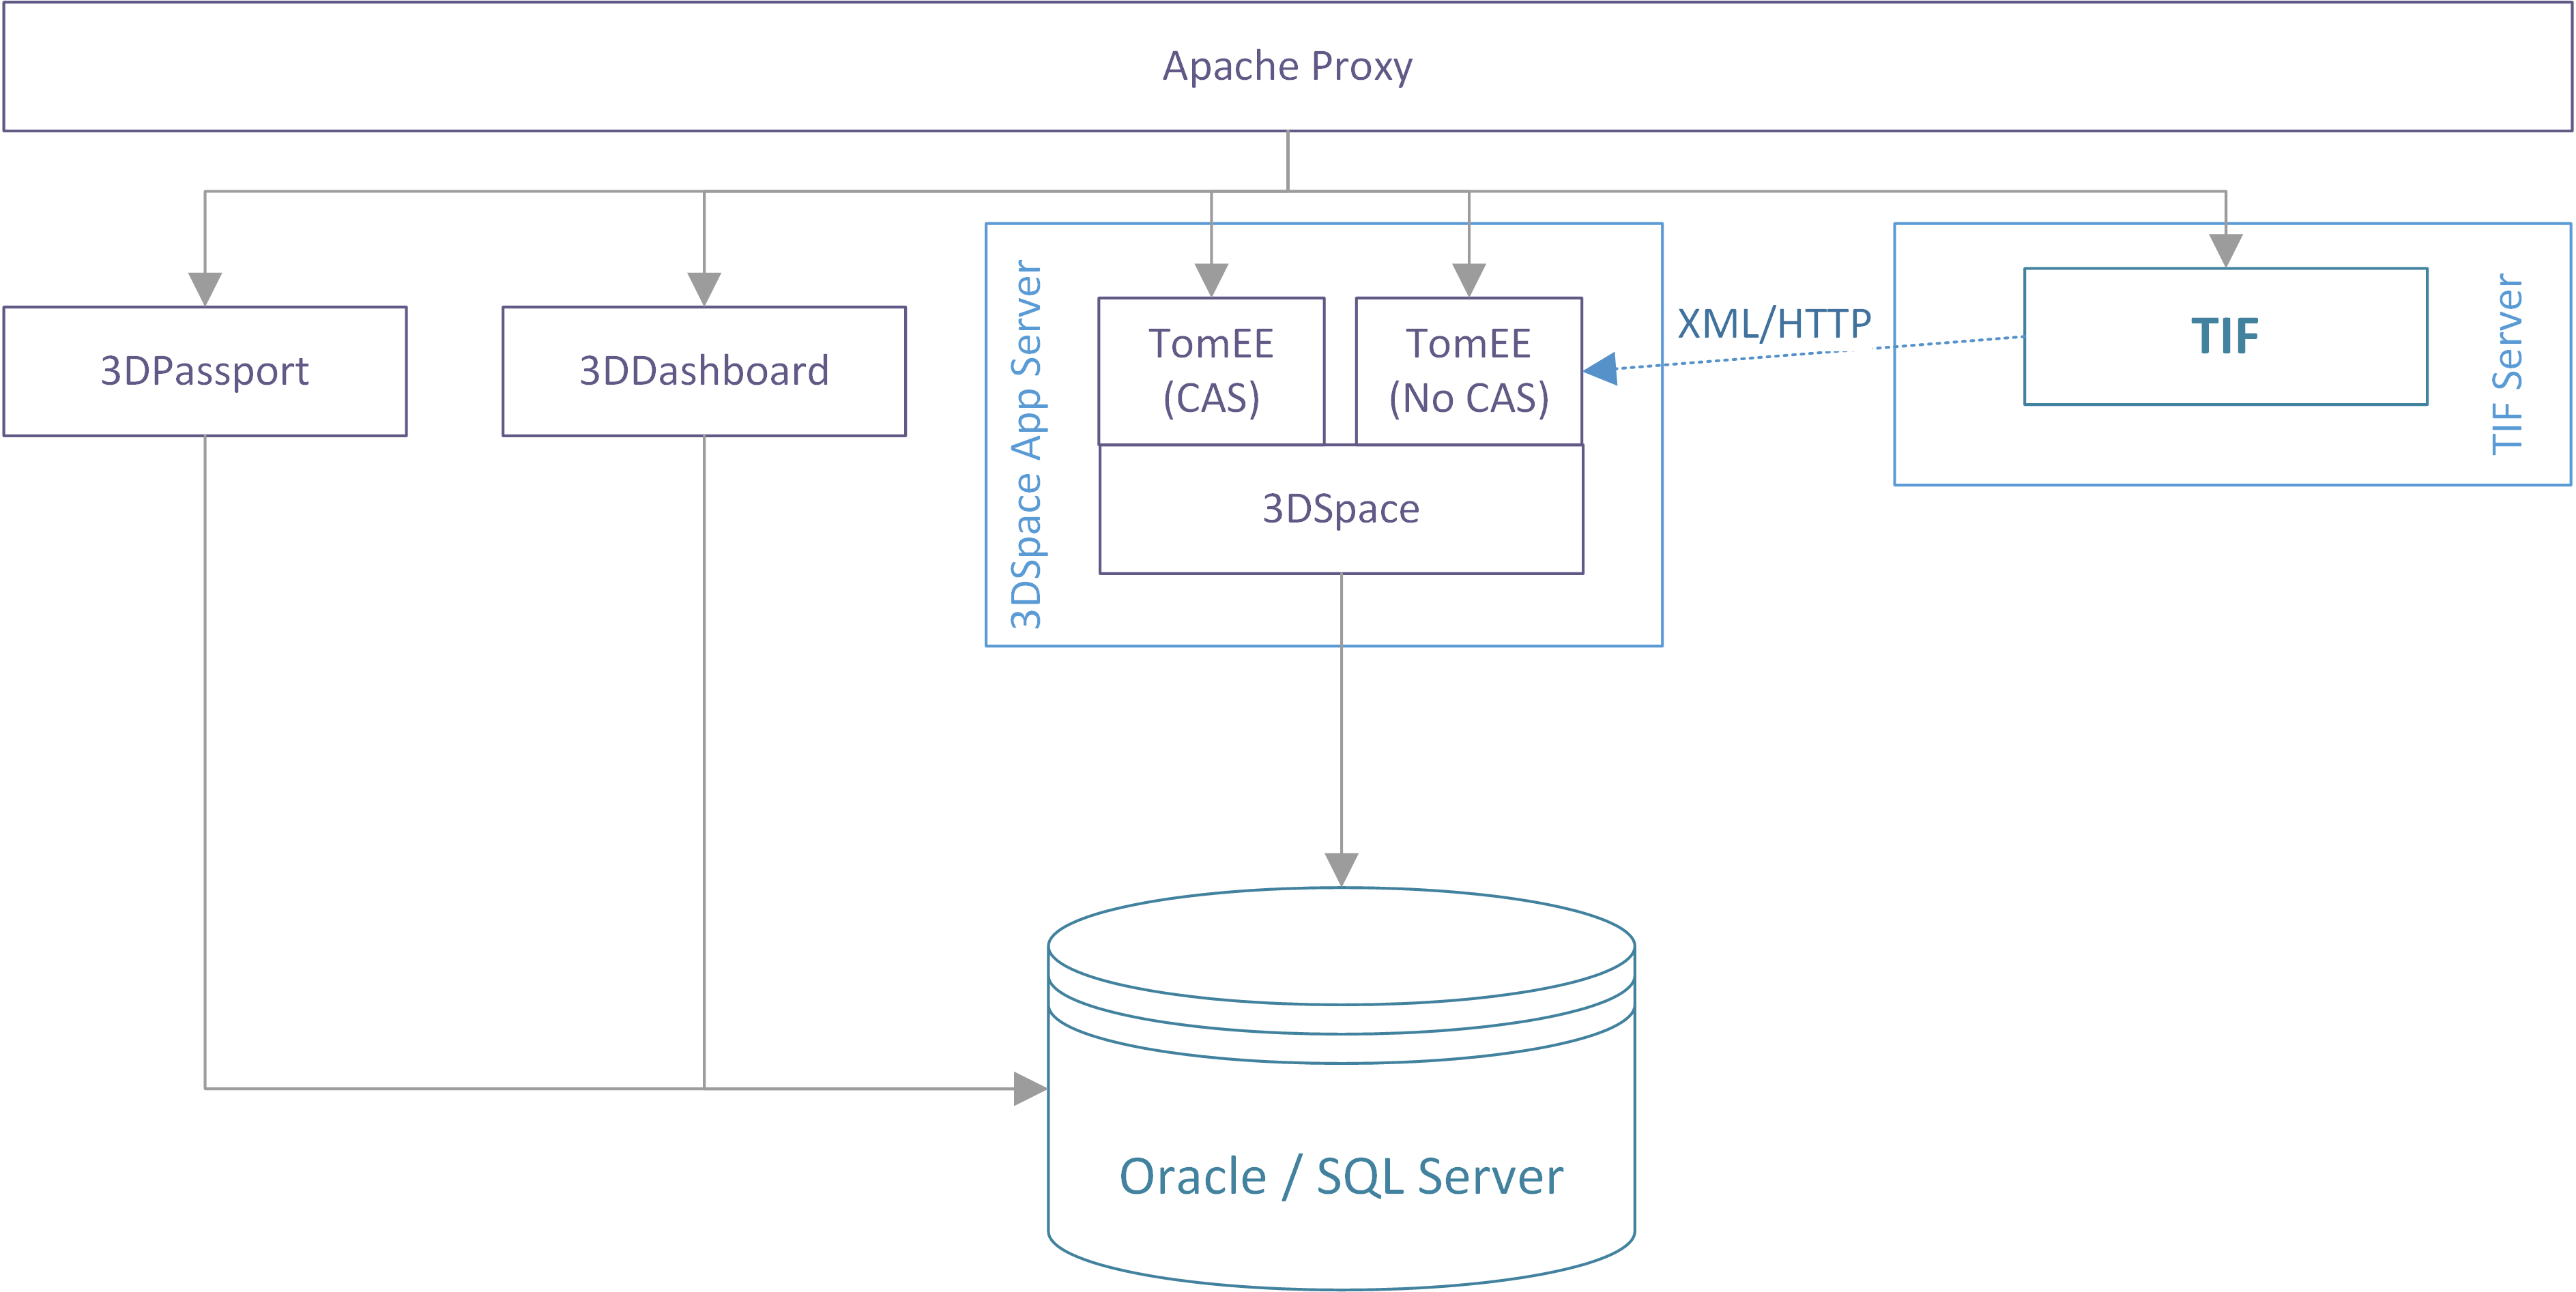
Figure 3. Installation Alternative 3
|
If you connect to ENOVIA/3DExperience over HTTP, remember that you need to define the ENOVIA/3DExperience connect string in the following file: ${TIF_HOME}/modules/envoia/etc/tvc.custom.properties
The property should be defined like shown in the example below: enovia.host=http://host.docker.internal:8080/enovia |
3. TIF Database
By default, TIF uses an embedded database to persist all data related to the integration jobs, but it is also possible to use an external database.
Using an external database is the preferred option especially if there are multiple TIF server instances. This allows to decide whether to use a dedicated database per instance or share it with multiple instances. Sharing a database allows to query data from multiple instances via any TIF Admin UI instance.
See details how to configure the database from here.
4. Upgrade Notes
The TIF server does not provide an installer that automates the installation process.
| One thing to remember between two upgrades, is to remove all JAR files from the TIF server installation directory if you perform the upgrade into the same directory as the previous version. |
5. Installing the Server
First, extract the tif-server.zip into a new and empty directory, for example c:\apps\tif-server. The root folder for the TIF server is from now on referred to as ${TIF_ROOT}.
Within the ${TIF_ROOT}/bin directory, you will find a couple of files that will be used to start/stop (manage) a TIF instance but also other helpful files such as example script that illustrates how to install the TIF server as a service within Windows OS.
File |
Description |
tif.bat |
Start/stop script for TIF on Windows. Note that this script might require some additional environment variables to be set prior to running. Take a look into the start_example.bat script how to do so. |
tif.sh |
Start/Stop script for TIF on UNIX. Note: Ensure that this file has the +x flag set on UNIX. This script might require some environment variables to be set prior to starting TIF. See notes below. |
These scripts most likely requires some additional environment variables to be set prior to starting TIF, this has been exemplified within the "start_example.bat" script on Windows and within the "setenv.example.sh" file for Unix.
Note that this file should be renamed to setenv.sh in order to work,
the provided file is just there for convenience and will never be executed by the tif.sh start script.
|
The script you use needs to be changed to match your own environment.
So on Windows, you should copy the file start_tif.bat into your own.
On Unix, you should create a file called setenv.sh.
So, create a file called start_tif.bat, which will set the following properties:
set JAVA_HOME=d:\apps\jdk64\latest
set ENOVIA_HOME=d:\apps\ENOVIA\V6R2012X\Server
set WEBAPP_ROOT=D:\Projects\DEV-2012X\enovia
call tif.bat run
The JAVA_HOME variable points out the JDK that will be used for running TIF.
TIF is compiled with Java 11 and thus requires at least Java 11 runtime.
|
In a few occasions, we have observed some unexplainable JVM crashes when using the IBM Semeru Java bundles. The solution have been to just switch to use a Temurin Java dito (https://adoptium.net/temurin/releases/). A JVM crash may have different causes so switching to Temurin is not a solution for all those situation - but worth having in mind when debugging mysterious crashes. |
Use the same bit size of the JVM as your ENOVIA/3DExperience requires, nowadays 64-bit is the main architecture for most OS’es.
The ENOVIA_HOME variable (if set) will result in that the bin directory is added to the PATH.
You can omit this if your global PATH variable already is setup correctly.
Finally, the WEBAPP_ROOT directory is used to point of the ENOVIA/3DExperience application.
The reason why you need to point out the ENOVIA/3DExperience web-application,
is because TIF needs to be aware of the JAR files and other class/properties files found from WEB-INF/classes and WEB-INF/lib.
You may choose to not set this environment variable.
In that case, you must copy the content of WEB-INF/classes and WEB-INF/lib from your ENOVIA/3DExperience web-application into the ${TIF_ROOT}/modules/enovia/lib/custom directory.
The least required JAR file you need to copy depends on the ENOVIA/3DExperience version you use, but the list below may give a hint:
-
eMatrixServletRMI.jar
-
enoviaKernel.jar
-
FcsClient.jar
-
FcsClientLargeFile.jar
-
Mx_jdom.jar
-
search_common.jar
Note 1: The "tif.bat" script takes one argument, which can be any of "run", "start" or "stop".
Note 2: The difference between "run" and "start" is that run starts the server in the same window while "start" opens a new window.
Note 3: To stop the TIF server, use a stop script that launches "tif.bat" with stop as argument. Don’t stop the server using CTRL-C or similar, because that causes an unclean shutdown of TIF with unexpected result.
Note 4: By default, the tif.bat script reads an environment variable called HEAP_SIZE to set the Java heap size. This value is default set to 1024MB.
5.1. JDK Version
The lowest JDK version that you can use with TIF is currently JDK 11. This is the version, which the TIF source code is compiled with.
But you should preferably select the same version of the JDK as your ENOVIA/3DExperience application uses.
Note on Java 11+:
If you use a later version than Java 11 and utilize the scripting capabilities within TIF, e.g. having some code in a JavaScript file,
then you need to add some additional JAR files into ${TIF_ROOT}/lib/custom.
This because the scripting engine have been removed from the JDK bundle as of JDK 15 and onwards.
Adding scripting capabilities to the JVM can be done in a couple of different ways. The absolute easiest solution is to add the Nashorn scripting engine, which was the engine part of the JDK earlier. There are some dependencies to the Nashorn engine that also needs to be added. At the time of writing this document, the latest version of the Nashorn engine was 15.4 and that version came with a dependency to the asm 7.3.1 library. So for this version to work, you then needed the following JAR files.
-
nashorn-core-15.4.jar
-
asm-7.3.1.jar
-
asm-commons-7.3.1.jar
-
asm-tree-7.3.1.jar
-
asm-util-7.3.1.jar
All of these artifacts can be downloaded from the Maven Central.
5.2. TIF as a Linux systemd service
If you want to define a service to be administrated via the systemd manager, you need to create a so called systemd unit file describing the service.
Below is an example of such service.
[Unit]
Description="Technia Integration Framework (TIF) systemd-style service."
After=local-fs.target network-online.target

[Service]
Type=exec
ExecStart=/opt/tif/bin/tif.sh start
ExecStop=/opt/tif/bin/tif.sh stop
Restart=on-failure
User=tif

[Install]
WantedBy=multi-user.target
The service can be put in for example /etc/systemd/system/tif.service.
After adding the service file, reload the systemd cache via systemctl daemon-reload
To start the service, run systemctl start tif.service.
To enable, e.g. ensuring that it is started when the server is rebooted, the service run systenctl enable tif.service
5.3. TIF as a Linux init.d service
Below is an example of a script suitable for putting into the init.d folder as a Linux service.
This is only an example and can be considered as a starting point for your own service.
The variables TIF_HOME and TIF_USER needs to be set in the script.
#!/bin/sh
# chkconfig: 2345 95 20
# description: Starts and stops the tif daemon
# This is the init script for starting/stopping tif
# processname: tif
TIF_HOME=
TIF_USER=

start() {
    echo -n $"Starting tif service: "
    su -s /bin/bash $TIF_USER -c $TIF_HOME/bin/tif.sh start
    echo $?
}
stop() {
    echo -n $"Stopping tif service: "
    su -s /bin/bash $TIF_USER -c $TIF_HOME/bin/tif.sh stop
    echo $?
}
restart() {
    stop
    start
}
status() {
    ps -aef | grep tif
}
# Handle the different input options
case "$1" in
    start)
    start
    ;;
    stop)
    stop
    ;;
    status)
    status
    ;;
    restart)
    restart
    ;;
    *)
    echo $"Usage: $0 {start|stop|restart|status}"
    exit 1
esac
exit 0
5.4. TIF as a Windows Service
There is a sample BAT (service_example.bat) file found from ${TIF_ROOT}/bin showing how to register the TIF as a Window service.
This requires you to download a separate application called prunsrv from the Apache Commons site.
Below is an example illustrating what parameters that may be needed to be set for the service:
@echo off
set PRUNSRV_HOME=c:\Apps\commons-daemon-1.3.3\amd64
set TIF_HOME=c:\apps\tif
set JAVA_HOME=c:\apps\jdk-17
set ENOVIA_HOME=c:\apps\enovia\V6R2013X\server
set DLL_PATH=%ENOVIA_HOME%\win_b64\code\bin
set WEBAPP_ROOT=c:\apps\enovia\V6R2013X\webapp
set NODE_ID=%COMPUTERNAME%
set INSTANCE_ID=TIF-1
set HTTP_PORT=8181
set HTTPS_PORT=-1
set SHUTDOWN_PORT=9010
set MEM_SIZE=1024
set TIF_LOG_LEVEL=DEBUG
set TIF_PRODUCTION_MODE=false

%PRUNSRV_HOME%\prunsrv.exe //IS//%INSTANCE_ID% ^
        --DisplayName="%INSTANCE_ID%" ^
		--Startup=auto ^
        --Description="TECHNIA Integration Framework" ^
        --Install=%PRUNSRV_HOME%\prunsrv.exe ^
        --Jvm=%JAVA_HOME:\=/%/bin/server/jvm.dll ^
        --StartMode=jvm ^
        --StopMode=jvm ^
        --StartClass=com.technia.tif.core.BootLoader ^
        --StartParams= ^
        --StopClass=com.technia.tif.core.BootLoader ^
        --StopParams=-stop ^
        --Classpath=%TIF_HOME:\=/%/lib/tif-bootloader.jar ^
        --JavaHome=%JAVA_HOME% ^
        --LogPath=%TIF_HOME%\data\%NODE_ID%\%INSTANCE_ID%\logs ^
        --LogPrefix=commons-daemon-%INSTANCE_ID% ^
        --LogLevel=Debug ^
        --StdOutput=auto ^
        --StdError=auto ^
        --PidFile=pid_%INSTANCE_ID%.txt ^
        --JvmMs=%MEM_SIZE% ^
        --JvmMx=%MEM_SIZE% ^
        --LibraryPath="%DLL_PATH:\=/%" ^
        ++Environment="MX_CHARSET=UTF8" ^
        ++Environment="NLS_LANG=_.UTF8" ^
        ++Environment="LANG=C" ^
        ++Environment="DSLS_CONFIG=C:\data\config\DSLicenseServer.txt"
        ++Environment="TNS_ADMIN=D:\apps\oracle\product\19.3.0\dbhome_1\network\admin" ^
        ++JvmOptions9="-Dtif.productionMode=%TIF_PRODUCTION_MODE%" ^
        ++JvmOptions9="-Dtif.home=%TIF_HOME:\=/%" ^
        ++JvmOptions9="-Dtif.loglevel=%TIF_LOG_LEVEL%" ^
        ++JvmOptions9="-Dfile.encoding=UTF-8" ^
        ++JvmOptions9="-Dtif.instance.id=%INSTANCE_ID%" ^
        ++JvmOptions9="-Dtif.http.port=%HTTP_PORT%" ^
		++JvmOptions9="-Dtif.https.port=%HTTPS_PORT%" ^
        ++JvmOptions9="-Dtif.shutdownListener.port=%SHUTDOWN_PORT%" ^
        ++JvmOptions9="-Denovia.webapp.dir=%WEBAPP_ROOT:\=/%" ^
        ++JvmOptions9="-Denovia.lib.dirs=%WEBAPP_ROOT:\=/%/WEB-INF/classes';'%WEBAPP_ROOT:\=/%/WEB-INF/lib"
6. Installing the ENOVIA/3DExperience Client
The ENOVIA/3DExperience client is provided as a ZIP archive. The ZIP archive contains two parts, e.g.
-
A MQL script for installation of the TIF related entities in the ENOVIA/3DExperience database
-
Example: vault, types, relationships, policies and trigger programs
-
This script is simply ran from an MQL prompt when you are logged in as a system administrator.
-
Simply run this from MQL:
run c:/apps/tif/client/schema/tif-schema.mql;
-
-
The J2EE artifacts to be part of the 3DSpace application.
-
These files are copied to the staging folder of 3dspace and/or the distrib folder
-
|
As mentioned earlier, the Client ZIP archive comes in two flavours. One for the Jakarta namespace (24xFD01 and later) and one for the Javax namespace. Pick the correct one for your environment. |