tvc:report/MyReport.xml
Report Generator - Administration Guide : Configuring
04 April 2016
1. Configuring the Report Generator
1.1. Global Properties
In this section we describe all of the possible settings and
configuration possibilities that globally apply to the Report Generator.
These global properties are stored within a page object in the database
called TVC Report Generator Properties. To view or modify the content
of this page object, you need to use the ENOVIA MQL client or the ENOVIA
Business Modeler application.
These properties are not re-loaded automatically when changed, unless the production-mode setting is set to FALSE. If the system has production-mode set to TRUE, then you must restart the application server to have your changes in use. The production mode setting is discussed within the installation guide for the TVC.
The table below contains those parameters that are changeable.
| Parameter | Description | Example | ||
|---|---|---|---|---|
mail.from.email |
Specifies an email address from which the user will see that the posted reports are from. |
|||
mail.from.name |
The "real" name that will be seen in the mail. |
Report Daemon |
||
mail.subject |
The subject of the mail. See chapter this chapter for further details regarding custom mail content. |
Report ${DEF-NAME} for ${TYPE}, ${NAME}, ${REVISION} |
||
mail.message |
The message of the mail. See chapter this chapter for further details regarding custom mail content. |
This is the requested report. Find the attachment below.\\n\\n |
||
mail.subject.onerror |
Mail subject in case of error. See chapter this chapter for further details regarding custom mail content. |
Report ${DEF-NAME} for ${TYPE}, ${NAME}, ${REVISION} FAILED ! |
||
mail.message.onerror |
Mail message in case of error |
The system was unable to generate the requested report. |
||
mail.sendTo.onerror |
The Email address to an administrator that should receive any error notification. |
|||
mail.smtp.host |
The SMTP host that will be used for outgoing mail |
mail.your.domain.com |
||
defaultUseLatestFOP |
Whether or not to use the latest FOP version by default. Default is TRUE. |
True |
||
openReportOnComplete |
If the report is being delivered on-demand, this setting can be used to force open the created report without the user having to click the link. This value default FALSE.
|
True |
||
max.concurrent.processes |
The number of concurrent running report threads. If you are using report agents for distributing the load, then each report agent has its own setting for controlling how many concurrent reports that are processed. |
5 |
||
max.concurrent.per-user.processes |
The maximum number of reports a single user may create concurrently. |
2 |
||
context.host |
Specifies which collaboration server that the report generator will use when fetching the data. Remove or comment out the property if the default collaboration server should be used. |
//127.0.0.1:1099 |
1.2. Report Definitions
A Report Definition defines how a report is being created. There are a number of different Report Definition types that can be used. The table below lists the available types and describes its use case.
| Report Definition | Use Case |
|---|---|
Advanced Report |
When your report is based upon data that cannot be easily retrieved by using either an expansion or an inquiry, but you need to combine this to retrieve different kind of data, you should use this type. This report type was introduced with TVC 6.4.0 and allows you to extract different set of data by using for example expansions, queries, select statements, inquiries etc and combine these in the way you need. There are also other capabilities that let you filter the data better, and also evaluate different tables over the different of sections of data. |
Expansion Report |
When creating a report of a structure and the data in the structure can be retrieved by using an expand command. Typically an EBOM structure, where the EBOM relationship is followed in one direction from top to bottom. |
Inquiry Report |
Can be used for arbitrary data retrieval. An inquiry can be used to make queries, expands, retrieve data from sets, performing more advanced expands that requires more logic than for a "Expansion Report" etc. |
Custom Report |
Allows you to create the report using custom code. |
JPO Report |
Should only be used when you need to integrate some legacy functionality with the report generator. As JPO invocations are not performing that well, you should consider using the "TVC Custom Report" type instead. |
A report definition can either be defined in the database as a Business Object of a certain type; or defined in an XML file stored within the ENOVIA web-application.
The recommended approach is to store them as XML configuration files within the ENOVIA web application since this allows you to deploy reports faster and decreases the time to develop a report.
1.2.1. Defining Report Definitions as XML files
Reports defined in XML files are stored within a folder called "report" below the "/WEB-INF/tvc" folder of your web application. The file must have the suffix ".xml".
Referencing a report stored as XML on disk is done using a specific
naming syntax. To reference the report stored in
/WEB-INF/tvc/report/MyReport.xml, one would use the following name:
You can also group these XML resources within domains. For example,
you might want to store the configuration files related to Engineering
Central in a certain place. As an example the file
/WEB-INF/tvc/enc/report/MyReport.xml would then be referenced as.
tvc:report:enc/MyReport.xml
          ^^^^
The root element of the XML file defines what type of report definition it is. The mapping between report definition type and its root elements are listed in the table below:
| Root Element | Report Definition Type |
|---|---|
<AdvancedReport> |
Advanced Report |
<ExpansionReport> |
Expansion Report |
<InquiryReport> |
Inquiry Report |
<CustomReport> |
Custom Report |
<JPOReport> |
JPO Report |
| This document contains more information about XML files in general. |
1.2.2. Defining Report Definitions as Business Objects
Business Object Types
The different report definition business object types are listed below along with their respective attributes.
| Business Object Type | Attributes | Description |
|---|---|---|
TVC Advanced Report |
TVC Data Extraction Definition |
Defines the data extraction rules. |
TVC Expansion Report |
TVC Expansion Level |
Defines Expand Level |
TVC Get From |
Defines if to expand in the from-direction |
|
TVC Get To |
Defines if to expand in the to-direction. |
|
TVC Object Pattern |
Defines the business object type pattern. A comma separated list of type names. |
|
TVC Object Where |
Defines the where clause to be applied on the business objects. |
|
TVC Relationship Pattern |
Defines the relationship type pattern. A comma separate list of type names. |
|
TVC Relationship Where |
Defines the where clause to be applied on the relationships in the structure. |
|
TVC Inquiry Report |
TVC Inquiry |
Defines the name of the inquiry to be used |
TVC Custom Report |
TVC Class |
Defines the Java class that is implementing the reporting functionality. |
TVC JPO Report |
TVC Class |
Defines the JPO name |
TVC Method |
Defines the method within the JPO |
All of these types are derived from a common business type called "TVC Report Definition".
This type has the following attributes defined:
| Attribute Name | Used For |
|---|---|
TVC Conversion Properties |
Specifying the conversion properties |
TVC Displayed Output Format |
Defining the displayed output format |
TVC Filter Expression |
Defines the expression, which defines what business objects this report is valid for. |
TVC Output Format |
Defines the output format |
TVC Global |
Defines if the report is global or contextual |
TVC Hidden |
Defines if the report is hidden or not. |
TVC Icon |
Defines a custom icon to be used to represent this report in the UI. |
TVC PreProcess Page |
Defines a pre process page. |
TVC Sort Order |
Defines the order, which this report is sorted against compared to other reports definition types. |
TVC Stylesheet |
Defines the stylesheet |
TVC System Table |
Defines the system table. |
Creating the Instances
Creating the Report Definition instances are simply made from either the ENOVIA thick client or the MQL client.
Please remember that these objects must be created with following properties:
Vault: TVC Administration
Policy: TVC Report Definition
The vault and the policy above are created during installation of the Report Generator.
1.2.3. Common Report Definition Configuration Options
Many configuration options on a Report Definition are the same regardless what Report Definition type you have chosen. The sub-chapters describe these in detail.
Even though the configuration options are on the common level, there are some Report Definition types that may not use some of the configuration options mentioned here. These exceptions are described per Report Definition type later on within this document.
1.2.4. Global
Defines if the report is global or context dependent (e.g. requires a business object as input). See chapter 3.1 and 3.2 for more information.
To define the global value within your report definition, use the syntax below:
<AdvancedReport> <!-- or any other type -->
    <Global>true</Global>
</AdvancedReport>
1.2.5. Filter Expression
Defines an expression that is used to evaluate if the definition is available or not for the object that the report is being created for. The expression is used with the MQL command "evaluate expression" and must therefore conform to that syntax.
Note that if your report definition is marked as being "global", then the filter expression has no meaning.
To define a filter expression within your report definition, use the syntax below:
<AdvancedReport> <!-- or any other type -->
<FilterExpression>type == Part &&current == Release</FilterExpression>
</AdvancedReport>Remember to escape XML sensitive characters. This can be made as in the
example above using XML entity references, or surround the value with <![PCDATA[ … ]]>.
Also note that you should test your expression in advance against a business object. Below is an example from MQL how to do so:
<MQL> print bus 1.2.3.4 select evaluate[type == Part && current == Release] dump;
E.g. you surround the filter expression with evaluate[].
In some situations (depends also on used ENOVIA version), you might need
to use the keywords AND instead of && and OR instead of ||.
Remember also that some keywords are reserved by ENOVIA. For example evaluating that current state equals to "Exists" requires the usage of the "const" keyword since "Exists" is a reserved word; see example below:
<MQL> print bus 1.2.3.4 select evaluate[current == const "Exists"] dump;
1.2.6. Access to a Report
To define the access to use a particular report definition, one can do this either based upon role or group assignment or to named users.
The access is defined like shown below:
<AdvancedReport> <!-- or any other type -->
    <Access>
        <RoleList>
            <Role>role_Engineer</Role>
            <Role>role_Manager</Role>
        </RoleList>
        <GroupList>
            <Group>System Administrator</Group>
        </GroupList>
        <UserList>
            <User>Joe</User>
            <User>Sue</User>
        </UserList>
    </Access>
</AdvancedReport>| Access is granted if one condition of the specified evaluates to true. |
+ E.g. a user having either the role "Engineer" or "Manager", or is member of the group "System Administrator", or the user actually is either Joe or Sue will have access to this report.
1.2.7. Output Format
Defines the output format that is being used for the report. Currently, the following formats are available:
-
PDF
-
DOCX
-
ODT
-
WML
-
RTF
-
PS
-
TXT
-
XML
-
HTML
| When selecting any of the formats PDF, DOCX, ODT, WML, RTF or PS, you must use a stylesheet that generates XSL-FO elements. E.g. the output-format and stylesheet attributes are dependent on each other. |
To define the output format within your report definition, use the syntax below:
<AdvancedReport> <!-- or any other type -->
    <OutputFormat>DOCX</OutputFormat>
</AdvancedReport>
1.2.8. Displayed Output Format
If defined, this value is shown in the GUI on the page where the user selects a report. If undefined, the value of the Output Format is shown instead.
To define the displayed output format within your report definition, use the syntax below:
<AdvancedReport> <!-- or any other type -->
    <OutputFormat>DOCX</OutputFormat>
    <DisplayedOutputFormat>Microsoft Word</DisplayedOutputFormat>
</AdvancedReport>
1.2.9. Stylesheet
Defines the stylesheet (XSLT) to be used to convert the extracted data from ENOVIA with.
The value refers to an XML file or to a page object within the database that holds the content. To define the stylesheet within your report definition, use the syntax below:
<AdvancedReport> <!-- or any other type -->
    <Stylesheet>tvc:stylesheet:enc/MyStylesheet.xslt</Stylesheet> (1)

    <!-- OR -->
    <Stylesheet>NameOfPageObject</Stylesheet> (2)
</AdvancedReport>

<1> Refers to the file: /WEB-INF/tvc/enc/stylesheet/MyStylesheet.xslt
<2> Refers to the page object: NameOfPageObject

[[table]]
==== Table

Defines the name of a table that defines which data to be extracted into
the report.

Note that the name might refer to a table stored inside the database,
or, to a table stored in XML within the web-application.

To define the table within your report definition, use the syntax below:

```xml
<AdvancedReport> <!-- or any other type -->
    <Table>tvc:table:enc/MyTable.xml</Table> (1)
    <!-- OR -->
    <Table>My Table</Table> (2)
</AdvancedReport>| 1 | Refers to the file: /WEB-INF/tvc/enc/table/MyTable.xml |
| 2 | Refers to the system table in the data base called "My Table" |
1.2.10. Hidden
Defines if the definition object is visible for the user when s/he is selecting a report to be created from the user interface.
For example, some report definitions are only used by triggers, hence these are not intended for use manually and setting the Hidden value to TRUE will make them unavailable.
To define the hidden value within your report definition, use the syntax below:
<AdvancedReport> <!-- or any other type -->
    <Hidden>true</Hidden>
</AdvancedReport>
1.2.11. Pre-process Page
Defines the name of a custom JSP page that is invoked before the report is being created.
Using a pre-process page enables more control over the created report. Depending on the pre-process page – more or less sophisticated functionality may be added, but typically a form with some options are displayed and the user does some selection that finally applies to the final report. See this chapter for details regarding implementation details of pre-process pages.
To define a pre process page within your report definition, use the syntax below:
<AdvancedReport> <!-- or any other type -->
    <PreProcessPage>/path/to/Page.jsp</PreProcessPage>
</AdvancedReport>
The path to the JSP page, must be context relative. E.g. start from the root of your web-application.
1.2.12. Icon
A report can be associated with a custom icon. This icon will be shown in the user interface where the user selects a report to be created. The purpose of associating a custom icon is to make it easier for the user to find the report to be created.
To define an icon, use the sytax below:
<AdvancedReport> <!-- or any other type -->
    <Icon>/common/images/image.png</Icon>
</AdvancedReport>
The path must be context relative, e.g. start from the root of your web-application.
1.2.13. Sort Order
Within the list of reports presented for the user, the order of appearance for the available reports can be adjusted.
To define the sort order, use the syntax below:
<AdvancedReport> <!-- or any other type -->
    <SortOrder>3</SortOrder>
</AdvancedReport>| By default, TVC Report Generator will sort the reports first by output format then by its display name. To actually use the sort order as defined on the report definitions, one need to apply a system init parameter within web.xml as described within this chapter. |
1.2.14. Report Settings
Defines different parameters that control the behavior of the report creation.
To define the settings/conversion properties within your report definition, use the syntax below:
<AdvancedReport> <!-- or any other type -->
    <Settings>
        <Setting name="name of setting" value="value"/> (1)
        <Setting name="another setting">the value</Setting> (2)
    </Settings>
</AdvancedReport>| 1 | Value is specified in the value attribute |
| 2 | Value is specified between start and end tag, e.g. body text. |
The table below shows the different parameters that are adjustable. Note that each output handler or post processor, or other feature, might have support for additional settings that are not listed in this table.
| Setting Name | Example | Description | ||
|---|---|---|---|---|
outputHandlers |
mail,checkin,ftp,fileStore |
Specifies the output-handlers that will be used, e.g. how the generated report should be handled. This is a comma-separated list of named output handlers. See this chapter for information regarding the output handlers. |
||
postProcessors |
zip,PDFStamp |
Specifies which post processors to be used. This is a comma separated list of named post processors. See this chapter for information regarding post processing. |
||
file.on.demand |
true |
Specifies if the report should be generated on demand. |
||
file.suffix |
The suffix which the file will use. This is normally only needed if you want to override the default value. |
|||
file.prefix |
BOM-Specification |
The prefix which the file will use. Note that you can use macros that resolves dynamic values against the context object, which the report is created for. See this chapter. |
||
file.contentType |
application/pdf |
Overrides the content-type of the report. Affects the download of the report. |
||
useLatestFOP |
true |
Defines if to use the latest FOP version. Can be used to override the global settings described in this chapter. |
||
pageHeader |
BOM Report |
Can be used to configure a custom header in the user interface. |
||
transactionType |
update |
Can be used to change the transaction type during the data extraction. By default, a read transaction is started. However, if you for some reason needs an update transaction, you can change it through this parameter |
||
createAsSuperUser |
True |
If you want to override the access mechanism in ENOVIA and create the report as a user without any restriction, you can set this value to true. |
||
checkoutImagesAsSuperUser |
True |
If set to true, all images are checked out / generated with super-user context. |
||
openReportOnComplete |
True |
If the report is being delivered on-demand, this setting can be used to force open the created report without the user having to click the link. This value default FALSE.
|
1.2.15. Transformer Properties
Parameters that you pass to the XSLT transformation (your stylesheet) can be declared within the report definition. To define these, use the syntax below:
<AdvancedReport> <!-- or any other type -->
    <TransformerProperties>
        <Property name="name of setting" value="value"/>
        <Property name="another setting">the value</Setting>
    </TransformerProperties>
</AdvancedReport>
1.2.16. Expansion Report Definition
An expansion report is used to generate a report over the objects and connections inside one structure. This is equal to browsing the relationships going from or to the selected business object in the defined number of levels. For more information about expanding business objects, see the ENOVIA MQL guide.
The root element within an expansion based report definition must be
<ExpansionReport>.
The expansion report has following configuration options.
| Option | Description | Configuration Example |
|---|---|---|
Expand Depth |
Defines the number of levels to expand. 0 means all levels. |
Or
|
Relationship Pattern |
Defines the relationship types to expand along. Symbolic names or real names might be used. If undefined, the relationship pattern "*" will be used. |
|
Object Pattern |
Defines which object types to expand. Symbolic names or real names might be used. If undefined, the type pattern "*" will be used. |
|
Relationship Where |
Where clause to apply on the relationships This value may contain an expression that contains symbolic names rather than actual names. |
|
Object Where |
Where clause to apply on the objects. This value may contain an expression that contains symbolic names rather than actual names. |
|
Expand Direction |
Defines the expand direction. The value "both" may not be used in conjunction with a full expand. |
`<Direction>from |
to |
both</Direction>` |
Load Root Nodes |
1.2.17. Inquiry Report Definition
The inquiry report uses an inquiry to retrieve the objects and relationships that will be included in the report. The inquiry report definition has the following configuration options.
| Option | Description | Configuration Example |
|---|---|---|
Inquiry |
Defines the name of the inquiry that is used to gather the objects/relationships to be included in the report. |
|
Below are two examples that show how the inquiries should be constructed in order to work properly with the report generator.
NB: The name of the fields in the format part of the inquiry must be same as below.
Inquiry for retrieval of flat data (a list of object without relationship information):
<Inquiry>
    <Pattern>*|*|*|${OID}</Pattern>
    <Format>${OID}</Format>
    <Code>temp query bus ${TYPE} * * where 'owner == "${USER}"' select id dump |</Code>
    <Argument name="TYPE" value="type_Part"/>
    <Argument name="USER" value="dummy"/>
</Inquiry>
An inquiry for structured data might look like this:
<Inquiry>
    <Pattern>${LEVEL}|*|${DIRECTION}|*|*|*|${OID}|${RELID}</Pattern>
    <Format>${LEVEL}|${DIRECTION}|${OID}|${RELID}</Format>
    <Code>expand bus ${ID} from rel ${REL} recurse to all
    select bus id select rel id dump |
    </Code>
    <Argument name="REL" value="relationship_EBOM"/>
    <Argument name="ID" value="dummy"/>
</Inquiry>
1.2.18. Passing Custom Parameters to the Inquiry
The inquiry report definition is very flexible. You may pass additional parameters in the URL that are sent further to the inquiry. This is accomplished by adding URL parameters to the command described in this chapter.
The arguments that can be passed to the inquiry must have the following syntax:
Inquiry arguments :== <Argument Name> & <Argument Value> [& <Inquiry arguments>]
Argument Name :== argName=<name-of-argument>
Argument Value :== argValue=<value-of-argument>
URL example:
${ROOT_DIR}/tvc-action/beginCreateReport?reportDefinition=MyInquiryDef&argName=NameOfFirstArg&argValue=ValueOfFirstArg&argName=NameOfSecondArg&argValue=ValueOfSecondArg
The arguments that are passed must also be defined on the inquiry itself.
1.2.19. Inquiry Report Example
Following example illustrates how these custom parameters can be used to create a report of objects stored in a set. The inquiry will retrieve the id of the objects stored in a set, and the name of the set is passed as input parameter.
-
Create an inquiry with following configuration
pattern: ${OID} format: ${OID} argument: SET dummy code: pri set "${SET}" select id dump -
Create an Inquiry Report Definition instance, called LoadFromSet, that used the created inquiry
-
Create a set from either MQL or ENOVIA Navigator that contains some business objects. Name the set to for example "MySet".
-
Create a command with following parameters:
${ROOT_DIR}/tvc-action/beginCreateReport?reportDefinition=LoadFromSet&argName=SET&argValue=MySet -
The command can now be used to make a report of the objects within the set called "MySet".
1.2.20. Advanced Report Definition
The advanced report definition allows dividing a report into sections, where each section contains data that is generated by evaluating one table over a set of objects / connections, which are provided by a so called dataset’s. The report might contain as many sections as needed to build up the complete report.
The definition of the data extraction logic is defined within the Report Definition configuration. For an example how such report is constructed, see the example below:
<AdvancedReport>
    <OutputFormat>DOCX</OutputFormat>
    ...

    <!-- First section evaluates a table over the revisions -->
    <TableDataSection element="Revisions">
        <Description>Revision information</Description>
        <DataSet>tvc:dataset/Revisions.xml</DataSet>
        <Table>tvc:table/BasicInformation.xml</Table>
    </TableDataSection>

    <!-- The second section evaluates another table over the EBOM -->
    <TableDataSection element="EBOM">
        <Description>Bill of Material</Description>
        <DataSet>tvc:dataset/EBOM.xml</DataSet>
        <Table>tvc:table/EBOM.xml</Table>
        <XMLSpec>
            <OmitRootNode>true</OmitRootNode>
        </XMLSpec>
    </TableDataSection>
</AdvancedReport>
This report contains two sections; Information about all the revisions and information about the BOM structure below the item. These sections are evaluated using different tables.
The data-set defining the revisions looks like this: (/WEB-INF/tvc/dataset/Revisions.xml)
<DataSet>
    <Select>
        <Statement>revisions.id</Statement>
    </Select>
</DataSet>
The data-set defining the EBOM structure looks like this: (/WEB-INF/tvc/dataset/EBOM.xml)
<DataSet>
    <Expand>
        <From>true</From>
        <To>false</To>
        <Depth>0</Depth>
        <TypePattern>
            <Type>type_Part</Type>
        </TypePattern>
        <RelationshipPattern>
            <Relationship>relationship_EBOM</Relationship>
        </RelationshipPattern>
    </Expand>
</DataSet>
1.2.21. Table Data Section
A table data section uses a table (system table or an XML defined table) and evaluates this table over the data returned by the data-set being used. Moreover, a section is in the final report grouped inside its own element, which is defined in the attribute "element" on the "TableDataSection" tag.
The minimum configuration requred for a Table-data-section, is to define a data set and a table. You can omit the table, however, then all basic properties including all attribute values are extracted for the business objects and connections, which the data-set returns.
<TableDataSection element="EBOM">
    <DataSet>tvc:dataset/EBOM.xml</DataSet>
    <Table>tvc:table/EBOM.xml</Table>
</TableDataSection>
The description element is optional, but can be used to provide a user friendly description describing the purpose of the section. This can be utilized from a pre-process page to allow the user to de-select a section from a particular report. There are two additional attributes that can be used to define the selection behavior of a section, namely: selectable and selected. The first one defines whether or not the user can control the inclusion of the section and the latter one defines if the section is selected by default or not. Below is an example where these attributes are used:
<TableDataSection selectable="true" selected="false" element="documents">
    <Description>Documents related to this object</Description>
</TableDataSection>
Moreover, the XMLSpec element allows you to configure how the XML data for this particular section should be formatted. The details are provided in the next chapter.
XML Specification
The XMLSpec element can have a number of different sub-elements, used for configuring the generated XML. The table below shows the current available elements, their purpose and possible values. Due to compatibility reasons, the default XML format is unchanged since earlier versions. However, the XMLSpec element allows you to adjust the format.
| Element Name | Purpose | Value(s) |
|---|---|---|
IncludeTableHeaders |
Whether or not to include information about the table columns in the table. |
True (default) / False |
IncludeTableGroups |
Whether or not to include data grouping information. |
True (default) / False |
IncludeTableContent |
Whether or not to include the actual table content. |
True (default) / False |
IncludeTableCalculations |
Whether or not to include any table calculations defined on the table |
True (default) / False |
IncludeGroupHeaders |
Whether or not to include information about any group headers in the table. |
True (default) / False |
IncludeSettings |
Whether or not to include the settings defined on the columns, within the table header section. |
True (default) / False |
FlattenStructure |
Whether or not to flatten the data. This is only applicable if the data is structural. |
True / False (default) |
ShowLevel |
Whether or not to include level information on the row. |
True (default) / False |
ShowDirection |
Whether or not to include direction information on the row. |
True (default) / False |
AddColumnId |
Whether or not to add an id on the column. |
True (default) / False |
AddCellIndex |
Whether or not to add cell index on the cells. |
True (default) / False |
AddColumnRef |
Whether or not to add a reference to the column from the cell. |
True (default) / False |
OmitCellValueElement |
Whether or not to have the value element within the cells. |
True / False (Default) |
OmitRootNode |
Whether or not to omit the root node from the XML tree. |
True / False (Default) |
OmitRowAttributes |
Whether or not to omit all attributes on the row |
True / False (Default) |
OmitEmptyCells |
Whether or not to omit the Cell element, if there aren’t any values in the cell. |
True / False (Default) |
UseColumnName |
Whether or not to use the name of the column as name on the Cell elements. This might in some cases help you in the transformation phase, to avoid having too complex XPath expressions. |
True / False (Default) |
TableDataGroupElement |
Define the name of the element that holds the table-data-grouping information |
data-groups |
TableDataElement |
Defines the name of the element that holds the table data information |
objects |
TableColumnsElement |
Defines the name of the element that holds the table column information |
headers |
TableColumnElement |
Defines the name of the Column element. |
header |
RowElement |
Defines the name of the row element. It is possible to use a special macro to create dynamic element names. Following macros are supported:
|
row |
CellElement |
Defines the name of the Cell element. Note that if the "UseColumName" has been set to true, the name of the Column will be used as Cell value element name. |
cell |
CellValueElement |
Defines the value element name |
value |
Data Groups
It is also possible to group the data. The data grouping is made by adding "Group" elements within the "DataGroups" element. Each group must have its own name.
<TableDataSection>
    <DataGroups>
        <Group name="OriginatedByYearQuarter">originated{Originated;year<yyyy>-quarter}</Group>
        <Group name="ByOwnerAndType">owner{Owner}#type{TypeName}</Group>
    </DataGroups>
</TableDataSection>
The syntax for a group definition is defined below:
definition   ::= <group> "#" <group>
group        ::= <column-name> | <column-name> "{" <element-name> ";" <group-spec> "}"
column-name  ::= <text>
element-name ::= <text>
group-spec   ::= <text>
A group is operating on the cells in the table hence the column is referenced by its name.
The group-spec is different depending on the data type of the property, which the group is made on. For example, date fields are different than numeric fields.
This is easiest explained with a few examples:
-
Group by originated date (year & quarter). Format the year using 4 digits
originated{Originated;year<yyyy>-quarter} -
Group by weight (numeric attribute):
Weight{==0,0<<10,>=10}This will make one group for all matching 0, one group for items having between 0 and 10 and one for those having weight above or equal to 10.
1.2.22. MQL Output Section
MQL output can be included by defining a MQLSection. This could either be just invoking a MQL command that returns XML output or invoking some other program that produces XML output.
See example below:
<AdvancedReport>
    <MQLSection>
        <Description>This is the description...</Description>
        <XML>true</XML>
        <Code>temp webreport ... xml; </Code>
    </MQLSection>
</AdvancedReport>
The sub elements of <MQLSection> are:
| Element Name | Type of data | Description | Required |
|---|---|---|---|
XML |
Boolean (true/false) |
Defining if the output is XML formatted |
No |
Code |
String |
The MQL code to execute |
Yes |
XSLT |
String |
An optional XSLT stylesheet (name of such) to be used for converting the XML output before its being part of the report |
No |
Description |
String |
A descriptive text of what kind of data this section generates |
No |
ExecuteAsSuperUser |
Boolean |
Defines if the MQL statement should be executed with super-user privileges |
No |
RequiresVersion |
String |
Specifies the lowest ENOVIA version. If this requirement is not met, the section will be omitted from the report. |
No |
If your report was created for a particular object, e.g. not a
global report, you can use the ${OBJECTID} macro within the code of
your MQL section to get access to the object-id value. Also, you can use
the macro ${USER} to substitute with the id of the current user.
|
1.2.23. Custom Report Definition
In case you have a need for creating a report that are not possible to create by using any of the previously mentioned Report Definition types, or you want to leverage some existing code within the Report Generator; you should use the "Custom Report" type.
This report definition type requires you to point out a Java class,
which is derived from the base class
com.technia.tvc.reportgenerator.impl.CustomReport.
<CustomReport>
    ...
    <Class>com.acme.report.EBOMtoExcel</Class>
</CustomReport>
1.3. Post Processing
After the report has been created, it is possible to modify the file containing the report. For example, if you create a PDF report, you can stamp the PDF with some text. In some other case, you might want to ZIP the report.
The built-in post processors are shown in the table below:
| Post Processor | Description |
|---|---|
pdf-stamp |
Used for adding a stamp to the PDF report |
zip |
Used to ZIP the generated report. |
It is also possible to perform multiple post-processing of the report, for example first stamp the PDF file then ZIP the PDF report. However, note that the post processors are executed in the order they are defined, hence you cannot PDF stamp a ZIP file.
The post processors are registered and configured within the Report Settings like shown below:
<InquiryReport>
    <Settings>
        <Setting name="postProcessors" value="pdf-stamp,zip"/>
1.3.1. Disabling a Post Processor
Even though you have defined to use a certain post processor using the "postProcessors" property; it is possible to disable a particular processor by setting a different property. The example below will disable the PDF Stamp processor.
<Setting name="postProcessors" value="pdf-stamp,zip"/>
<Setting name="pdf.stamp.enabled" value="false"/>
<Setting name="zip.enabled" value="true"/>
This can be utilized from a pre-process page to decide at runtime whether or not a post processor is enabled.
1.3.2. PDF Stamp
The following properties can be used to configure where the PDF should be stamped.
pdf.stamp.enabled=true | false
pdf.stamp.text=${CURRENT}
pdf.stamp.fontName=Arial
pdf.stamp.fontSize=18
pdf.stamp.fontColor=rgb(255,0,0)
pdf.stamp.margin=10
pdf.stamp.position=top-left | top-center | top-right | bottom-left | bottom-center | bottom-right | center-left | center-center | center-right
pdf.stamp.rotation=45
The "pdf.stamp.text" property may contain a macro.This chapter describes the possible macros that can be used.
1.4. Output Handlers
An output handler is responsible for delivering the report to some destination. The output handler(s) are invoked after the report has been created.
A report can use as many output handler(s) as wanted. The output handler to be used for a particular report is declared inside the Report Settings.
The built-in output handlers are shown in the table below:
| Output Handler | Description |
|---|---|
For sending the report via mail to the user that creates the report. It is also possible runtime to add more recipients. |
|
checkin |
Used to check-in the report to a new object or to the object, which the report is being created for. |
ftp |
For sending the report to a FTP server. |
fileStore |
For storing the report on a local mounted disk. |
For sending the report to a printer. |
Below is an example how the property is declared:
<InquiryReport>
    ...
    <Settings>
        <Setting name="outputHandlers" value="mail,checkin,ftp,fileStore,print"/>
    </Settings>
</InquiryReport>
Each output handler needs to be configured by adding/configuring other settings.
| If the report is not being delivered on-demand, at least one output handler must be defined. |
1.4.1. Disabling an Output Handler
Even though you have defined to use a certain output handler using the "outputHandlers" property; it is possible to disable a particular handler by setting a different property. The example below will disable the mail and ftp output handler.
<Settings>
    <Setting name="outputHandlers" value="mail,ftp,checkin"/>
    <Setting name="mail.enabled" value="false"/>
    <Setting name="ftp.enabled" value="false"/>
</Settings>
This can be utilized from a pre-process page to decide at runtime whether or not an output handler is enabled.
1.4.2. Check-in Handler
The check-in handler can be used to either attach the report to the object for which the report is being created for (e.g. the context object), or create a new object to where the report will be checked in.
A new object can be created using a number generator. Current release supports using the object generators from the AEF/BPS or by using the number generators from TVC to generate new names. To setup object generators in the AEF/BPS, please consult the Framework/Business Process Services documentation. To setup a TVC number generator, see this chapter.
Once an object generator is configured, following properties are used to control which object generator to use.
checkin.create.object=true
checkin.create.strategy=AEF | TVC

# If strategy = AEF
checkin.aef.objectgenerator.name=type_Report
checkin.aef.objectgenerator.revision=1
checkin.aef.objectgenerator.create-additional=false

# If strategy = TVC
checkin.tvc.objectgenerator.name=<The Name of the Number Generator>

# Common
checkin.object.type=<The type of the object to create>
checkin.object.policy=<Policy governing the Object>
checkin.object.revision=<Revision of the Object>
checkin.object.vault=<The name of the vault to hold the object>

# If you want to connect the newly created object with the object, which the
# report is being created for, apply these settings:
checkin.connect.relationship=relationship_MyRel
checkin.connect.direction=from
Important notes:
-
The
checkin.object.typeis required. -
The
checkin.object.policyis optional; If omitted, the best suited policy for the specified type will be used. -
The
checkin.object.revisionis optional; If omitted, the first revision in the sequence defined on the policy will be used. -
The `checkin.object.vault is optional; If omitted, the same vault as object which the report is created for will be used. If the report is not created around a business object (e.g. it’s a global report), the "eService Production" vault is assumed.
-
The
checkin.tvc.objectgenerator.nameis optional. If omitted, the first number generator for the specified type will be used.
Either if you check in the object to the original object or if you are creating a new one using an object generator, a set of additional settings can be specified in order to being able to check-in the report.
The following properties control the check-in:
checkin.format=<Symbolic name or real name of the format>
checkin.unlock=<true for unlock>
checkin.append=<true to append>
TVC Number Generator
When a number generator is created, one should use the type, vault and policy settings as shown in the picture below. The name of the object defines the "type", which the numbers are to be generated for. The revision is the logical name of the number generator – one type of object might have several number generators.
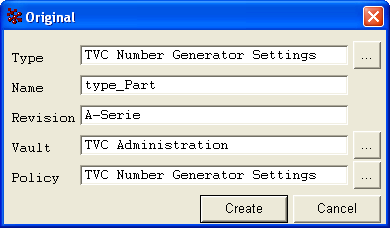
Figure 1. Creating a TVC Number generator
The attributes that controls how the generated names are formatted, is defined as the picture below shows.
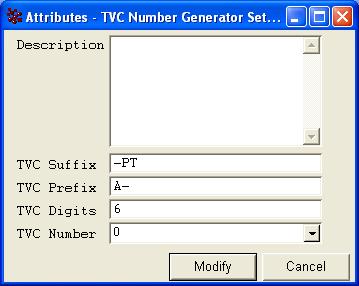
Figure 2. Defining attributes that controls the generated number
1.4.3. Mail Handler
The mail handler will send the mail to the user who initiated the report creation. A mail address must be specified on his/her person admin object.
The settings for mail sending is defined in the global page configuration object, but the following properties may be set/overridden in the report settings.
mail.from.email=<email of from user>
mail.from.name=<name of from user>
mail.subject=<mail subject>
mail.message=<mail message>
mail.sendTo.onerror=<mail address used to send info to upon failure>
mail.subject.onerror=<subject of mail upon failure>
mail.message.onerror=<message of mail upon failure>
mail.max.fileSize=10m
In order to have dynamic content in the mails that are sent, there are possibilities to use macros within the subject and mail message properties. This chapter describes the possible macros to be used.
The report is by default sent to the user that created the report. It is possible to change this behavior, and send the report to someone else.
The properties below can be used to define other recipients.
mail.to
mail.cc
mail.bcc
The property "mail.max.fileSize" can be used to disable the mail delivery in case the generated report is equal to or larger than the specified size. The size can be specified in various formats, example:
-
5000 (5000 bytes)
-
10k (10 kilobytes)
-
1.5m (1.5 megabytes)
1.4.4. FTP Upload Handler
The FTP handler sends the report via FTP. Following properties controls the built in FTP handler:
ftp.host = <name of ftp host>
ftp.port = 0 (for default port)
ftp.user = <name of user, which has an account on the FTP server>
ftp.password = <password for user>
ftp.dir = <name of directory on the ftp server>
ftp.file.name = <name of the uploaded file>
ftp.min.fileSize = 10m
ftp.sendNotification = false (default is true)
The properties ftp.dir and ftp.file may contain macros. This chapter describes the possible macros to be used.
An example of how a macro could be used is shown below:
ftp.file.name = ${DEF-TYPE}_${DEF-NAME}_${YEAR}${MONTH}${DAY}${HOUR}${MINUTE}${SECONDS}.pdf
ftp.dir = /home/ftpuser/${TYPE}/${NAME}/${REV}
The property ftp.min.fileSize can be used to restrict the delivery of
the report via FTP unless the size is greater than the specified value.
See previous chapter regarding the mail delivery handler for details
regarding the format of this value, including how this setting can be
used in conjunction with the mail handler.
The ftp.sendNotification property can be used to inform the user about
the delivery of the report to the FTP destination.
1.4.5. File Store Handler
The "fileStore" output handler is used when the file should be stored on a mounted drive.
Following properties controls this outputhandler.
fileStore.directory = <name of directory>
fileStore.fileName = <name of file>
Both these properties may contain macros. This chapter describes the possible macros to be used.
An example of how a macro could be used is shown below:
fileStore.fileName = ${DEF-TYPE}_${DEF-NAME}_${YEAR}${MONTH}${DAY}${HOUR}${MINUTE}${SECONDS}.pdf
fileStore.directory = /home/ftpuser/${TYPE}/${NAME}/${REV}
1.4.6. Print Handler
The print output handler sends the report directly to the printer.
The printers should be pre-configured with the necessary drivers & available on the application server where the report generator component is running.
Following property controls this outputhandler.
print.printers = <name of the printer>
It is also possible to pass a comma-separated list of printer names to the property above, in which case the report will be sent to each of the printers. The name of the printer, in this case, refers to the actual name of the printer as referred to by the operating system on the application server.
The above property could be statically defined in the report configuration or a more likely scenario is for them to be over-ridden at run time by the end user through a pre-process page.
Printer selection pre-process page
TVC provides functionality for having the printer selector on a pre-process page through which users can select from a list of printers to send the report to.
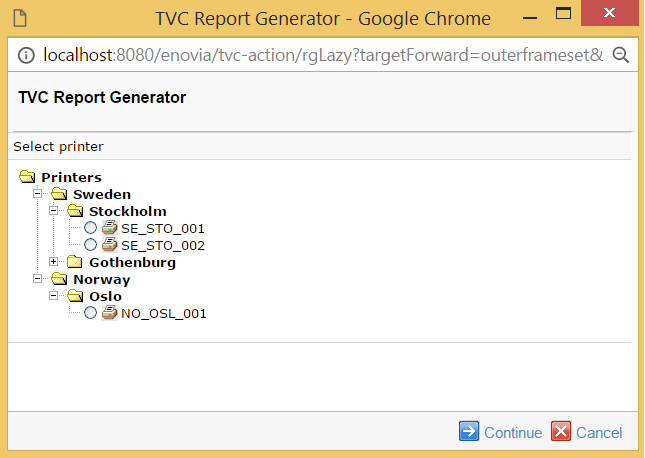
See this chapter for details on how to implement a pre process page with a printer selector.
The list of printers and their groupings are pre-defined in the page object called "TVC Report Generator Print Output Handler Configuration". The pre-process page reads this configuration and generates the necessary user interface to assist in printer selection.
The following is a sample configuration
<?xml version="1.0" encoding="UTF-8"?>
<!--+
    | Print Output Handler Configuration File.
    | This file contains the template for configuration of Print Output Handlers
    +-->
<PrintOutputHandlerConfiguration>
    <!--+
        | A flat list of configured printers.
        | Each printer must have a unique id
        +-->
    <Printers>
        <Printer id="SE_STO_001">
            <!-- The network path to the configured printer.
                 This printer should be configured and connected
                 in advance.-->
            <Path>\\printserver01\HP-4000</Path>
            <!-- A short description of this configuration.-->
            <Description>Printer on Floor 1</Description>
        </Printer>
        <Printer id="SE_STO_002">
            <Path>\\printserver01\Lexmark-Pro901</Path>
            <Description>Printer on Floor 2</Description>
        </Printer>
        <Printer id="SE_GBG_001">
            <Path>\\printserver02\Lexmark-Pro3500</Path>
            <Description>Printer in Gothenburg</Description>
        </Printer>
        <Printer id="NO_OSL_001">
            <Path>\\printserver03\HP-4100</Path>
            <Description>Printer in Oslo</Description>
        </Printer>
    </Printers>
    <!--+
        | Printers can also be structured in groups & sub-groups e.g.
        | classifying the printers by location or certain printer
        | characteristics.
        | This classification can be used in report pre-process pages for
        | allowing the users to select printers used for printing the report.
        | The printers used in the groups are referred to their printer id
        | defined above.
        | Printer titles can also be localized by appending the locale
        | suffix to the title attribute (e.g. title_de)
        +-->
    <Groups title="Printers" title_de="Drucker">
        <Group title="Sweden" title_sv="Sverige">
            <Group title="Stockholm">
                <PrinterId>SE_STO_001</PrinterId>
                <PrinterId>SE_STO_002</PrinterId>
            </Group>
            <Group title="Gothenburg">
                <PrinterId>SE_GBG_001</PrinterId>
            </Group>
        </Group>
        <Group title="Norway">
            <Group title="Oslo">
                <PrinterId>NO_OSL_001</PrinterId>
            </Group>
        </Group>
    </Groups>
</PrintOutputHandlerConfiguration>
1.4.7. Macros, used by different output handlers
Following table contains macros that may be used on some properties used by some of the output handlers.
| Macro | Description |
|---|---|
|
The name of the user that initiated the report creation |
|
The full name of the user |
|
The type of the definition object that was used |
|
The name of the definition object that was used |
|
The revision of the definition object that was used |
|
The type of the object that the report was created for (if any) |
|
The name of the object that the report was created for (if any) |
|
The revision of the object that the report was created for (if any) |
|
The current state of the object that the report was created for (if any) |
|
The full-date when the report was initiated |
|
The year when the report was initiated |
|
The month when the report was initiated |
|
The day when the report was initiated |
|
The hour when the report was initiated |
|
The minute when the report was initiated |
|
The seconds when the report was initiated |
|
The week no of the year |
|
The week no of the month |
|
The date in ISO format |
|
The date and time in ISO format |
| if the report was created around a business object, e.g. not a global report, you can also use macros that are resolved against the context business object. Example: |
${attribute[attribute_Title]}1.5. Configure FOP Version
TVC Report Generator comes with two versions of the Apache FOP processor; 1.1 and 0.20.5. Technia recommends using the 1.1 version as it is much better compared to the 0.20.5 release, which is several years old and contains many issues.
To upgrade old reports that were designed for the 0.20.5 version, please read through the following page:
The used FOP version is configured in two ways.
-
A global setting specifying the default value that will apply to all reports not specifying what FOP version it requires.
-
A setting per report specifying what version of FOP to be used.
1.5.1. Configure the Global Setting
Find the page object called TVC Report Generator Properties. Add or
find the line containing "defaultUseLatestFOP". Set the value to either
TRUE or FALSE:
defaultUseLatestFOP=true
Note that if you omit this line, or comment it out, the value will be treated as TRUE.
| There are two additional properties within the "TVC Report Generator Properties" page object that can be used to override anything set within a single report. These are: |
-
alwaysUseLatestFOP = true | false
-
neverUseLatestFOP = true | false
If any of those values return true, the setting made on a single report will never be used.
*This can, for example, be used to verify if the reports are compatible with the latest FOP or not, without having to modify the reports themselves. *
1.6. Configuring the Report List Page
The page that shows the available reports, either the reports available for a context object or the list of global reports can be configured in a couple of ways such as the order of the reports and the image to display for each report.
1.6.1. Sort Order
The sorting of the reports on the list page can be configured through a TVC init parameter (system parameter) through the web.xml file.
Below are some examples how this init parameter could be applied:
<init-param>
    <param-name>tvc.reportgenerator.sortReportsBy</param-name>
    <param-value>format,displayname</param-value>
</init-param>
<init-param>
<param-name>tvc.reportgenerator.sortReportsBy</param-name>
<param-value>name</param-value>
</init-param><init-param>
<param-name>tvc.reportgenerator.sortReportsBy</param-name>
<param-value>sortorder</param-value>
</init-param>The first example is the default sort order in TVC if no other configuration has been made. It will sort the reports first by its format secondly by the display-name.
The second example will sort the reports by their internal name (the name of the business object or the name of the XML report).
The third example will utilize the sort-order value set on the report definition itself. This is either specified on the business object report through the "TVC Sort Order" attribute, or on the XML report as shown below:
<ExpansionReport>
<SortOrder>10</SortOrder>| In order to utilize the sort order in an efficient way, you need to ensure that this value has been set correctly in the report definitions. |
All acceptable values for the init parameter are listed below: (they can be combined by separating them using the "," character (comma)).
-
sortorder
-
displayname
-
format
-
name
By default, the ascending sort order is used, however, a "!" character before the property will force descending sort order.
1.6.2. Image
You can associate an image to each report. By default, the system will try to figure out what icon to be shown depending on the output format. To customize what icon to be displayed, you should either use the attribute "TVC Icon" for business object defined report and for XML reports do as shown below:
<ExpansionReport>
<Icon>/common/images/some-image.png</Icon>| The path to the image should be relative to the context root of your application. |