resourceChart.reloadDelay = 5000
TIF Admin UI
04 June 2019
1. Configuration
The Admin UI contains features that can be configured in ${TIF_ROOT}/modules/enovia/etc/module.custom.properties.
Please see ${TIF_ROOT}/modules/enovia/etc/module.properties that contains detailed explanation for each property.
1.1. Monitor
Configurations introduced in this chapter apply to Monitor view.
1.1.1. Resource Charts
Reload delay of charts displayed in Monitor Resources view can be adjusted. See property resourceChart.reloadDelay.
For example:
The value must be in milliseconds. The minimum delay is 5000ms.
1.1.2. Free Disk Space
In Monitor Resources view, free disk space can be monitored from one or more locations in the file system. See property adminui.resourceChart.diskSpace.path.
For example:
adminui.resourceChart.diskSpace.path = C:
The property is a list of paths from which disk space is monitored. Each path must point to an existing location in the file system.
1.1.3. Units
In Monitor Resources view, unit for measuring used JVM heap and ENOVIA/3DExperience memory and used disk space can be configured. See properties:
-
adminui.resourceChart.unit.memoryData -
adminui.resourceChart.unit.enoviaData -
adminui.resourceChart.unit.diskSpaceData
For example:
adminui.resourceChart.unit.memoryData = MB
Supported values for properties are: MB, GB or TB. Default is MB, if value is empty.
1.2. Maximum Number of Rows in Job Table Export
When table contents are exported, the maximum number of rows is limited. See properties:
-
adminapi.export.csv.maxRows -
adminapi.export.pdf.maxRows
1.3. Log settings
Configurations introduced in this chapter applies to the Log Settings view.
1.3.1. Runtime Log Levels
You may configure the list of features that appears in the Log Settings view. Runtime log level for these features can be adjusted from that view.
A feature can be added to the list by introducing new property in the following format:
logPackages.FEATURENAME=a.b.c, d.e.f
Property name must contain prefix logPackages.FEATURENAME., where FEATURENAME is a unique name for the feature.
Property value is a comma separated list of package name(s) that belong to the feature.
In this example, level change of feature FEATURENAME would affect classes that belong to package "a.b.c" or "d.e.f".
1.4. Configuration Editor
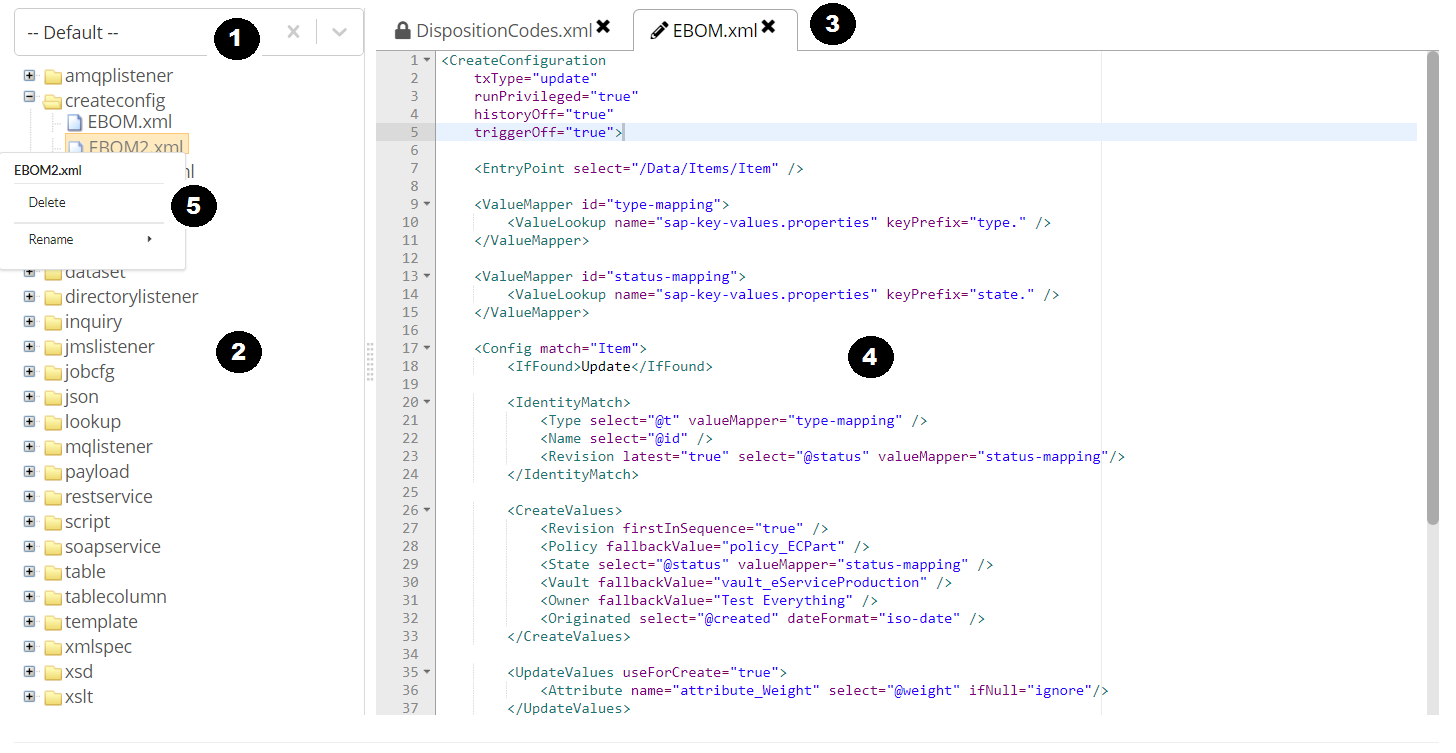
The configuration editor can be accessed from the "Configuration" menu.
With the editor you may read and modify configuration files that are accessible by TIF, typically located under ${TIF_ROOT}/modules/enovia/cfg and webapp folders.

Overview:
-
Namespace selector.
-
Tree view lists files found from selected namespace. The files are grouped by resource type.
-
File name tab panel displays opened files.
-
Editor view displays the contents of opened file.
-
Context menu that be accessed by right clicking on file or folder.
The editor has some restictions:
-
For security reasons, files that are located outside the folder
${TIF_ROOT}/modules/enovia/cfgcannot be deleted or renamed and can be viewed only in read-only mode. This is indicated with a lock symbol in file name tab panel. -
New files are always created in a sub folder under
${TIF_ROOT}/modules/enovia/cfgaccording to the selected type and namespace.
1.4.1. Create Namespace
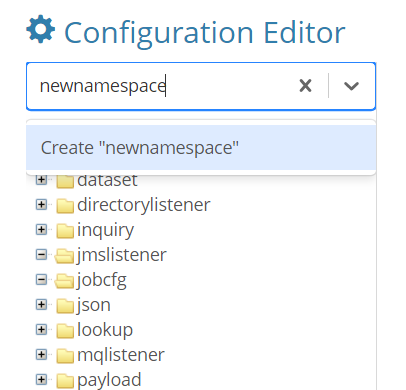
New namespace can be created by typing name into the namespace selector field and pressing "Create …" action below the selector.
To avoid creating possibly unnecessary empty folders, a folder for new namespace is created under ${TIF_ROOT}/modules/enovia/cfg only after the first resource (of any type) is added. If you create namespace but do not add any resources, the namespace disappears from the namespace selector list if you reload the editor.
|

1.5. Using Admin UI with Proxy Server or Load Balancer
In cases when you have a proxy server, you might need to configure Admin UI web application to be aware of this in order to return correct information on the HttpServletRequest class; otherwise the URLs that are generated will not point correctly.
The proxy server typically passes the correct values behind the request headers:
-
X-Forwarded-Host
-
X-Forwarded-Port
-
X-Forwarded-Proto
Admin UI web application has a servlet filter enabled by default that will honor the values set there. If no such header is present, the filter will fall back to the default value obtained via the HttpServletRequest API.
If needed, request headers can be defined in ${TIF_ROOT}/modules/enovia/etc/module.custom.properties:
adminui.lbfilter.host=X-Forwarded-Host
adminui.lbfilter.port=X-Forwarded-Port
adminui.lbfilter.scheme=X-Forwarded-Proto
1.6. Multiple TIF Server Instances with Shared External Database
Sharing an external database with multiple TIF server instances allows you to work with the same data regardless which
TIF Admin UI instance you log in to. This set-up however requires some configuration in ${TIF_ROOT}/modules/enovia/etc/module.custom.properties
to allow the web browser to submit cross-site requests and let Admin UI communicate with remote server instances via
their Admin REST API. Cross-site requests allow accessing payload data that is persisted locally in a server outside the database.
This example configuration allows cross-site requests to this server from any Admin UI webapp:
adminapi.corsFilter.enabled = true
adminapi.corsFilter.allowedOrigin.value = *
Other option is to only allow requests from specific origins:
adminapi.corsFilter.enabled = true
adminapi.corsFilter.allowedOrigin.list = http://allowedhost:8181;\
    http*://secondallowedhost:*
The above example only allows requests to this server from Admin UI instances that are accessed via URL http://allowedhost:8181 or http*://secondallowedhost:*. Notice that the latter URL contains wildcards that allow e.g. both HTTP and HTTPS protocol, and any port number.
Please see ${TIF_ROOT}/modules/enovia/etc/module.properties for further documentation.
