TIF ENOVIA™ Server - Jobs and Queues
23 August 2013
1. Jobs and Queues
Jobs executed on the TIF server may be initiated through some event within the ENOVIA™ web-application (or thick/rich client). You may for example configure a trigger that will initiate a job (for example promote event, create event etc.).
The kind of jobs that most typical is initiated in this way are Outbound Integration Jobs and/or Batch Jobs.
When this happens, then within the ENOVIA™ database a business object of type "TIF Job" in a separate vault dedicated to TIF is created. This job object holds the necessary information for the later execution of the Job on the TIF side. The Job object is then connected to a Queue object (type is "TIF Queue").
| These TIF Job business objects will after completion, at some point in the future, be deleted automatically by a scheduled task running at the TIF server. |
A job may be configured to be executed in one particular queue (if not defined, the default queue will be used). See chapter Create Trigger for some additional information. The reason for this might be to ensure that only certain TIF instances are processing certain jobs, and/or for scalability reasons.
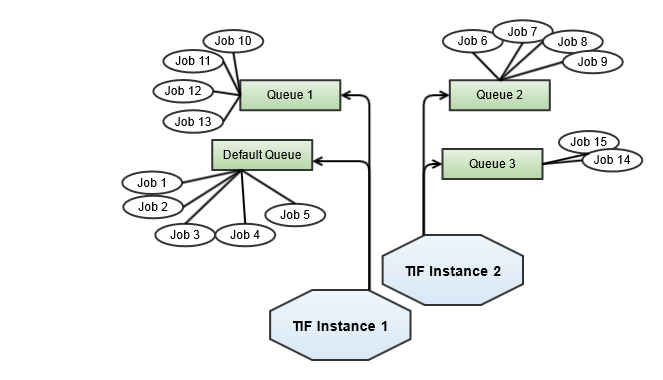
A setup of TIF might look like the diagram below illustrates.

In this case we have four queues setup in ENOVIA™ and we are using two different TIF instances (TIF processes). TIF Instance 1 picks job from the default queue including the queue with name "Queue 1".
The second TIF instance processes jobs from "Queue 2" and "Queue 3".
To configure TIF for listening to a particular queue or configure it to NOT listen on the default queue, please look at the page Module Settings
1.1. Configuring Queues
In the module properties file you define which Queues you will listen to, e.g. what queues in ENOVIA you will process jobs for.
If you have setup several TIF instance, you may want to configure which instances that processes jobs from what queues.
By default, there is always a 'default queue' available in TIF. If you for example have multiple TIF instances running, each instance will by default process jobs from this default queue.
To disable listen on the default queue, you will use the following property
defaultQueueListener.enabled = falseMost common is to allocate jobs with the default queue. However, in some cases it might be useful to process certain jobs in its own queue. When you create the job object, you simply specify the name of the queue - this queue is automatically created if it doesn’t exist.
However, in order to process jobs from this queue, you need at least one TIF instance that listens on such queue.
In order to setup a listener for a particular queue, look at the example below:
queueListener.MyQueue.enabled = true
queueListener.MyQueue.name = My Queue
queueListener.MyQueue.threadCount = 5
queueListener.MyQueue.sleepInterval = 15000
queueListener.MyQueue.exclusive = false
The use of the prefix queueListener.MyQueue.
This prefix must be unique among your queues.
The name MyQueue may be whatever as long as the key itself is a valid Java property, however, recommended is to use something relevant for the queue in order to make debugging a bit easier.
|
The thread-count property defines how many worker threads will be used, e.g. how many concurrent jobs will be processed by this queue. Increasing this value will result in performance degradation.
The sleep-interval is a value in milliseconds defining how long time to sleep until next check (if no jobs were found in the queue in the previous check).
The exclusive flag should only be set if you are 100% sure that you don’t have any other TIF instance polling the same queue.
You may have the following optional properties:
queueListener.MyQueue.pickupDelay = 10It is possible to configure pickup delay in seconds. In practice, the queue listener reacts on created jobs with delay by not picking up jobs created within queueListener.MyQueue.pickupDelay.
The pickup delay works well in combination with exclusive jobs to prevent for example triggers from creating duplicate jobs.
It is also possible to configure pickup delay for jobs created in a certain queue OR for a certain job type via TVC init parameters. See ENOVIA Client part of the documentation.
|
1.1.1. Create new Queue in ENOVIA
To setup a new queue in ENOVIA, use the following MQL code as base for so.
add bus "TIF Queue" "MyQueue" "" vault "TIF" policy "TIF Queue";1.1.2. Queue Polling
Jobs are polled from the queue in the order they are created. E.g. first in first out.
This is by default accomplished by performing an expansion of the Queue with limit 1.
There has been some issues reported related to returning of jobs in wrong order. This is caused by a bug in ENOVIA and to workaround this issue - it is possible to change the polling strategy.
To change the polling strategy, use the property defaultQueuePollStrategy in module.properties.
Allowed values are
-
query-connection
-
expand-select
-
expand-iterator
-
expansion-iterator
-
mql-expand
-
mql-query
-
query
TIF will by default use either expand-iterator or expand-select depending on backend Database. But if you experience issues with job processing order, you should try changing this value to "query-connection".